Huawei Cloud Deployment Guide
1 Prerequisites
1.1 Document Description
This document mainly introduces the complete steps from resource planning and configuration to deployment of Guance, using Huawei Cloud as an example.
Note:
- This document uses dataflux.cn as the main domain name example. In actual deployment, replace it with the corresponding domain name.
1.2 Keywords
| Term | Description |
|---|---|
| Launcher | A web application used for deploying and installing Guance. Complete the installation and upgrade of Guance by following the guidance steps provided by the Launcher service |
| Operations Machine | A machine installed with kubectl, located in the same network as the target Kubernetes cluster |
| Installation Machine | A machine that accesses the launcher service through a browser to complete the guided installation of Guance |
| kubectl | Command-line client tool for Kubernetes, installed on the Operations Machine |
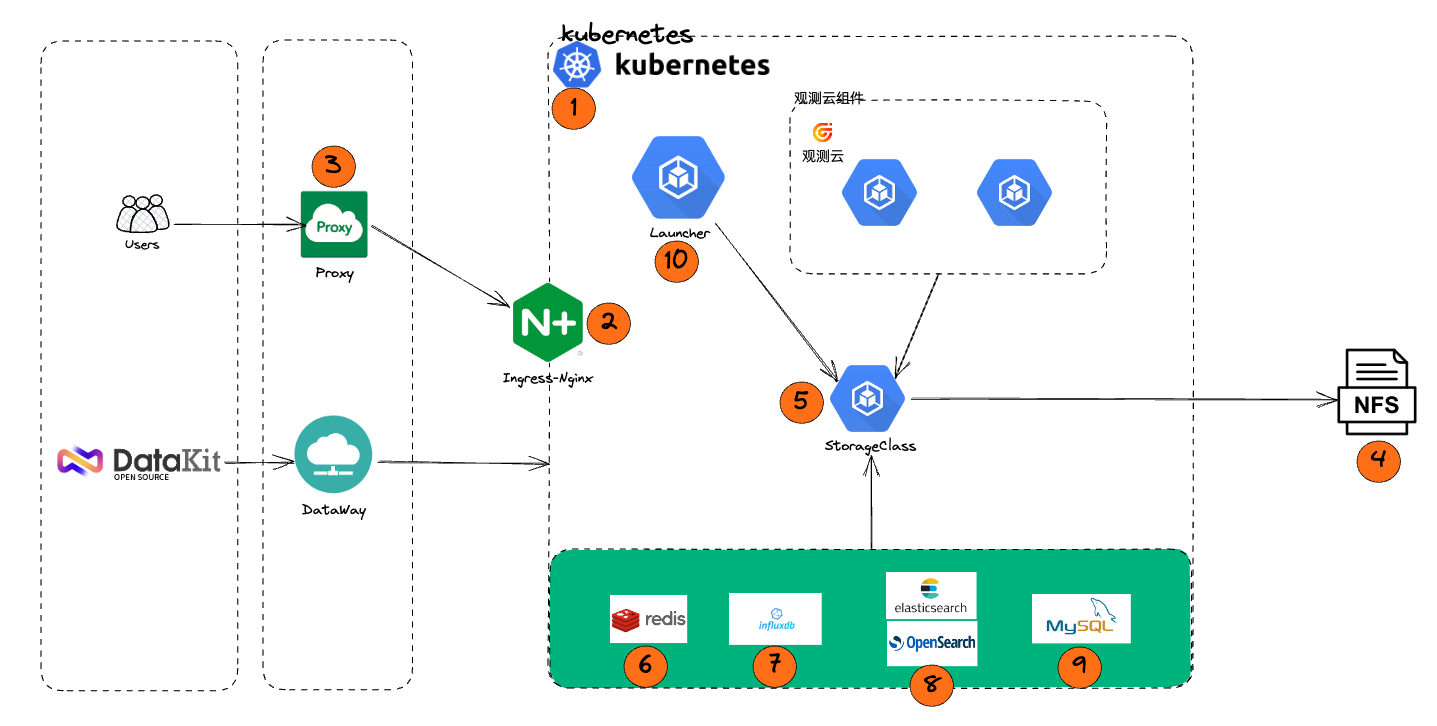
1.3 Deployment Architecture
2 Resource List
Note
1. The "Minimum Configuration" is only suitable for POC scenarios and functional verification, not for production environments.
2. The "Recommended Configuration" is suitable for scenarios where InfluxDB has less than 150,000 time series and Elasticsearch has less than 7 billion documents (the total number of logs, traces, RUM, and event documents).
3. For production deployments, evaluate based on the actual amount of data being ingested. As more data is ingested, higher storage and specification configurations are required for InfluxDB and Elasticsearch.
4. If self-built TDengine and OpenSearch are used, they need to be added to the CCE node pool. Self-built OpenSearch nodes require 3 coordinating nodes (4c8g) and 3 data nodes (8c32g), totaling 6 nodes.
| Resource | Specification (Minimum) | Specification (Recommended) | Quantity | Remarks |
|---|---|---|---|---|
| CCE | Standard Managed Cluster | Standard Managed Cluster | 1 | Version: 1.23 |
| CCE Node Pool | 4C8G (single system disk 80GB) | 8C16G (single system disk 120GB) | 4 | Deploy Huawei Cloud CCE managed cluster |
| 2C4G (single system disk 80GB) | 4C8G (single system disk 120GB) | 2 | Deploy Dataway | |
| NAT Gateway | Small NAT Gateway | Small NAT Gateway | 1 | Used for CCE cluster outbound traffic |
| ELB | Shared | Shared | 1 | In front of Kubernetes Ingress |
| RDS | 2C4G 50GB | 4C8G 100GB (Master-Slave) | 1 | MySQL 8.0 |
| Redis | 4G | 8G (Standard Master-Slave with dual replicas) | 1 | Version: 6.0 |
| GuanceDB | 4C16G 300GB | 8C32G 500GB (Cluster version) | 2 | |
| Elasticsearch|OpenSearch | 4C16G 1T (Single node) | 16C64G 2T (3-node) | 1 | Elasticsearch version: 7.10.2; OpenSearch (Self-built) version: 2.3 |
| Domain Name | - | - | 1 | Main domain needs ICP filing; 8 subdomains under one main domain |
| SSL Certificate | Wildcard domain certificate | Wildcard domain certificate | 1 | - |
3 Infrastructure Deployment
3.1 Deployment Notes
Create RDS, Redis, Elasticsearch according to the configuration requirements and deploy them within the same region under the same VPC network.
3.2 Step One, Two, Three: Create CCE Service
3.2.1 Step One: Purchase a CCE Cluster
Go to the official website, select Products in the navigation bar, choose Containers, click Cloud Container Engine (CCE), and then select to create a CCE cluster.
- Must be in the same region as the RDS, ECS, and other resources created later
- Select the cluster scale based on your own situation, as this determines how many worker nodes will be created.

3.2.2 Step Two: Worker Node Configuration
Mainly select the ECS specifications and quantity. Specifications can be created according to the configuration list or evaluated based on actual conditions, but must not be lower than the minimum configuration requirements. At least 3 or more worker nodes should be deployed. It is recommended that the data disk size should not be less than 100GiB.


3.2.3 Step Three: Plugin Management
The everest and coredns plugins have already been created by default when purchasing the k8s cluster. It is recommended to add the following two plugins here. Also, to ensure cluster resources and avoid additional costs, it is recommended to delete the ICAgent plugin.

Install nginx-ingress plugin
1) Configure CPU and memory resource limits

2) Create Load Balancer ELB
You can choose a dedicated elastic load balancer if needed. This article selects the shared type. Note: When selecting an Elastic Public IP, it is recommended to use an existing one or create a new one with a bandwidth of 300Mbit/s billed by traffic.
- Differences between dedicated and shared types:
https://support.huaweicloud.com/productdesc-elb/elb_pro_0004.html


3) Configure nginx-ingress plugin regarding nginx forwarding content
# Add the following content
{
    "allow-backend-server-header": "true",
    "client-header-buffer-size": "32k",
    "enable-underscores-in-headers": "true",
    "forwarded-for-header": "X-Forwarded-For",
    "generate-request-id": "true",
    "ignore-invalid-headers": "true",
    "keep-alive-requests": "100",
    "large-client-header-buffers": "4 32k",
    "proxy-body-size": "20m",
    "proxy-connect-timeout": "20",
    "reuse-port": "true",
    "server-tokens": "false",
    "ssl-protocols": "TLSv1 TLSv1.1 TLSv1.2 SSLv3",
    "ssl-redirect": "false",
    "use-gzip": "true",
    "worker-cpu-affinity": "auto"
}
Install node-local-dns plugin
- Enable DNS Config Injection Feature
Note
The namespace needs to be labeled with node-local-dns-injection=enabled to enable the DNS cache feature.
Delete ICAgent plugin (optional)
Select AOM Application Operations Management and uninstall the ICAgent plugin, and turn off the switches for continuing log collection beyond quota and metric collection.

3.4 Step Four: Cache Services
- You can choose to use the built-in cache service by default. If you do not use the built-in cache service, configure Redis according to the following requirements:
- Distributed Cache Service (Redis version).
- Redis version: 6.0, standard master-slave architecture, supports dual replicas.
- Configure Redis password.
- Add the internal IP addresses of the ECS instances automatically created by CCE to the Redis whitelist.
3.5 Step Five: GuanceDB for Metrics
3.6 Step Six: Elasticsearch
- Name: Cloud Search Service (CSS)
- Version: 7.10.2
- Enable secure mode to set administrator account and password
- Add the internal IP addresses of the ECS instances automatically created by CCE to the Elasticsearch whitelist
3.7 Step Seven: RDS
- Name: Cloud Database RDS
- Version: 8.0, standard master-slave edition
- Set MySQL root user password
- Add the internal IP addresses of the ECS instances automatically created by CCE to the MySQL whitelist
4 Install and Configure kubectl
4.1 Install kubectl
kubectl is a command-line client tool for Kubernetes, which allows you to deploy applications, inspect and manage cluster resources. Our Launcher is based on this command-line tool to deploy applications. For specific installation methods, please refer to the official documentation:
Alternatively, click on the cluster and find kubectl View Details.

4.2 Configure kube config
Whether to use public access or private access kubeconfig depends on whether your operations machine can connect to the cluster via the internal network. Determine the access method based on the Use Cases below:

5 Start Installation
After completing the above operations, refer to the manual Start Installation