离线部署
某些时候,目标机器没有公网访问出口,按照如下方式可离线安装 DataKit。
代理安装
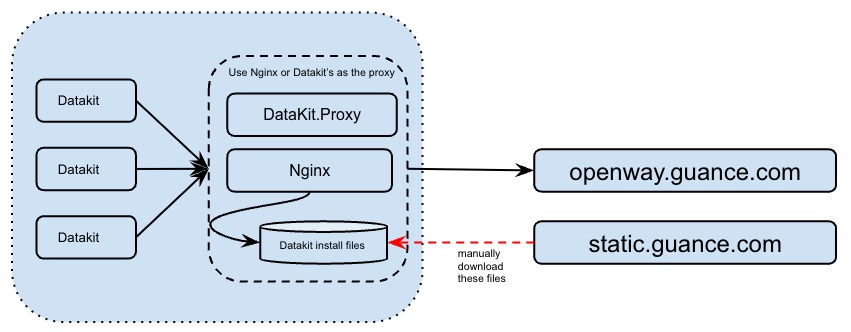
如果内网有可以通外网的机器,可以在该节点部署一个 proxy,将内网机器的访问流量通过该机器代理出来。
当前 DataKit 自己内置了一个 proxy 采集器;也能通过 Nginx 正向代理功能来实现同一目的。基本网络结构如下:
flowchart LR
dk1(Datakit)
dk2(Datakit)
dk3(Datakit)
proxy(Nginx or Datakit.Proxy)
cdn(观测云 CDN)
studio(openway.观测云.com)
%%%

dk1--> proxy
dk2--> proxy
dk3--> proxy

proxy --> cdn
proxy --> studio
前置条件
- 或者准备配置好正向代理的 Nginx
- 使用 DataKit 代理
增加环境变量 HTTPS_PROXY="1.2.3.4:9530",安装命令如下:
DK_DATAWAY=https://openway.guance.com?token=<TOKEN> HTTPS_PROXY=http://1.2.3.4:9530 bash -c 'eval "$(curl -L https://static.guance.com/datakit/install.sh)"'
- 使用 Nginx 代理
增加环境变量 DK_PROXY_TYPE="nginx"; DK_NGINX_IP="1.2.3.4";,安装命令如下:
- 使用 DataKit 代理
增加环境变量 $env:HTTPS_PROXY="1.2.3.4:9530",安装命令如下:
Remove-Item -ErrorAction SilentlyContinue Env:DK_*;
$env:DK_DATAWAY="https://openway.guance.com?token=<TOKEN>";
$env:HTTPS_PROXY="1.2.3.4:9530";
Set-ExecutionPolicy Bypass -scope Process -Force;
Import-Module bitstransfer;
start-bitstransfer -ProxyUsage Override -ProxyList $env:HTTPS_PROXY -source https://static.guance.com/datakit/install.ps1 -destination .install.ps1;
powershell ./.install.ps1;
- 使用 Nginx 代理
增加环境变量 $env:DK_PROXY_TYPE="nginx"; $env:DK_NGINX_IP="1.2.3.4";,安装命令如下:
Remove-Item -ErrorAction SilentlyContinue Env:DK_*;
$env:DK_DATAWAY="https://openway.guance.com?token=<TOKEN>";
$env:DK_NGINX_IP="1.2.3.4";
$env:DK_PROXY_TYPE="nginx";
Set-ExecutionPolicy Bypass -scope Process -Force;
Import-Module bitstransfer;
start-bitstransfer -ProxyUsage Override -ProxyList $env:DK_NGINX_IP -source https://static.guance.com/datakit/install.ps1 -destination .install.ps1;
powershell ./.install.ps1;
注意:其它安装参数设置,跟正常安装 无异。
全离线安装
当环境完全没有外网的情况下,只能通过移动硬盘(U 盘)等方式将安装包从公网下载到内网。
全离线安装有两张策略可以选择:
- 简单模式:直接将 U 盘内的文件拷贝到每一台主机上,安装 DataKit。但简单模式目前不支持安装阶段通过环境变量来做一些设置。
- 高级模式:在内网部署一个 Nginx,通过 Nginx 构建一个文件服务器,以替代 static.guance.com
简单模式
以下文件的地址,可通过 wget 等下载工具,也可以直接在浏览器中输入对应的 URL 下载。
Note
Safari 浏览器下载时,后缀名可能不同(如将 .tar.gz 文件下载成 .tar),会导致安装失败。建议用 Chrome 浏览器下载。
-
先下载数据包 data.tar.gz,每个平台都一样。
-
然后再下载其他所需安装程序:
-
X86 32 位
-
X86 64 位
-
Arm 32 位
-
Arm 64 位
Windows 安装目前只支持 X86 平台。
下载完后,应该有以下文件(此处 [OS-ARCH] 指特定平台的安装包,如 linux-amd64):
- datakit-[OS-ARCH].tar.gz
- dk_upgrader-[OS-ARCH].tar.gz
- installer-[OS-ARCH] 或 installer-[OS-ARCH].exe
- data.tar.gz
- datakit-apm-inject-[OS-ARCH].tar.gz
将这些文件拷贝到对应机器上(通过 U 盘或 scp 等命令)。
Note
这些文件务必每个都完整下载,在各个版本之间,它们不一定能复用,比如 installer 程序在不同的 DataKit 版本之间,其行为也不同,因为 installer 可能会调整 DataKit 的默认配置,而不同 DataKit 的配置是有不同程度的增删的。最好 1.2.3 版本的 DataKit 就用 1.2.3 版本对应的 installer 程序来安装或升级。
安装
如果是离线安装精简版版本的 DataKit,需指定带
_lite后缀的安装包,比如 datakit_lite-linux-amd64-1.76.1.tar.gz。
需以 root 权限运行:
升级
如果是离线升级 lite 版本的 DataKit,需指定带
_lite后缀的安装包,比如datakit_lite-linux-amd64-1.76.1.tar.gz。
离线安装如何指定更多的配置参数
非离线安装时,我们可以通过环境变量 DK_XXX=YYY 的方式来指定一些默认参数,这些默认参数实际上是通过 install.sh(Windows 下为 install.ps1)来生效的,但是这些环境变量对安装程序 installer-xxx 无效,我们只能使用 installer-xxx 的命令行参数来额外添加这些选项,通过如下命令,我们可以得知安装程序支持的参数:
比如,上面我们指定 Dataway 地址就是通过 --dataway 方式来指定的。另外,这些额外的命令行参数设置,只有在安装模式才能生效,(离线)模式下,这些是不生效的。
高级模式
DataKit 目前的安装地址是公网地址,所有二进制数据以及安装脚本都是从 static.guance.com 站点下载。对于不能访问该站点的机器,可以通过在内网部署一个文件服务器,以替代 static.guance.com 站点。
高级模式的网络流量拓扑如下:
先准备一台内网均可访问的机器,在该机器上安装 Nginx, 将 DataKit 安装所需的文件下载(或通过 U 盘拷贝)到 Nginx 服务器上,这样其它机器可以从 Nginx 文件服务器上下载安装文件来完成安装。
- 设置 Nginx 文件服务器 {#nginx-config}
在 nginx.conf 中添加配置:
server {
    listen 8080;
    server_name _;
    ## 映射到跟目录下
    location / {
        root /;
        autoindex on;
        autoindex_exact_size off;
        autoindex_localtime on;
        charset utf-8,gbk;
    }
}
重启 Nginx:
- 将文件下载到 Nginx 服务器所在的 /datakit 目录下,这里以 wget 下载 Linux AMD64 平台的安装包为例:
#!/bin/bash

mkdir -p /datakit
mkdir -p /datakit/apm_lib
wget -P /datakit https://static.guance.com/datakit/install.sh
wget -P /datakit https://static.guance.com/datakit/version
wget -P /datakit https://static.guance.com/datakit/data.tar.gz
wget -P /datakit https://static.guance.com/datakit/installer-linux-amd64-1.76.1
wget -P /datakit https://static.guance.com/datakit/datakit-linux-amd64-1.76.1.tar.gz
wget -P /datakit https://static.guance.com/datakit/datakit_lite-linux-amd64-1.76.1.tar.gz
wget -P /datakit https://static.guance.com/datakit/dk_upgrader-linux-amd64.tar.gz
wget -P /datakit https://static.guance.com/datakit/datakit-apm-inject-linux-amd64-1.76.1.tar.gz
wget -P /datakit/apm_lib https://static.guance.com/dd-image/dd-java-agent.jar

# 下载其它工具包:sources 是开启 RUM sourcemap 功能使用的安装包,如果未开启此功能,可选择不下载
sources=(
  "/datakit/sourcemap/jdk/OpenJDK11U-jdk_x64_mac_hotspot_11.0.16_8.tar.gz"
  "/datakit/sourcemap/jdk/OpenJDK11U-jdk_aarch64_mac_hotspot_11.0.15_10.tar.gz"
  "/datakit/sourcemap/jdk/OpenJDK11U-jdk_x64_linux_hotspot_11.0.16_8.tar.gz"
  "/datakit/sourcemap/jdk/OpenJDK11U-jdk_aarch64_linux_hotspot_11.0.16_8.tar.gz"
  "/datakit/sourcemap/R8/commandlinetools-mac-8512546_simplified.tar.gz"
  "/datakit/sourcemap/R8/commandlinetools-linux-8512546_simplified.tar.gz"
  "/datakit/sourcemap/proguard/proguard-7.2.2.tar.gz"
  "/datakit/sourcemap/ndk/android-ndk-r22b-x64-mac-simplified.tar.gz"
  "/datakit/sourcemap/ndk/android-ndk-r25-x64-linux-simplified.tar.gz"
  "/datakit/sourcemap/atosl/atosl-darwin-x64"
  "/datakit/sourcemap/atosl/atosl-darwin-arm64"
  "/datakit/sourcemap/atosl/atosl-linux-x64"
  "/datakit/sourcemap/atosl/atosl-linux-arm64"
)

mkdir -p /datakit/sourcemap/jdk \
  /datakit/sourcemap/R8       \
  /datakit/sourcemap/proguard \
  /datakit/sourcemap/ndk      \
  /datakit/sourcemap/atosl

for((i=0;i<${#sources[@]};i++)); do
  wget https://static.guance.com${sources[$i]} -O ${sources[$i]}
done
Note
Windows 下的 Installer 程序的下载链接需添加 .exe 后缀,如 https://static.guance.com/datakit/installer-windows-386-1.76.1.exe 和
https://static.guance.com/datakit/installer-windows-amd64-1.76.1.exe。
安装
在内网机器上,通过设置 DK_INSTALLER_BASE_URL,将其指向 Nginx 文件服务器:
Remove-Item -ErrorAction SilentlyContinue Env:DK_*;
$env:DK_DATAWAY="https://openway.guance.com?token=<TOKEN>";
$env:DK_INSTALLER_BASE_URL="http://[Nginx-Server]:8080/datakit";
$env:HTTPS_PROXY="1.2.3.4:9530";
Set-ExecutionPolicy Bypass -scope Process -Force;
Import-Module bitstransfer;
start-bitstransfer  -source ${DK_INSTALLER_BASE_URL}/install.ps1 -destination .install.ps1;
powershell ./.install.ps1;
到此为止,离线安装完成。注意,此处还额外设置了 HTTPS_PROXY 以支持代理。
升级
如果有新的 DataKit 版本,可以将其安装上面的方式下载下来,执行如下命令来升级:
Remove-Item -ErrorAction SilentlyContinue Env:DK_*;
$env:DK_INSTALLER_BASE_URL="http://[Nginx-Server]:8080/datakit";
$env:DK_UPGRADE="1";
Set-ExecutionPolicy Bypass -scope Process -Force;
Import-Module bitstransfer;
start-bitstransfer  -source ${DK_INSTALLER_BASE_URL}/install.ps1 -destination .install.ps1;
powershell ./.install.ps1;
Kubernetes 离线部署
脚本辅助安装
这里我们提供一个简单脚本来帮助大家完成免密登录、分发文件、解压镜像的任务。
datakit_tools.sh (单击点开)
#!/bin/bash
# 请修改要免密的主机 IP
host_ip=(
  10.200.14.112
  10.200.14.113
  10.200.14.114
)
# 请修改登陆密码
psd='123.com'

menu() {
  echo -e "\e[33m------请选择需要的操作------\e[0m"
  echo -e "\e[33m1、设置 SSH 远程免密登录\e[0m"
  echo -e "\e[33m2、远程传输文件\e[0m"
  echo -e "\e[33m3、远程解压镜像\e[0m"
  read -p "请输入选项:" num
}

# 远程免密
SSH-COPY(){
yum install -y expect
ssh-keygen -t rsa -P '' -f ~/.ssh/id_rsa
for i in ${host_ip[@]}
  do
    /usr/bin/expect<<EOF
    spawn ssh-copy-id ${i}
    expect {
          "(yes/no)" {send "yes\r";exp_continue}
          "password" {send "${psd}\r"}
}
expect eof
EOF
done
}

SCP(){
read  -p "请输入要传输的文件名(可传入多个):" file_name
for i in ${host_ip[@]}
  do
  for j in ${file_name[@]}
    do
      echo -e "\e[33m------${i}---${j}------\e[0m"
      scp ${j} root@${i}:/root/
  done
done
}

SSH(){
read -p "请输入要解压的文件名:" file_name
# 远程解压镜像包
for i in ${host_ip[@]}
  do
    echo -e "\e[33m------${i}------\e[0m"
    # ssh root@${i} "docker load -i ${file_name}"
    ssh root@${i} " ctr -n=k8s.io image import ${file_name} "
done
}
#menu
CASE(){
case ${num} in
1)
SSH-COPY
        echo -e "\e[33m------------------------------------------------------\e[0m"
;;
2)
SCP
        echo -e "\e[33m------------------------------------------------------\e[0m"
;;
3)
SSH
        echo -e "\e[33m------------------------------------------------------\e[0m"
  ;;
*)

  echo -e "\e[31m 请输入选项中的数字{1|2|3}:\e[0m"
  echo -e "\e[31m 请输入选项中的数字{1|2|3}:\e[0m"
esac
}

menu
CASE
read -p "是否继续执行列表操作?[y/n]:" a
while [ "${a}" == "y" ]
  do
    menu
    CASE
    read -p "是否继续执行列表操作?[y/n]:" a
    continue
done
代理安装
如果内网有可以通外网的机器,可以在该节点部署一个 NGINX 服务器,当作获取镜像使用。
1、下载 datakit.yaml 文件
2、下载 DataKit 镜像并打包
# 拉取 amd 镜像并打包
docker pull --platform amd64 pubrepo.guance.com/datakit/datakit:1.76.1
docker save -o datakit-amd64-1.76.1.tar pubrepo.guance.com/datakit/datakit:1.76.1
mv datakit-amd64-1.76.1.tar /home/guance

# 拉取 arm 镜像并打包
docker pull --platform arm64 pubrepo.guance.com/datakit/datakit:1.76.1
docker save -o datakit-arm64-1.76.1.tar pubrepo.guance.com/datakit/datakit:1.76.1
mv datakit-arm64-1.76.1.tar /home/guance

# 查看镜像架构是否正确
docker image inspect pubrepo.guance.com/datakit/datakit:1.76.1 |grep Architecture
3、修改 NGINX 配置代理
/etc/nginx/nginx.conf (单击点开)
#user  nobody;
worker_processes  1;

#error_log  logs/error.log;
#error_log  logs/error.log  notice;
#error_log  logs/error.log  info;

#pid        logs/nginx.pid;


events {
    worker_connections  1024;
}


http {
    include       mime.types;
    default_type  application/octet-stream;

    #log_format  main  '$remote_addr - $remote_user [$time_local] "$request" '
    #                  '$status $body_bytes_sent "$http_referer" '
    #                  '"$http_user_agent" "$http_x_forwarded_for"';

    #access_log  logs/access.log  main;

    sendfile        on;
    #tcp_nopush     on;

    #keepalive_timeout  0;
    keepalive_timeout  65;

    #gzip  on;

    server {
        listen       8080;
        server_name  localhost;
        root /home/guance;
        autoindex on;

        #charset koi8-r;

        #access_log  logs/host.access.log  main;


        #error_page  404              /404.html;

        # redirect server error pages to the static page /50x.html
        #

        # proxy the PHP scripts to Apache listening on 127.0.0.1:80
        #
        #location ~ \.php$ {
        #    proxy_pass   http://127.0.0.1;
        #}

        # pass the PHP scripts to FastCGI server listening on 127.0.0.1:9000
        #
        #location ~ \.php$ {
        #    root           html;
        #    fastcgi_pass   127.0.0.1:9000;
        #    fastcgi_index  index.php;
        #    fastcgi_param  SCRIPT_FILENAME  /scripts$fastcgi_script_name;
        #    include        fastcgi_params;
        #}

        # deny access to .htaccess files, if Apache's document root
        # concurs with nginx's one
        #
        #location ~ /\.ht {
        #    deny  all;
        #}
    }


    # another virtual host using mix of IP-, name-, and port-based configuration
    #
    #server {
    #    listen       8000;
    #    listen       somename:8080;
    #    server_name  somename  alias  another.alias;

    #    location / {
    #        root   html;
    #        index  index.html index.htm;
    #    }
    #}


    # HTTPS server
    #
    #server {
    #    listen       443 ssl;
    #    server_name  localhost;

    #    ssl_certificate      cert.pem;
    #    ssl_certificate_key  cert.key;

    #    ssl_session_cache    shared:SSL:1m;
    #    ssl_session_timeout  5m;

    #    ssl_ciphers  HIGH:!aNULL:!MD5;
    #    ssl_prefer_server_ciphers  on;

    #    location / {
    #        root   html;
    #        index  index.html index.htm;
    #    }
    #}

}
4、其余内网机器执行命令。
wget http://<nginx-server-ip>:8080/datakit.yaml
wget http://<nginx-server-ip>:8080/datakit-amd64-1.76.1.tar
5、解压镜像命令
# docker
docker load -i /k8sdata/datakit/datakit-amd64-1.76.1.tar

# containerd
ctr -n=k8s.io image import /k8sdata/datakit/datakit-amd64-1.76.1.tar
6、启动 DataKit 容器
全离线安装
当环境完全没有外网的情况下,只能通过移动硬盘(U 盘)等方式将安装包从公网下载到内网。
- 解压镜像命令
# docker
docker load -i datakit-amd64-1.76.1.tar

# containerd
ctr -n=k8s.io image import datakit-amd64-1.76.1.tar
- 集群控制机执行启动命令
- 更新命令
