Python 수집기 빠른 시작 가이드
Pythond는 사용자 정의 Python 수집 스크립트를 정기적으로 트리거하는 일련의 솔루션입니다. 이 문서에서는 "매시간 로그인한 사용자 수"를 메트릭으로 센터에上报하는 예제를 다룹니다.
비즈니스 데모 소개
비즈니스 프로세스는 대략 다음과 같습니다:
데이터베이스에서 데이터 수집 (Python 스크립트) -> Pythond 수집기가 정기적으로 해당 스크립트를 트리거하여 데이터 上报 (Datakit) -> 센터에서 메트릭 확인 (웹)
데이터베이스에 customers라는 테이블이 있으며, 다음과 같은 필드가 있습니다:
name: 이름 (문자열)last_logined_time: 로그인 시간 (타임스탬프)
테이블 생성 구문은 다음과 같습니다:
create table customers
(
  `id`                BIGINT(20)  not null AUTO_INCREMENT COMMENT '자동 증가 ID',
  `last_logined_time` BIGINT(20)  not null DEFAULT 0      COMMENT '로그인 시간 (타임스탬프)',
  `name`              VARCHAR(48) not null DEFAULT ''     COMMENT '이름',

  primary key(`id`),
  key idx_last_logined_time(last_logined_time)
) ENGINE=InnoDB DEFAULT CHARSET=utf8mb4;
위 테이블에 테스트 데이터를 삽입합니다:
INSERT INTO customers (id, last_logined_time, name) VALUES (1, 1645600127, 'zhangsan');
INSERT INTO customers (id, last_logined_time, name) VALUES (2, 1645600127, 'lisi');
INSERT INTO customers (id, last_logined_time, name) VALUES (3, 1645600127, 'wangwu');
다음 SQL 문을 사용하여 "매시간 로그인한 사용자 수"를 가져옵니다:
위 데이터를 메트릭 형식으로 센터에 上报합니다.
아래에서 위 비즈니스를 구현하는 구체적인 단계를 자세히 설명합니다.
사전 조건
Python 환경
현재 알파 단계이며, Python 3+만 호환됩니다. 테스트된 버전:
- 3.10.1
Python 종속 라이브러리
다음 종속 라이브러리를 설치해야 합니다:
- requests (네트워크 작업, 메트릭 上报에 사용)
- pymysql (MySQL 데이터베이스 작업, 데이터베이스 연결 및 비즈니스 데이터 조회에 사용)
설치 방법은 다음과 같습니다:
위 설치를 위해 pip가 필요합니다. pip가 없는 경우 다음 방법을 참고하세요 (출처: 여기):
설치 및 배포
1 사용자 정의 스크립트 작성
사용자는 DataKitFramework 클래스를 상속받고 run 메서드를 재정의해야 합니다. DataKitFramework 클래스의 소스 파일은 datakit_framework.py이며, 경로는 datakit/python.d/core/datakit_framework.py입니다.
자세한 사용법은 소스 파일
datakit/python.d/core/demo.py를 참고하세요.
예제에서는 위 요구사항에 따라 다음과 같은 Python 스크립트를 작성하고 hellopythond.py로命名합니다:
hellopythond.py
from datakit_framework import DataKitFramework
import pymysql
import re
import logging

class MysqlConn():
    def __init__(self, logger, config):
        self.logger = logger
        self.config = config
        self.re_errno = re.compile(r'^\((\d+),')

        try:
            self.conn = pymysql.Connect(**self.config)
            self.logger.info("pymysql.Connect() ok, {0}".format(id(self.conn)))
        except Exception as e:
            raise e

    def __del__(self):
        self.close()

    def close(self):
        if self.conn:
            self.logger.info("conn.close() {0}".format(id(self.conn)))
            self.conn.close()


    def execute_query(self, sql_str, sql_params=(), first=True):
        res_list = None
        cur = None
        try:
            cur = self.conn.cursor()
            cur.execute(sql_str, sql_params)
            res_list = cur.fetchall()
        except Exception as e:
            err = str(e)
            self.logger.error('execute_query: {0}'.format(err))
            if first:
                retry = self._deal_with_network_exception(err)
                if retry:
                    return self.execute_query(sql_str, sql_params, False)
        finally:
            if cur is not None:
                cur.close()
        return res_list

    def execute_write(self, sql_str, sql_params=(), first=True):
        cur = None
        n = None
        err = None
        try:
            cur = self.conn.cursor()
            n = cur.execute(sql_str, sql_params)
        except Exception as e:
            err = str(e)
            self.logger.error('execute_query: {0}'.format(err))
            if first:
                retry = self._deal_with_network_exception(err)
                if retry:
                    return self.execute_write(sql_str, sql_params, False)
        finally:
            if cur is not None:
                cur.close()
        return n, err

    def _deal_with_network_exception(self, stre):
        errno_str = self._get_errorno_str(stre)
        if errno_str != '2006' and errno_str != '2013' and errno_str != '0':
            return False
        try:
            self.conn.ping()
        except Exception as e:
            return False
        return True

    def _get_errorno_str(self, stre):
        searchObj = self.re_errno.search(stre)
        if searchObj:
            errno_str = searchObj.group(1)
        else:
            errno_str = '-1'
        return errno_str

    def _is_duplicated(self, stre):
        errno_str = self._get_errorno_str(stre)
        # 1062: 필드 값 중복, 데이터베이스 저장 실패
        # 1169: 필드 값 중복, 레코드 업데이트 실패
        if errno_str == "1062" or errno_str == "1169":
            return True
        return False

class HelloPythond(DataKitFramework):
    __name = 'HelloPythond'
    interval = 10 # 10초마다 수집 및 上报. 실제 비즈니스에 따라 조정하며, 여기서는 데모 목적입니다.

    # datakit IP가 127.0.0.1이고 포트가 9529인 경우 아래는 필요하지 않으므로 주석 처리하세요.
    # def __init__(self, **kwargs):
    #     super().__init__(ip = '127.0.0.1', port = 9529)

    def run(self):
        config = {
            "host": "172.16.2.203",
            "port": 30080,
            "user": "root",
            "password": "Kx2ADer7",
            "db": "df_core",
            "autocommit": True,
            # "cursorclass": pymysql.cursors.DictCursor,
            "charset": "utf8mb4"
        }

        mysql_conn = MysqlConn(logging.getLogger(''), config)
        query_str = "select count(1) from customers where last_logined_time>=(unix_timestamp()-%s)"
        sql_params = ('3600')
        n = mysql_conn.execute_query(query_str, sql_params)

        data = [
        {
            "measurement": "hour_logined_customers_count", # 메트릭 이름
            "tags": {
                "tag_name": "tag_value", # 사용자 정의 태그. 원하는 대로 입력하며, 여기서는 임의로 작성함
            },
            "fields": {
                "count": n[0][0], # 메트릭. 여기서는 매시간 로그인한 사용자 수
            },
        },
        ]

        in_data = {
            'M':data,
            'input': "pyfromgit"
        }

        return self.report(in_data) # 여기서 self.report를 호출해야 합니다.
2 사용자 정의 스크립트를 올바른 위치에 배치
Datakit 설치 디렉터리의 python.d 디렉터리 아래에 새 폴더를 만들고 hellopythond로命名합니다. 이 폴더 이름은 위에서 작성한 클래스 이름과 동일해야 합니다. 즉, hellopythond입니다.
그런 다음 위에서 작성한 스크립트 hellopythond.py를 이 폴더에 넣습니다. 최종 디렉터리 구조는 다음과 같습니다:
├── ...
├── datakit
└── python.d
    ├── core
    │   ├── datakit_framework.py
    │   └── demo.py
    └── hellopythond
        └── hellopythond.py
참고: 위의
core폴더는 Pythond의 핵심 폴더이므로 수정하지 마십시오.
위는 gitrepos 기능을 활성화하지 않은 경우입니다. gitrepos 기능을 활성화한 경우 디렉터리 구조는 다음과 같습니다:
├── ...
├── datakit
├── python.d
├── gitrepos
│   └── yourproject
│       ├── conf.d
│       ├── pipeline
│       └── python.d
│           └── hellopythond
│               └── hellopythond.py
3 Pythond 구성 파일 활성화
Pythond 구성 파일을 복사합니다.
conf.d/pythond 디렉터리에서 pythond.conf.sample을 pythond.conf로 복사한 후 다음과 같이 구성합니다:
[[inputs.pythond]]

    # Python 수집기 이름
    name = 'some-python-inputs'  # 필수

    # Python 수집기 실행에 필요한 환경 변수
    #envs = ['LD_LIBRARY_PATH=/path/to/lib:$LD_LIBRARY_PATH',]

    # Python 수집기 실행 파일 경로 (가능하면 절대 경로 사용)
    cmd = "python3" # 필수. python3 권장.

    # 사용자 스크립트의 상대 경로 (폴더 입력. 입력한 폴더의 하위 모듈 및 py 파일이 모두 적용됨)
    dirs = ["hellopythond"] # 여기에는 폴더 이름, 즉 클래스 이름을 입력
4 DataKit 재시작
결과 확인
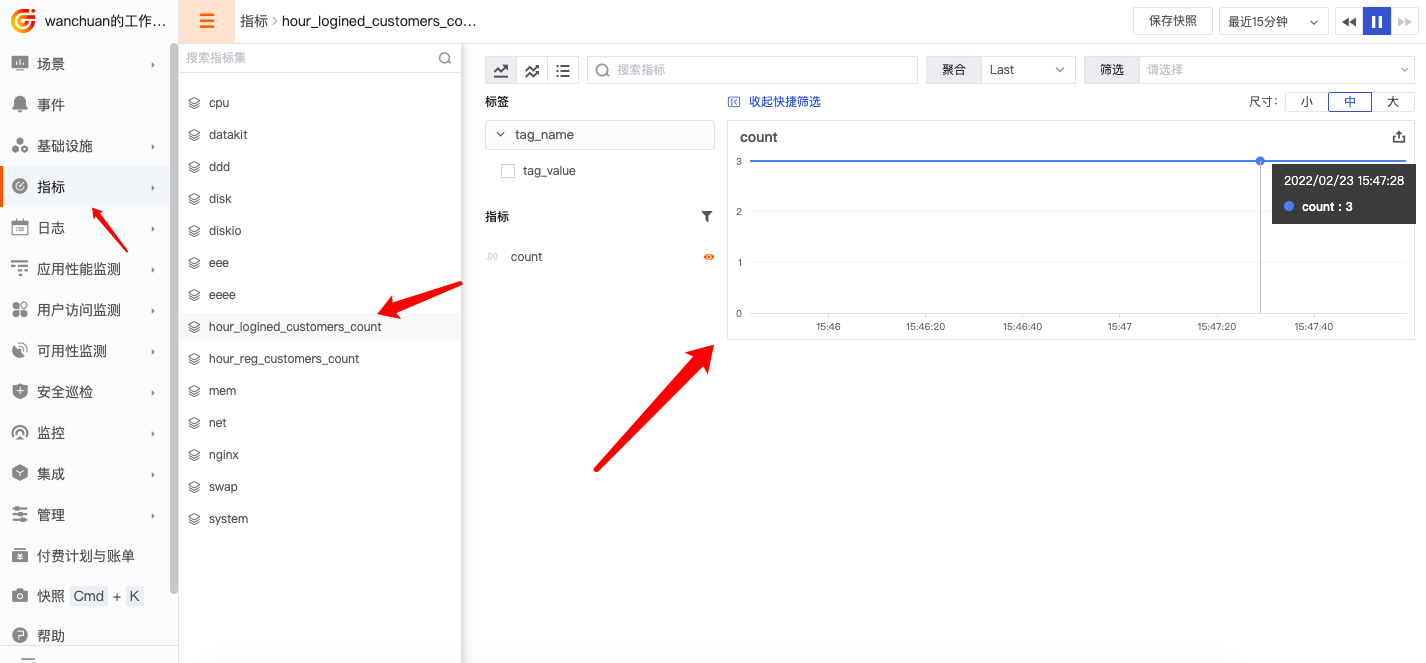
모든 것이 정상적으로 진행되면 약 1분 이내에 센터에서 메트릭 차트를 확인할 수 있습니다.