Workspace Settings
Manage > Workspace Settings is the core configuration center of a workspace. Workspace Owners and Administrators can:
- View data such as workspace version, site, Token, and member scale;
- Export/import dashboards, monitors, and other configurations for reuse across workspaces;
- Ensure data security through multi-layer mechanisms such as MFA, IP allowlists, and invitation approval;
- Perform irreversible operations such as adjusting storage policies and cleaning historical data.
Basic Information
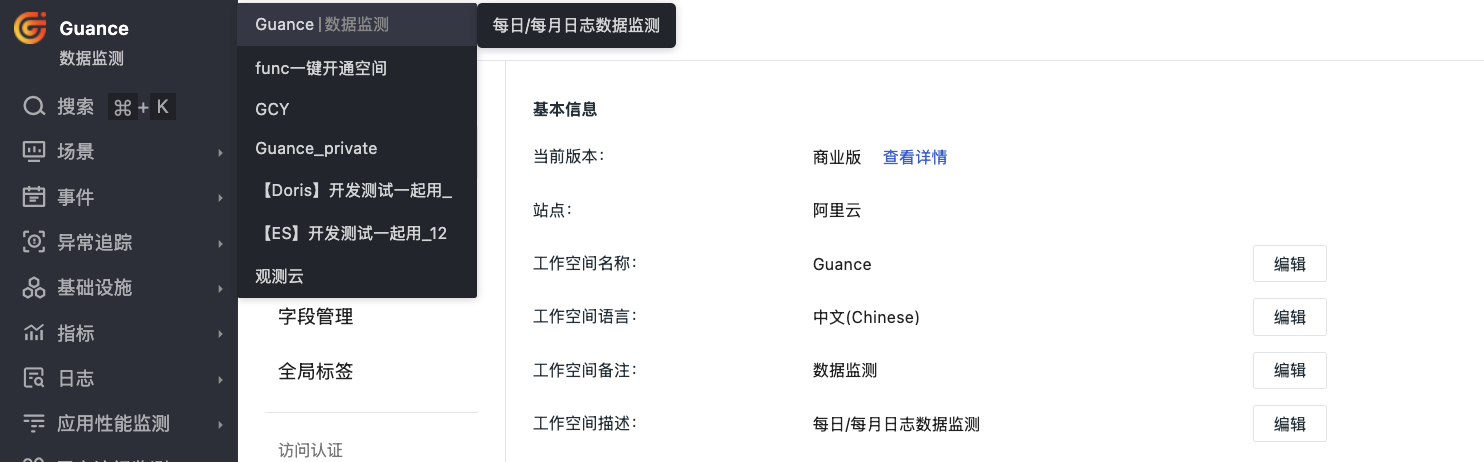
Displays the core information of the current workspace. Only the Owner and Administrator can edit it.
| Field | Description | Visibility | Editable |
|---|---|---|---|
| Current Version | Commercial Plan / Free Plan | All members | No |
| Site | The data center node where the workspace is deployed (for example, Alibaba Cloud, Huawei Cloud, AWS, etc.) | All members | No |
| Workspace Name | The name displayed in the workspace switcher in the upper-left corner | All members | Yes |
| Workspace Language | Language of system events, alerts, and SMS templates | All members | Yes |
| Workspace Remark | Auxiliary identification information from a personal perspective | Visible only to you | Yes |
| Workspace Description | Description of the workspace purpose | All members | Yes |
| Workspace ID | Globally unique identifier (starting with wksp_) |
All members | No |
| Token | Authentication key for data reporting | Owner/Administrator | Yes |
| Member Count | The number of members currently in the workspace | All members | No |
Workspace Language
Supports Chinese or English. After switching, system events, alert notifications, SMS templates, and more use the corresponding language by default.
Note
-
The "Workspace Language" here only applies to the current settings page and does not affect the display language of the console after you enter the workspace. At login, the system prioritizes the display language used during the browser's most recent successful access to the console; if there is no record, the browser's current language is used. For example, if the browser language is Chinese, the console displays in Chinese by default.
-
Only the workspace Owner or Administrator has the permission to modify this language setting.
Remark
Add a remark visible only to you for the current workspace.
The remark is displayed together with the workspace name in the upper-left corner for quick identification.
Description
Add description information for the current workspace. Once added, it can be viewed directly in the workspace in the upper-left corner for easy identification.
Token
The Token is the authentication credential for data reporting by DataKit and OpenAPI.
View and Copy
Click the copy button next to the Token to copy the full key.
Replace Token
Click Replace to set the expiration time for the old Token and generate a new Token:
- Expire immediately
- 10 minutes
- 6 hours
- 12 hours
- 24 hours
Notes Before Replacing
After selecting "Expire immediately", DataKit using the old Token stops reporting immediately, which may cause monitoring interruptions and alert failures.
Edit Token Configuration
Click Edit to configure:
-
Custom Token: set a custom key (optional);
-
Enable data query: allow querying platform data through the Token (disabled by default; enable it as needed).
Configuration Migration
Supports one-click import and export of the full workspace configuration, covering core resources such as monitoring views, alert policies, data processing rules, role management settings, and data compliance.
Expand to view the specific resource items
- Dashboards
- Custom Explorers
- Monitor configurations
- Data forwarding rules
- Alert policies
- Notification targets
- SLO
- Security detection rules
- Log indexes (excluding external indexes)
- Attribute Claims
- Field management
- Global labels
- Environment variables (excluding RUM)
- Role management
- Blacklists
- Pipelines
- Regular expressions
- Field display permissions
- Sensitive Data Scanning
-
Click Export to download a compressed package containing all related configurations of the current workspace.
-
Click Import to upload a JSON file or compressed package. If resources with the same name are detected, the system provides the following handling methods:
- Skip: only creates non-duplicate files;
- Overwrite: overwrites and creates the corresponding resources based on the imported file name.
Advanced Settings
Click Settings to enter the advanced configuration page:
Security
Invitation Approval
When enabled, invited members must be approved by the Owner or Administrator before they can join; when disabled, invited members can enter the workspace directly.
MFA Security Authentication
When enabled, all members of the workspace must complete MFA binding and authentication; otherwise, they cannot access the workspace.
API Key Security Display Policy
Used to centrally manage the display method of API Keys in the workspace. When enabled, newly created API Keys are displayed only once at the time of creation, and the plaintext cannot be viewed after the page is closed; when the policy is disabled, members with permissions can view the full Key again.
Notes on Changes
-
After changing the policy, it applies only to subsequently newly created API Keys; existing API Keys keep their original display form;
-
Automatically created API Keys remain displayed in plaintext;
-
This setting is disabled by default, and can only be modified by the workspace Owner.
After an API Key is created successfully, a popup displays the full plaintext API Key once, including the name, API Key, role, creation time, and remark. In the lower-left corner, it can be downloaded as a text file (.txt).
After closing the creation success popup or refreshing the page, the plaintext of this API Key is no longer displayed; the list and details pages only display "The Key is only visible at creation."
AI Intelligent Analysis
Controls the permission for external data transmission of AI features in the workspace.
-
Enabled: information such as monitoring data, log fragments, trace data, and metric summaries from this workspace may be transmitted to external large models (public network services) for processing;
-
Disabled: AI features are unavailable, and data is not transmitted externally.
Note
- Newly created workspaces have this switch disabled by default;
- Only the workspace Owner can enable or disable it; non-Owners do not see this switch;
- Before enabling this feature, confirm that your organization's security and compliance policies allow such external data transmission, to ensure data security and compliance;
- Enabling and disabling applies to all AI features simultaneously.
Special Characters
Login IP Allowlist
Restricts the IP sources that can log in to the console.
When enabled, only IPs in the allowlist can log in normally; other sources are rejected.
IP allowlist format:
- Multiple IPs must be separated by line breaks, with only one IP address or CIDR block per line. Up to 1,000 entries can be added;
- Specific IP address: 192.168.0.1, indicating that access from the IP address 192.168.0.1 is allowed;
- Specific IP range: 192.168.0.0/24, indicating that access from IP addresses 192.168.0.1 to 192.168.0.255 is allowed;
- All IP addresses: 0.0.0.0/0.
Note
Workspace Owners are not subject to this restriction, ensuring they are not locked out accidentally.
Role IP Allowlist
Based on the global IP allowlist, login IP control can be further refined by role. When both the global allowlist and the Role IP allowlist are enabled, you can configure allowed login IP addresses or CIDR blocks for different roles.
Effective rules: when a user has matching role rules, the role rules are applied; when no role rules match, the global IP list is applied. If a user belongs to multiple roles, matching any role rule grants access.
Note
After a role is deleted, its corresponding IP rules become invalid automatically.
Data Reporting IP Allowlist
Restricts the egress IPs that can report data. When enabled, only IPs in the allowlist can report data normally; data from other sources is blocked.
IP allowlist format:
- Multiple IPs must be separated by line breaks, with only one IP address or CIDR block per line. Up to 1,000 entries can be added;
- Specific IP address: 192.168.0.1, indicating that access from the IP address 192.168.0.1 is allowed;
- Specific IP range: 192.168.0.0/24, indicating that access from IP addresses 192.168.0.1 to 192.168.0.255 is allowed;
- All IP addresses: 0.0.0.0/0.
OpenAPI Access IP Allowlist
Restricts the source IPs for OpenAPI and API Key calls in the current workspace. Only IPs in the allowlist are allowed to access; requests from non-allowlisted sources are blocked and audit logs are recorded.
- Go to Manage > Workspace Settings > Security;
- In "OpenAPI Access IP Allowlist", click "Settings";
- Enable the allowlist switch and add allowed IP addresses or CIDR blocks to the IP list;
- Save.
IP allowlist format:
- Multiple IPs must be separated by line breaks, with only one IP address or CIDR block per line. Up to 1,000 entries can be added;
- Specific IP address: 192.168.0.1, indicating that access from that IP address is allowed;
- Specific IP range: 192.168.0.0/24, indicating that access from IP addresses 192.168.0.1 to 192.168.0.255 is allowed;
- All IP addresses: 0.0.0.0/0.
Note
- When enabled, only IPs in the allowlist can access the OpenAPI of the current workspace (including API Key calls);
- Requests from non-allowlisted sources are rejected, and audit logs are recorded;
- Workspace Owners are not subject to this restriction.
Role IP Allowlist
Based on the global IP allowlist, OpenAPI access IP control can be further refined by role. When both the global allowlist and the Role IP allowlist are enabled, you can configure allowed IP addresses or CIDR blocks for different roles.
Effective rules: when a user has matching role rules, the role rules are applied; when no role rules match, the global IP list is applied. If a user belongs to multiple roles, matching any role rule grants access.
Note
- After a role is deleted, its corresponding IP rules become invalid automatically.
Data Access Scope Limit
When enabled, regular members who do not match any data access rule in the current workspace cannot view any of the data covered by the data access rules.
This switch only controls the default access behavior when members do not match any rule; it does not affect the execution of associated data access rules.
Note
- Only users with the Owner and Administrator roles can operate this switch;
- Owner is not restricted by data access rules;
- When Administrator is associated with a rule, the data scope is restricted and desensitized according to the rule; when no rule is associated, data can still be queried within the original permissions even with this switch enabled.
Risky Operations
The following operations are irreversible. Proceed with caution.
Daily Metrics Reporting Limit
Commercial Plan workspaces billed by data points support setting a daily limit for metric data point reporting. When the daily metric data point limit is reached, metric data stops being received, and reporting resumes automatically at 0:00 the next day.
Prerequisites
| Condition | Description |
|---|---|
| Workspace type | Only available to Commercial Plan workspaces billed by data points; workspaces billed by time series must contact their Account Manager to adjust the billing mode before setting the limit |
| Operation permission | Only the workspace Owner, Administrator, and roles with the Manage > Settings Management permission can operate |
Configuration Steps
- Go to Manage > Workspace Settings > Risky Operations;
- Find Data Point Reporting Limit and click Settings;
-
In the popup:
- Enable the feature switch;
- Enter the daily data point limit (unit: 10 million data points);
- Select notification targets (Owner is selected by default and cannot be removed; multiple workspace members and external email addresses are supported);
-
Click OK, re-confirm the limit value and its impact, and then save. When disabling the feature, save directly without a confirmation popup.
Cost conversion reference
Data points are billed based on the total accumulated within the storage period (daily cost ≈ existing data points ÷ 10 million × unit price). The limit value can be roughly estimated as follows:
-
With standard storage: limit ≈ daily budget ÷ data point unit price ÷ metric storage days;
-
Example: daily budget ¥200, China region unit price ¥0.2/10 million data points, standard storage 7 days → limit ≈ 1.43 billion data points/day;
-
For workspaces with long-term storage enabled, it is recommended to set the limit directly based on the actual data point inventory trend in Usage Analysis.
Trigger and Notification
| Timing | Behavior |
|---|---|
| Daily usage reaches 80% of the limit | Email notification to Owner and notification targets (once per day) |
| Daily usage reaches 100% of the limit | Stop receiving metric data; generate a system event (viewable in the Event Center: trigger time, limit value); email notification |
| 0:00 the next day | Automatically resume receiving data; email notification |
During Truncation
Only the reception of metric data stops; other data types such as logs, traces, RUM, and events are not affected. Data already stored before the truncation remains normally queryable.
Status Description
The inline status on the page changes with the configuration:
- Not set: the feature is not enabled;
- Set (daily limit xx data points): the limit has been configured, and the threshold has not been reached today;
- Triggered (limit reached today, reception stopped): today's limit has been exceeded, metric data reception is paused, and it automatically resumes at 0:00 the next day.
Note
- Email notifications may have delays in sending and receiving. In high-throughput reporting scenarios, the daily limit may be reached and data reception may stop before the warning email is received;
- This feature only applies to workspaces billed by data points and cannot control costs for workspaces billed by time series.
Change Data Storage Policy
The system supports the Owner in changing the data storage policy in the workspace.
- Go to Manage > Workspace Settings > Change Data Storage Policy;
- Click Replace;
- Select the desired data storage duration;
- Confirm.
Note
After the change, new data is stored according to the new policy; historical data is not affected.
Delete Measurement
The system supports the Owner and Administrator in deleting measurements in the workspace.
- Go to Manage > Workspace Settings > Delete Specified Measurement;
- Select a measurement name from the dropdown (fuzzy matching supported);
- Click OK, and the measurement enters the deletion queue and waits to be deleted.
Note
-
Only the workspace Owner and Administrator can perform this operation;
-
Once a measurement is deleted, it cannot be recovered. Proceed with caution;
-
Deleting a measurement generates system notification events, such as a user creating a measurement deletion task, a measurement deletion task executed successfully, a measurement deletion task failed, etc.
Delete Resource Catalog
The system supports the Owner and Administrator in deleting specified resource catalog categories and all resource catalogs.
- Go to Manage > Workspace Settings > Delete Resource Catalog;
- Click Delete Resource Catalog;
- Select the deletion method for the resource catalog;
-
Confirm.
- Specified resource catalog category: only deletes data under the selected object category; indexes are not deleted;
- All resource catalogs: deletes all resource catalog data and indexes.