iOS/tvOS/macOS App Integration
By collecting metrics data from iOS, tvOS, and macOS apps, you can visually analyze the performance of applications on Apple platforms.
Reading Path
- First-time integration: Start with Quick Start
- Full integration: Continue reading this document
- Upgrading from a version prior to 1.6.6: See Migration Guide
- Initialization parameters: See SDK Initialization, RUM Configuration, Log Configuration, Trace Configuration
- Customization: See Custom Tags, Custom Track Rules, Data Masking
- Advanced scenarios: See the dedicated pages under the "Advanced Scenarios" section
- Troubleshooting: See Troubleshooting
Prerequisites
Note
If the RUM Headless service is already enabled, the prerequisites are automatically configured and you can directly integrate the application.
- Install DataKit;
- Configure the RUM Collector;
- Make DataKit publicly accessible over the internet and install the IP geolocation database.
macOS Alpha Notice
In SDK 1.6.6 and later, the GuanceSDK main SDK covers iOS, tvOS, and macOS. macOS is currently in Alpha and not all iOS features are guaranteed to be supported. Before integrating macOS, please verify core workflows such as initialization, RUM, Log, Trace, and data synchronization in a test environment. Session Replay and Widget Extension are not supported on macOS.
App Integration
- Go to Real User Monitoring (RUM) > Create Application, and select iOS, tvOS, or macOS as the application type.
- Enter the application name.
- Enter the application ID.
-
Select the application integration method:
- Public DataWay: Receives RUM data directly, without needing to install the DataKit collector.
- Local Environment Deployment: Receives RUM data after meeting the prerequisites.
Installation


Source Code: https://github.com/GuanceCloud/datakit-ios
Demo: https://github.com/GuanceDemo/guance-app-demo
CocoaPods Future Maintenance Notice
According to the CocoaPods official announcement, CocoaPods plans to switch the trunk to read-only after December 2, 2026, and will no longer accept new Podspecs. Published Pod versions and existing builds will not be immediately affected, but obtaining new versions, compatibility fixes, and security updates via CocoaPods may be limited in the future. Therefore, for new integrations or SDK upgrades, we recommend using Swift Package Manager as the preferred integration method.
Using Xcode UI
-
In Xcode, select
File->Add Package Dependency.... -
In the search box of the pop-up page, enter
https://github.com/GuanceCloud/datakit-ios.git. -
After Xcode resolves the package, select the dependency version rule. It is recommended to choose
Up to Next Major Version.Select the project to add to, then click
Add Packageand wait for the loading to complete. -
After the package is resolved, select the products to add to each target from the Package Products list, then click
Add Package.GuanceSDK: Add to the main project target, supports iOS, tvOS, and macOS. macOS is in Alpha.GuanceWidgetExtension: Add only to the iOS Widget Extension target.
Using Package.swift
If your project is itself a Swift Package, add the SDK as a dependency in Package.swift by adding to dependencies.
// Main project
dependencies: [
.package(url: "https://github.com/GuanceCloud/datakit-ios.git",
.upToNextMajor(from: "[latest_version]"))
]
Add dependencies to your targets:
targets: [
    .target(
        name: "YourTarget",
        dependencies: [
            .product(name: "GuanceSDK", package: "GuanceSDK"),
        ]),
    .target(
        name: "YourWidgetExtensionTarget",
        dependencies: [
            .product(name: "GuanceWidgetExtension", package: "GuanceSDK"),
        ]),
    ]
Note: Swift Package Manager is supported from version 1.4.0-beta.1 onward. In SDK 1.6.6 and later, the SPM product names have been adjusted to GuanceSDK, GuanceWidgetExtension, and GuanceSessionReplay. For migration from old product names, please refer to the Migration Guide.
-
Configure the
Cartfilefile. -
Update dependencies.
Depending on your target platform (iOS, tvOS, or macOS), run the corresponding
carthage updatecommand and add the--use-xcframeworksparameter to generate XCFrameworks:-
For iOS platform:
-
For tvOS platform:
-
For macOS platform:
The generated xcframework is used like a regular Framework. Add the compiled library to your project.
GuanceSDK: Add to the main project target, supports iOS, tvOS, and macOS. macOS is in Alpha.GuanceWidgetExtension: Add only to the iOS Widget Extension target. -
-
In
TARGETS->Build Setting->Other Linker Flags, add-ObjC. -
Supported SDK versions with Carthage integration:
GuanceSDK: >=1.6.6GuanceWidgetExtension: >=1.6.6
CocoaPods Applicability Note
According to the CocoaPods official announcement, CocoaPods plans to switch the trunk to read-only after December 2, 2026, and will no longer accept new Podspecs. For new projects or projects adjusting their dependency management approach, please use the Swift Package Manager method above to integrate the SDK.
-
Configure the
Podfilefile.-
Using Dynamic Library
use_frameworks! def shared_pods pod 'GuanceSDK', '[latest_version]' # If you need to collect Widget Extension data pod 'GuanceSDK/WidgetExtension', '[latest_version]' end # Main project target 'yourProjectName' do shared_pods end # Widget Extension target 'yourWidgetExtensionName' do shared_pods end -
Using Static Library
-
Using the code base downloaded locally
Podfilefile:use_modular_headers! # Main project target 'yourProjectName' do pod 'GuanceSDK', :path => '[folder_path]' end # Widget Extension target 'yourWidgetExtensionName' do pod 'GuanceSDK/WidgetExtension', :path => '[folder_path]' endfolder_path: Path to the folder containingGuanceSDK.podspec.GuanceSDK.podspecfile:Modify
s.versionands.sourcein theGuanceSDK.podspecfile.Pod::Spec.new do |s| s.name = "GuanceSDK" s.version = "[latest_version]" s.source = { :git => "https://github.com/GuanceCloud/datakit-ios.git", :tag => s.version } ends.version: Set to the desired version, it is recommended to matchSDK_VERSIONinSources/Agent/Core/FTSDKVersion.h.s.source:tag => s.version
-
Widget Extension Compatibility:
For SDK 1.6.6 and later, it is recommended to use GuanceSDK/WidgetExtension. If an existing project previously used pod 'FTMobileSDK', :subspecs => ['Extension'], after upgrading to GuanceSDK, you can continue using the compatible subspec:
- Run
pod installin thePodfiledirectory to install the SDK.
Compatibility Note: In SDK 1.6.6 and later, the main pod name is GuanceSDK. The old FTMobileSDK integration method applies to versions prior to 1.6.6. When upgrading to 1.6.6 or later, please refer to the Migration Guide to adjust the dependency name.
Adding Header Files
Detailed Configuration Entry Points
Advanced Scenarios
- Custom Tags
- Custom Track Rules
- Data Masking
- URLSession Custom Network Collection
- Dynamic Configuration
- Symbol File Upload
- Widget Extension Data Collection
- WebView Data Monitoring
- tvOS Data Collection
Frequently Asked Questions
About Crash Log Analysis
In Debug and Release modes during development, the thread backtrace captured on Crash is symbolicated. However, released packages do not contain the symbol table, so the key backtrace of the offending thread shows the image name but does not translate into valid code symbols. The relevant information in the obtained crash log appears as hexadecimal memory addresses, which cannot pinpoint the crashing code. Therefore, you need to resolve these hexadecimal memory addresses into the corresponding classes and methods.
How to find the dSYM file after compilation or archiving
- In Xcode, the dSYM file is usually generated alongside the compiled .app file and located in the same directory.
- If you have archived the project, select
Organizerfrom theWindowmenu in Xcode, then choose the corresponding archive. Right-click the archive and selectShow in Finder. Locate the.xcarchivefile in Finder. Right-click the.xcarchivefile and selectShow Package Contents, then go into thedSYMsfolder to find the dSYM file.
No dSYM file generated after Xcode compilation?
Xcode Release builds generate dSYM files by default, while Debug builds do not. The corresponding Xcode settings are as follows:
Build Settings -> Code Generation -> Generate Debug Symbols -> Yes

Build Settings -> Build Option -> Debug Information Format -> DWARF with dSYM File

How to upload the symbol table when Bitcode is enabled?
When you upload your Bitcode app to the App Store, check the option to generate symbol files (dSYM files) in the submission dialog:
- Before configuring the symbol table file, you need to download the corresponding dSYM file for that version from the App Store to your local machine. Then use a script to process and upload the symbol table file based on the input parameters.
- There is no need to integrate the script into the Xcode project target, nor use the locally generated dSYM file to generate the symbol table file, because the symbol table information in the dSYM file generated by local compilation is hidden. If you upload the locally compiled dSYM file, the restored symbols will be something like "__hiden#XXX".
How to retrieve the dSYM file for an App already published to the App Store?
| Distribution options when uploading to App Store Connect | dSYM file |
|---|---|
| Don’t include bitcode Upload symbols |
Retrieve via Xcode |
| Include bitcode Upload symbols |
Retrieve via iTunes Connect Retrieve via Xcode, requires .bcsymbolmap for de-obfuscation. |
| Include bitcode Don’t upload symbols |
Retrieve via Xcode, requires .bcsymbolmap for de-obfuscation. |
| Don’t include bitcode Don’t upload symbols |
Retrieve via Xcode |
Retrieve via Xcode
-
Xcode -> Window -> Organizer -
Select the
Archivestab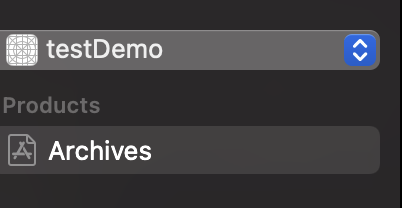
-
Find the published archive, right-click it, and select
Show in Finder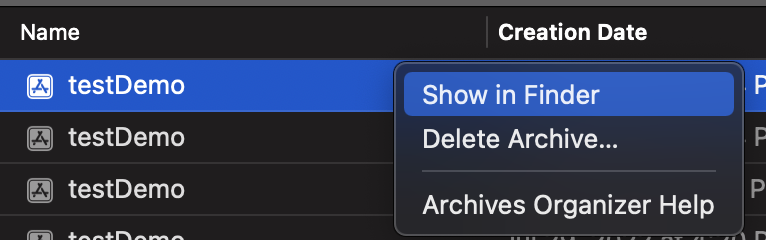
-
Right-click the located archive file, and select
Show Package Contents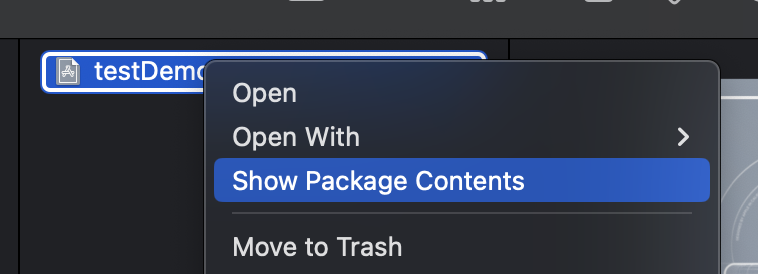
-
Select the
dSYMsdirectory; the dSYM files are inside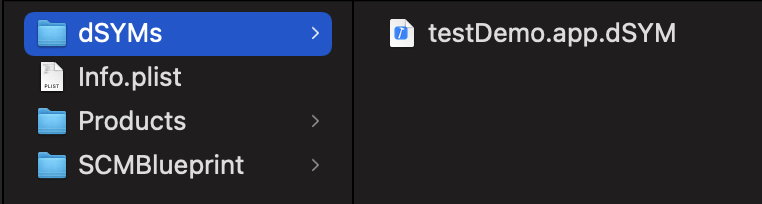
Retrieve via iTunes Connect
- Log in to App Store Connect;
- Go to "My Apps"
- Select a version under "App Store" or "TestFlight", click "Build Metadata", and on this page click the "Download dSYM" button to download the dSYM file.
De-obfuscation with .bcsymbolmap
When locating the dSYM file via Xcode, you can see the BCSymbolMaps directory
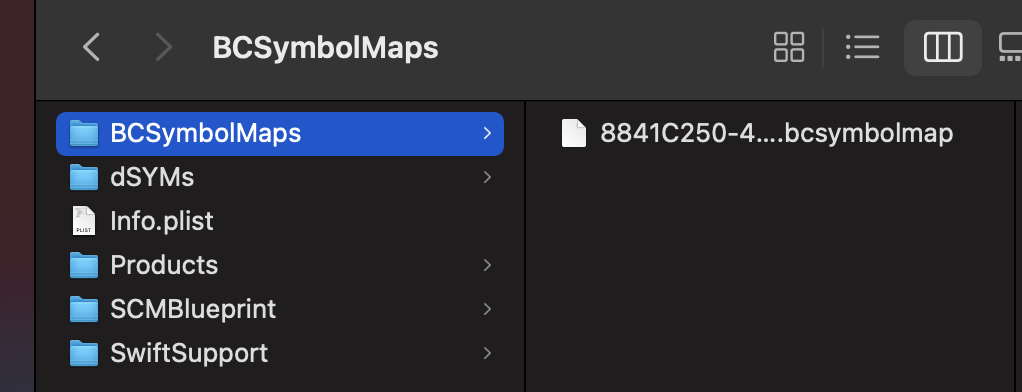
Open the terminal and run the following command to de-obfuscate:
xcrun dsymutil -symbol-map <BCSymbolMaps_path> <.dSYM_path>
Adding Global Variables to Avoid Field Conflicts
To avoid conflicts between custom fields and SDK data, it is recommended to prefix tag names with a project abbreviation, for example custom_tag_name. You can look up the key values used in the project in the source code. When a global variable in the SDK coincides with the same variable in RUM or Log, the RUM or Log variable overrides the SDK global variable.
GXP_1_X GXP_2_X GXP_3_X