DataKit Development Manual
How to Add a Collector
Assuming that a new collector zhangsan is added, the following steps are generally followed:
- Add the module
zhangsanunderplugins/inputsand create aninput.go - Create a new structure in
input.go
// Uniformly named Input
type Input struct {
  // Some configurable fields
  ...

  // Generally, each collector can add a user-defined tag
  Tags   map[string]string
}
- The structure implements the following interfaces, for example, see
democollector:
Catalog() string                  // Collector classifications, such as MySQL collectors, belong to the `db` classification
Run()                             // Collector entry function, which usually collects data here and sends the data to the `io` module
SampleConfig() string             // Sample collector configuration file
SampleMeasurement() []Measurement // Auxiliary structure of collector document generation
AvailableArchs() []string         // Operating system applicable to collector
As some collector features are constantly being added, new collectors should implement all interfaces in plugins/inputs/inputs.go as much as possible
- In
input.go, add the following module initialization entry:
func init() {
  inputs.Add("zhangsan", func() inputs.Input {
    return &Input{
      // Here you can initialize a bunch of default configuration parameters for this collector
    }
  })
}
- Add
importinplugins/inputs/all/all.go
import (
  ... // Other existing collectors
  _ "gitlab.jiagouyun.com/cloudcare-tools/datakit/internal/plugins/inputs/zhangsan"
)
- Add collectors to the top-level directory
checked.go:
allInputs = map[string]bool{
  "zhangsan":       false, // Note that it is initially set to false, and then changed to true when the collector is released
  ...
}
- Perform compilation and replace the existing DataKit with the compiled binary. Take the Mac platform as an example:
$ make
$ tree dist/
dist/
└── datakit-darwin-amd64
    └── datakit          # Replace this dakakit with the existing datakit binary, typically /usr/local/datakit/datakit

sudo datakit service stop                                       # stop existing datakit
sudo truncate -s 0 /var/log/datakit/log                         # Empty the log
sudo cp -r dist/datakit-darwin-amd64/datakit /usr/local/datakit # Overlay binary
sudo datakit service start                                      # restart datakit
- At this point, you typically have a
zhangsan.conf.samplein the /usr/local/datakit/conf.d/<Catalog>/ directory. Note that the<Catalog>here is the return value of the interfaceCatalog() stringabove. - Open the
zhangsancollector, make a copy ofzhangsan.conffromzhangsan.conf.sample, modify the corresponding configuration (such as user name, directory configuration, etc.), and restart DataKit - Check the collector condition by executing the following command:
sudo datakit check --config # Check whether the collector configuration file is normal
datakit -M --vvv            # Check the operation of all collectors
-
If the collector function is complete, add
man/manuals/zhangsan.mddocument, this can refer todemo.md, install the template inside to write -
For measurements in the document, the default is to list all the measurements that can be collected and their respective metrics in the document. Some special measurements or metrics, if there are preconditions, need to be explained in the document.
- If a metric set needs to meet certain conditions, it should be described in
MeasurementInfo.Descof measurement - If there is a specific precondition for a metric in the measurement, it should be described on
FieldInfo.Desc.
- If a metric set needs to meet certain conditions, it should be described in
Compile Environment Build
Install Golang
the current Go version 1.18.3
CI Settings
Assume go is installed in the /root/golang directory
- Setting the directory
- Set the following environment variables
export GO111MODULE=on
# Set the GOPROXY environment variable
export GOPRIVATE=gitlab.jiagouyun.com/*

export GOPROXY=https://goproxy.io

# Assume that golang is installed in the /root directory
export GOROOT=/root/golang-1.18.3
# Clone go code into GOPATH
export GOPATH=/root/go
export PATH=$GOROOT/bin:~/go/bin:$PATH
Create a set of environment variables under ~/.ossenv and fill in OSS Access Key and Secret Key for release:
export RELEASE_OSS_ACCESS_KEY='LT**********************'
export RELEASE_OSS_SECRET_KEY='Cz****************************'
export RELEASE_OSS_BUCKET='zhuyun-static-files-production'
export RELEASE_OSS_PATH=''
export RELEASE_OSS_HOST='oss-cn-hangzhou-internal.aliyuncs.com'
Install packr2
Install packr2
go install github.com/gobuffalo/packr/v2/packr2@v2.8.3
Install common tools
- tree
- make
- goyacc:
go install golang.org/x/tools/cmd/goyacc@master - golangci-lint:
go install github.com/golangci/golangci-lint/cmd/golangci-lint@v1.46.2 - gofumpt:
go install mvdan.cc/gofumpt@v0.1.1 - wget
- docker
- curl
- llvm: version >= 10.0
- clang: version >= 10.0
- Linux kernel(>= 5.4.0-99-generic)header file:
apt-get install -y linux-headers-$(uname -r) - cspell:
npm install -g cspell@6.31.1 - markdownlint-cli:
npm install -g markdownlint-cli@0.34.0
Installing third-party libraries
gcc-multilib
# Debian/Ubuntu
sudo apt-get install -y gcc-multilib
sudo apt-get install -y linux-headers-$(uname -r)
# Centos: TODO
- IBM Db2 ODBC/CLI driver (Linux only). The guide is in IBM Db2 integration document。
not supported
not supported
Install, Upgrade and Test
After DataKit released new features, we had better do a full set of testing, including installation, upgrade and other processes. All existing DataKit installation files are stored on OSS. Let's use another isolated OSS bucket to do installation and upgrade tests.
Try this default OSS path:oss://df-storage-dev/ (East China region). The following AK/SK can be obtained if necessary:
Available for download OSS Browser client tool to view files in OSS.
- AK:
LTAIxxxxxxxxxxxxxxxxxxxx - SK:
nRr1xxxxxxxxxxxxxxxxxxxxxxxxxx
In this OSS bucket, we specify that each developer has a subdirectory for storing their DataKit test files. The specific script is in the source code scripts/build.sh. Copy it to DataKit source root directory, and slightly modify, can be used for local compilation and publishing.
Custom Directory Running DataKit
DataKit runs in the specified directory (/usr/local/DataKit under Linux) as service by default, but you can customize the DataKit working directory to run in a non-service mode and read configuration and data from the specified directory in an additional way, which is mainly used to debug the functions of DataKit during development.
- Update the latest code (dev branch)
- Compile
- Create the expected DataKit working directory, such as
mkdir -p ~/datakit/conf.d - Generate the default
datakit.confconfiguration file. Take Linux as an example, execute
-
Modify the
datakit.confgenerated above:- Fill in
default_enabled_inputsand add the list of collectors you want to open, typicallycpu,disk,memand so on http_api.listenchange the address- Change the token in
dataway.urls - Change the logging directory/level if necessary
- Fill in
-
Start the DataKit, taking Linux as an example:
DK_DEBUG_WORKDIR=~/datakit ./dist/datakit-linux-amd64/datakit - You can add a new alias to your local bash so that you can just run
ddkeach time you compile the DataKit (that is, Debugging-DataKit)
echo 'alias ddk="DK_DEBUG_WORKDIR=~/datakit ./dist/datakit-linux-amd64/datakit"' >> ~/.bashrc
source ~/.bashrc
In this way, the DataKit does not run as a service, and you can end the DataKit directly by ctrl+c
$ ddk
2021-08-26T14:12:54.647+0800    DEBUG   config  config/load.go:55       apply main configure...
2021-08-26T14:12:54.647+0800    INFO    config  config/cfg.go:361       set root logger to /tmp/datakit/log ok
[GIN-debug] [WARNING] Running in "debug" mode. Switch to "release" mode in production.
 - using env:   export GIN_MODE=release
  - using code:  gin.SetMode(gin.ReleaseMode)

  [GIN-debug] GET    /stats                    --> gitlab.jiagouyun.com/cloudcare-tools/datakit/http.HttpStart.func1 (4 handlers)
  [GIN-debug] GET    /monitor                  --> gitlab.jiagouyun.com/cloudcare-tools/datakit/http.HttpStart.func2 (4 handlers)
  [GIN-debug] GET    /man                      --> gitlab.jiagouyun.com/cloudcare-tools/datakit/http.HttpStart.func3 (4 handlers)
  [GIN-debug] GET    /man/:name                --> gitlab.jiagouyun.com/cloudcare-tools/datakit/http.HttpStart.func4 (4 handlers)
  [GIN-debug] GET    /restart                  --> gitlab.jiagouyun.com/cloudcare-tools/datakit/http.HttpStart.func5 (4 handlers)
  ...
You can also execute some command-line tools directly with ddk:
# Install IPDB
ddk install --ipdb iploc

# Query IP information
ddk debug --ipinfo 1.2.3.4
      city: Brisbane
  province: Queensland
   country: AU
       isp: unknown
        ip: 1.2.3.4
Testing
There are 2 types of testing in DataKit,one is integration testing, another is unit testing. There is no essential difference between them, but for integration testing, we have to set more environments.
Most of the time, we just run make ut for all testing, and we have to setup a Docker(remote or local) to help these integration testings. Here we show a example to do these:
-
Configure a remote Docker and enable it's remote function. For local Docker, nothing required to configure.
-
Make a shell alias, start
make utwithin it:
Sometimes we need to configure more for integration testing:
-
If we need to exclude some testing on package, we can add
UT_EXCLUDEin the alias:UT_EXCLUDE="gitlab.jiagouyun.com/cloudcare-tools/datakit/internal/plugins/inputs/snmp" -
We can post the testing result to Guance, add a Dataway and the token:
DATAWAY_URL="https://openway.guance.com/v1/write/logging?token=<YOUR-TOKEN>"
The complete example:
alias ut='REMOTE_HOST=<YOUR-DOCKER-REMOTE-HOST> make ut UT_EXCLUDE="<package-name>" DATAWAY_URL="https://openway.guance.com/v1/write/logging?token=<YOUR-TOKEN>"'
Release
The DataKit release consists of two parts:
- DataKit version release
- Document release
DataKit Release
The current release of DataKit is implemented in GitLab, which triggers the release of a specific branch of code once it is pushed to GitLab, as shown in .gitlab-ci.yml.
In versions prior to 1.2. 6 inclusive, the DataKit release relied on the output of the command git describe --tags. Since 1.2. 7, DataKit versions no longer rely on this mechanism, but by manually specifying the version number, the steps are as follows:
Note: The current reliance on
git describe --tagsin script/build.sh is just a version acquisition policy issue and does not affect the main process.
- Edit .gitlab-ci.yml to modify the
VERSIONvariable inside, such as:
Each release, you need to manually edit .gitlab-ci.yml to specify the version number.
- Add a tag to the code after the release is complete
Note: At present, the release of Mac version can only be released on Mac based on amd64 architecture. Because CGO is turned on, the Mac version of DataKit cannot be released on GitLab. It is implemented as follows:
DataKit Version Number Mechanism
- Stable version: Its version number is
x.y.z, whereymust be an even number - Non-stable version: its version number is
x.y.z, whereymust be cardinality
Document Publishing
Documentation can only be published on the development machine by installing mkdocs. The process is as follows:
- Execute
mkdocs.sh
If no version is specified, the latest tag name is used as the version number.
Note that if it is an online code release, it is best to ensure that it is consistent with the current stable version number of online DataKit, otherwise it will cause user trouble.
About the Code Specification
We don't emphasize the specific code specification here. Existing tools can help us standardize our own code habits. At present, golint tools are introduced to check the existing code separately:
You can see various modification suggestions in check.err. For false positives, we can use //nolint to explicitly turn off:
// Obviously, 16 is the largest single-byte hexadecimal number, but gomnd in lint will report an error:
// mnd: Magic number: 16, in <return> detected (gomnd)
// But a suffix can be added here to mask this check
func digitVal(ch rune) int {
  switch {
  case '0' <= ch && ch <= '9':
    return int(ch - '0')
  case 'a' <= ch && ch <= 'f':
    return int(ch - 'a' + 10)
  case 'A' <= ch && ch <= 'F':
    return int(ch - 'A' + 10)
  }

  // larger than any legal digit val
  return 16 //nolint:gomnd
}
When to use
nolint, see here
However, we do not recommend frequently adding //nolint:xxx,yyy to cover. Lint can be used in the following situations:
- Some well-known magic numbers in-such as 1024 for 1K and 16 for the maximum single-byte value.
- Security alerts that are really irrelevant, such as running a command in your code, but the command parameters are passed in from outside, but since the lint tool mentions them, it is necessary to consider whether there are possible security issues.
- Other places that may really need to be closed for inspection should be treated with caution.
Troubleshoot DATA RACE
There are many DATA RACE problems in DataKit. These problems can be solved by adding a specific option when compiling DataKit, so that the compiled binary can automatically detect the code with DATA RACE during runtime.
To compile a DataKit with automatic detection of DATA RACE, the following conditions must be met:
- CGO must be turned on, so you can only make local (make by default).
- You must pass in the Makefile variable:
make RACE_DETECTION=on
The compiled binary will increase a little, but it doesn't matter. We just need to test it locally. DATA RACE automatic detection has a feature, which can only be detected when the code runs to a specific code. Therefore, it is recommended that you automatically compile with RACE_DETECTION=on when testing your own functions daily, so as to find all the codes that cause DATA RACE as soon as possible.
DATA RACE Doesn't Really Cause Data Disorder
When a binary runtime with DATA RACE detection function encounters goroutines >=2 accessing the same data, and one of the goroutines executes write logic, it will print out code similar to the following on the terminal:
==================
WARNING: DATA RACE
Read at 0x00c000d40160 by goroutine 33:
  gitlab.jiagouyun.com/cloudcare-tools/datakit/vendor/github.com/GuanceCloud/cliutils/dialtesting.(*HTTPTask).GetResults()
    /Users/tanbiao/go/src/gitlab.jiagouyun.com/cloudcare-tools/datakit/vendor/github.com/GuanceCloud/cliutils/dialtesting/http.go:208 +0x103c
  ...

Previous write at 0x00c000d40160 by goroutine 74:
  gitlab.jiagouyun.com/cloudcare-tools/datakit/vendor/github.com/GuanceCloud/cliutils/dialtesting.(*HTTPTask).Run.func2()
    /Users/tanbiao/go/src/gitlab.jiagouyun.com/cloudcare-tools/datakit/vendor/github.com/GuanceCloud/cliutils/dialtesting/http.go:306 +0x8c
  ...
From these two pieces of information, we can know that the two codes work together on a data object, and at least one of them is a Write operation. However, it should be noted that only WARNING information is printed here, which means that this code does not necessarily lead to data problems, and the final problems need to be identified manually. For example, the following codes will not have data problems:
Troubleshooting DataKit Memory Leaks
Version-1.9.2 enabled pprof by default.
Edit DataKit.conf and add the following configuration fields at the top to turn on the DataKit remote pprof function:
If you install DataKit for DaemonSet, you can inject environment variables:
Restart DataKit to take effect.
Get Pprof File
# Download the current DataKit active memory pprof file
wget http://<datakit-ip>:6060/debug/pprof/heap

# 下 Download the current DataKit Total Allocated Memory pprof file (including memory that has been freed)
wget http://<datakit-ip>:6060/debug/pprof/allocs
Port 6060 here is fixed and cannot be modified for the time being
Also accessed via the web http://<datakit-ip>:6060/debug/pprof/heap?=debug=1. You can also see some memory allocation information.
View Pprof File
After downloading to the local, run the following command. After entering the interactive command, you can enter top to view the top10 hot spots of memory consumption:
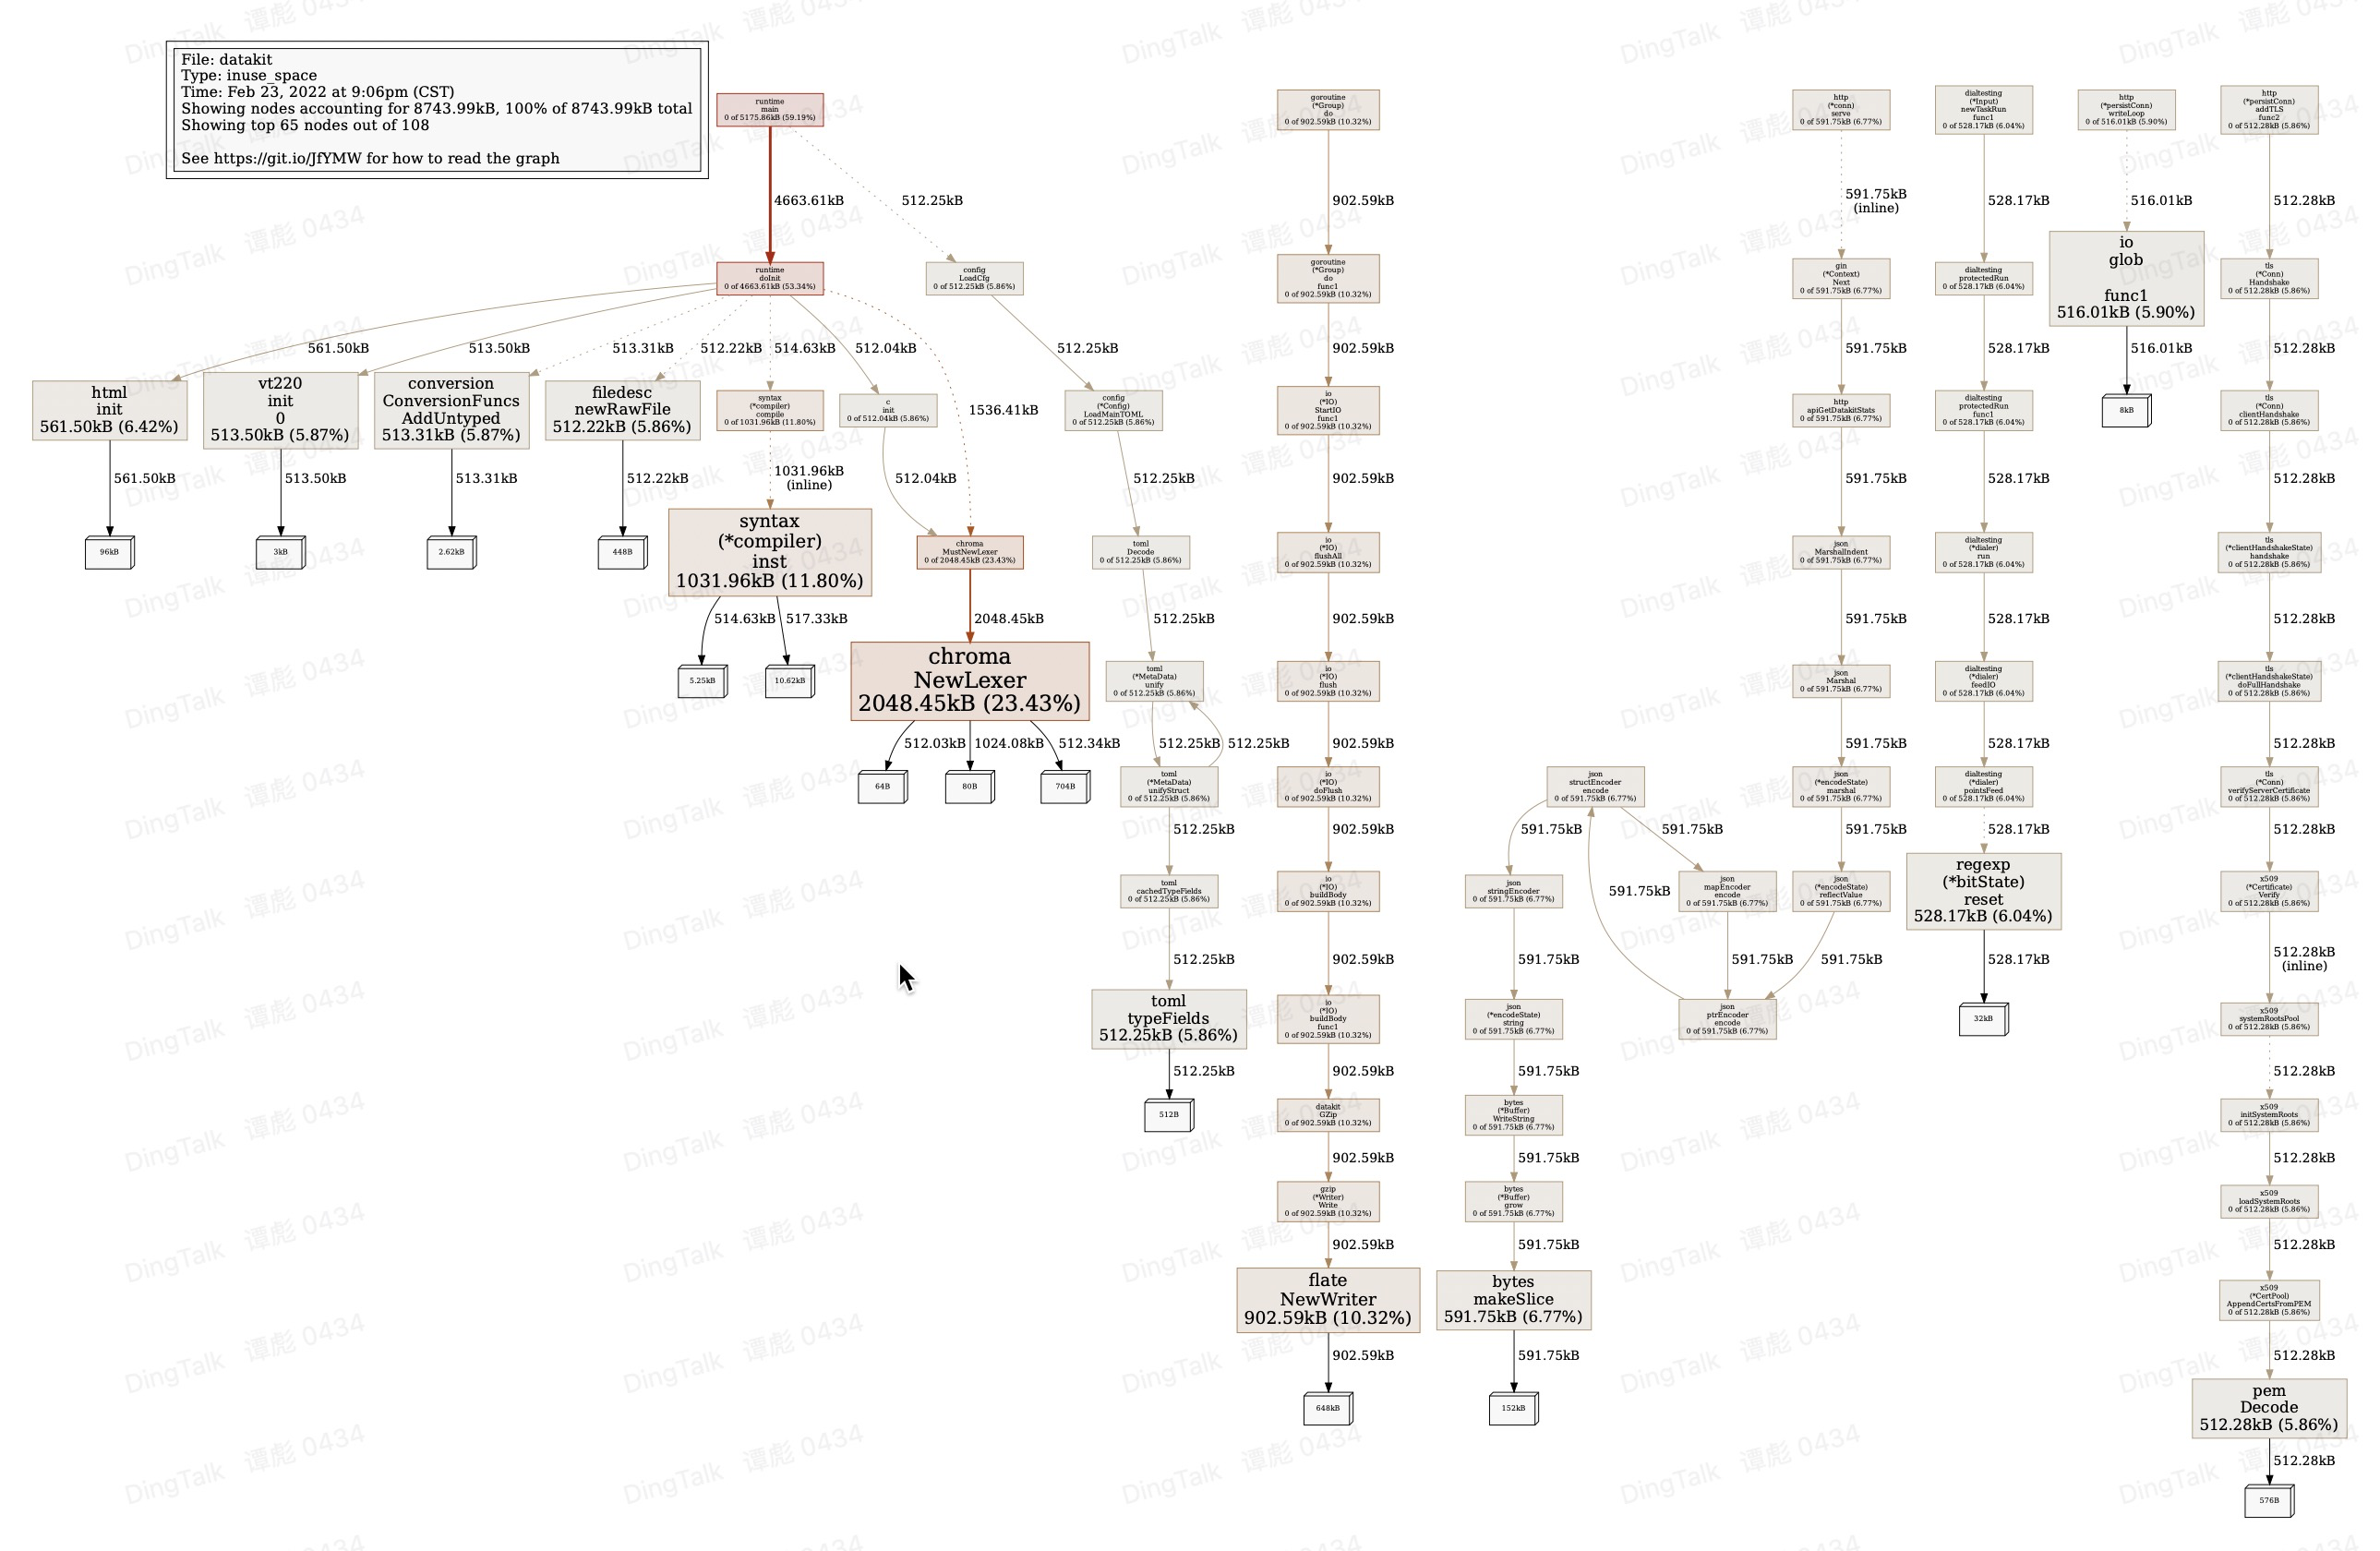
$ go tool pprof heap
File: datakit
Type: inuse_space
Time: Feb 23, 2022 at 9:06pm (CST)
Entering interactive mode (type "help" for commands, "o" for options)
(pprof) top                            <------ View top 10 memory hot spots
Showing nodes accounting for 7719.52kB, 88.28% of 8743.99kB total
Showing top 10 nodes out of 108
flat  flat%   sum%        cum   cum%
2048.45kB 23.43% 23.43%  2048.45kB 23.43%  gitlab.jiagouyun.com/cloudcare-tools/datakit/vendor/github.com/alecthomas/chroma.NewLexer
1031.96kB 11.80% 35.23%  1031.96kB 11.80%  regexp/syntax.(*compiler).inst
902.59kB 10.32% 45.55%   902.59kB 10.32%  compress/flate.NewWriter
591.75kB  6.77% 52.32%   591.75kB  6.77%  bytes.makeSlice
561.50kB  6.42% 58.74%   561.50kB  6.42%  gitlab.jiagouyun.com/cloudcare-tools/datakit/vendor/golang.org/x/net/html.init
528.17kB  6.04% 64.78%   528.17kB  6.04%  regexp.(*bitState).reset
516.01kB  5.90% 70.68%   516.01kB  5.90%  io.glob..func1
513.50kB  5.87% 76.55%   513.50kB  5.87%  gitlab.jiagouyun.com/cloudcare-tools/datakit/vendor/github.com/gdamore/tcell/v2/terminfo/v/vt220.init.0
513.31kB  5.87% 82.43%   513.31kB  5.87%  gitlab.jiagouyun.com/cloudcare-tools/datakit/vendor/k8s.io/apimachinery/pkg/conversion.ConversionFuncs.AddUntyped
512.28kB  5.86% 88.28%   512.28kB  5.86%  encoding/pem.Decode
(pprof)
(pprof) pdf                            <------ Output as pdf, that is, profile001. pdf will be generated in the current directory
Generating report in profile001.pdf
(pprof)
(pprof) web                            <------ View it directly in the browser, and the effect is the same as PDF
You can see the allocation of objects by
go tool pprof -sample_index=inuse_objects heap, and consultgo tool pprof -helpfor details.
In the same way, you can view the total allocated memory pprof file allocs. The effect of PDF is roughly as follows:
For more ways to use pprof, see here.
DataKit Accessibility
In addition to some of the accessibility features listed in the official document, DataKit supports other features that are used primarily during development.
Check Sample Config is Correct
datakit check --sample
------------------------
checked 52 sample, 0 ignored, 51 passed, 0 failed, 0 unknown, cost 10.938125ms
Export Document
Exports the existing DataKit document to the specified directory, specifies the document version, replaces the document marked TODO with - and ignores the collector demo.
man_version=`git tag -l | sort -nr | head -n 1` # Get the most recently released tag version
datakit doc --export-docs /path/to/doc --version $man_version --TODO "-" --ignore demo
Component Health Integration
Collectors can register component instances through internal/health and report whether they are alive or have failed to recover through the common Reporter interface. A component must unregister its instance when it exits. /v1/health exposes the combined result; Prometheus metrics should not be added solely for liveness decisions. Only components that cannot recover without restarting DataKit should register.