Management
Administrators
On the Settings > Administrators page, you can search for, add, modify, and disable/enable all administrator accounts.
Administrator account roles are currently divided into two types: Administrator and Developer:
- Administrator: Has all management permissions, can log in to the management backend and the DataFlux f(x) development platform.
- Developer: Can only log in to the DataFlux f(x) development platform.

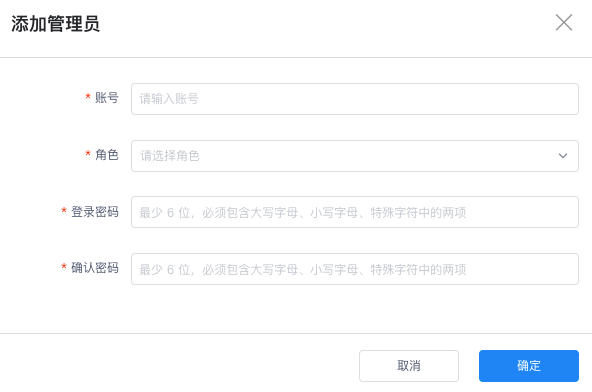
Add Administrator
On the Settings > Administrators page, click Add Administrator in the upper right corner. In the pop-up dialog, fill in the administrator account information, select the role permissions, enter the password, and click OK to add a new administrator.
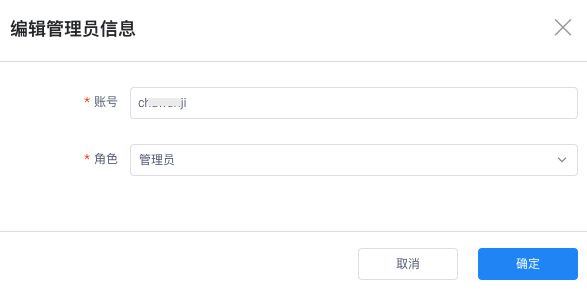
Modify
On the Settings > Administrators page, click Modify on the right side of the account to enter the Edit Administrator Information page. You can modify the administrator account and role permissions.
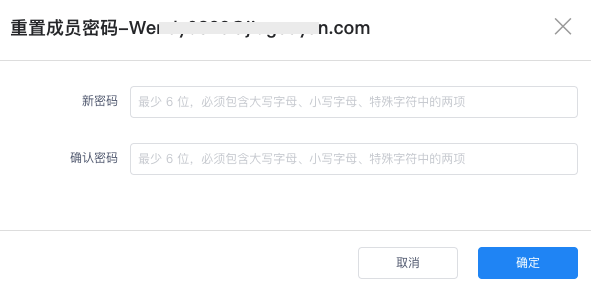
Reset Password
On the Settings > Administrators page, click Reset Password to change the password for that administrator account.
Disable/Enable Member
On the Settings > Administrators page, click Disable or Enable on the right side of the account to toggle the account status of that administrator.
Note: Once the currently logged-in account is disabled, the login account information becomes invalid, and you are automatically logged out of the management backend. It will be impossible to log back into the management backend until the account is re-enabled.
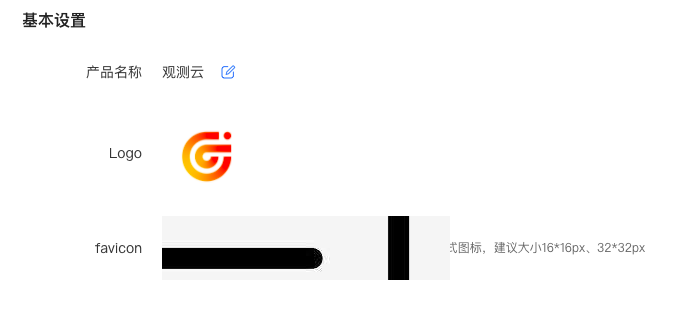
Basic Information
On the Guance Management Backend Settings > Basic Information page, you can customize settings such as the default language, product name, logo, and browser display icon.
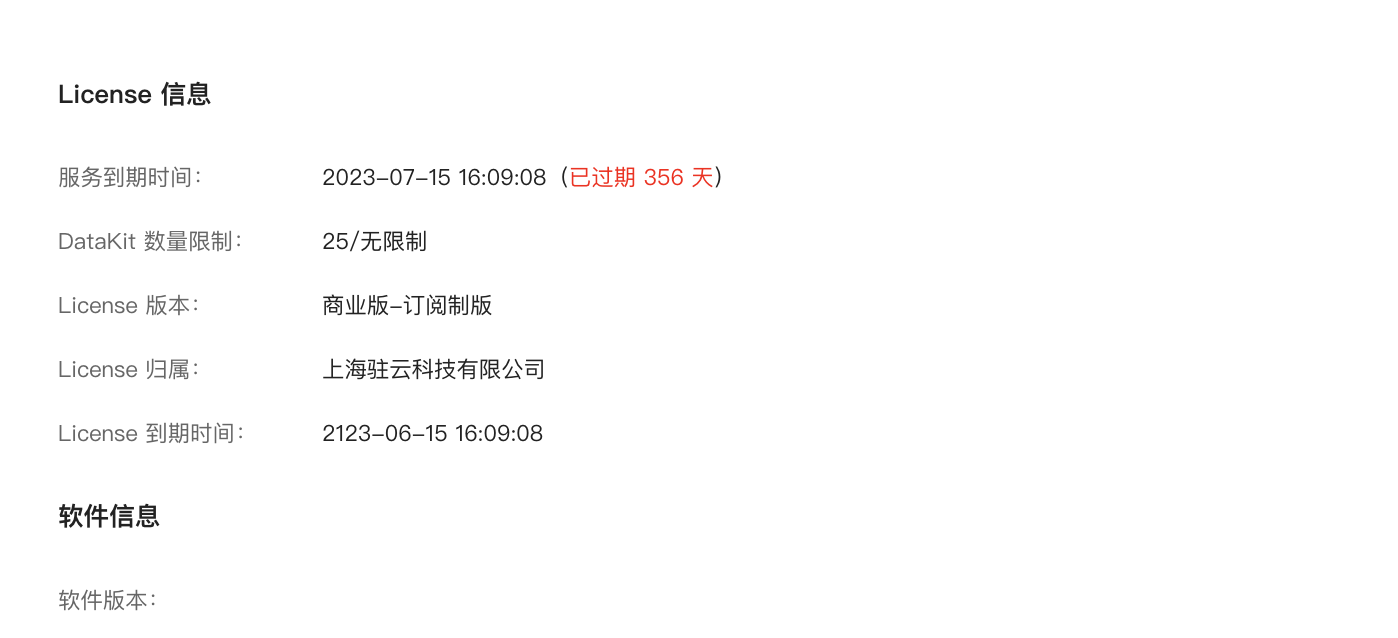
In addition, you can view the workspace's License information and software information, including its service expiration time, DataKit quantity limit, License version, attribution, and expiration time:
User Settings
On the Settings > User Settings page, you can change the password for the currently logged-in account.

Mapping Rules
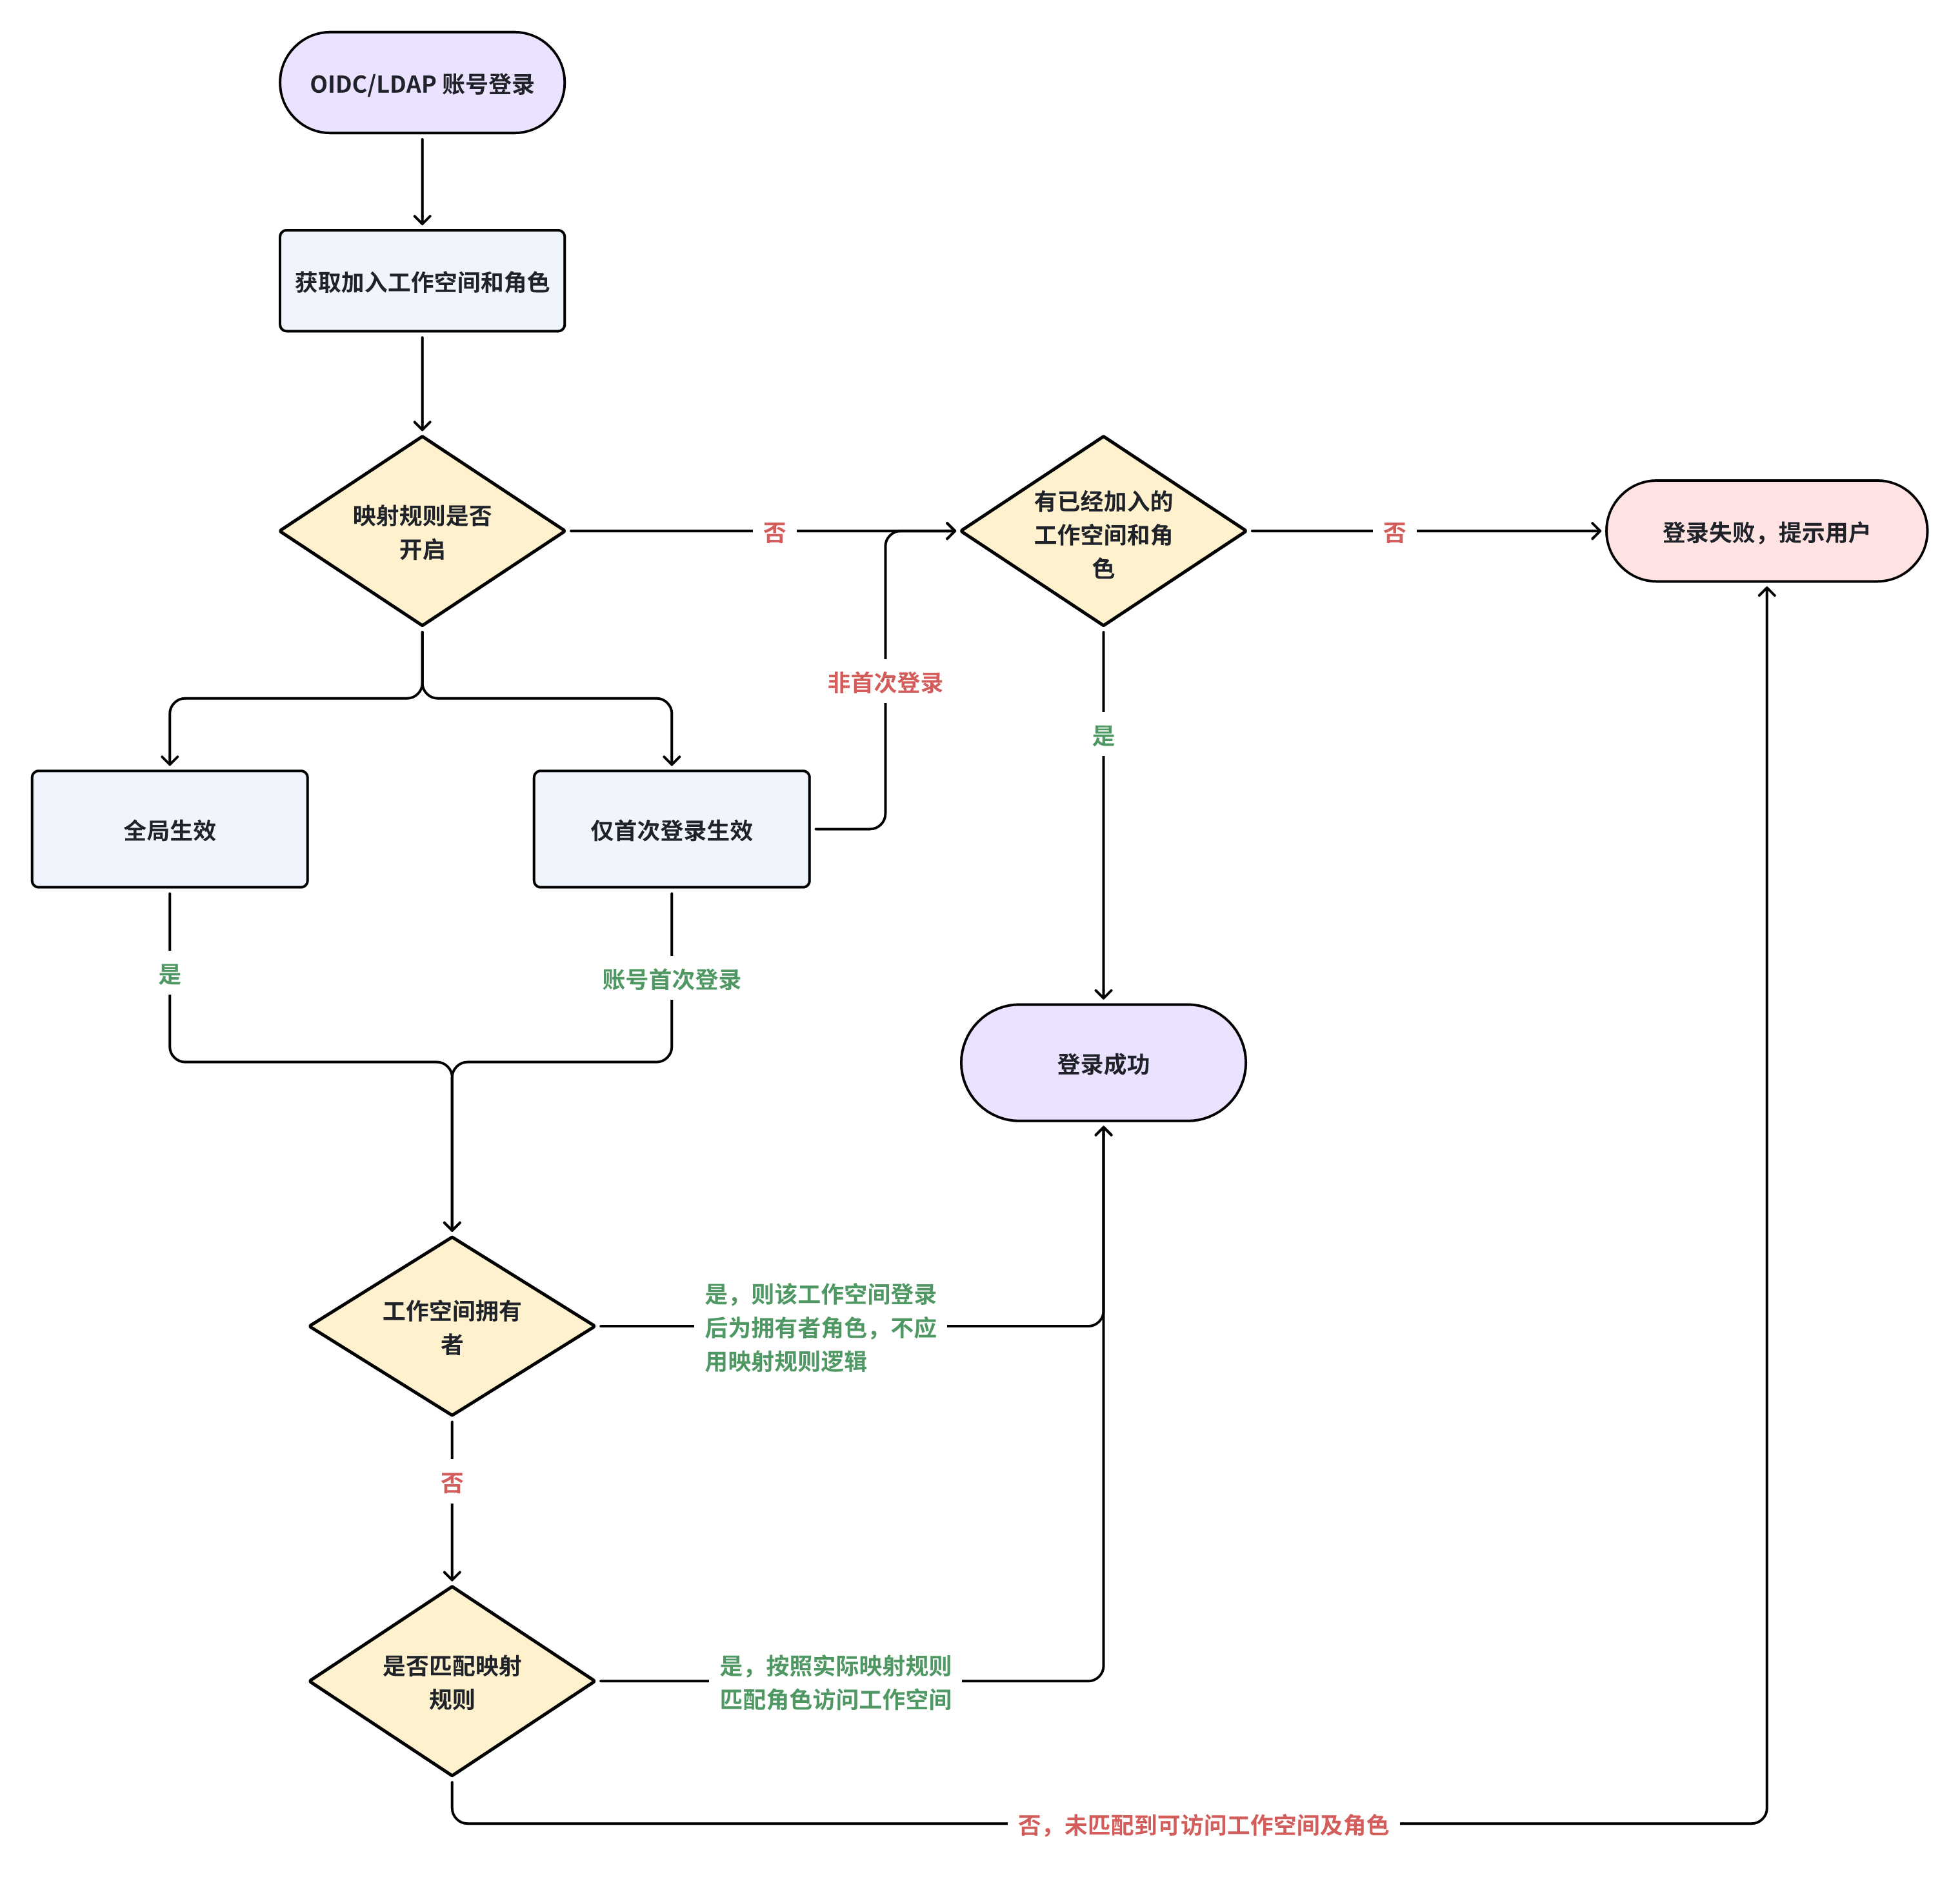
Guance Deployment Plan supports single sign-on (SSO) for applications using the OpenID Connect/OAuth 2.0/LDAP protocols and allows configuring mapping rules for such login accounts. Once mapping is enabled, enterprise employees can be dynamically assigned access permissions. Employees can access Guance based on their assigned role permissions.
When an SSO account is set as the workspace owner, note that:
The role of this account in this workspace is fixed as Owner, and it is not affected by mapping rule matches. Otherwise, access to the workspace is granted according to the actual mapping rule matches.
In addition to configuring mapping rules in the management backend, you also need to configure Keycloak SSO mapping rules. The mapping rules will only take effect after both configurations are complete.
Scope of Application
In Management > Mapping Rules, for the mapping rule application scope, you can choose Valid Only for First Login or Globally Valid:
Valid Only for First Login
When you enable this option, if a user logging in via SSO is doing so for the first time, they will be dynamically added to the workspace and assigned a role based on the mapping rules.
Note: SSO member accounts that have already logged in are not affected by the mapping rules.
Append Valid
Once enabled, accounts logging in via SSO will be assigned workspaces and roles according to the mapping rules, while their original workspaces and roles remain unchanged.
For example, if a member originally had the Standard role, and a new mapping rule grants the Administrator role, they will then possess both the Standard and Administrator roles.
Globally Valid
When you enable this option, user accounts logging in via SSO will be stripped of their current roles in the workspace. Roles will be dynamically assigned based on the attribute fields and values provided by the Identity Provider (IdP) side, matching the mapping rules. If no mapping rule is matched, the user account will be stripped of all roles and will not be allowed to log in and access the Guance workspace.
Note: Every login by the user will require going through the dynamic process of joining the workspace and assigning roles. Once the corresponding mapping rule is deleted in the management backend, the corresponding workspace becomes inaccessible to the user.
Not Enabled: Users logging in via SSO will continue to possess the roles previously assigned to their accounts. These roles are not affected by changes in assertions from the Identity Provider side.
Add Mapping
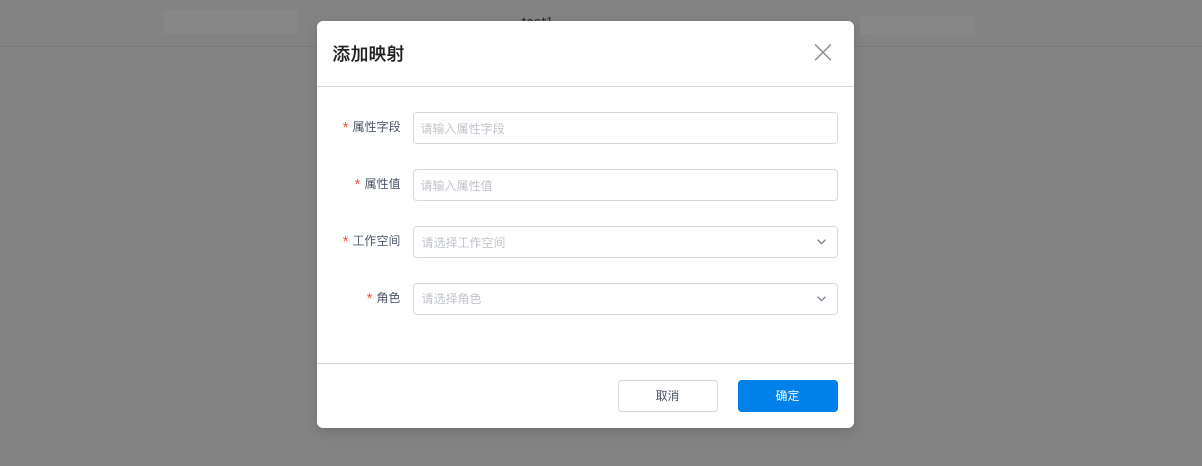
After configuring mapping rules, the management backend will add members to the corresponding workspace and assign the corresponding roles based on the mapping relationship. In Management > Mapping Rules, click Add Mapping.
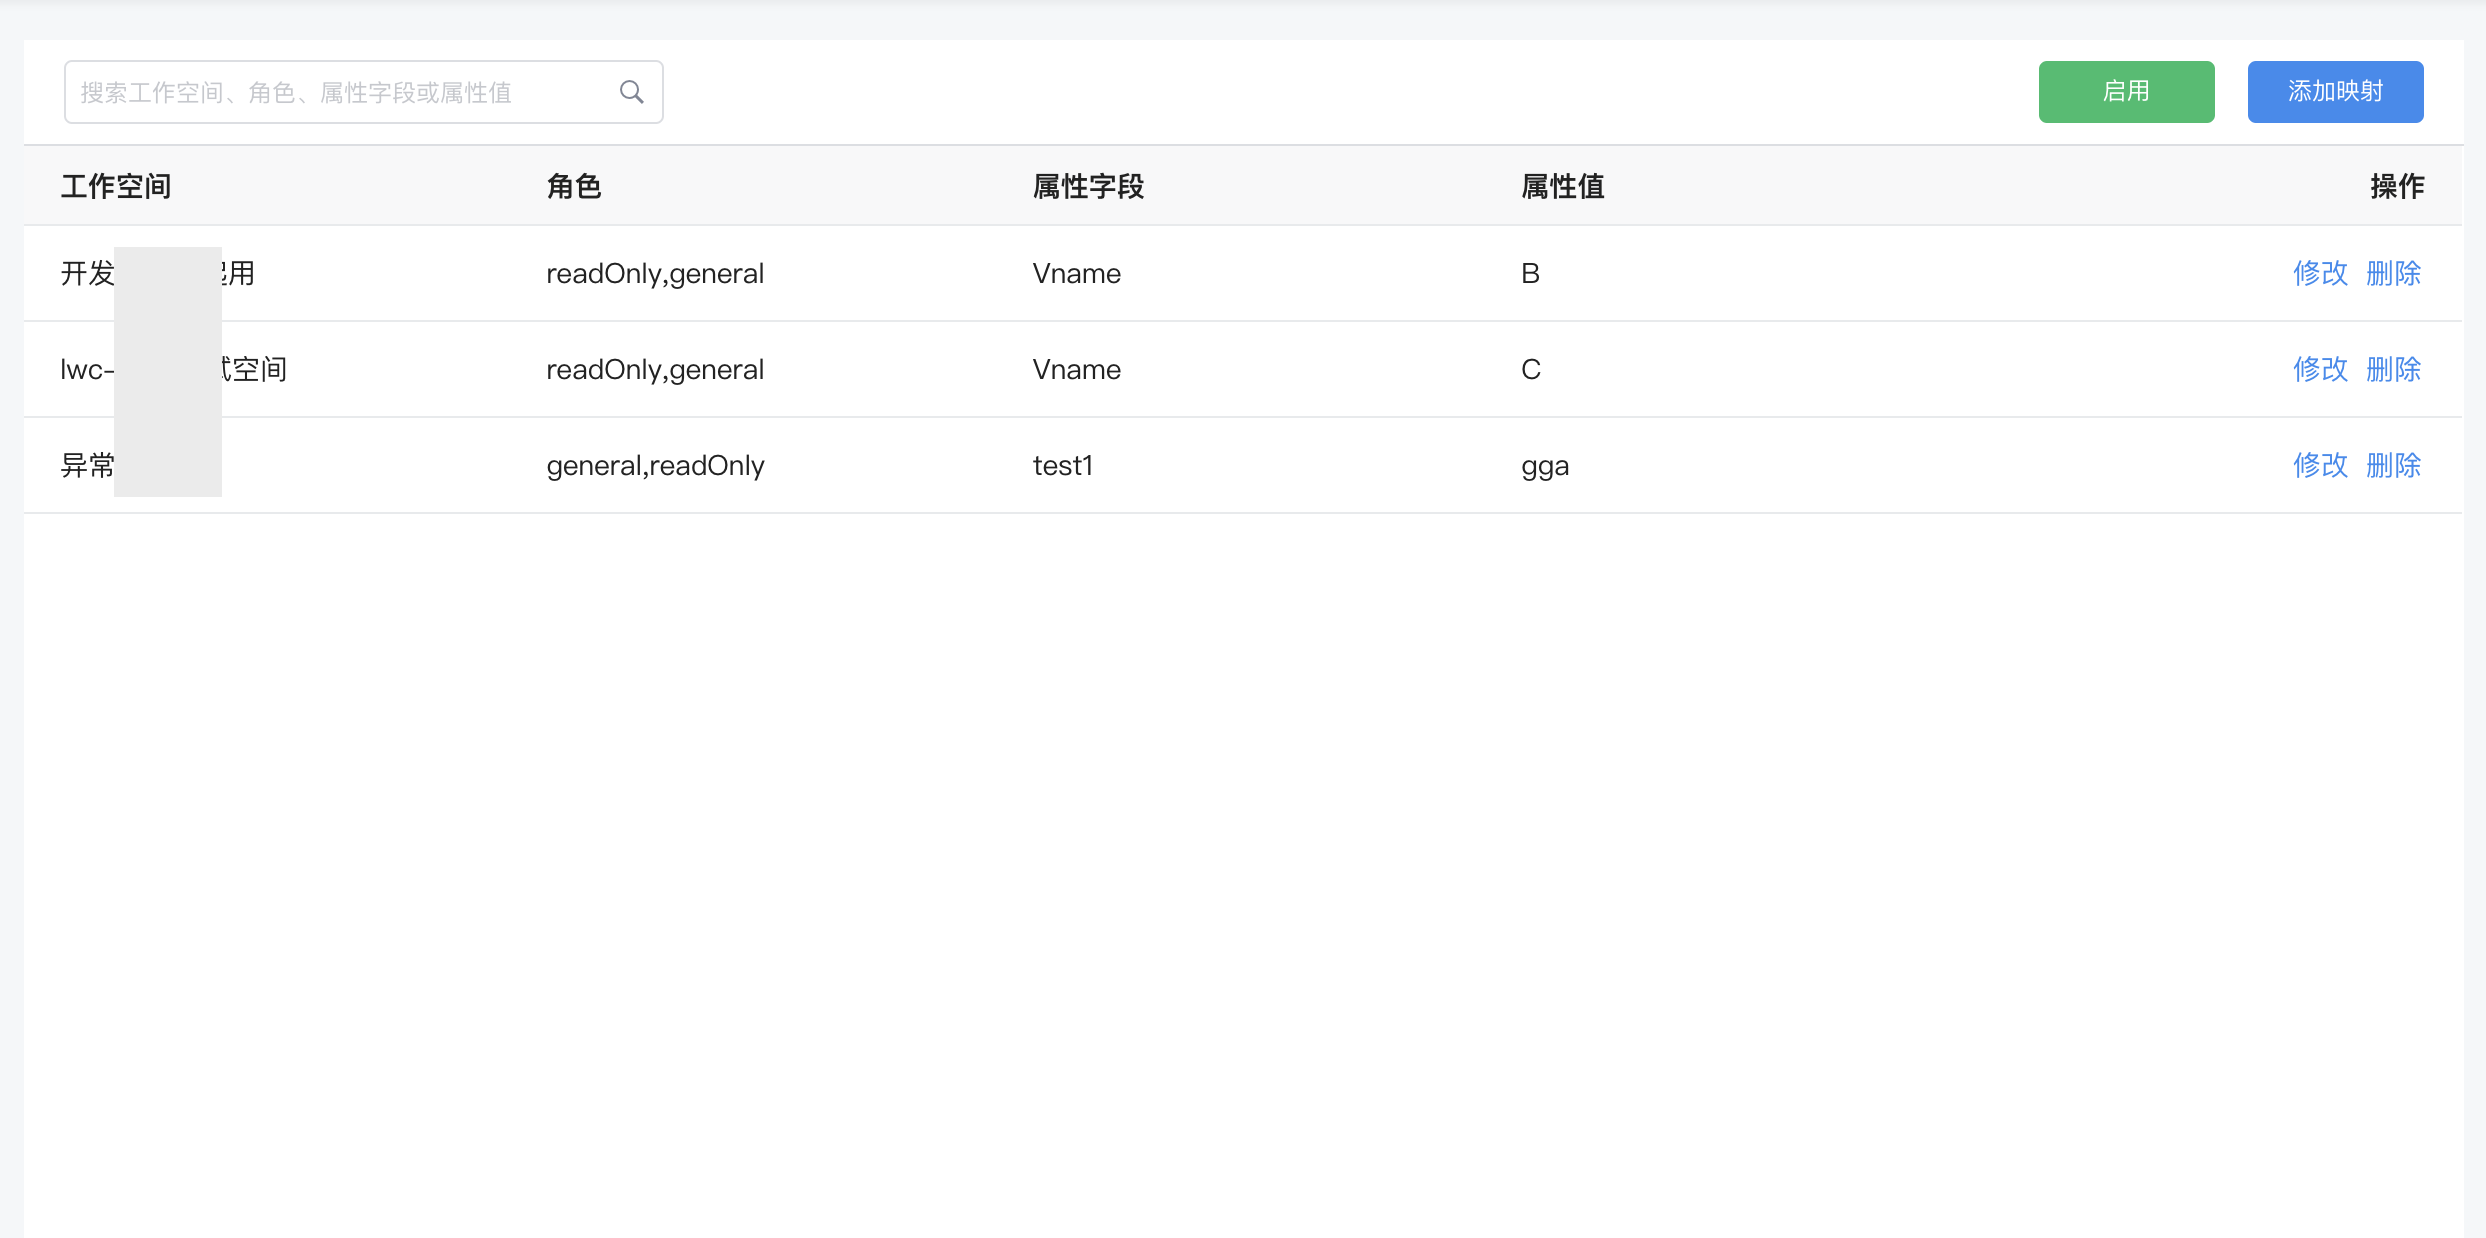
In the dialog for creating a new mapping, enter the Attribute Field and its Attribute Value that need to be mapped, select the Role, and click Save.
| Field | Description |
|---|---|
| Attribute Field/Attribute Value | The attribute field and its value configured in the mapping. These must exactly match the attribute field and value configured on the IdP account for the mapping validation to succeed. Upon successful validation, the account will be granted the role permissions corresponding to the mapping upon login via the IdP. |
| Workspace | All workspaces within the management backend. |
| Role | Guance supports four default member roles: Owner, Administrator, Standard, and Read-only. You can also create new roles in Role Management and assign permission scopes to these roles to meet the needs of different users. |
Search/Edit/Delete Mapped Roles
- Search: Supports filtering and viewing configured mapped roles by Workspace, Role, Attribute Field, and Attribute Value.
- Edit/Delete: Supports clicking the Edit/Delete button on the right to modify already configured mapped roles. Changes do not affect the roles and permissions of currently logged-in accounts; they only affect subsequent user logins.

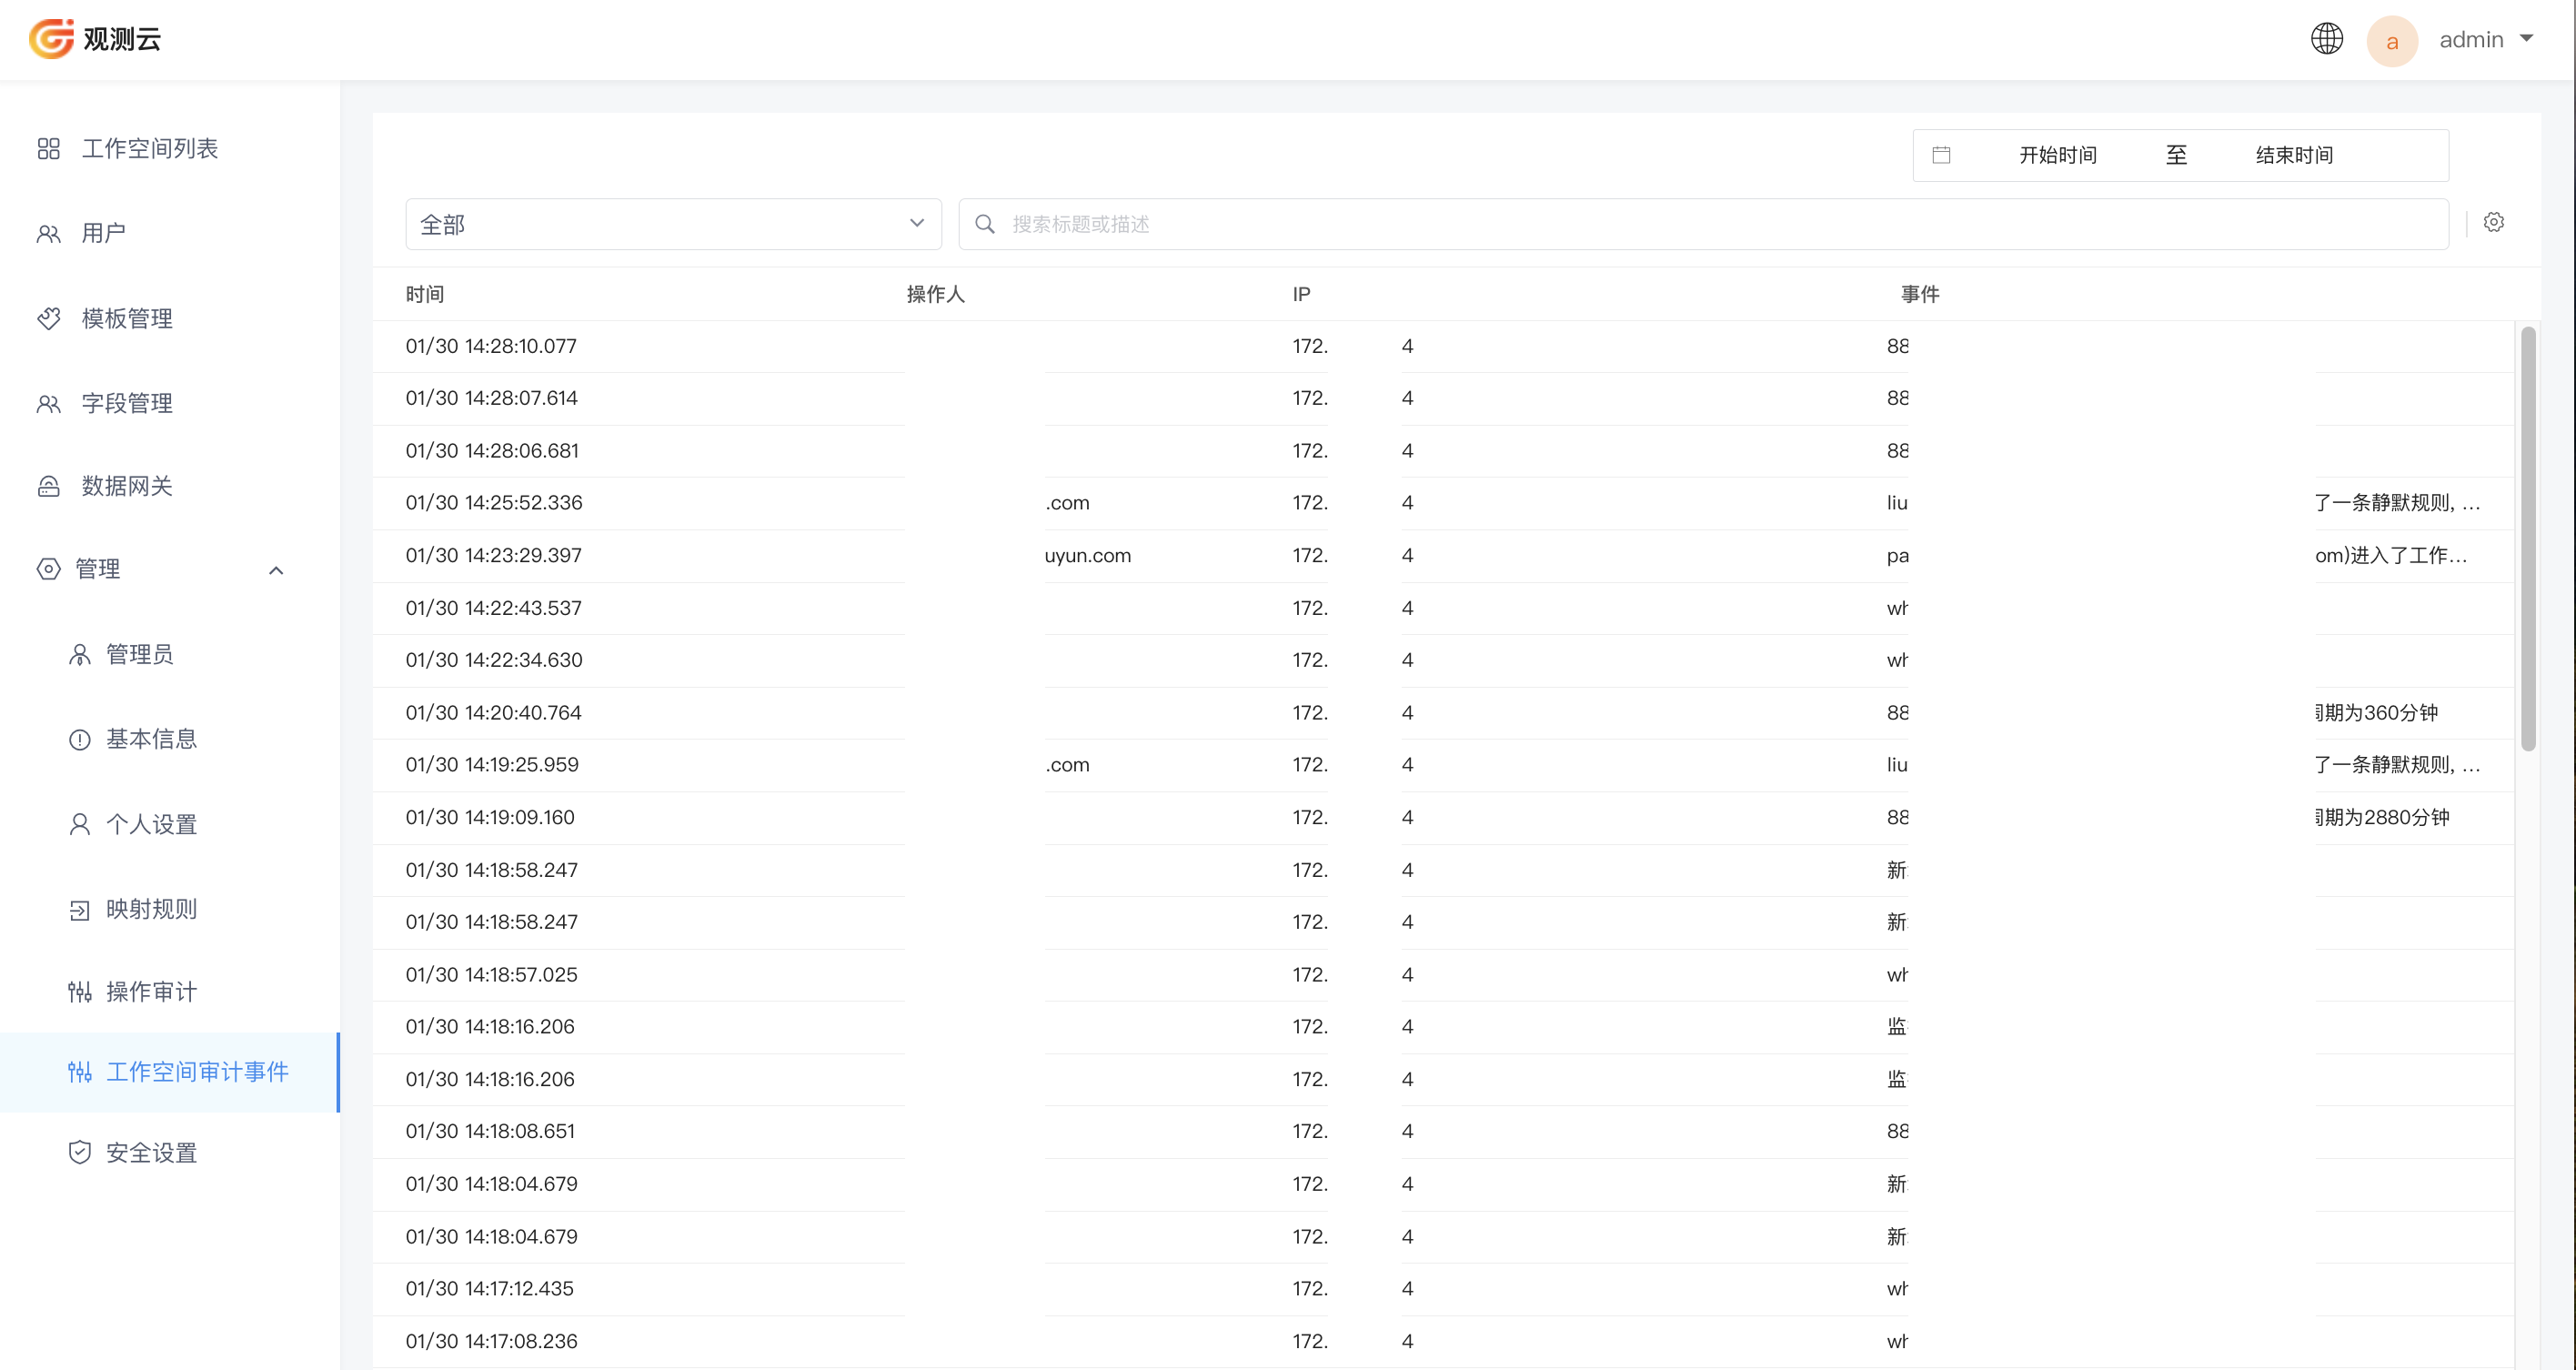
Operation Audit
Go to Management > Operation Audit to view all audit events.
Time Widget
By default, all audit events are listed automatically. You can add a time range for further filtering.
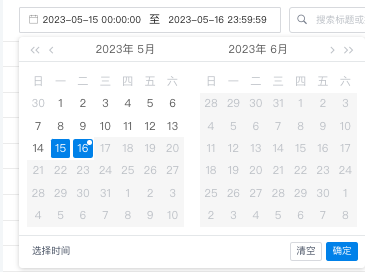
After selecting a date range, all audit events within that time period are listed according to the selected range. The default start time is 00:00:00, and the default end time is 23:59:59.
- After selecting the time range, click Select Time to customize the time range.
- Click Clear to remove the time filter criteria.
Search & Export
| Operation | Description |
|---|---|
| Search | You can search based on the audit event title or description content. |
| Export | Click the button to export the current audit events as a CSV file. |
Audit Event Details Page
Click on a specific event in the list to expand its details page. On the details page, you can view the attributes and content of that audit event.

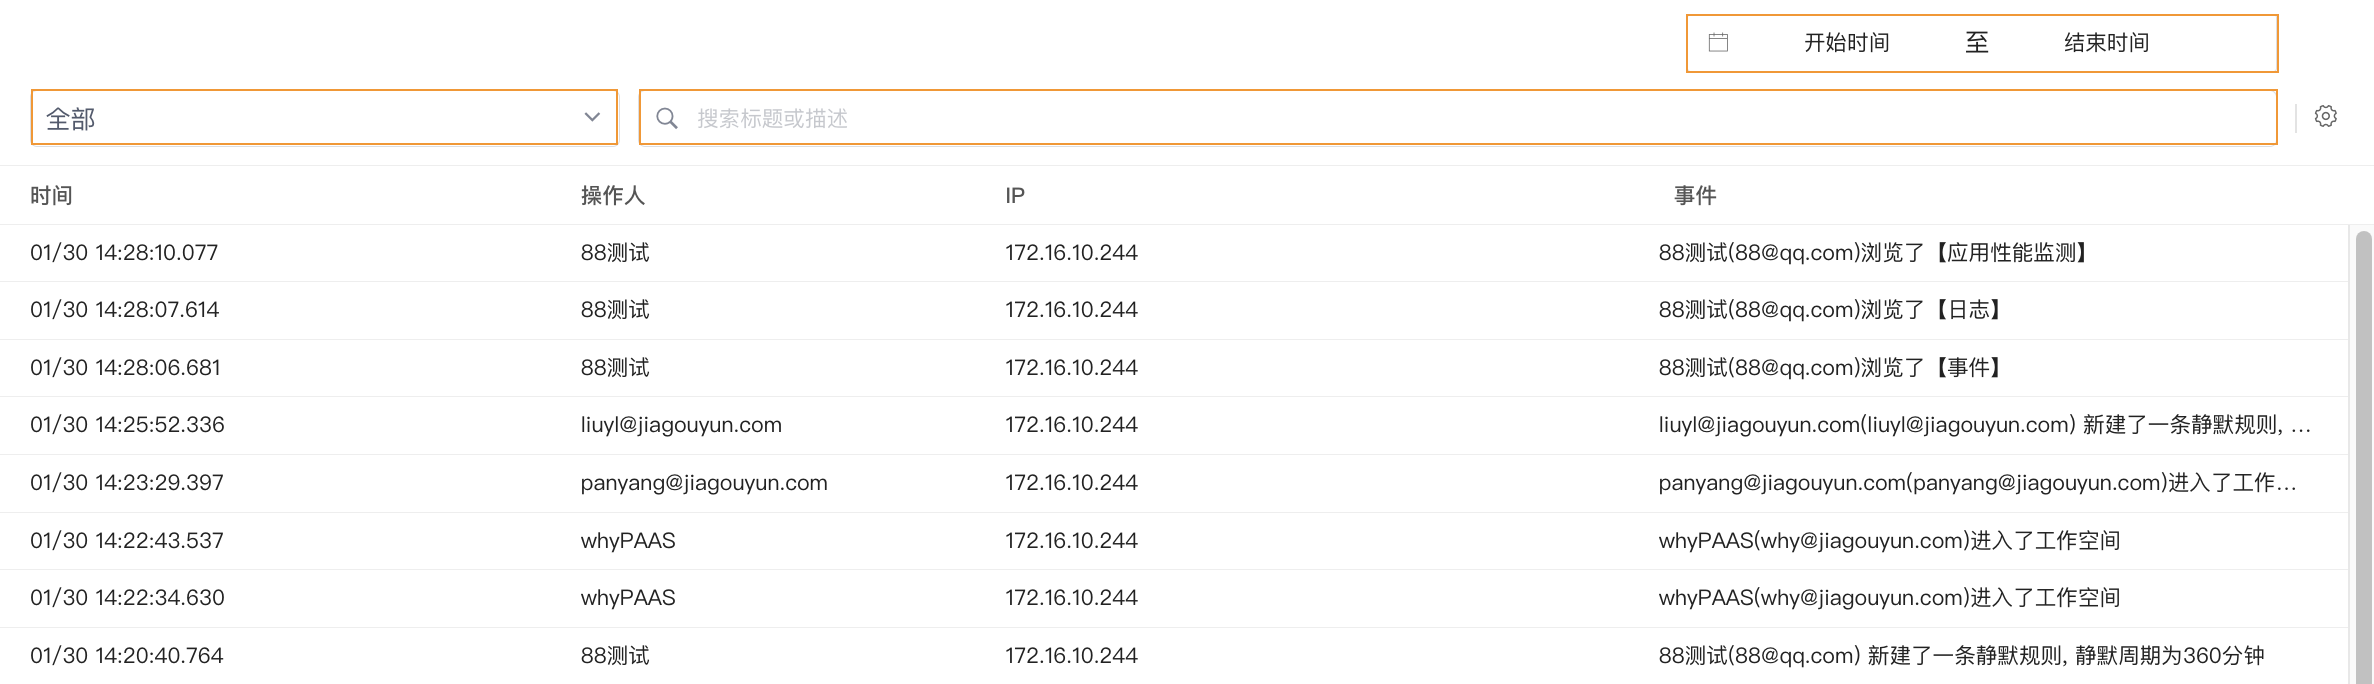
Workspace Audit Events
You can view audit events for all workspaces.
You can filter events based on workspace or time range, or directly search by entering relevant titles and descriptions:
Security Settings
Password Rotation Policy
To further enhance the security of the management backend, the Guance Deployment Plan provides a password rotation policy. By default, the Password Rotation Policy is Not Enabled.
You can choose the password validity period as needed: 3 months, 6 months, or 12 months; it is disabled by default.
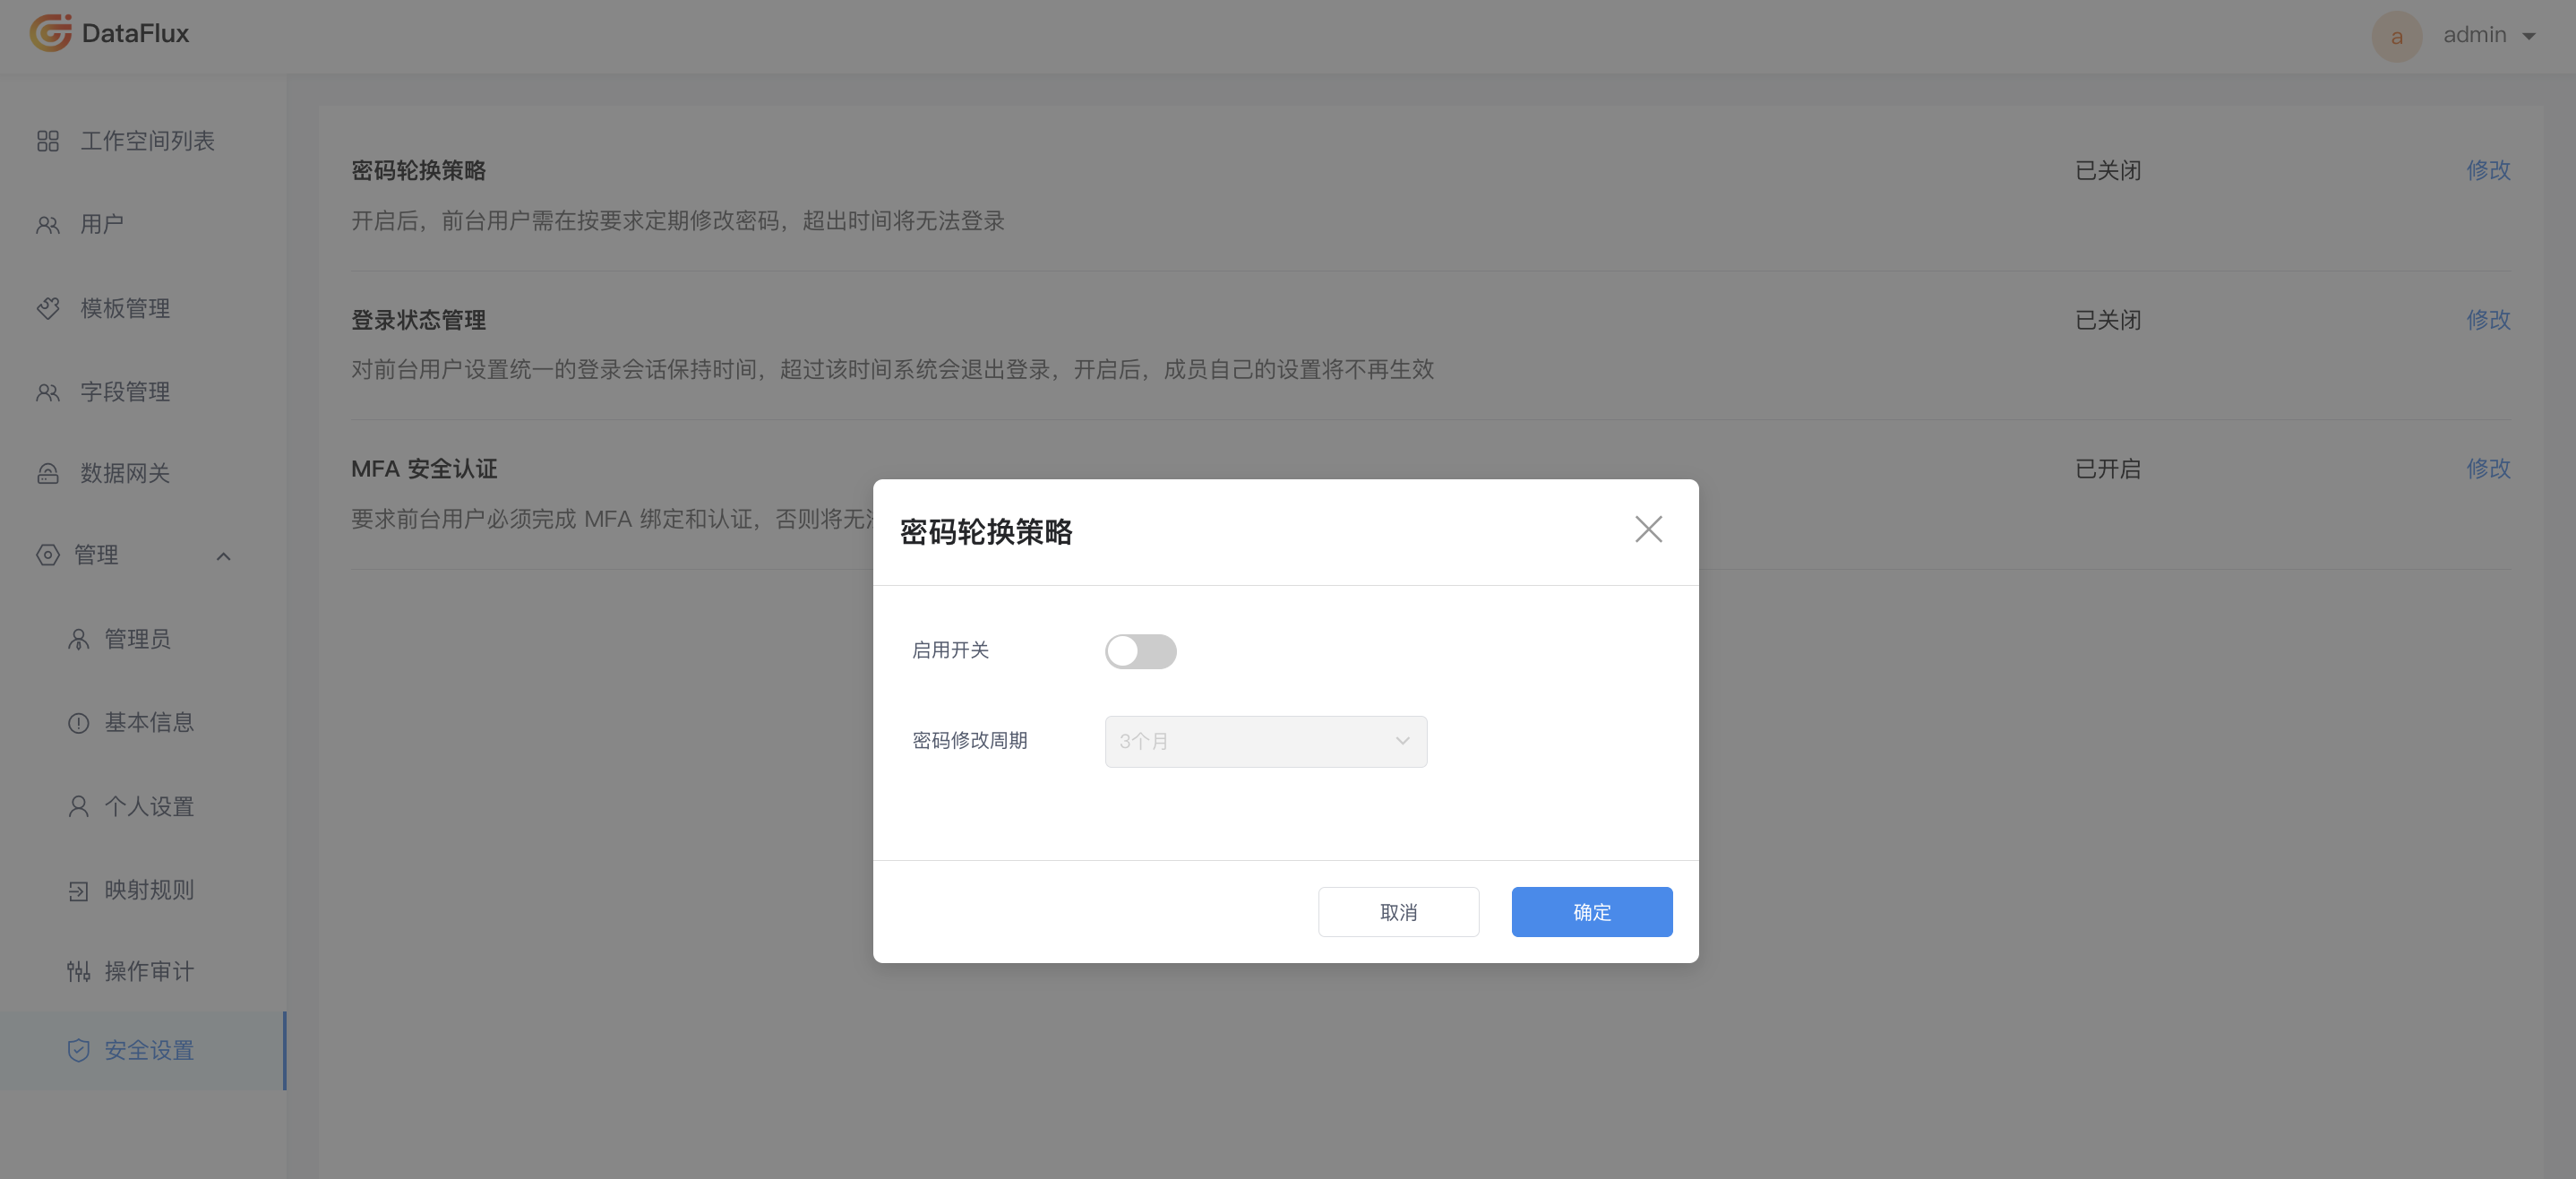
Note: 7 days before the password expires, a reminder email about the management backend password expiration will be sent to you daily. You can reset the password via the link in the email. The new password cannot be the same as the current password.
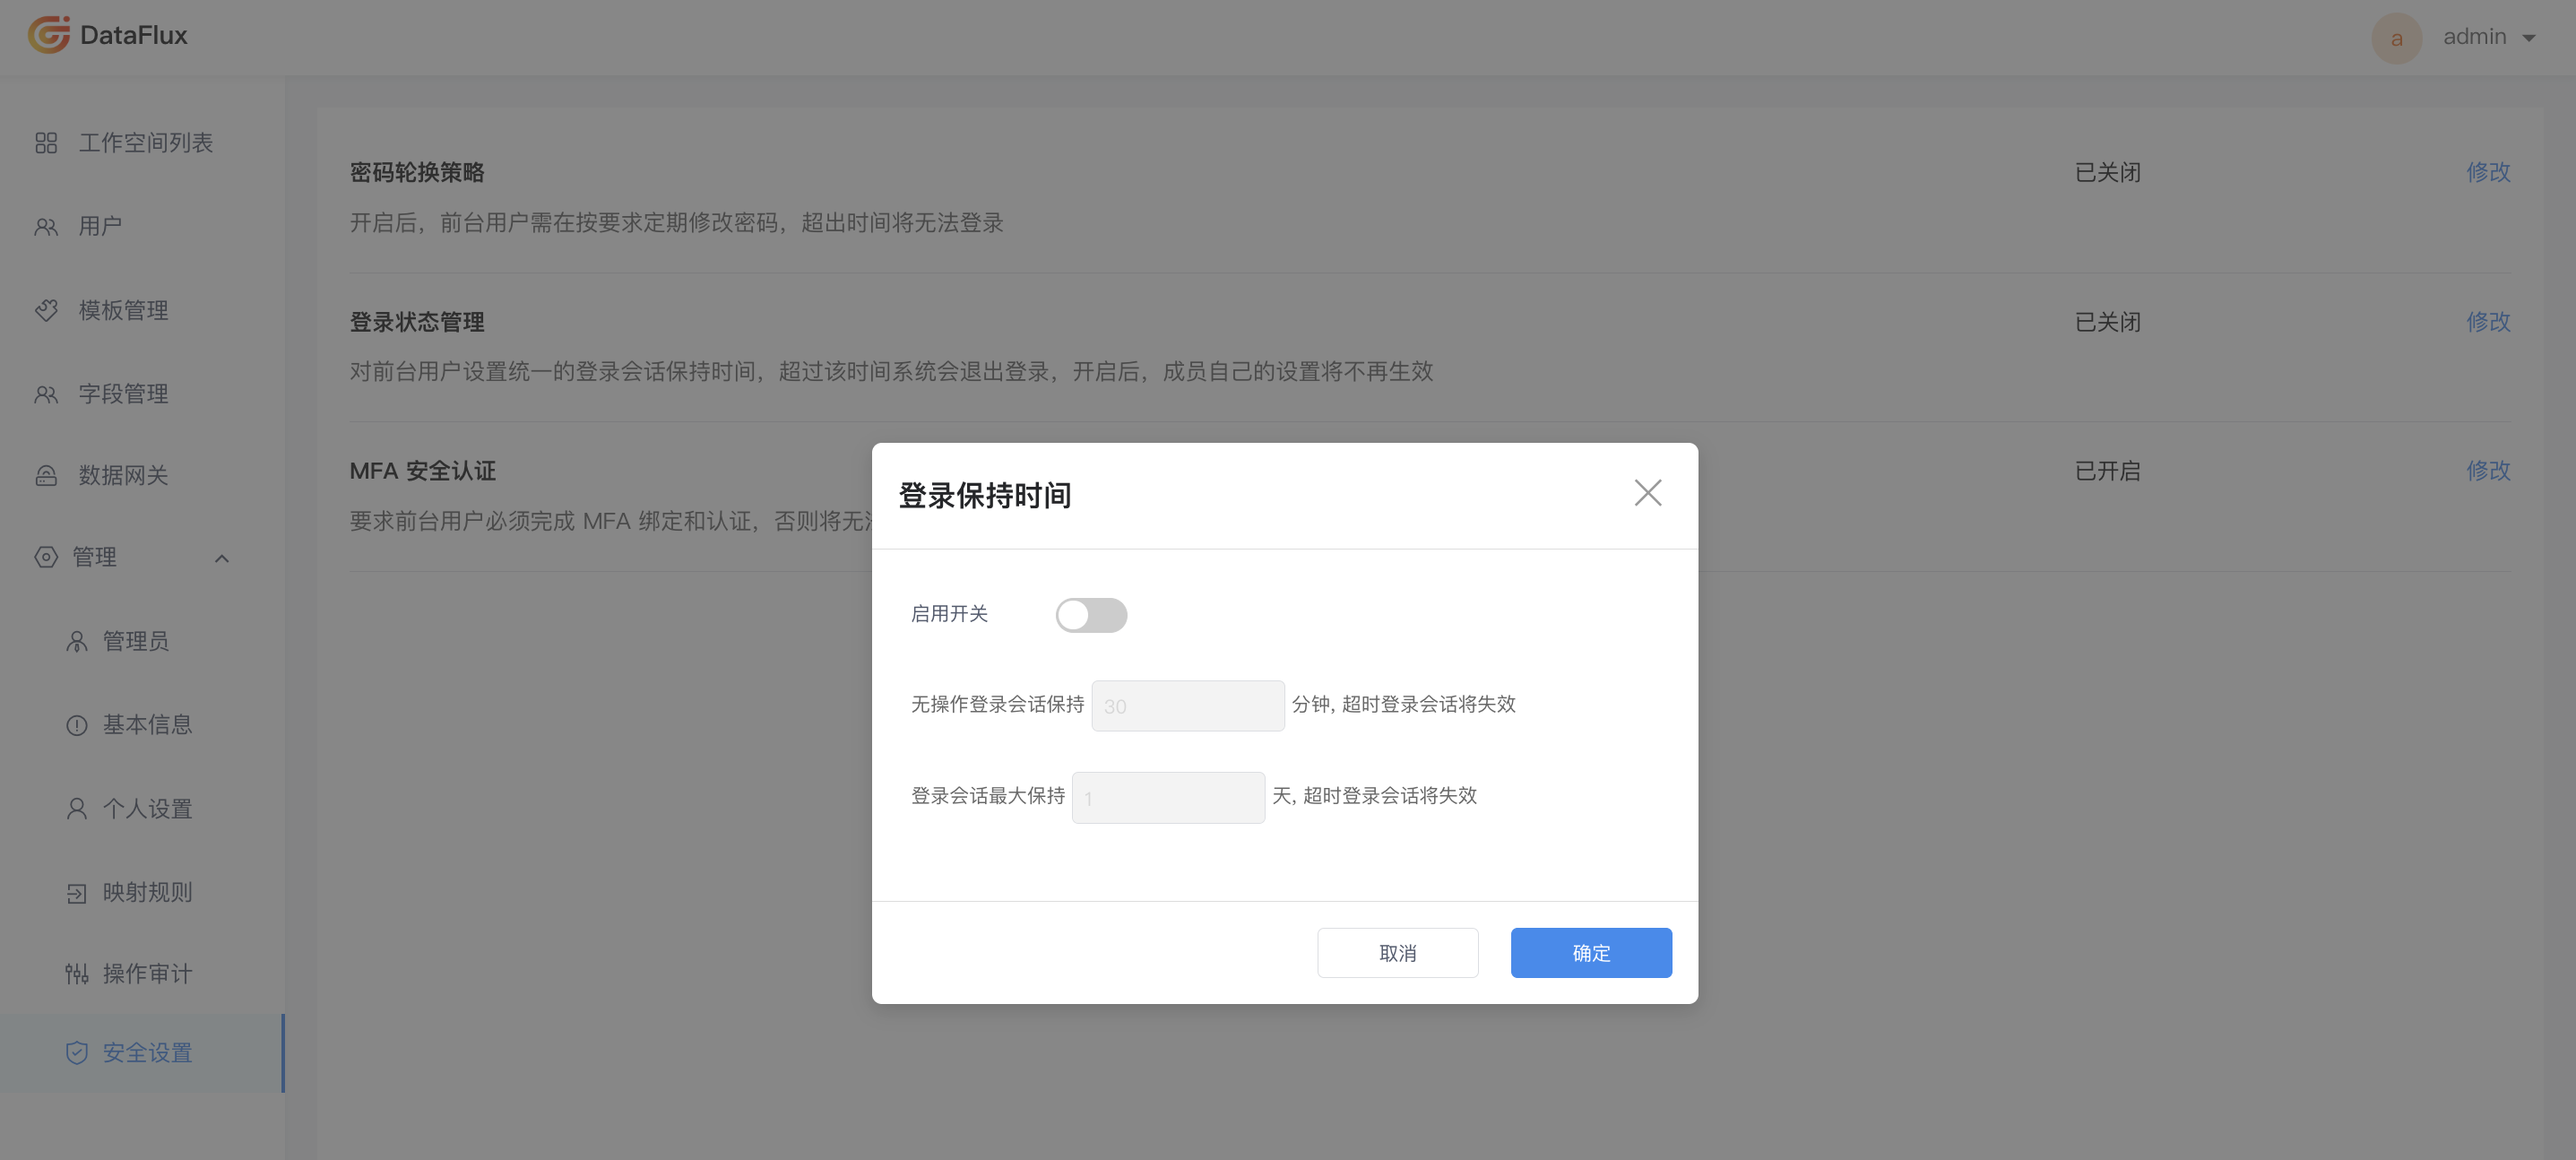
Login Status Management
Guance supports setting a unified login session duration for foreground users. When disabled, members within the foreground workspace can freely configure their session duration. When enabled, members cannot freely modify it and must adhere to the settings configured here.
Under Login Session Duration, click Modify to change the default login session settings, including the idle session timeout and the maximum session duration. Once set, login sessions will expire upon timeout.
- Idle Session Timeout: Supports a range from 30 to 1440 minutes, default is 180 minutes.
- Maximum Session Duration: Supports a range from 1 to 7 days, default is 7 days.
Console/Management Backend MFA Security Authentication
Guance Workspace and Management Backend both provide mandatory two-factor MFA (Multi-Factor Authentication) security management, adding an extra layer of security beyond usernames and passwords. After enabling MFA authentication, you will need to undergo a secondary verification during login, thereby helping to improve your account security.
If secondary verification is not desired, you can check "Trust this device" to simplify your login process.
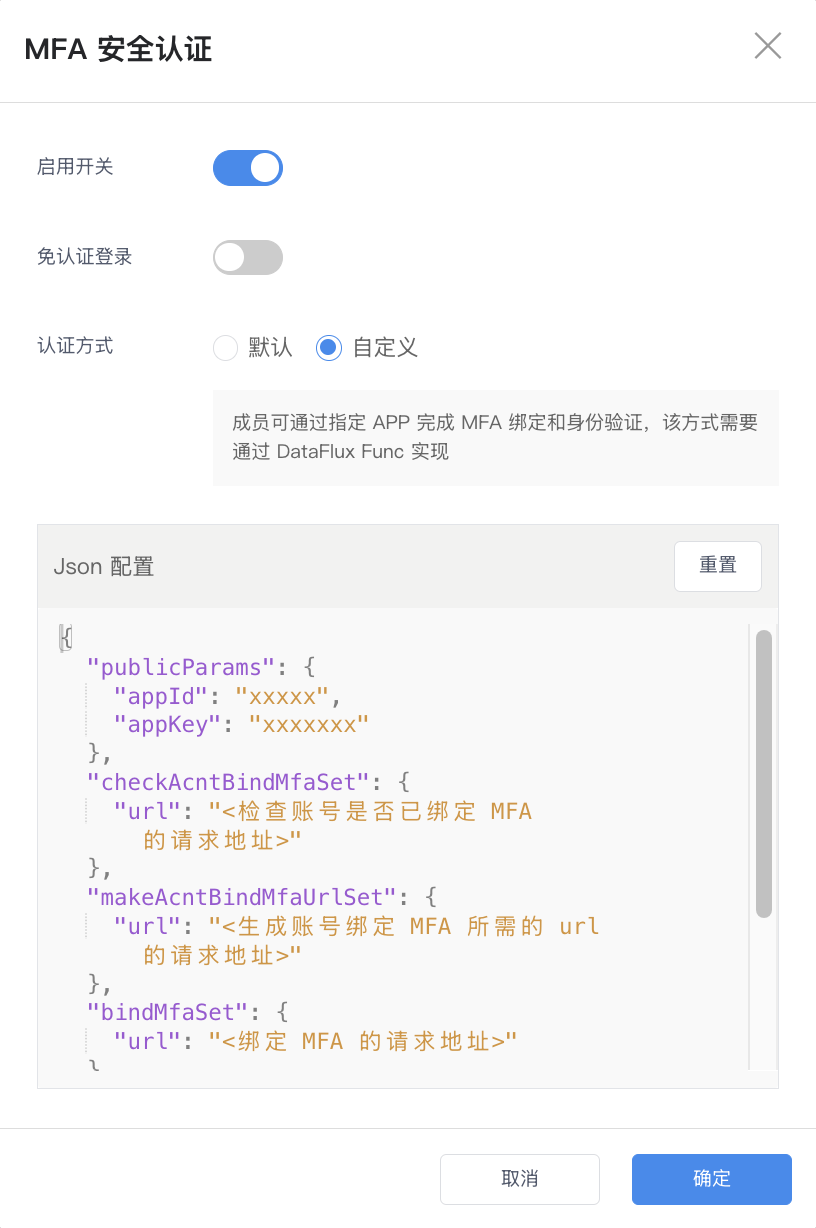
- Default: Members can use any authenticator APP to complete MFA binding and authentication.
- Custom: Members must use a specified APP to complete MFA binding and authentication. This method needs to be implemented through DataFlux Func. In custom MFA mode, when a user unbinds MFA, the MFA for that account on the Guance side is also unbound synchronously.
Independent Alarm Notification Sending
Guance supports configuring Independent Alarm Notification Sending for monitor detection results when alarm aggregation is disabled.
In non-aggregated alarm notification mode, alarm events are combined into one notification and sent to the corresponding notification target every 20 seconds. Supports enabling/disabling independent alarm notification sending, configuring whether alarm notifications are merged into one message.
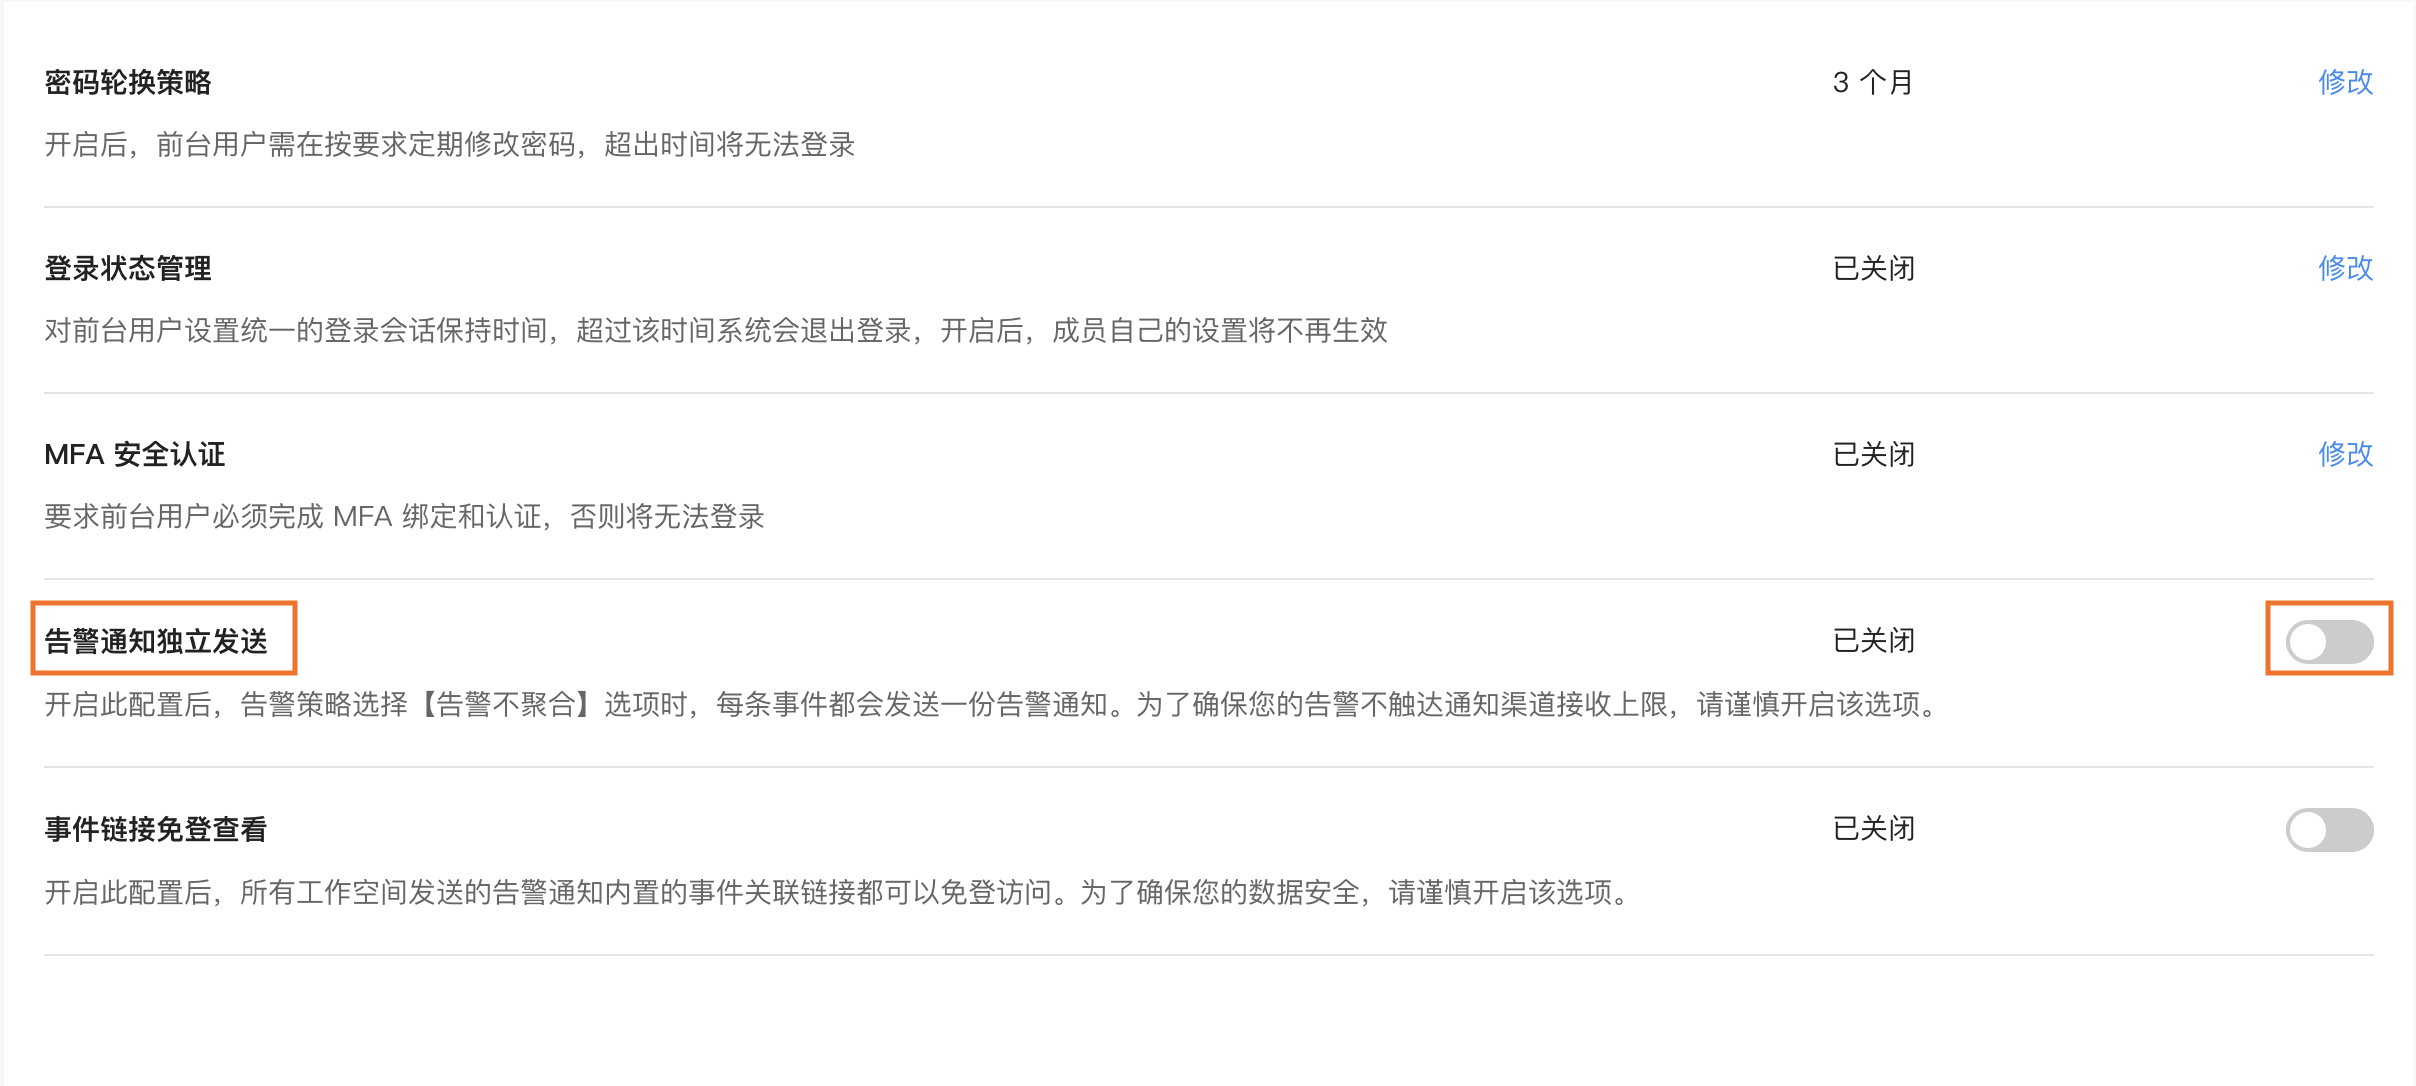
Event Link Viewing Without Login
Supports viewing jump links embedded in alarm notifications through public sharing. You can configure Event Link Viewing Without Login. After enabling this configuration, all event links embedded in alarm notifications sent from any workspace can be accessed without logging in. After disabling, viewing permissions for all historically sent no-login links will become invalid.
Login Method Management
Currently, three login methods are supported to access the Guance Console: Local Account, LDAP Account, and OIDC. Click Modify to manage user account login channels.
- Local Account: Refers to accounts created by Registering for Guance.
- LDAP Account
- OIDC: Refers to Single Sign-On (SSO) using the OpenID Connect protocol. Refer to:
DataKit Management
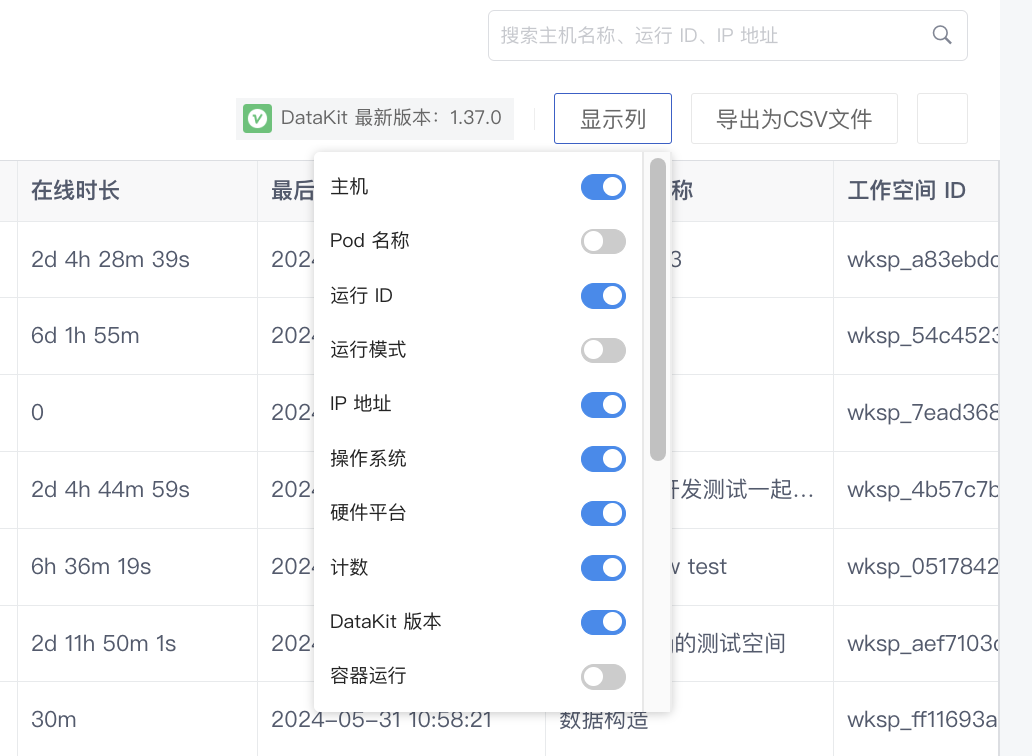
On this page, administrators can view information about hosts that have ever installed DataKit on the current platform, including the Run ID, IP address, operating system, hardware platform, count, DataKit version, etc., under different workspaces.
Note: If DataKit is running in gateway mode, the [Count] here does not follow physical counting but is counted based on the number of CPU Cores.
For this list, you can manage it through the following operations:
- Click on Workspace, DataKit Version for dropdown filtering.
- Use the search bar to directly enter host name, Run ID, IP address, and other information to locate data.
- Check "Show only online hosts" and filter hosts that have reported data within the selected time period (Last 10 minutes, Last 15 minutes, Last 30 minutes, Last 1 hour, Last 3 hours).
- Export the DataKit inventory data for subsequent issue backtracking or use as a basis for expansion reports, etc.
- The displayed information in the specific list can be adjusted through the Display Columns:
Note: If the number of DataKits used on the current platform exceeds the license limit, pay attention to the DataKit usage in each workspace. Also, in this case, management backend and workspace login users need to perform subsequent renewal operations, and it will be temporarily impossible to upgrade the Guance version. If more DataKit usage is needed, contact your account manager to purchase additional quantities.
Global Configuration
Incident Level Management
You can uniformly manage the Incident level configurations for all workspaces from this entry.
Note: After enabling global configuration, the Incident level configurations at the workspace level will no longer apply.

Click Add Level, select the level color block, enter the level name and its description, and it will be created successfully.
For levels, you can perform the following operations:
- Edit: Click the edit button to modify the color, name, and description of the current custom level.
- Delete: Click to delete the current level. After deletion, if this level is applied in rules like monitors, intelligent monitoring, or automatic issue discovery within any workspace, the level for newly created issues will be set to empty.
System Announcement Management
- Enter the announcement title.
- Enter the announcement content.
- Select the validity period of the announcement.
- Confirm.
System announcements are at the platform level. The platform limits the display of announcements to 10. Please manage the number and content of announcements reasonably to avoid affecting content presentation.
After creating the announcement, return to the list page, you can publish it as needed. In addition, for created announcements, you can also perform the following operations:
- Quickly edit the announcement name.
- Modify the announcement again.
- Delete the current announcement.
Note:
- Expired announcements do not support publishing or revoking operations, but they can still be edited or deleted.
- If the start time of an announcement has arrived but it has not been manually published, the announcement will not be displayed on the foreground.
Global DCA Configuration
DCA is the DataKit Online Management Platform. On this platform, you can view the running status of DataKit and uniformly manage and configure collectors, blacklists, and Pipelines.
After enabling this configuration, the DCA address configured here will be synchronized to all workspaces, overwriting the originally configured DCA address in the workspaces.
- Enable the switch.
- Enter the new DCA access address.
- Click OK.
After enabling the new configuration here, clicking the "Configure DCA Address" button in a workspace will automatically populate the address with the one configured in the management backend, and it will be uneditable.
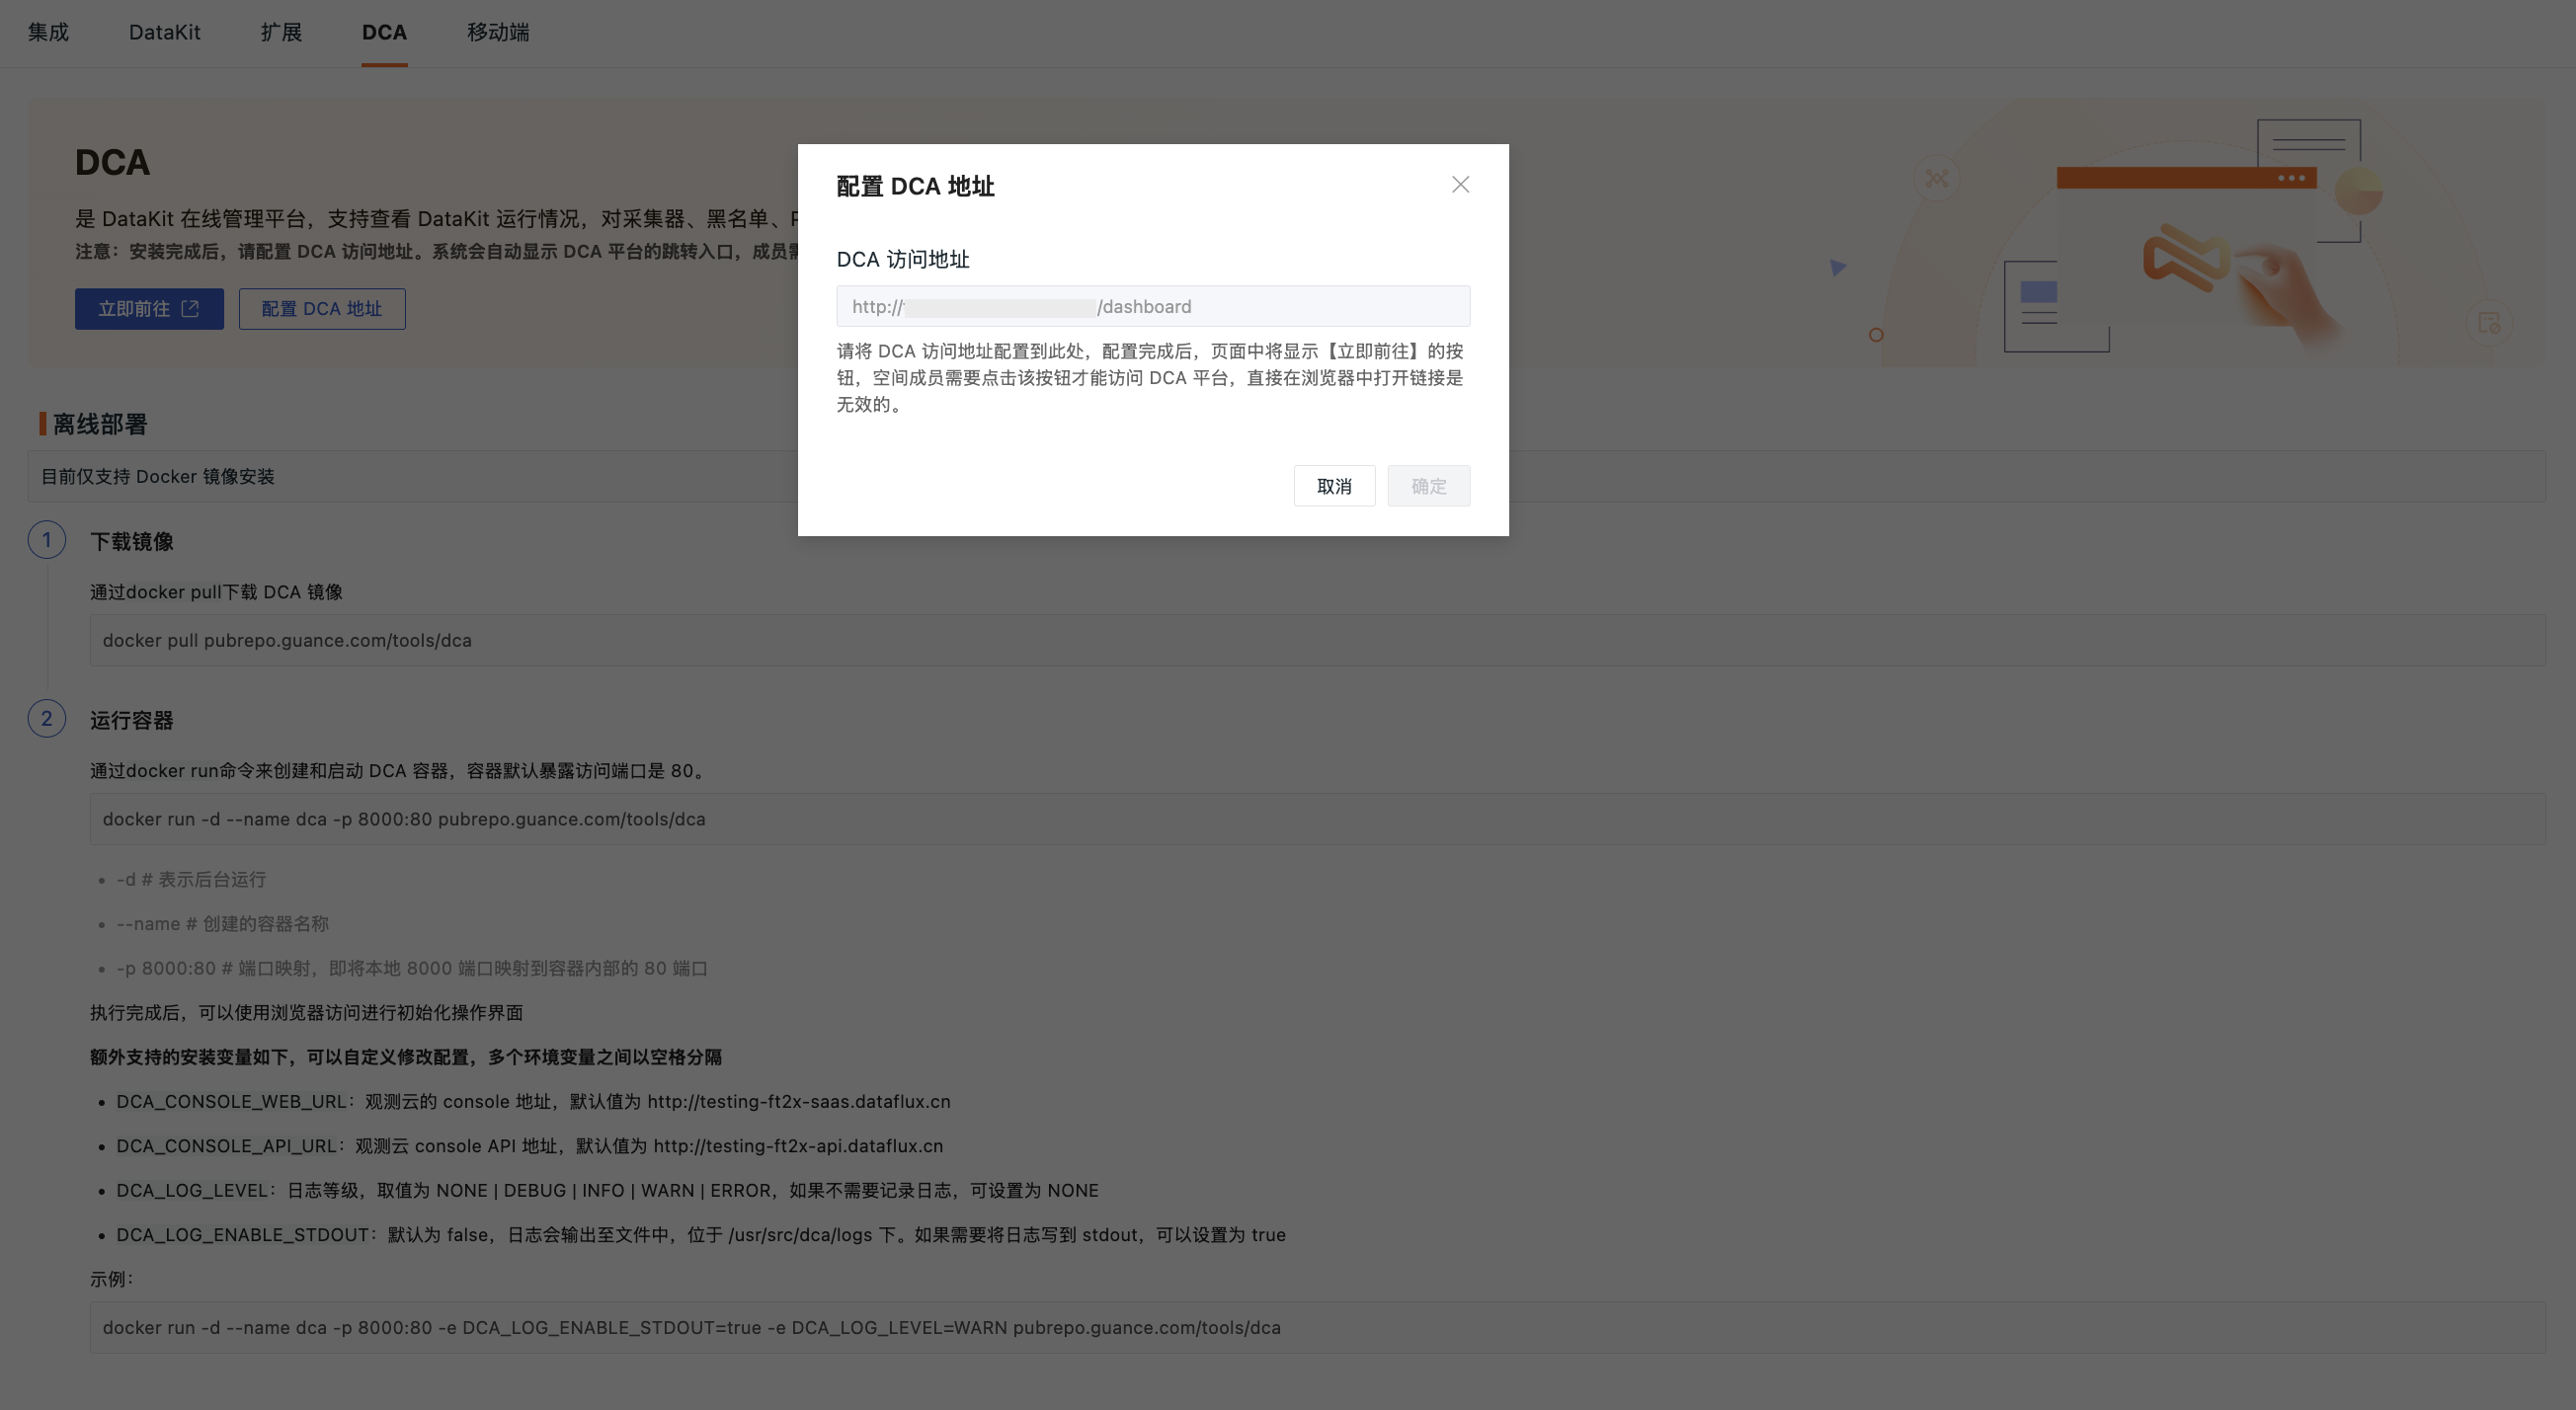
If you choose to disable the DCA configuration, the workspace will revert to its original DCA configuration. At this point, the DCA address can be edited.