Alibaba Cloud Deployment Manual
1 Preface
1.1 Document Description
This document mainly introduces the complete steps from resource planning and configuration to deploying Guance and running it, with deployment on Alibaba Cloud as the example.
Note:
- This document uses dataflux.cn as the main domain name example; replace it with the corresponding domain name in actual deployment.
1.2 Keywords
| Term | Description |
|---|---|
| Launcher | A WEB application used to deploy and install Guance, following the guide steps provided by the Launcher service to complete the installation and upgrade of Guance |
| Operation Machine | A machine installed with kubectl, operating within the same network as the target Kubernetes cluster |
| Installation Machine | A machine used to access the launcher service via a browser to complete the guided installation of Guance |
| kubectl | The command line client tool for Kubernetes, installed on the Operation Machine |
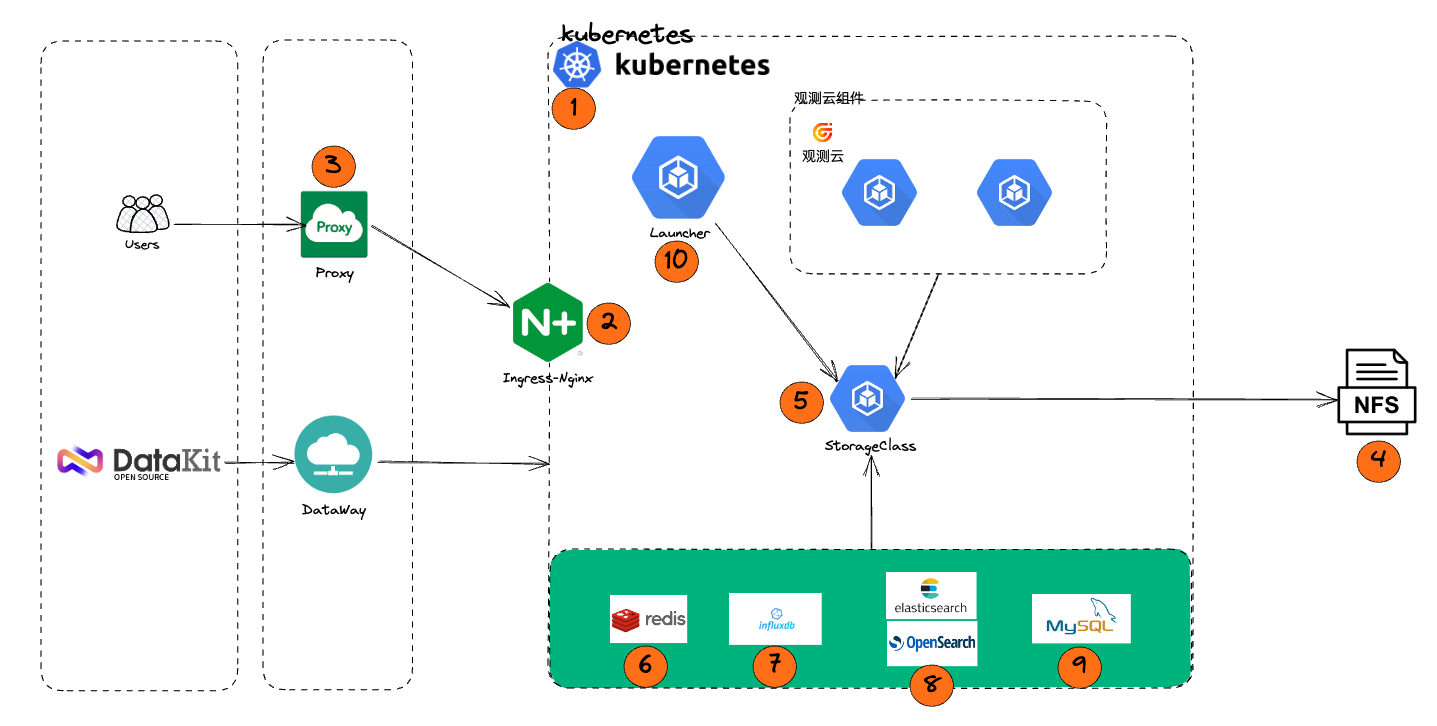
1.3 Deployment Steps Architecture
2 Resource Preparation
3 Infrastructure Deployment
3.1 Deployment Description
Create RDS and NAS storage according to the configuration requirements, placing them under the same VPC network within the same region. ECS, SLB, and NAT gateway will be automatically created by ACK and do not need to be created separately; that is, steps 1, 2, and 3 in the deployment steps diagram do not need to be performed separately.
3.2 Step One, Two, Three - Creating ACK Service
3.2.1 Cluster Configuration
Go to Container Service Kubernetes Edition, create a Kubernetes cluster, select Standard Managed Cluster Edition, pay attention to the following points when configuring the cluster:
- Must be in the same region as previously created RDS, ECS, etc.
- Check the "Configure SNAT" option (ACK automatically creates and configures the NAT gateway, enabling the cluster to have outbound internet capability)
- Check the "Public Access" option (to allow public internet access to the cluster API; this can be unchecked if you are managing this cluster from an internal network)
- Temporarily select FlexVolume as the storage driver when activating the ACK service; CSI driver is not supported in this document yet

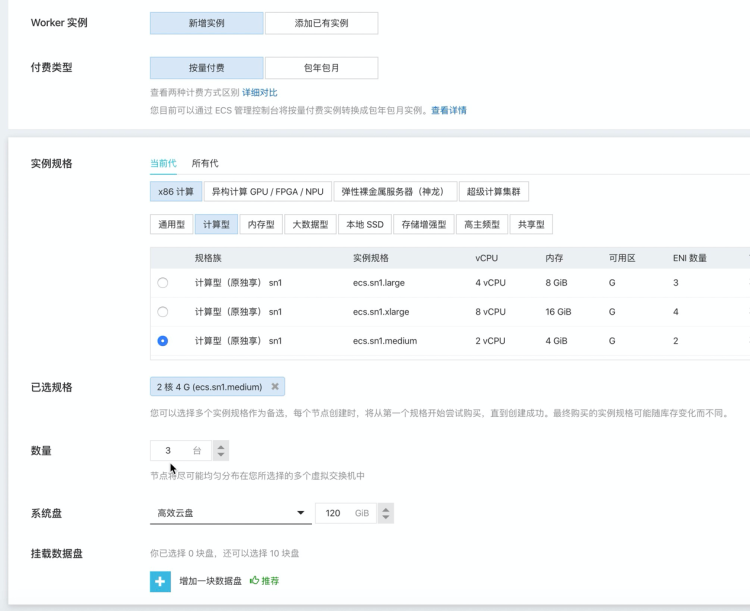
3.2.2 Worker Configuration
Mainly involves selecting the ECS specification and quantity. Create according to the specifications required in the configuration list or evaluate based on actual conditions, but must not fall below the minimum configuration requirements. At least 3 or more instances are required.
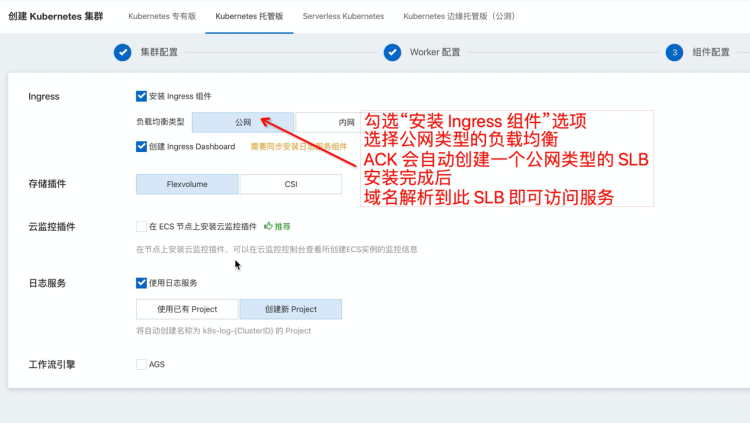
3.2.3 Component Configuration
In component configuration, ensure the "Install Ingress Component" option is checked and choose the "Public" type. ACK will automatically create a public type SLB, after installation completes, point the domain name to the public IP address of this SLB.
3.3 Step Four, Five - Dynamic Storage Configuration
Need to create a NAS file system in advance and obtain the nas_server_url
3.3.1 Dynamic Storage Installation
Alibaba Cloud Container Service ACK's container storage functionality is built upon the Kubernetes Container Storage Interface (CSI), deeply integrated with Alibaba Cloud storage services such as Cloud Disk EBS, File Storage NAS, and CPFS, as well as Object Storage OSS and local disks, fully compatible with Kubernetes-native storage services like EmptyDir, HostPath, Secret, ConfigMap, etc. This article introduces an overview of ACK storage CSI, features supported by ACK storage CSI, CSI usage authorization, and limitations. The console will default install CSI-Plugin and CSI-Provisioner components.
- Verify plugin
- Execute the following command to check whether the CSI-Plugin component has been successfully deployed.
- Execute the following command to check whether the CSI-Provisioner component has been successfully deployed.
- Create StorageClass
Create and copy the following content into the alicloud-nas-subpath.yaml file.
alicloud-nas-subpath.yaml
Replace {{ nas_server_url }} with the Server URL of the previously created NAS storage, execute the command on the operation machine:
When creating clusters of Kubernetes versions before 1.16 on Alibaba Cloud, if the storage plugin was selected as Flexvolume, the console defaults to installing the Flexvolume and Disk-Controller components, but does not default install the alicloud-nas-controller component.
- Install alicloud-nas-controller component
Download nas_controller.yaml Execute the command on the operation machine:
- Verify plugin
Execute the following command to check if the alicloud-nas-controller component has been successfully deployed.
- Create StorageClass
Create and copy the following content into the storage_class.yaml file.
storage_class.yaml
apiVersion: storage.k8s.io/v1
kind: StorageClass
metadata:
  name: alicloud-nas
  annotations:
    storageclass.beta.kubernetes.io/is-default-class: "true"
    storageclass.kubernetes.io/is-default-class: "true"
mountOptions:
- nolock,tcp,noresvport
- vers=3
parameters:
  server:  "{{ nas_server_url }}:/k8s/"
  driver: flexvolume
provisioner: alicloud/nas
reclaimPolicy: Delete
Replace {{ nas_server_url }} with the Server URL of the previously created NAS storage, execute the command on the operation machine:
3.3.2 Verify Deployment
3.3.2.1 Create PVC, view status
Execute command to create PVC
$ cat <<EOF | kubectl apply -f -
apiVersion: v1
kind: PersistentVolumeClaim
metadata:
 name: cfs-pvc001
spec:
 accessModes:
   - ReadWriteOnce
 resources:
   requests:
     storage: 1Gi
 storageClassName: alicloud-nas
EOF
3.3.2.2 View PVC
$ kubectl get pvc | grep cfs-pvc001

cfs-pvc001       Bound    pvc-a17a0e50-04d2-4ee0-908d-bacd8d53aaa4   1Gi        RWO            alicloud-nas           3d7h
Boundindicates successful deployment
3.4 Step Six - Cache Service
- Can use the default built-in caching service.
- If not using the default built-in cache service, configure Redis according to the following requirements:
- Redis Version: 6.0, supports Redis clusters in standalone mode, proxy mode, and master-slave mode.
- Configure Redis password.
- Add the private IP addresses of the automatically created ECS to the Redis whitelist.
3.5 Step Seven - GuanceDB for Metrics
3.6 Step Eight - OpenSearch
- Create administrator account
- Install Chinese tokenizer plugin
- Add the private IP address of the ECS automatically created by ACK to the OpenSearch whitelist
3.7 Step Nine - RDS
- Create administrator account (must be administrator account, subsequent installation and initialization require this account to create and initialize each application DB)
- Modify parameter settings in the console, set innodb_large_prefix to ON (not needed for MySQL 8+)
- Add the private IP address of the ECS automatically created by ACK to the RDS whitelist
4 Installation and Configuration of kubectl
4.1 Installing kubectl
kubectl is a command-line client tool for Kubernetes, which can be used to deploy applications, inspect and manage cluster resources, etc. Our Launcher is based on this command-line tool to deploy applications. For specific installation methods, please refer to the official documentation:
https://kubernetes.io/docs/tasks/tools/install-kubectl/
4.2 Configuring kube config
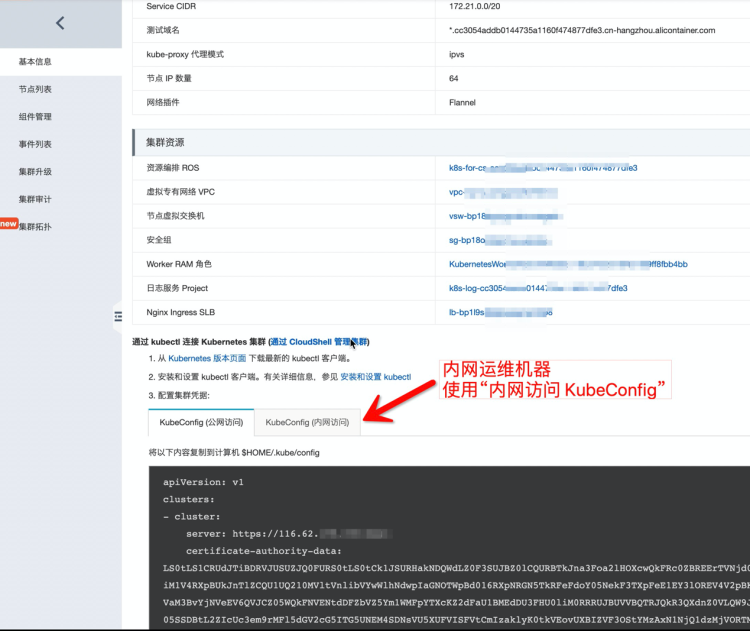
To grant kubectl the ability to manage clusters, the cluster's kubeconfig content needs to be placed into the $HOME/.kube/config file. The kubeconfig content can be viewed in the cluster's Basic Information section.
Whether to choose the kubeconfig for public access or intranet access depends on whether your operation machine can communicate with the cluster via intranet.
5 Starting Installation
After completing the operations, you can refer to the manual Starting Installation