MOBILE
Guance App supports viewing and handling incidents, observability data, on-call schedules, and account settings within the workspace on mobile devices. The App currently organizes capabilities around five entry points: "Home, Observe, Incident, Schedule, My". You can quickly enter incident details after receiving alerts or collaboration notifications, view logs, traces, events, RUM, and dashboard data, and continue handling issues through status transitions, collaboration comments, link sharing, and Handoff.
Installation
Within the Guance workspace, you can download via "Integration" - "Mobile", or scan the QR code below.

Alternatively, you can directly click the following links to download.
Login
Existing Guance Free Plan/Commercial Plan users can select the site their account belongs to in the App and log in via password, mobile verification code, or SSO. The site list is displayed according to the current product line, and you can also refresh site information on the login page.
- Password login: Enter email or account, password to log in, with the option to remember the account.
- Verification code login: Enter phone number and 6-digit verification code to log in. A graphical verification may be required before sending the code.
- SSO login: Enter email or full SSO address, follow page prompts to select login entry, workspace, and complete single sign-on.
- Forgot password: Enter the password reset process on the password login page, set a new password after completing account verification.
- MFA: When the workspace has MFA security policy enabled, logging in or switching workspaces requires completing verification as prompted. The binding process will also be displayed during initial binding.
If you do not have a Guance account yet, you can go to the Guance official website Apply Now and choose to register for a suitable site account.
After successful login, the App enters the default workspace accessible by the current account. You can switch workspaces from Home, Observe, Incident, Schedule, or "My". After switching, data on the corresponding pages will reload according to the new workspace.
Private Site Login
If your team uses a privately deployed site, you can add the private site in the site selector on the login page and complete login under the corresponding site.
Add Private Site
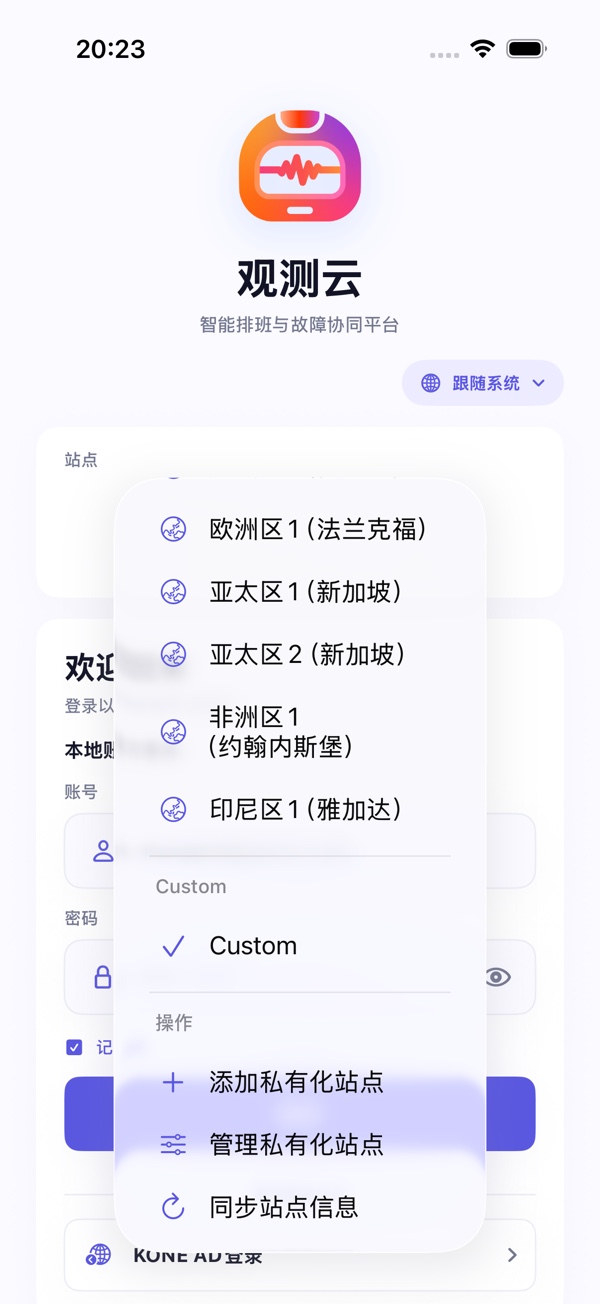
- Click "Site" on the login page to open the site selector.
- Click "Add Private Site".
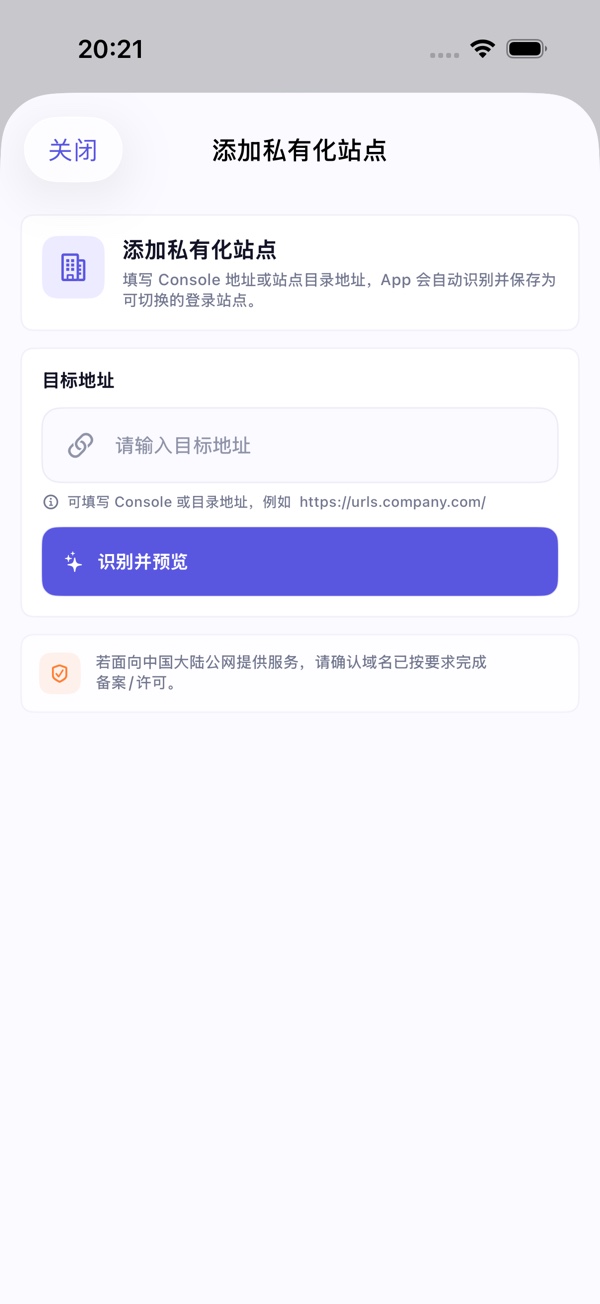
- In "Target Address", fill in the Console address or site directory address of the private site, e.g.,
https://console.company.comorhttps://urls.company.com/. - Click "Identify and Preview". The App will automatically identify the site name, Console address, API address, and supported login methods.
- Confirm the site name and click "Add and Save". If multiple sites are identified, follow the page prompts to select the site used by default on the login page.
After successful save, the private site will appear in the "Private" group of the site selector. After selecting the target site, you can continue using password, verification code, or SSO login. The specific available login methods depend on the configuration of that private site.
Manage Private Sites
After adding a private site, you can click "Manage Private Sites" in the site selector on the login page to refresh the remote directory, switch the default site, delete configurations no longer in use, or copy diagnostic information for troubleshooting. If remote directory refresh fails, the App will prioritize using the last successfully synchronized local cache.
Site Directory Address Format
If you use a site directory address, the directory address needs to be an HTTPS URL accessible by the App, e.g., https://urls.company.com/ or https://urls.company.com/site-map.json. If an address without protocol or an http:// address is entered, the App will uniformly convert it to https:// before accessing. The content returned by this address must be a JSON object, with a top-level urls field. Each key under urls represents a site, and the site needs to provide Console and API addresses.
Example:
{
  "urls": {
    "prod": {
      "name": "Company Production Environment",
      "name_en": "Company Production",
      "console": "https://console.company.com",
      "console_api": "https://console-api.company.com"
    },
    "staging": {
      "name": "Company Staging Environment",
      "name_en": "Company Staging",
      "console": "https://staging-console.company.com",
      "console_api": "https://staging-console-api.company.com"
    }
  }
}
Here, name and name_en are used to display the site name. console is the web console address. console_api is the business API address.
Note: The private site address must be accessible via HTTPS in the current network environment. If identification fails, confirm whether the address is a valid Console address or site directory address, and check network, VPN, certificates, and site configuration.
Home
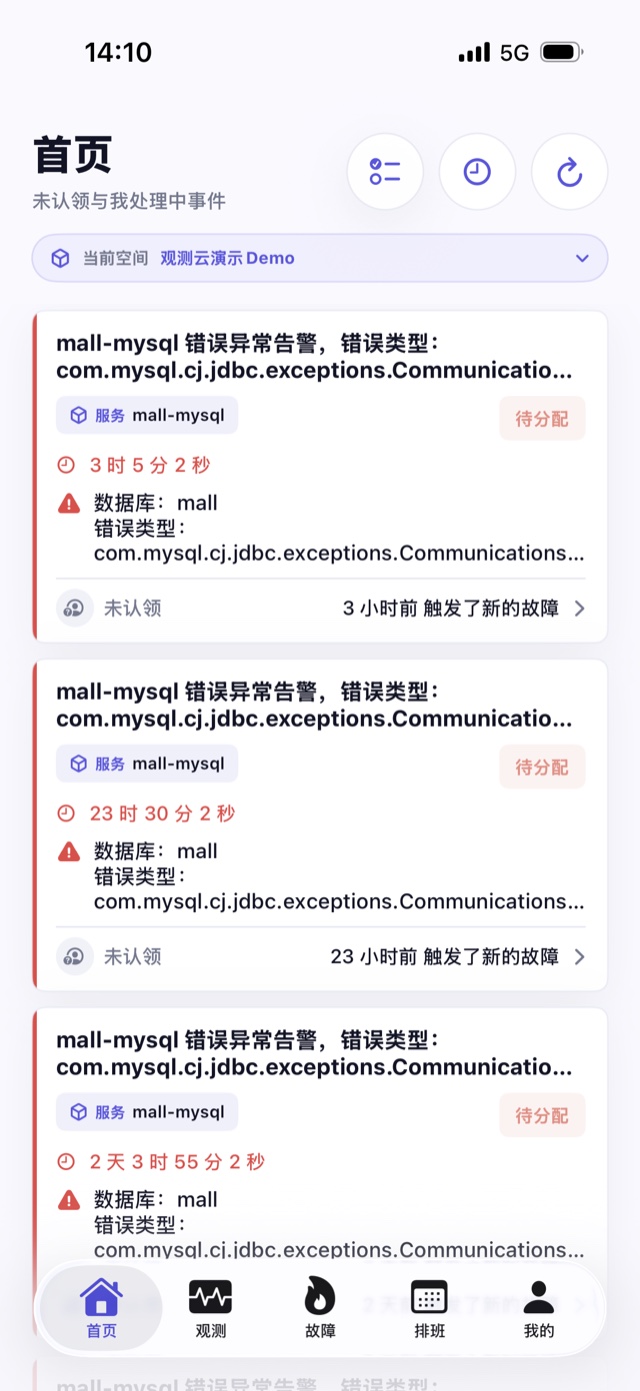
Home aggregates incidents that currently require attention, including unassigned incidents within the current workspace, and incidents assigned to you that are not yet resolved. You can quickly perform the following operations on Home:
- View incident name, level, status, assignee, update time, and on-call information.
- Select recent time or precise time range to locate incidents within a specific period.
- Pull down to refresh the incident list of the current workspace.
- Long-press an incident to enter multi-select mode, batch take over, mark as resolved, or adjust incident status.
- Click an incident card to enter the details page for further investigation and collaboration.
- Switch workspaces and reload Home data.
If there are no pending incidents in the current space, Home will display an empty state prompt.
Observe
"Observe" provides mobile query entry points for dashboards, logs, traces, events, and RUM. You can quickly view key data on mobile devices, or jump to corresponding data details from shared links or Handoff.
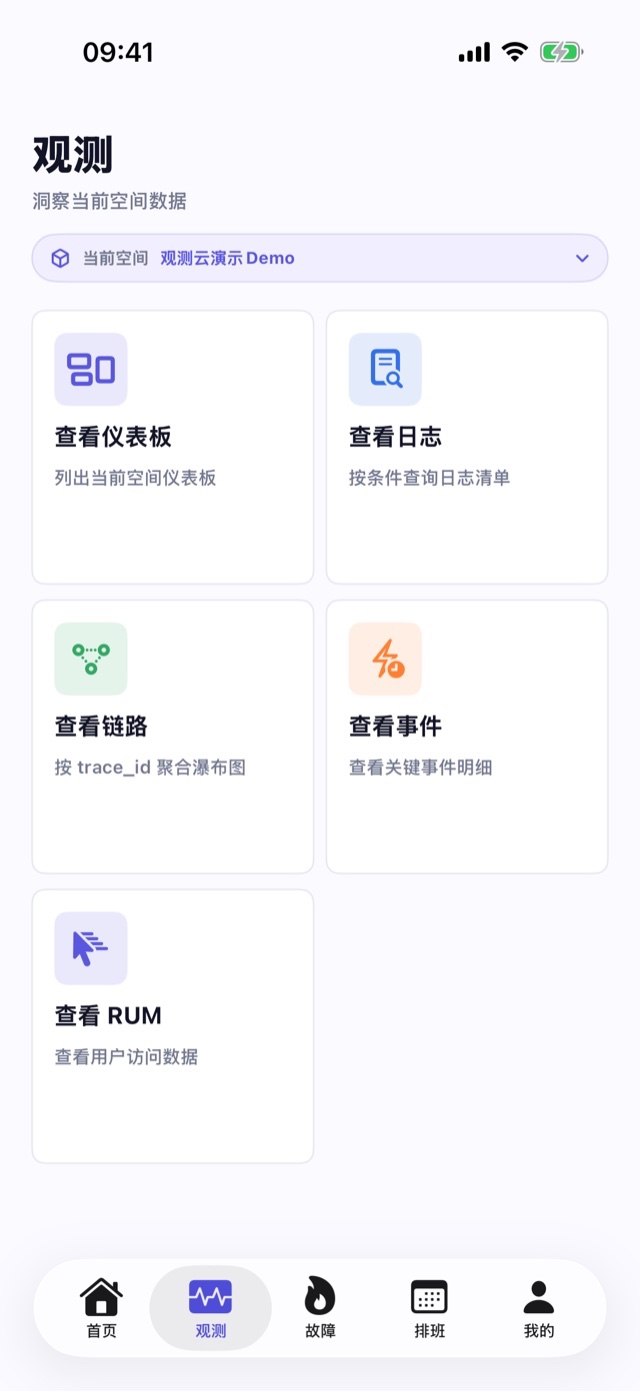
Dashboard
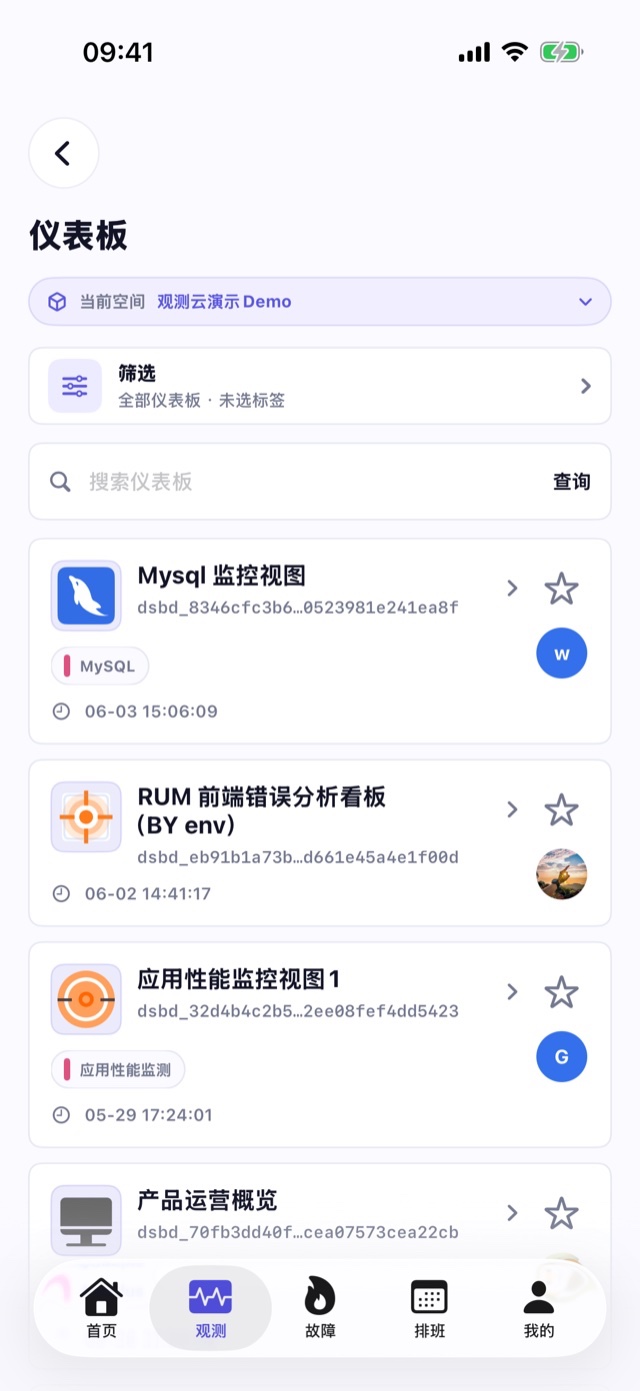
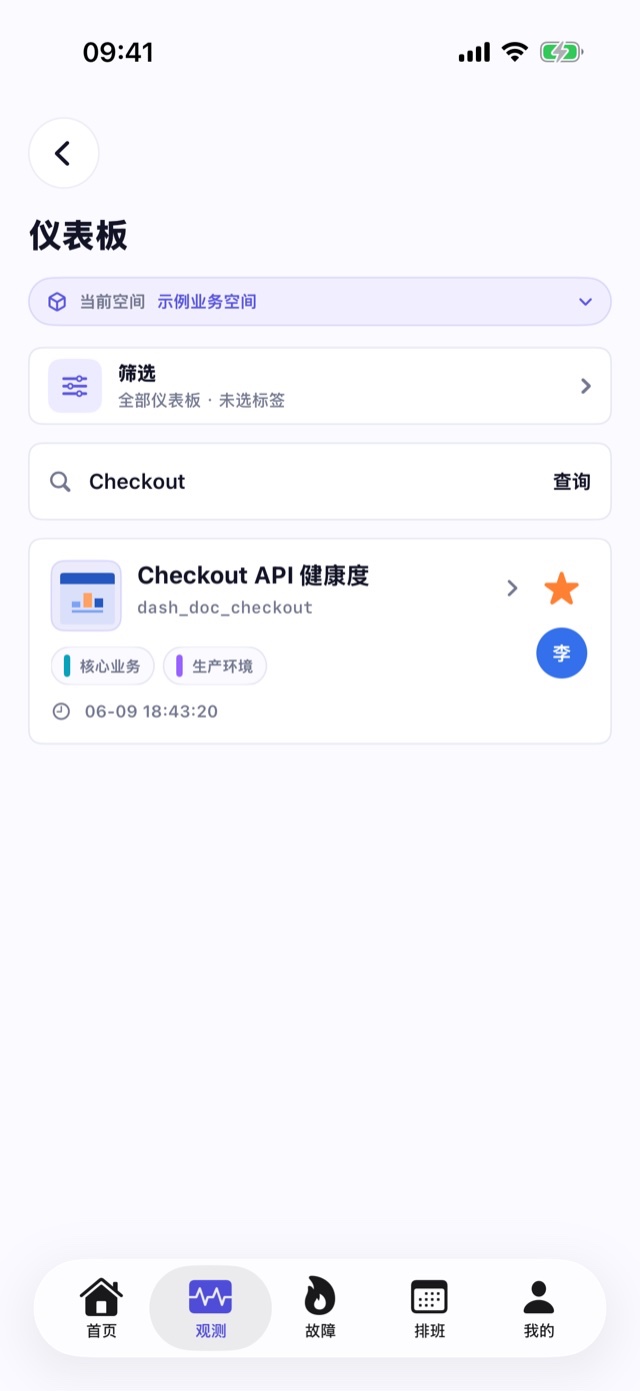
In "Observe" - "View Dashboards", you can view the list of dashboards accessible in the current workspace. Dashboards support search by name, quick filtering, tag filtering, favoriting, and viewing creation/update information. After entering dashboard details, you can:
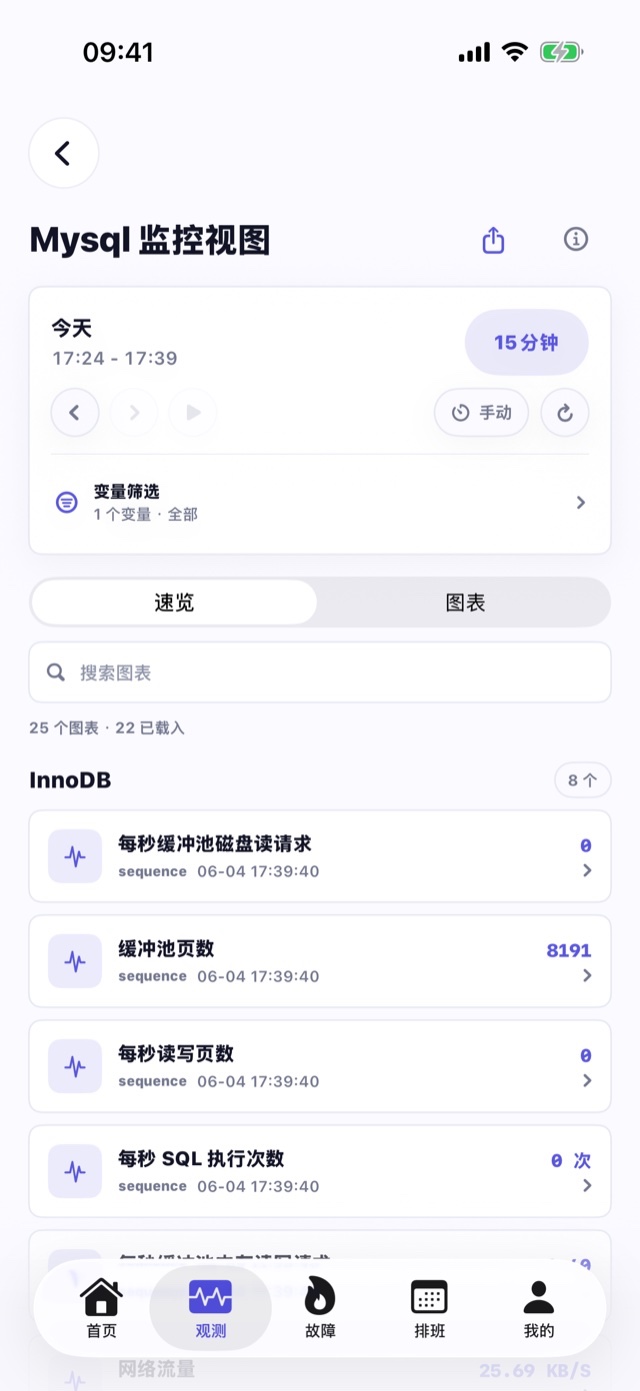
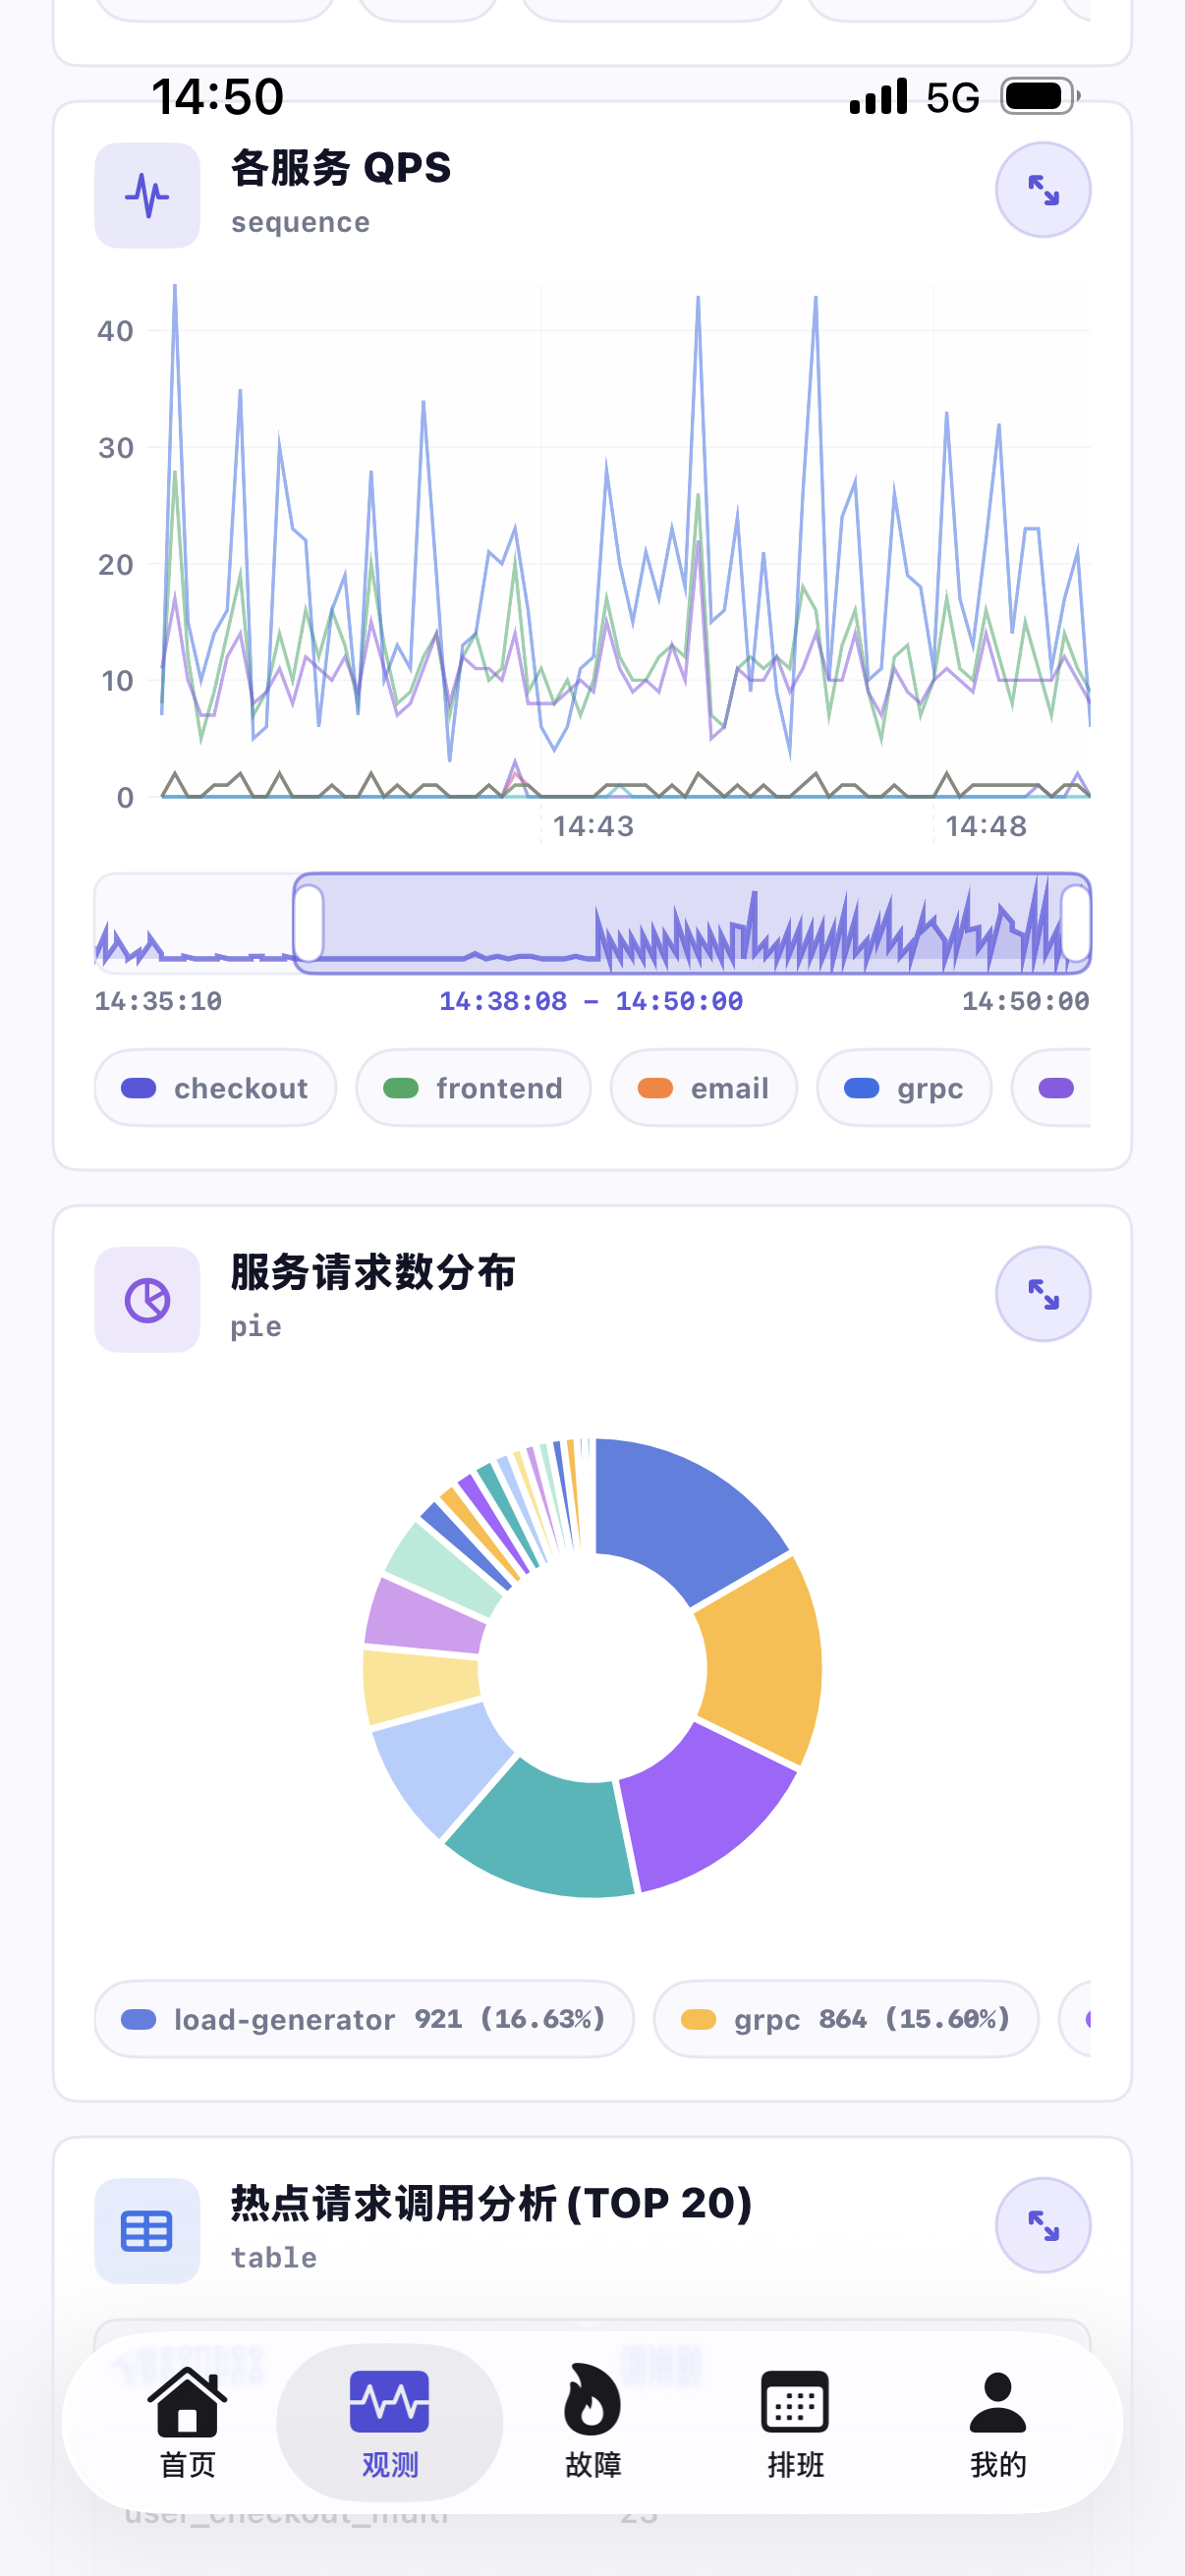
- View components within the dashboard such as charts, tables, Top Lists, numbers, text, etc.
- Use the Time Widget to switch between recent time or precise time ranges.
- Adjust dashboard variables to switch data by dimensions like service, host, application, etc.
- Search component names to quickly locate target charts.
- Switch between chart overview and chart reading modes, and expand or collapse charts by group.
- Zoom in on a single component and share or open the corresponding console link via Handoff.
Dashboards are synchronized with the web version. For details, refer to Dashboards.
Log, Trace, Event, and RUM Queries
In "Observe", you can enter log, trace, event, and RUM query pages respectively:
- Logs: Supports selecting log indexes, querying log records by keyword or
key:valueconditions, and entering log details to view field content. - Traces: Supports querying Traces by
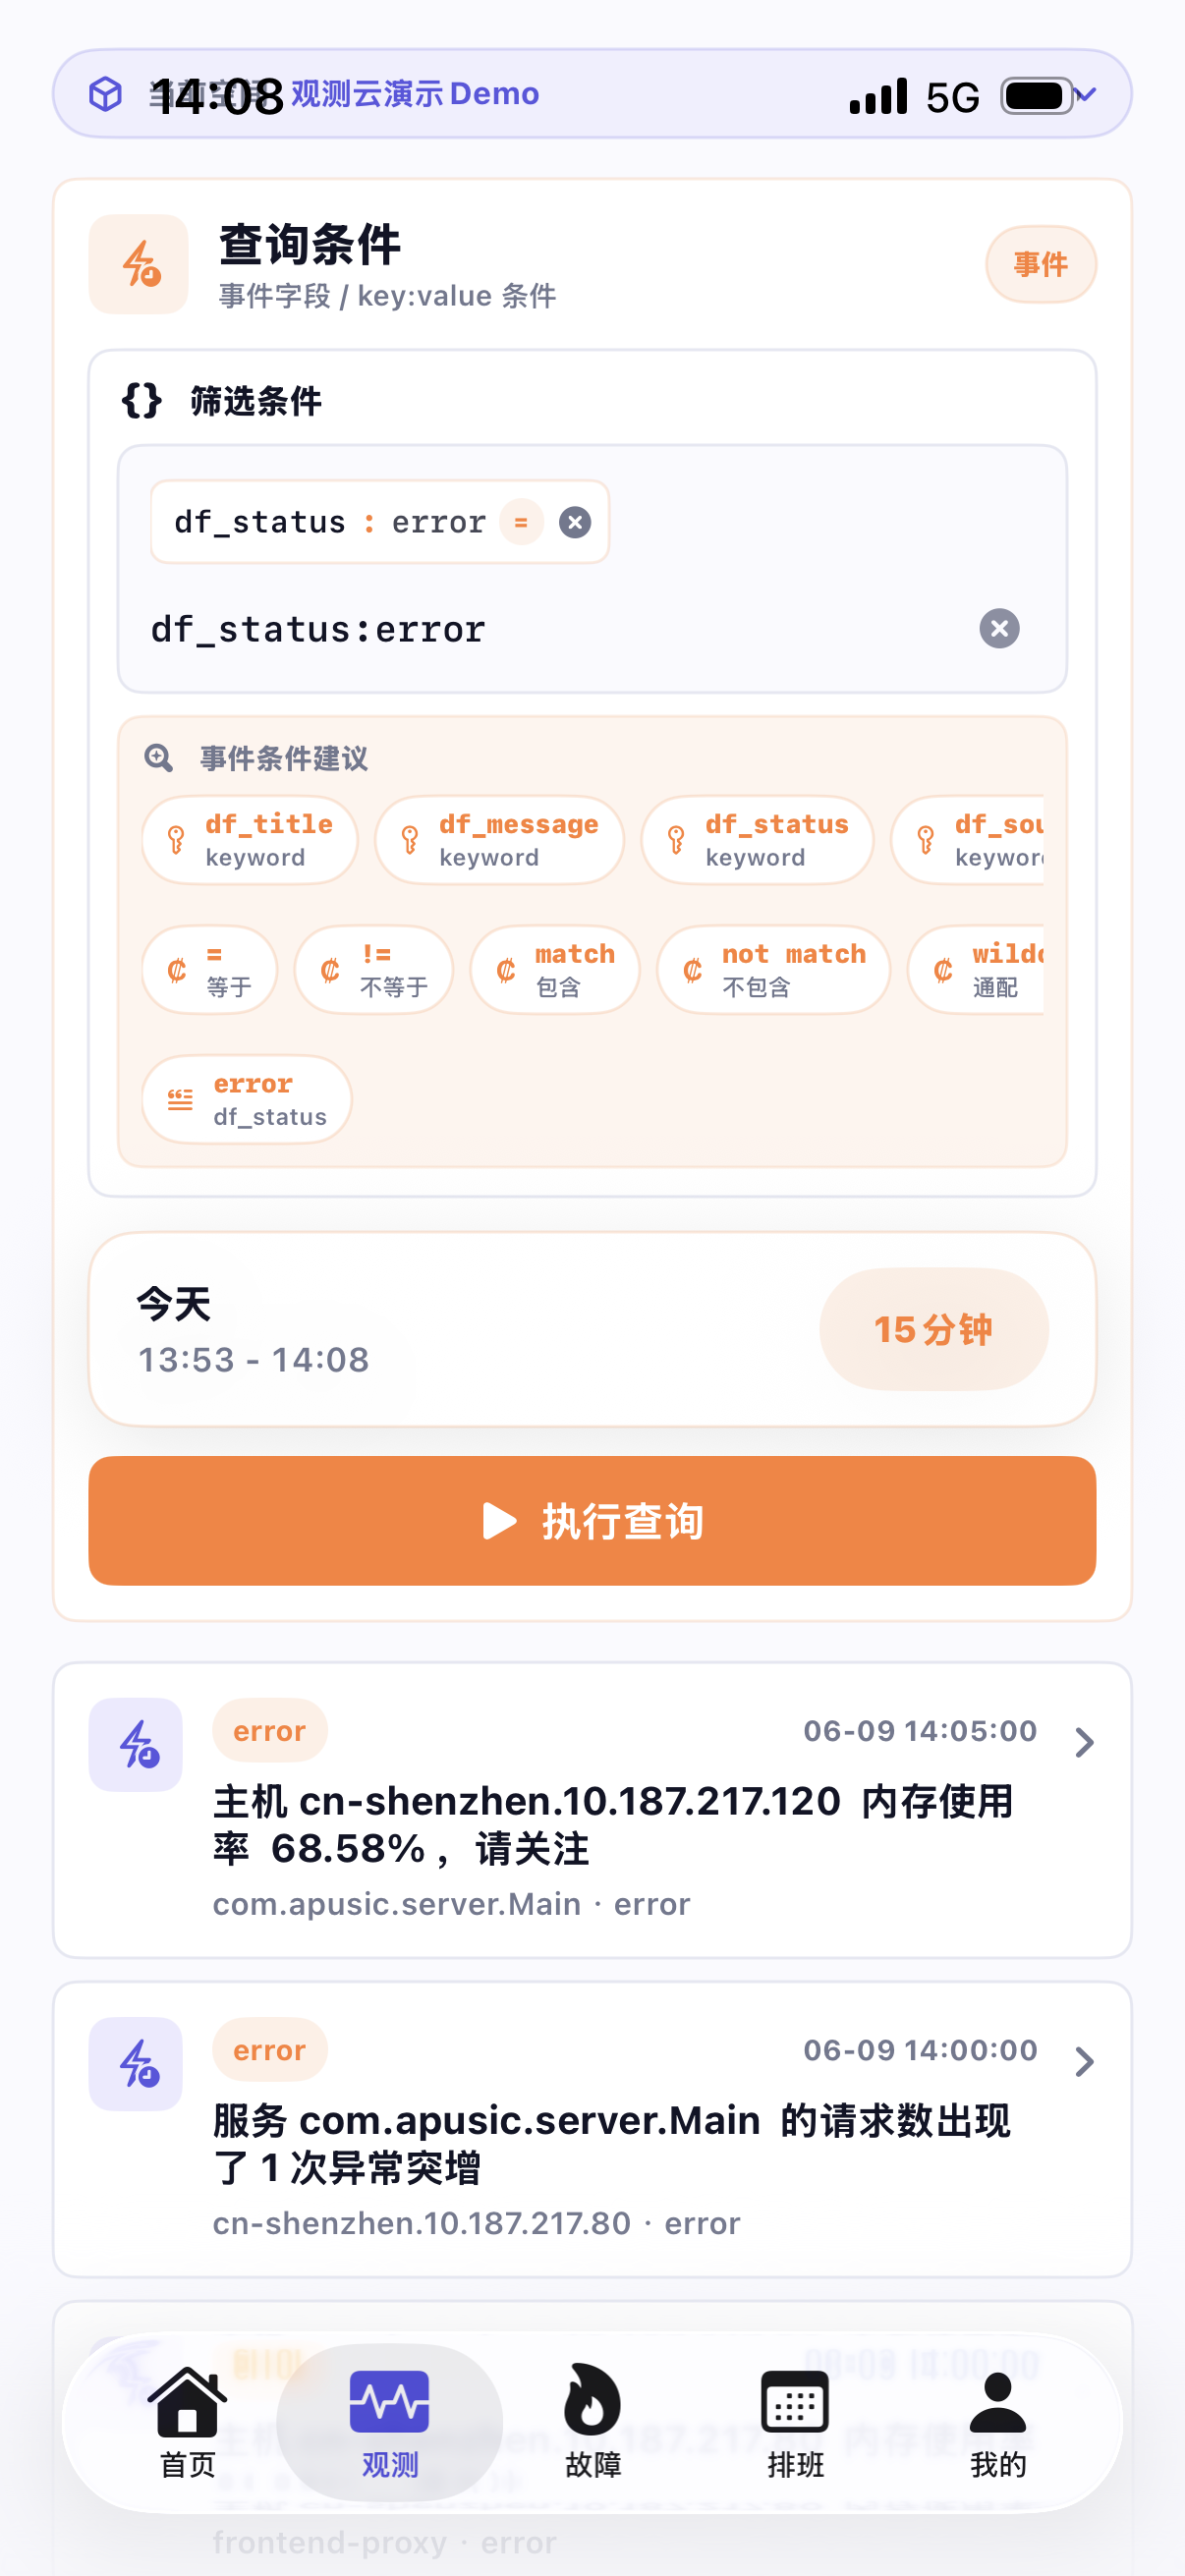
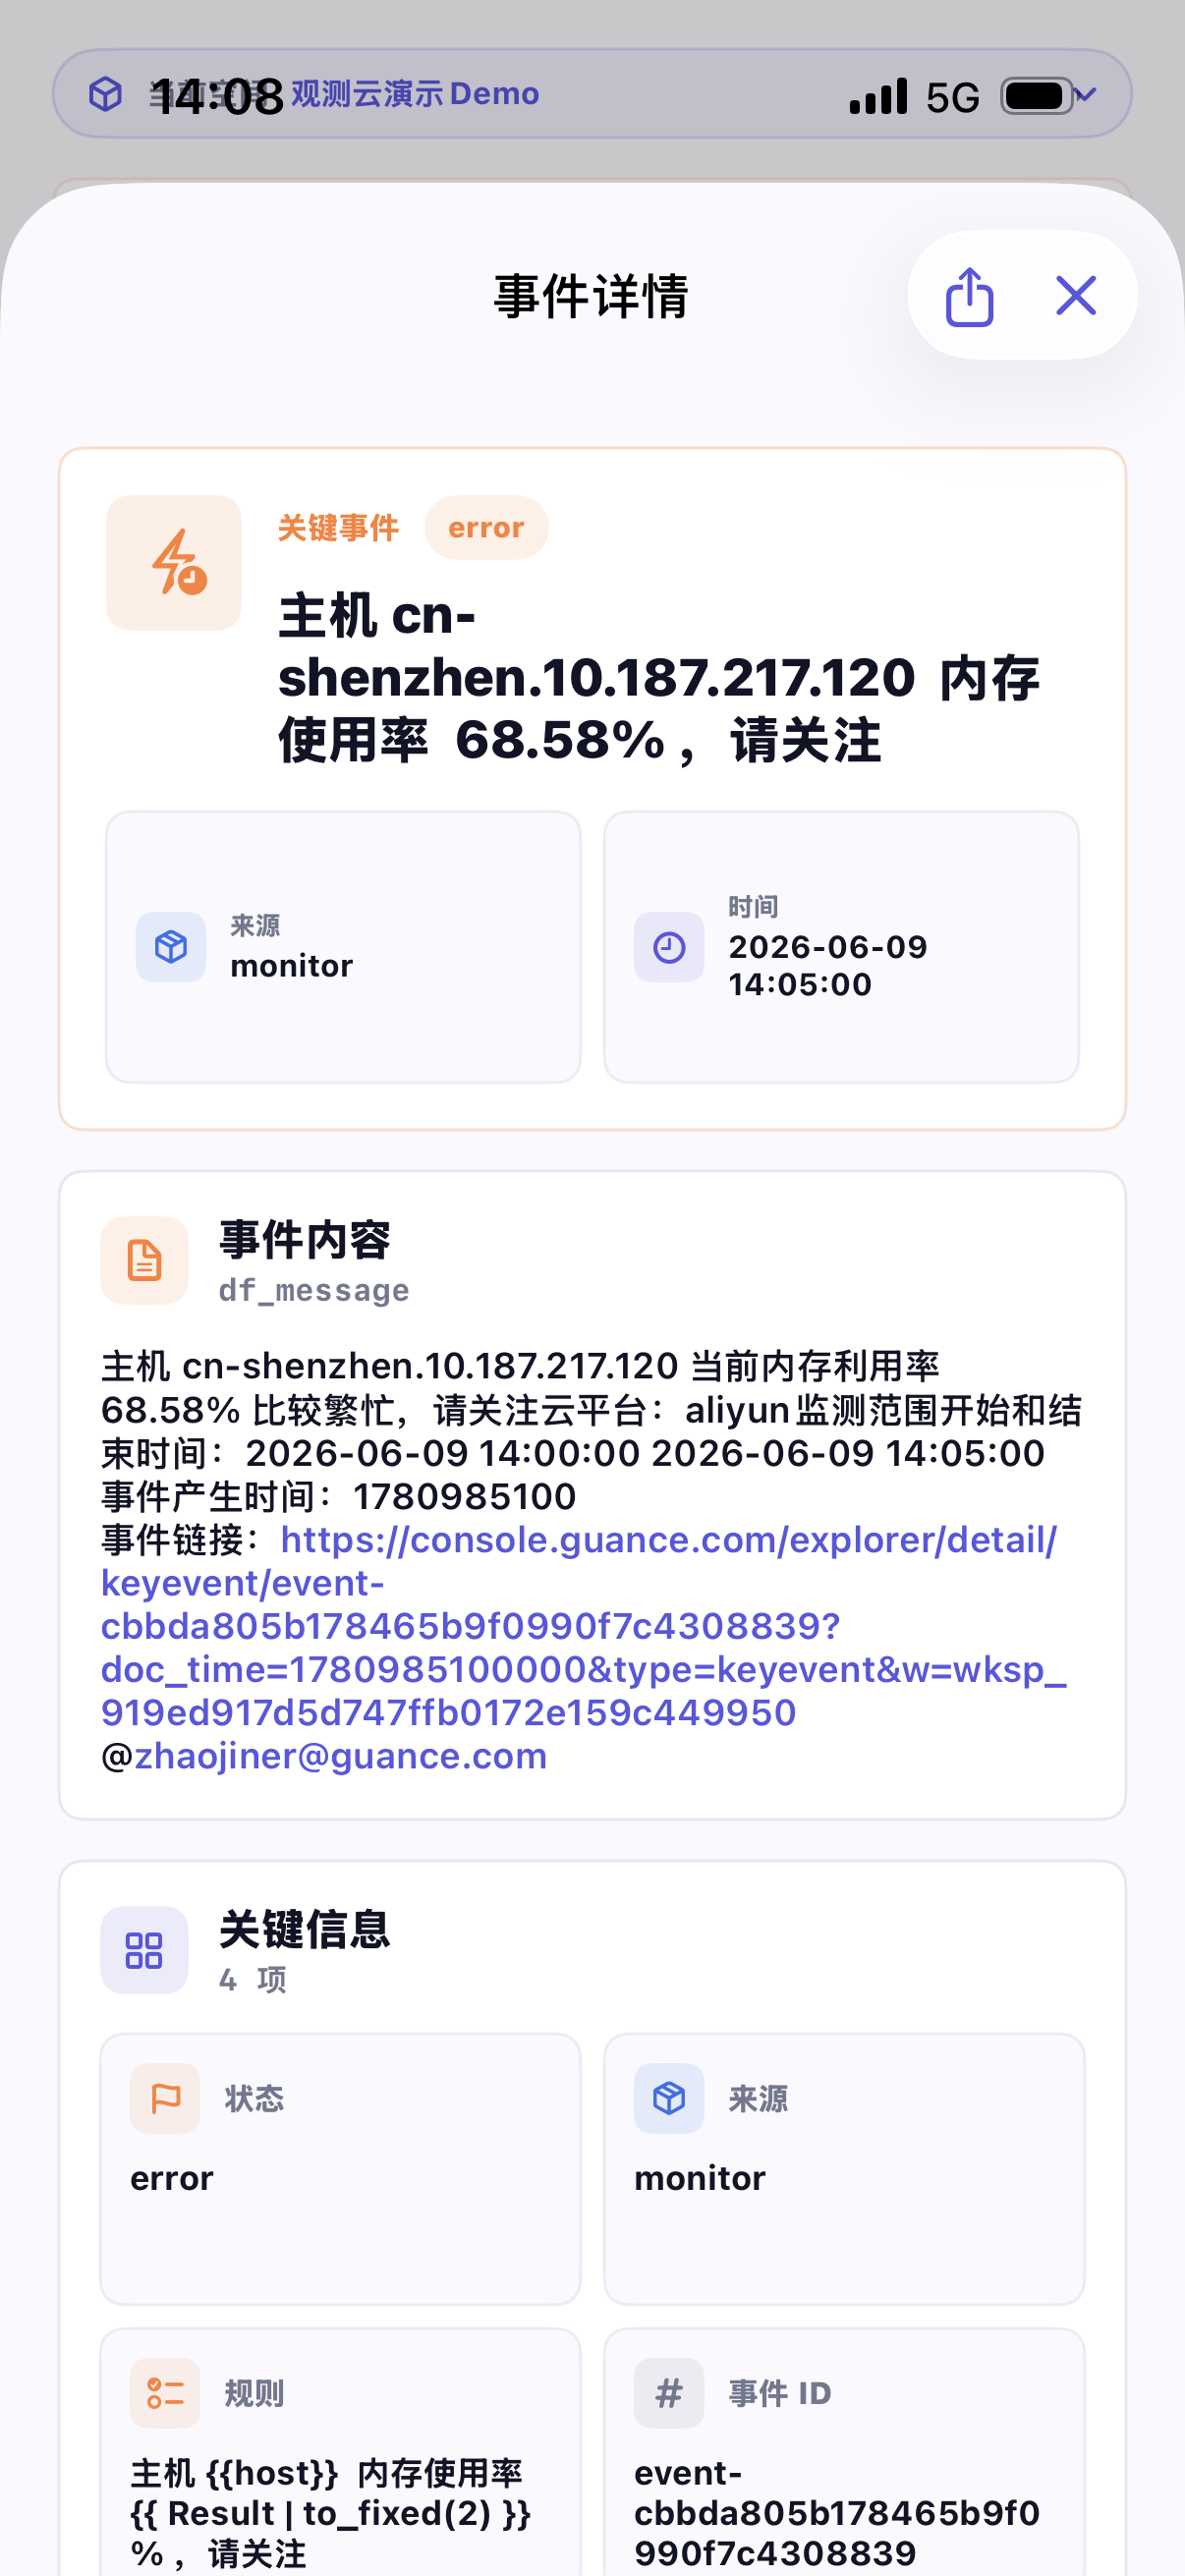
trace_id, service, status, etc., and viewing Span call relationships with waterfall charts. - Events: Supports viewing key event details and locating events by event ID, monitor fields, etc.
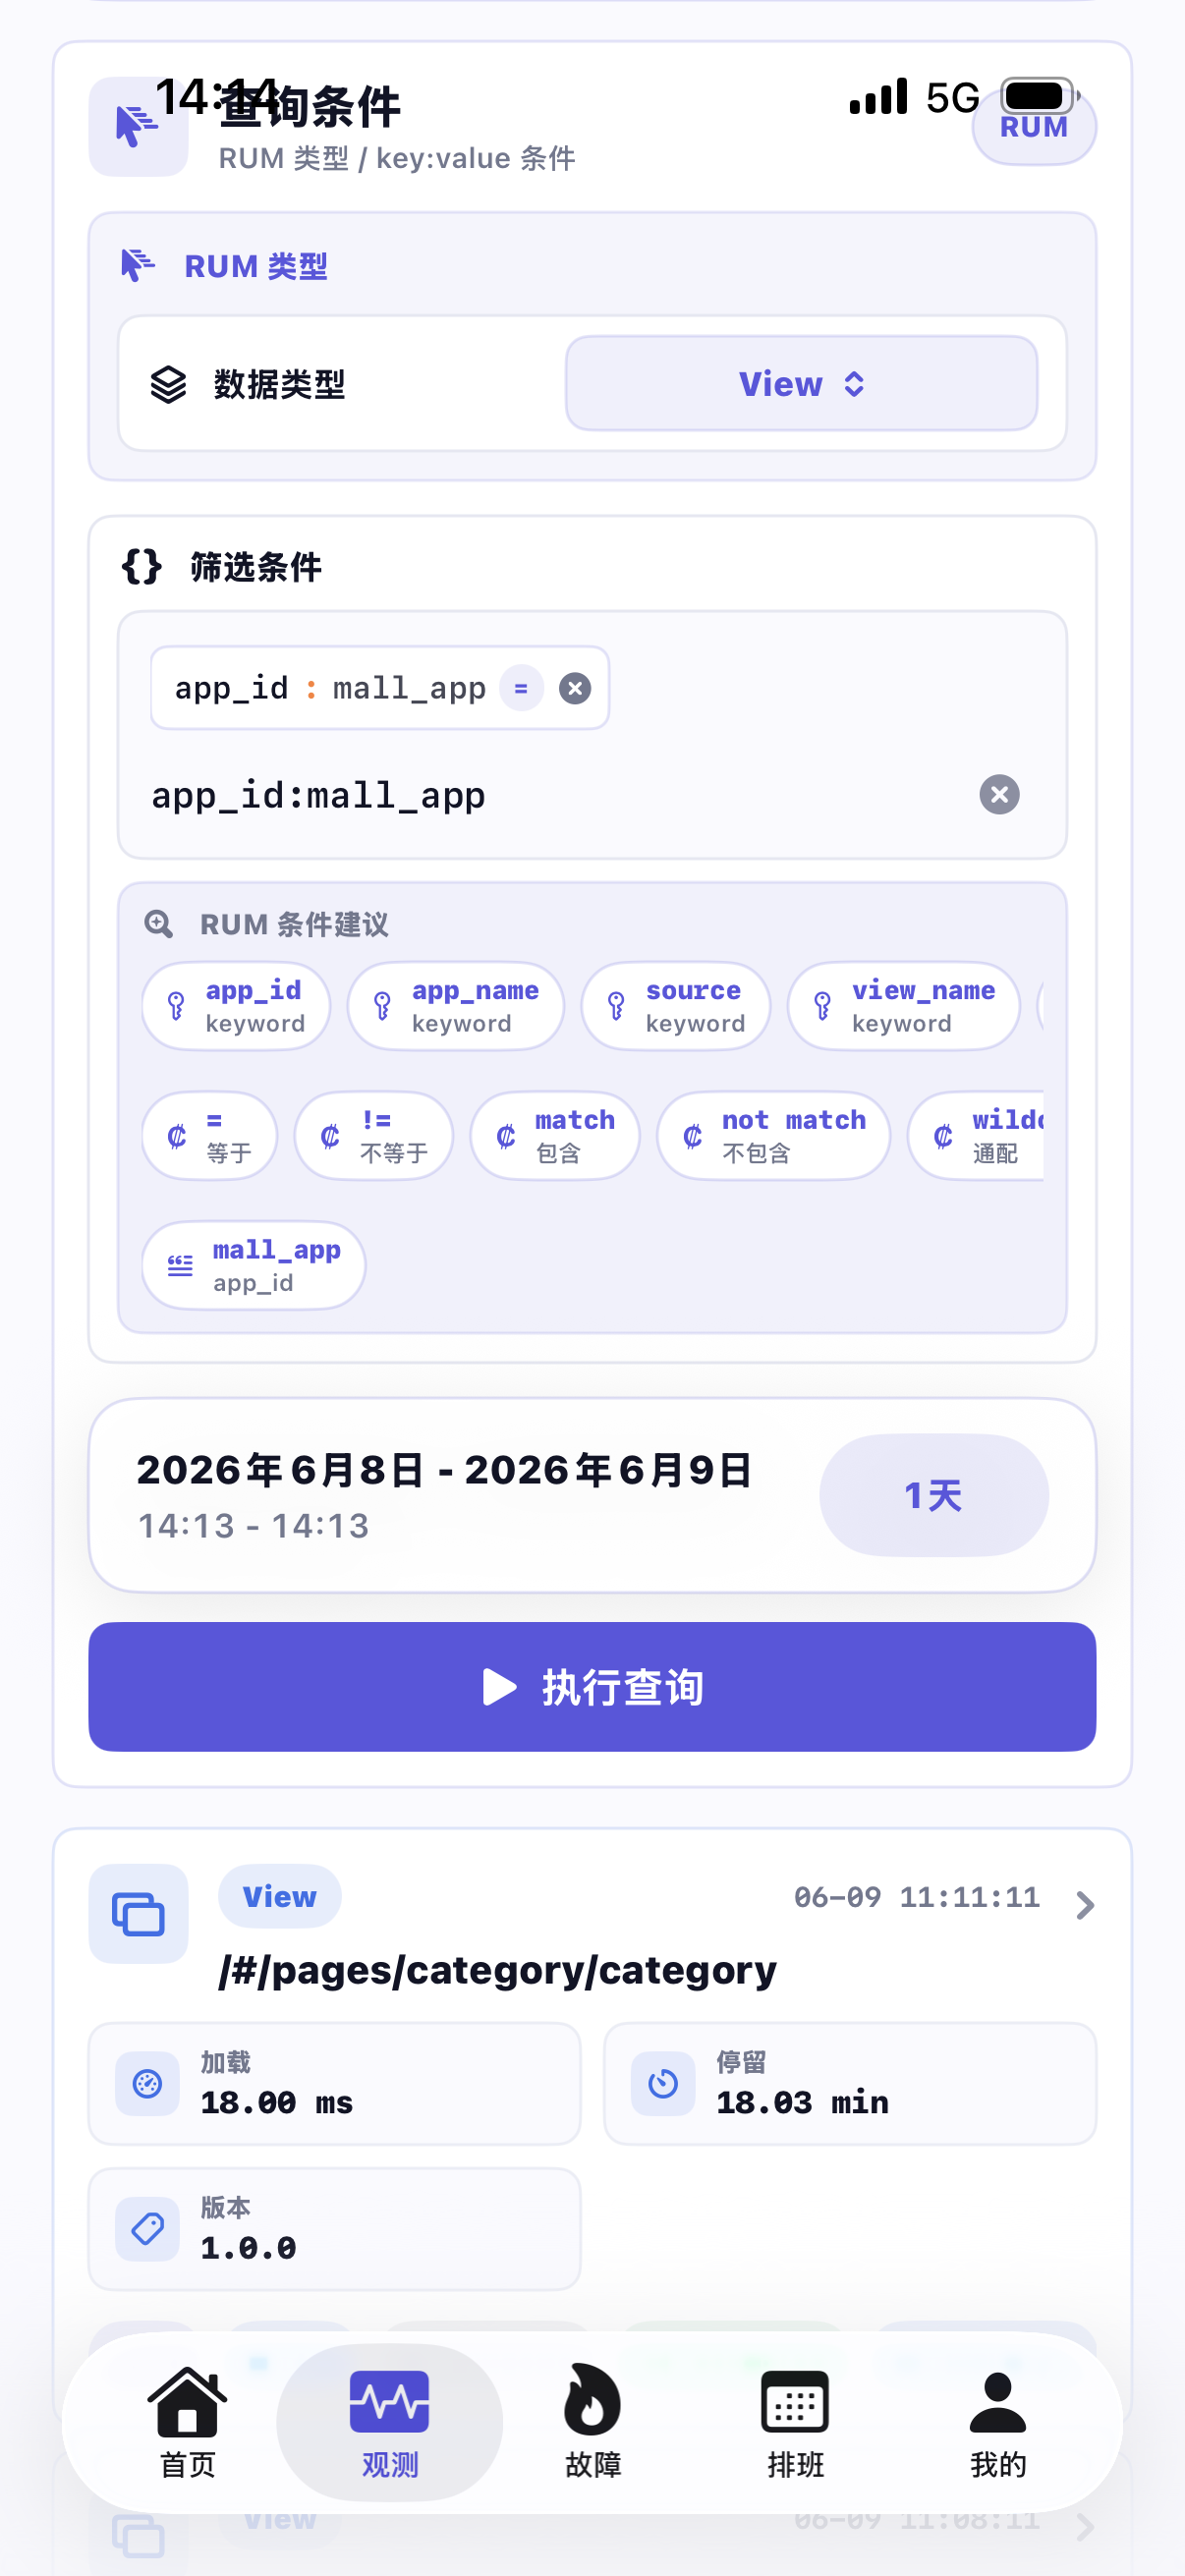
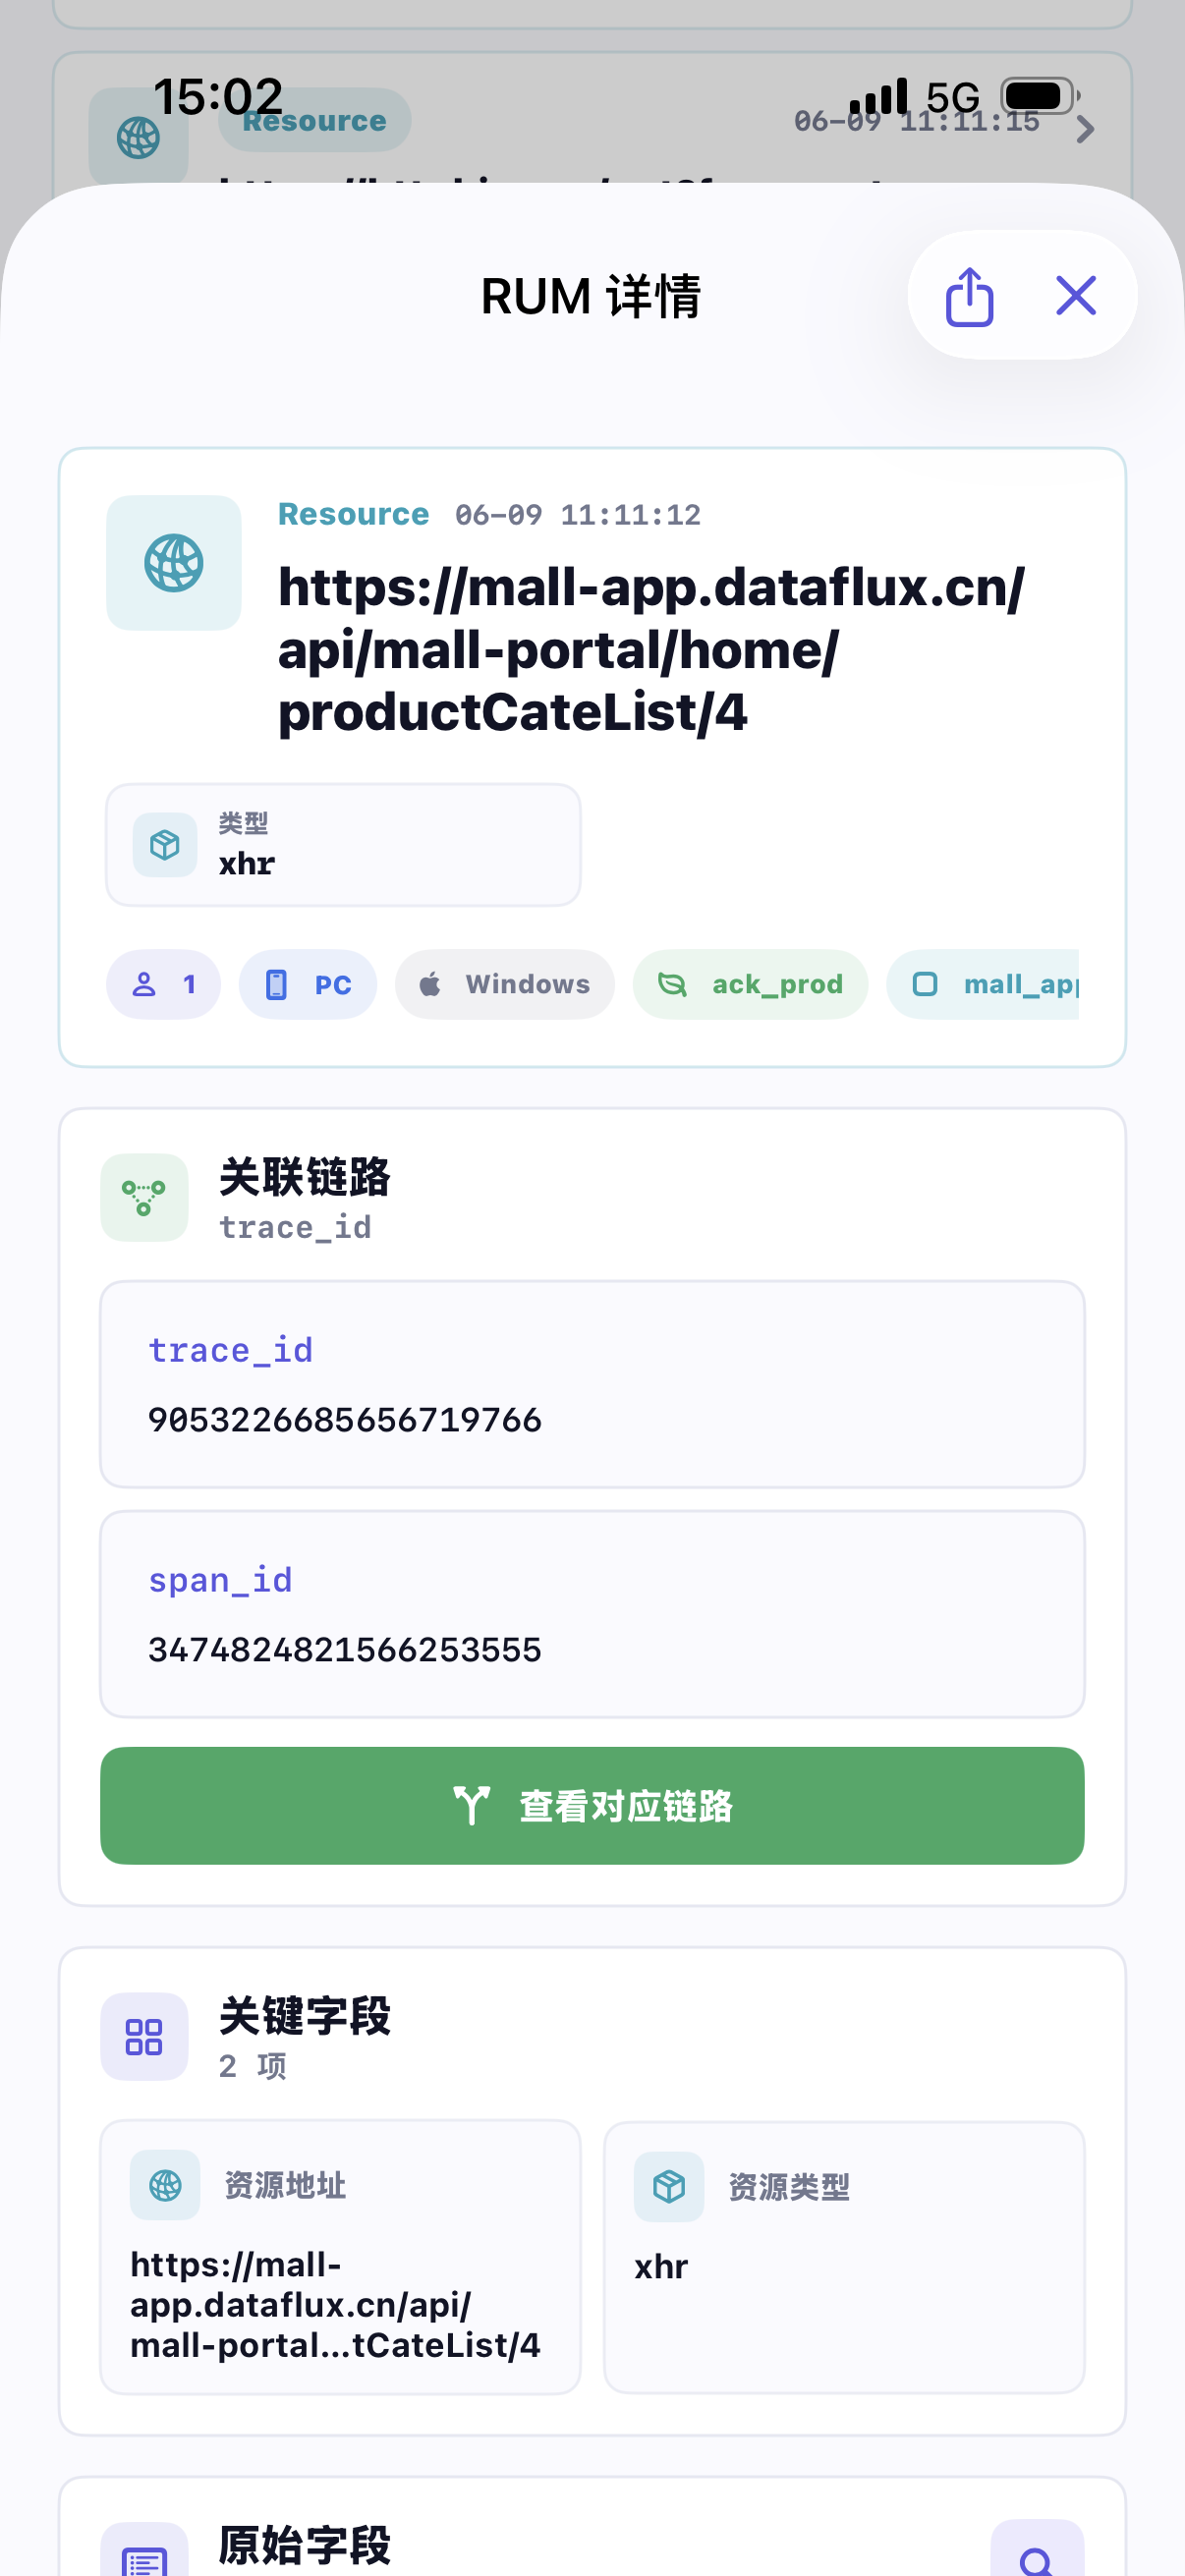
- RUM: Supports viewing user access data by types like View, Action, Resource, Long Task, Error, etc., and associating Traces or Resources in details.
Query pages support recent time, precise time, field suggestions, and value suggestions. After opening record details, you can view summaries, field lists, raw content, and share console links. In Trace waterfall charts, you can also view associated RUM Resources or enter individual Span details. Log query and details:
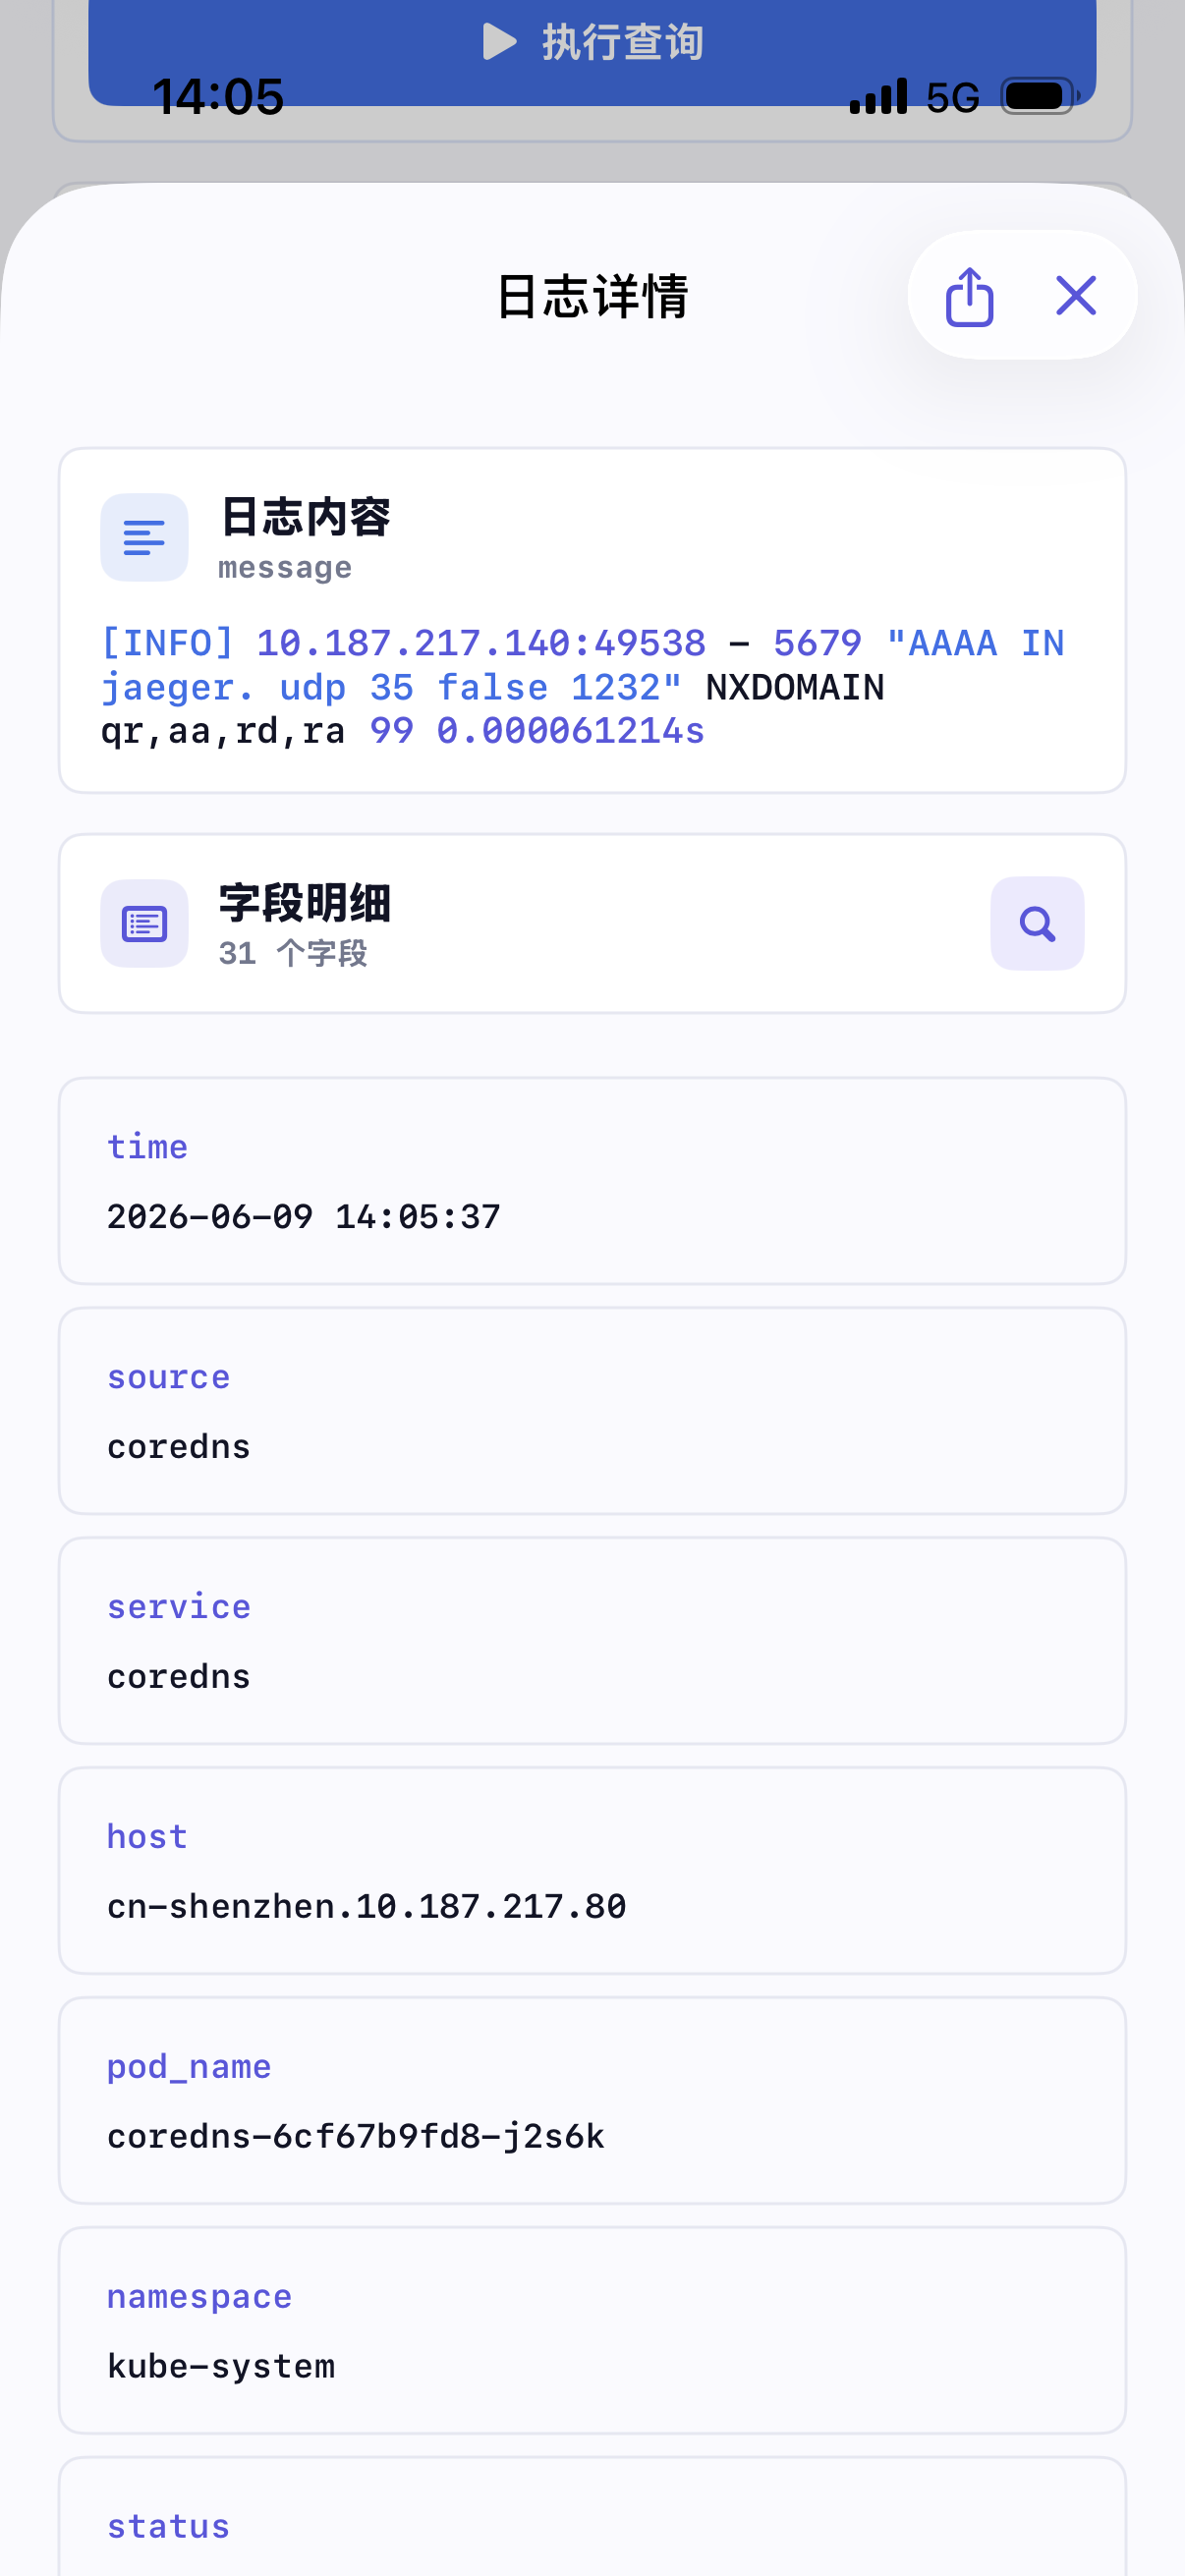
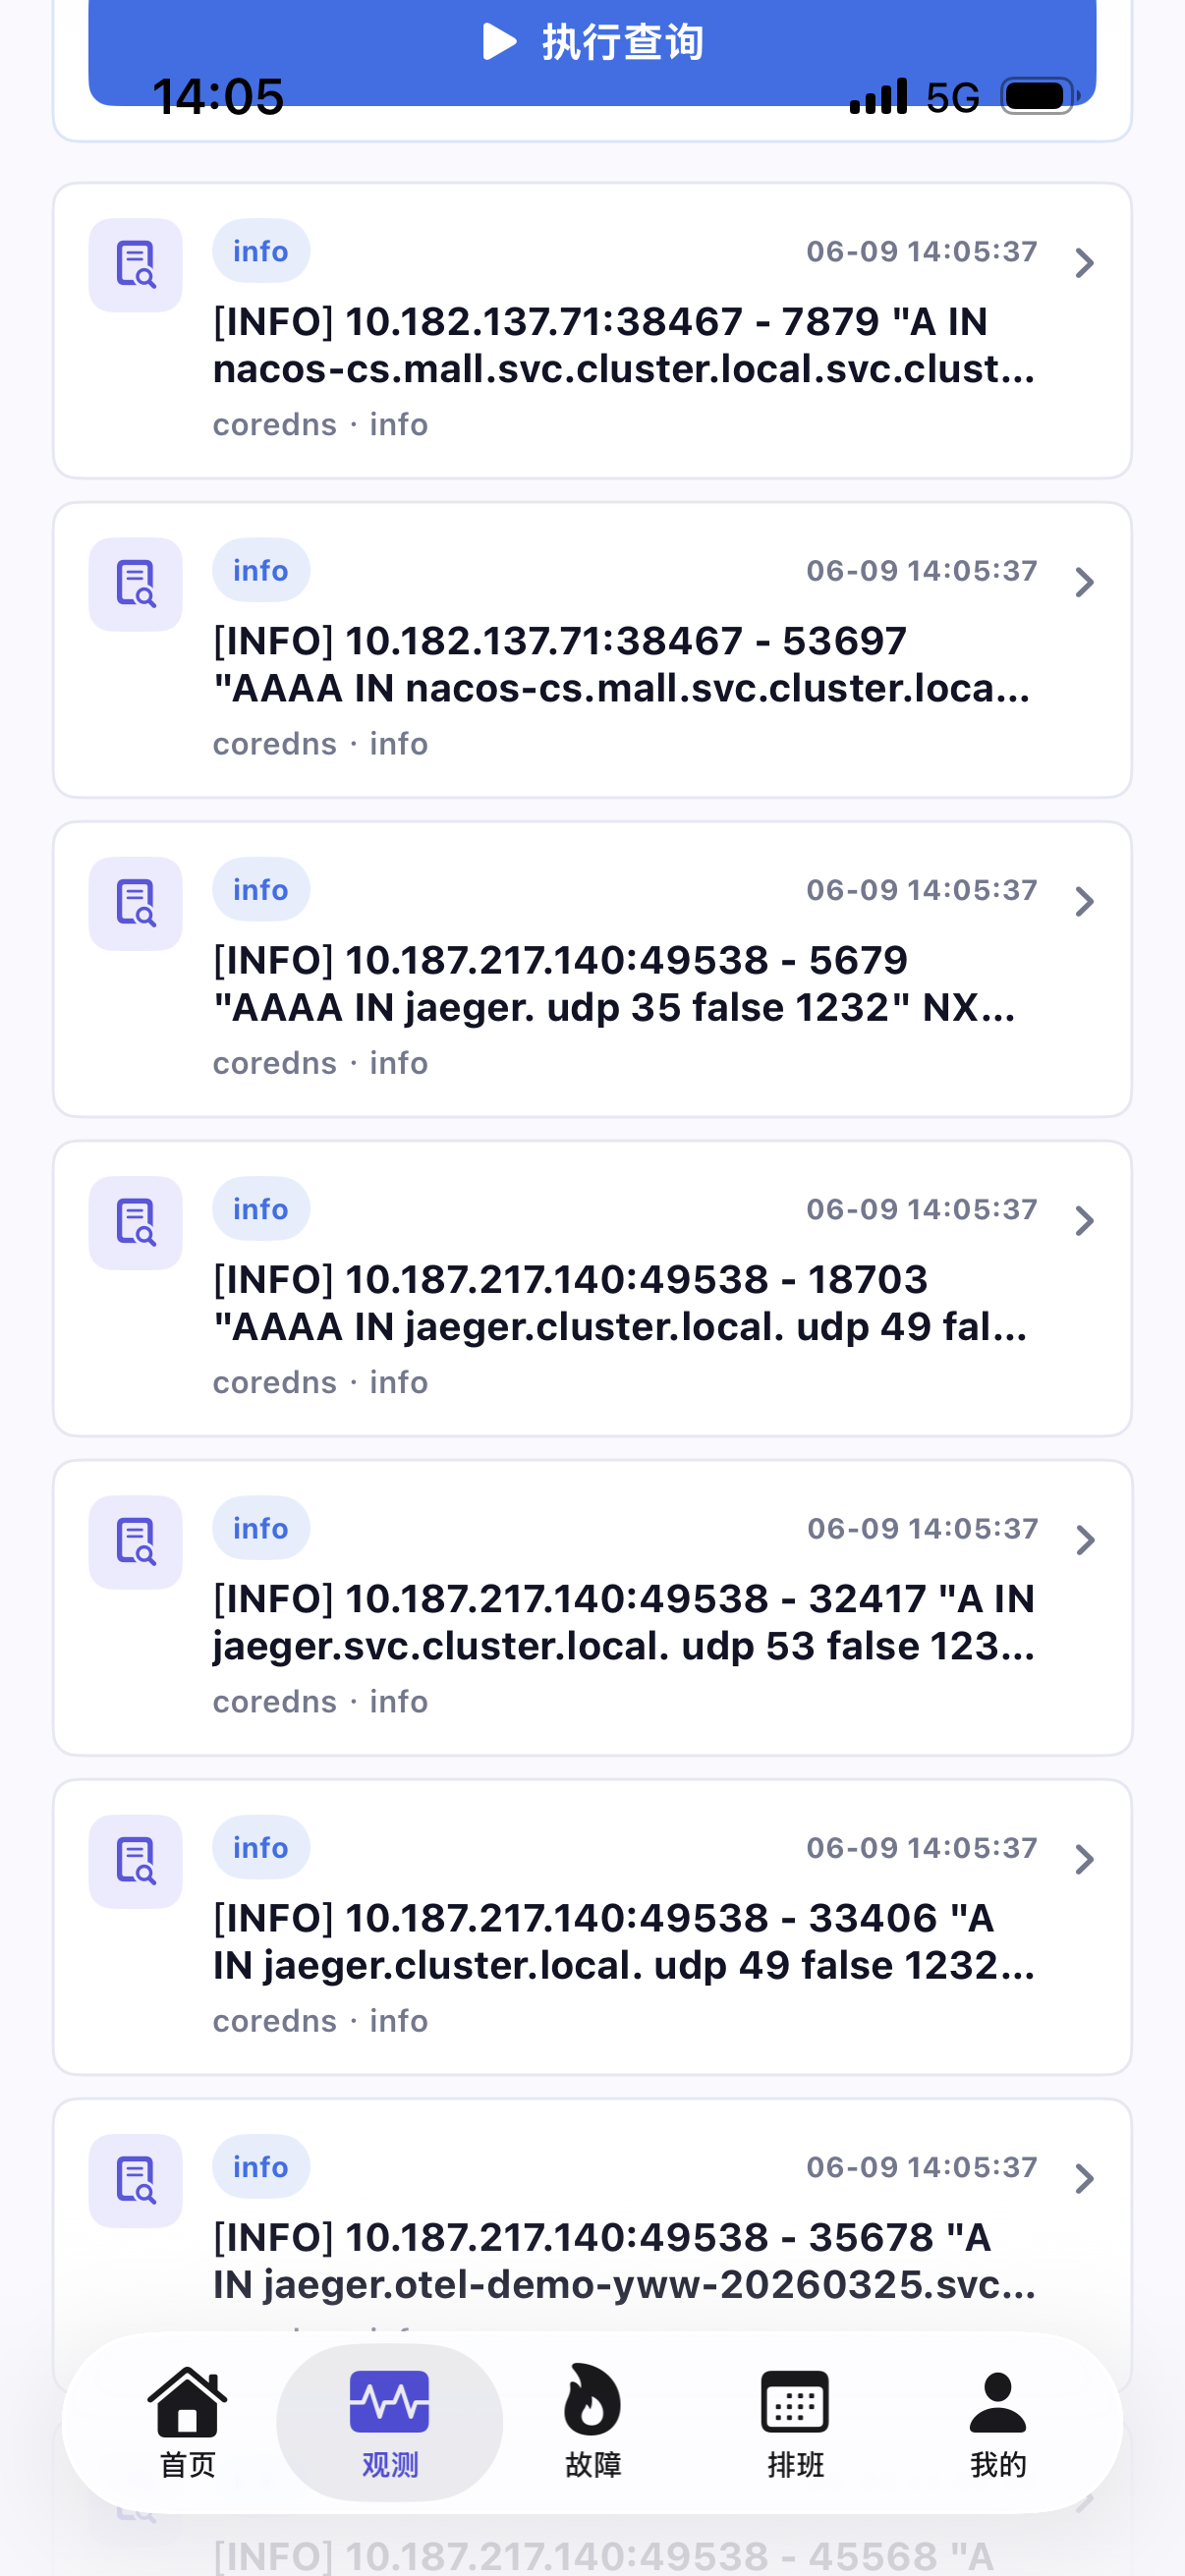
Trace query and waterfall chart:
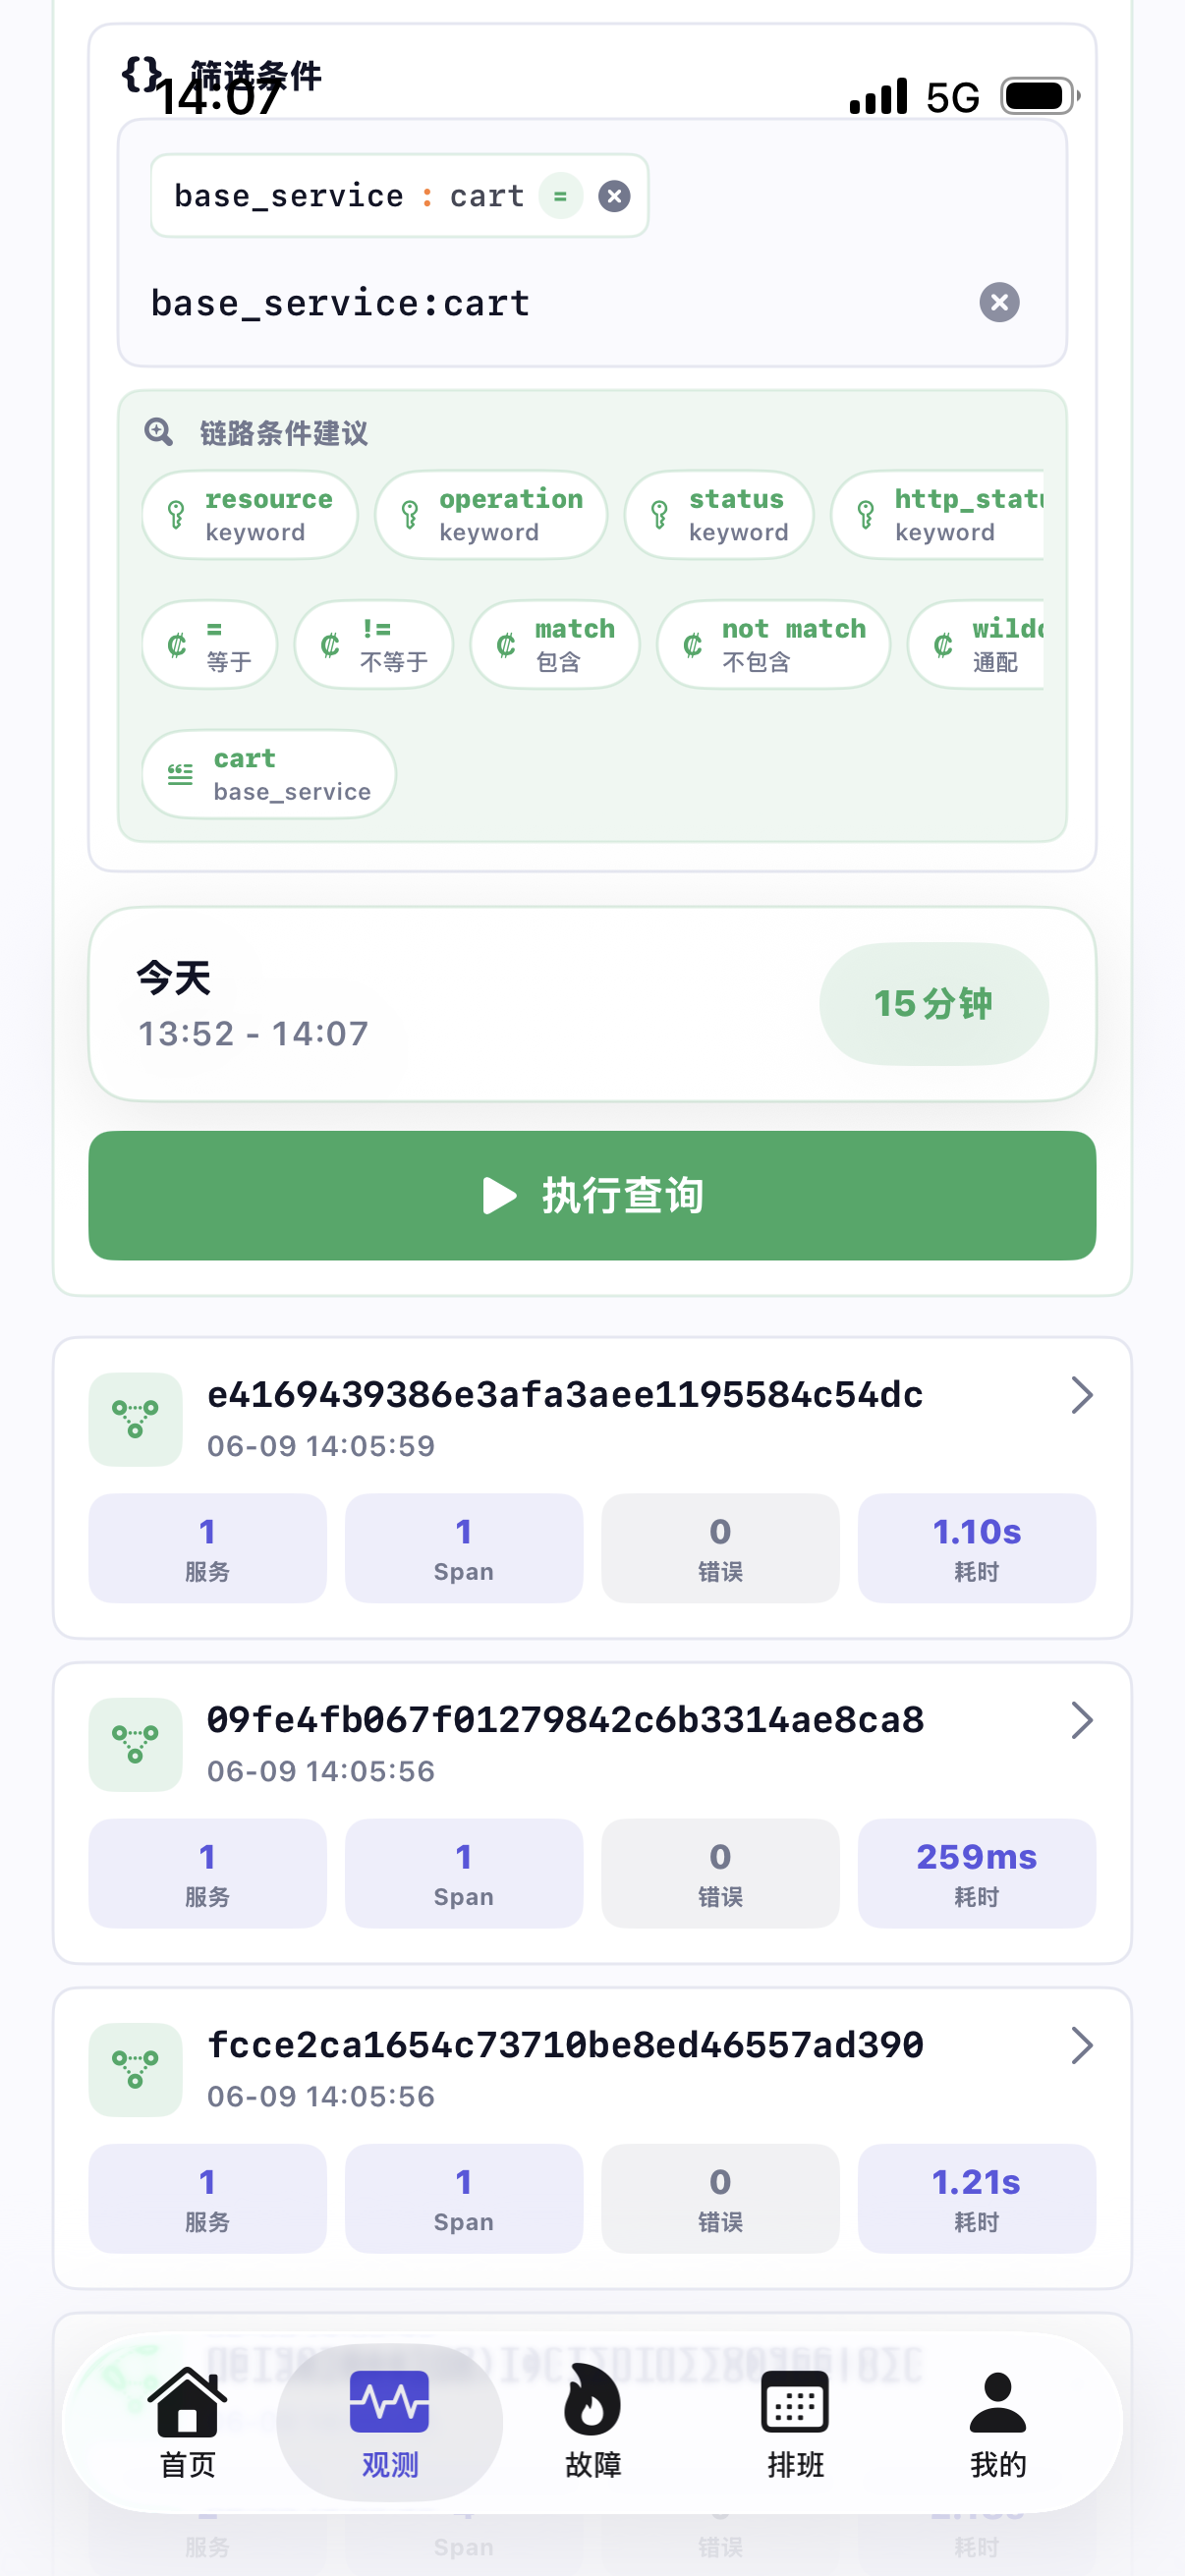
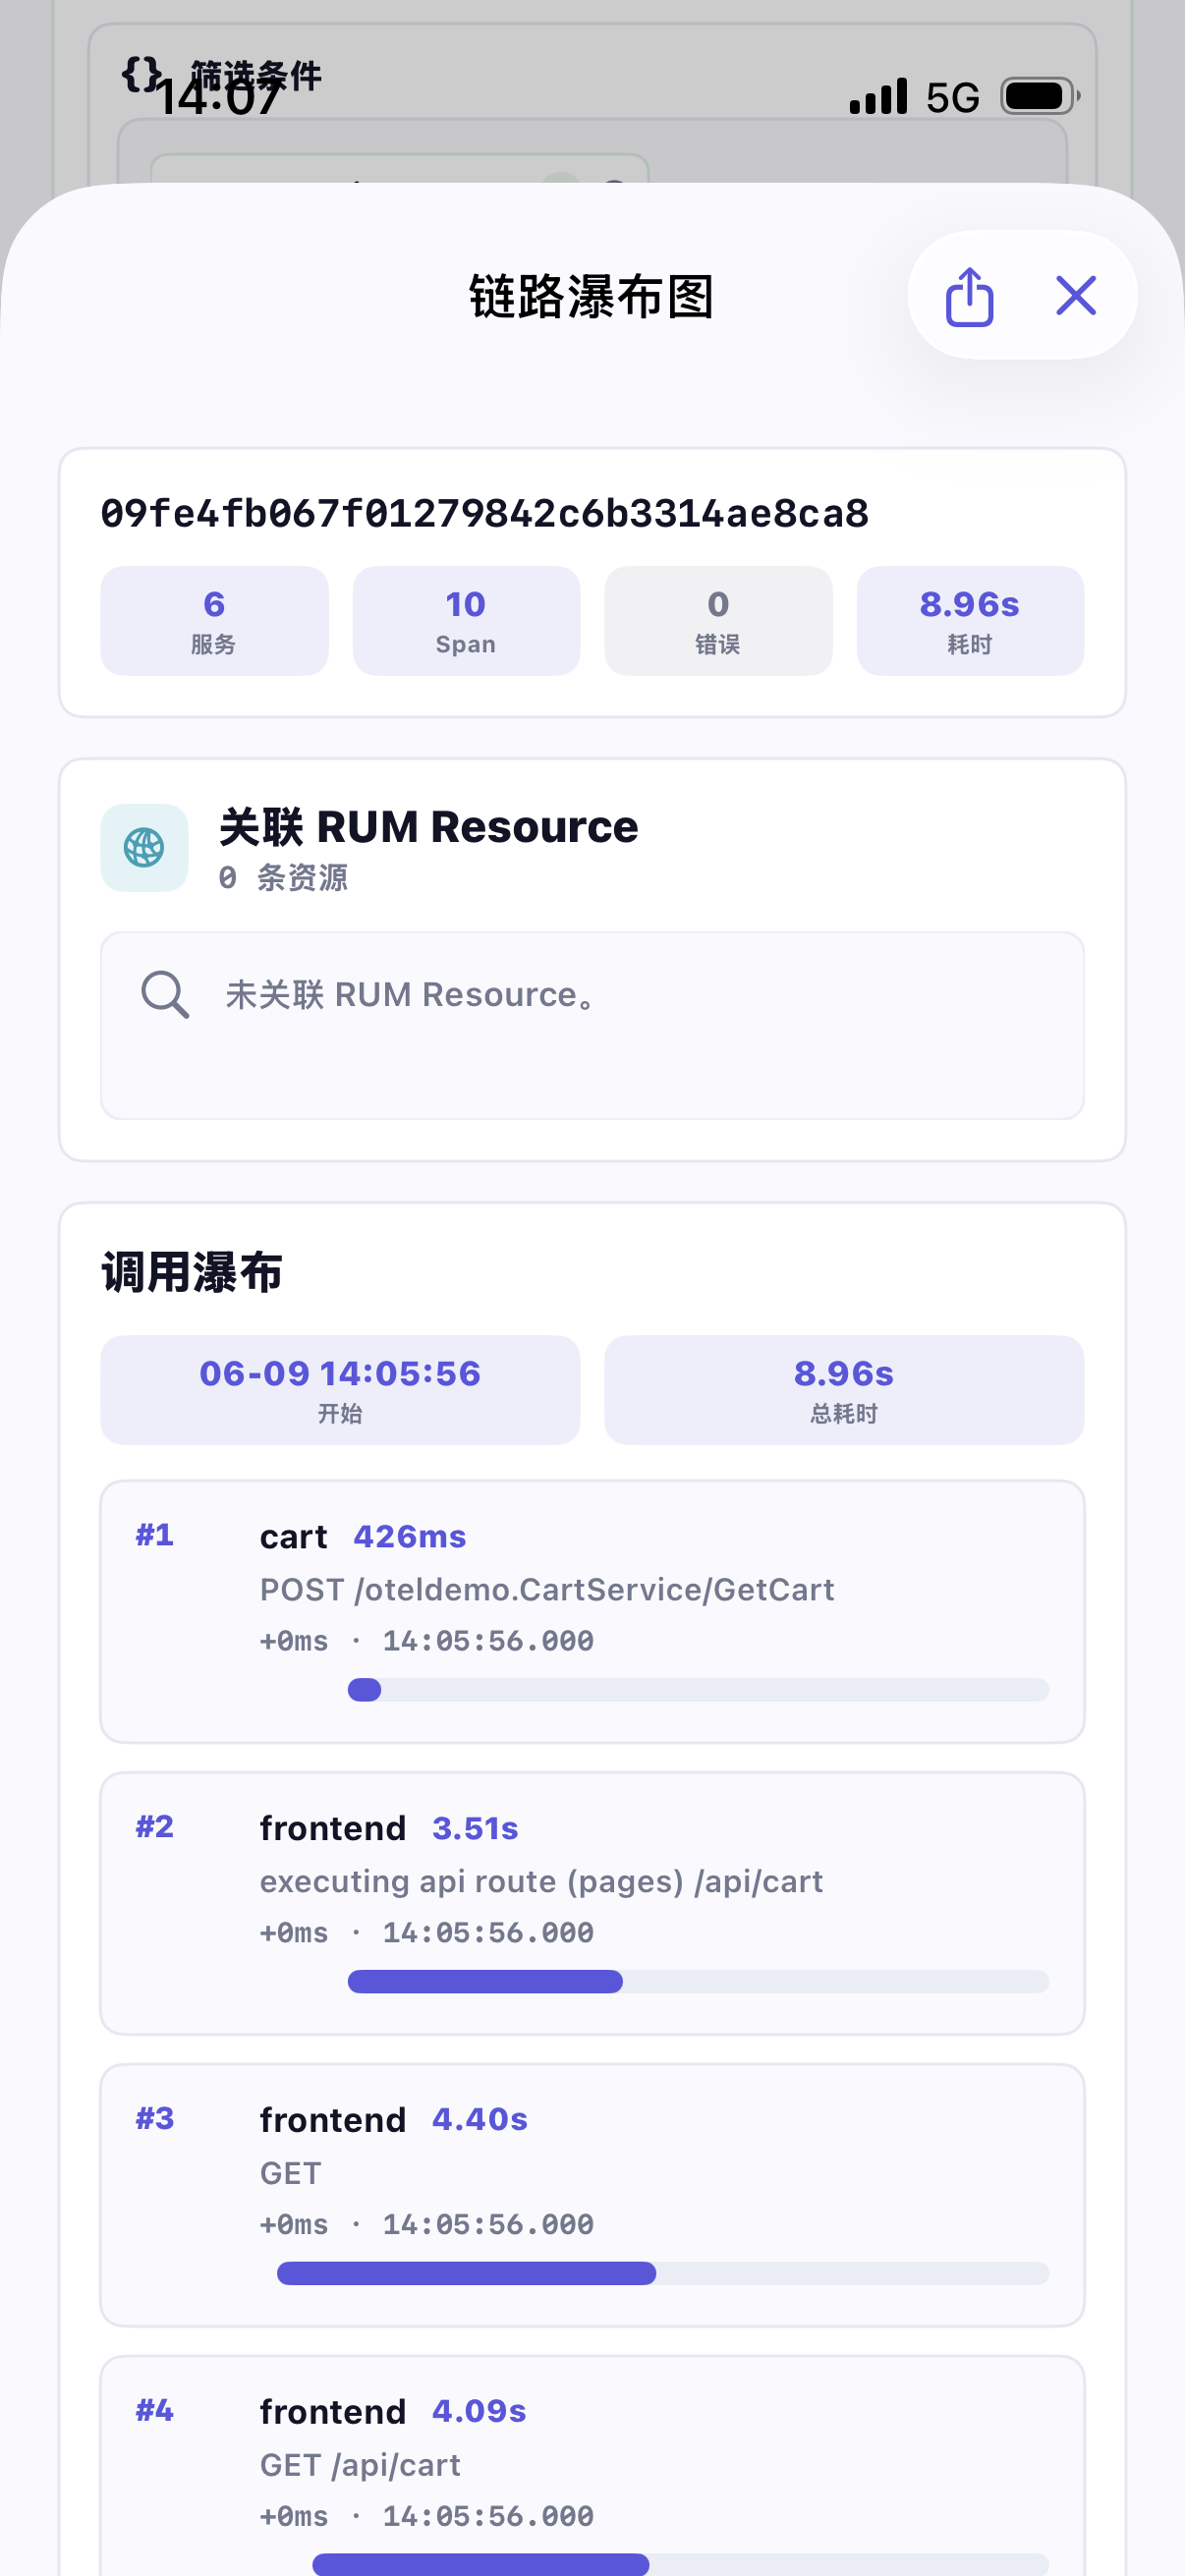
Event query and details:
RUM query and details:
Incident
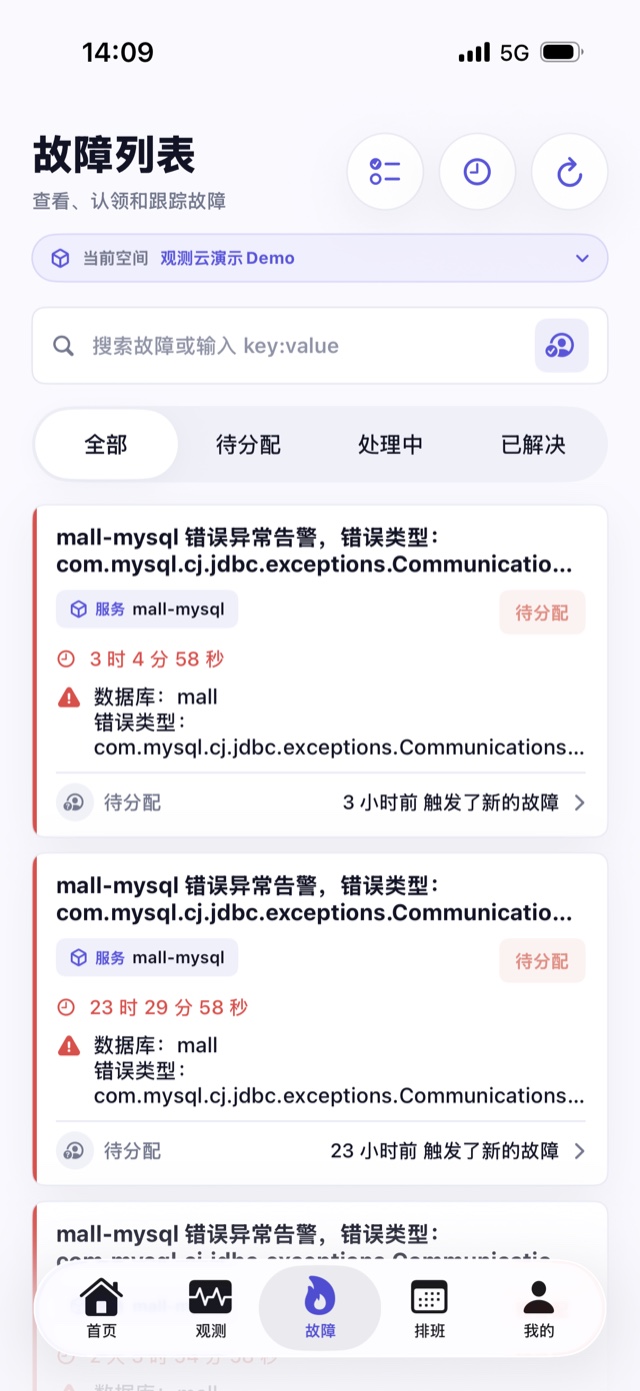
"Incident" is used to view, search, claim, and track incidents within the current workspace. The incident list supports switching by status, common statuses include unassigned, in progress, resolved, etc.
In the incident list, you can:
- Filter incidents by recent time or precise time.
- Search incidents by keyword or
key:valueconditions. - Use search suggestions to quickly select fields like title, level, status, site, host, assignee, etc.
- Enable "Related to Me" filter to prioritize viewing incidents notified to you, assigned to you, or related to your on-call rules.
- Long-press to enter multi-select mode and batch update incident status.
- Switch workspaces and refresh data for the current space.
Incident Details
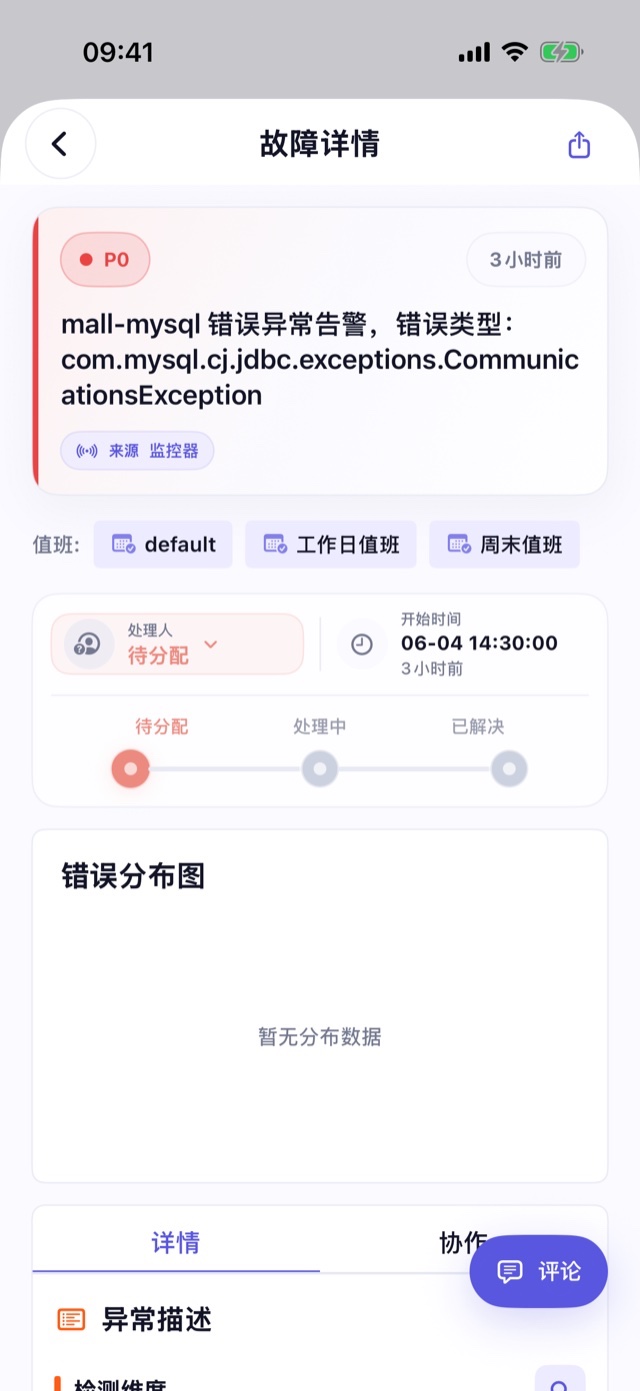
After entering incident details, you can view the incident's core information, status transitions, and investigation context. The details page supports:
- Viewing incident title, level, status, assignee, site, detection dimensions, and associated tags.
- Viewing event distribution to understand the distribution of the same incident under different statuses.
- Taking over the incident as in progress, marking as resolved, reopening, or abandoning handling.
- Viewing partitioned content like details, fields, collaboration records, etc.
- Viewing operation timelines, comments, and system changes in collaboration records, with the option to switch to comments only.
- Writing comments, @mentioning space members, and uploading attachments.
- Continuing to view the same incident on mobile or computer via sharing or Handoff.
When receiving incident pushes or collaboration @mentions, you can click the notification to enter the corresponding incident. If the notification points to a collaboration comment, the App will locate to the collaboration area and highlight the target comment.
Schedule
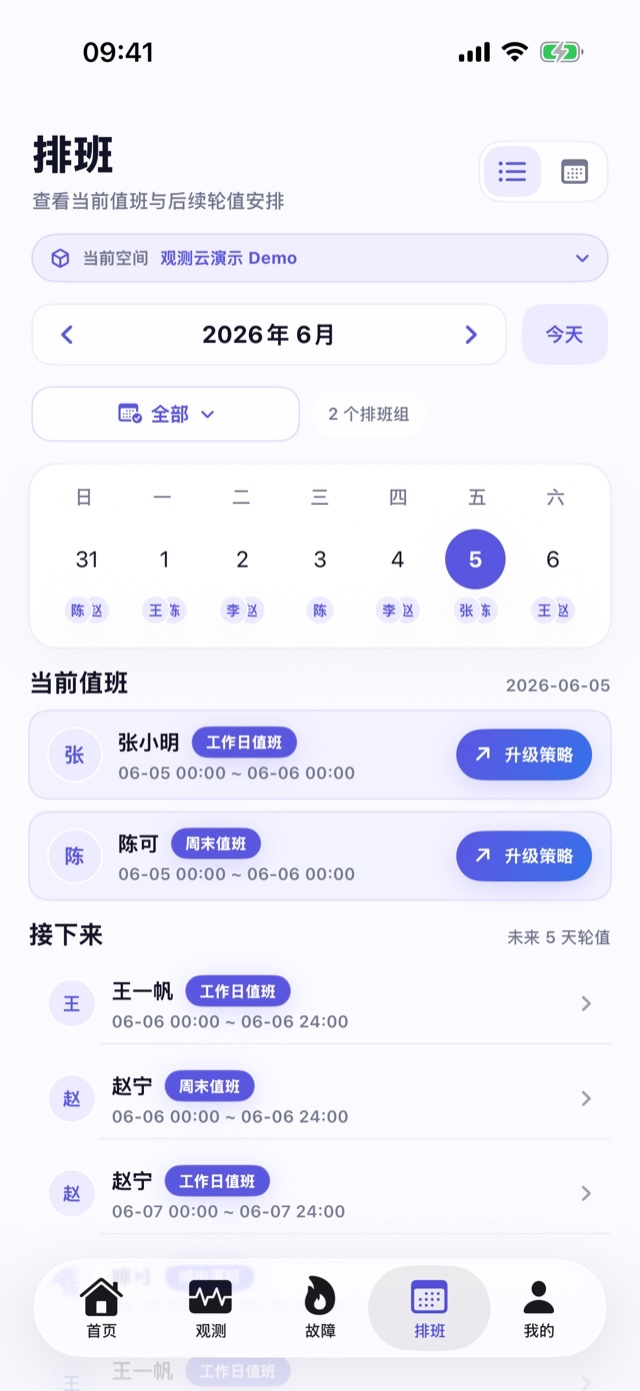
"Schedule" is used to view on-call arrangements within the current workspace. You can view on-call groups and daily on-call members by month, and enter on-call details to confirm current on-call, next on-call, and historical records.
The Schedule page supports:
- Viewing accessible on-call groups within the current month.
- Viewing the current on-call person for the day.
- Viewing on-call arrangements for different dates in the monthly calendar.
- Opening member on-call details to view on-call status, next on-call, and on-call records.
- Viewing member on-call contact information, including phone numbers and emails as configured.
- Viewing on-call escalation strategies, notification levels, notification methods, and notification targets to confirm how alerts reach on-call members.
- Switching workspaces and reloading schedule data.
My
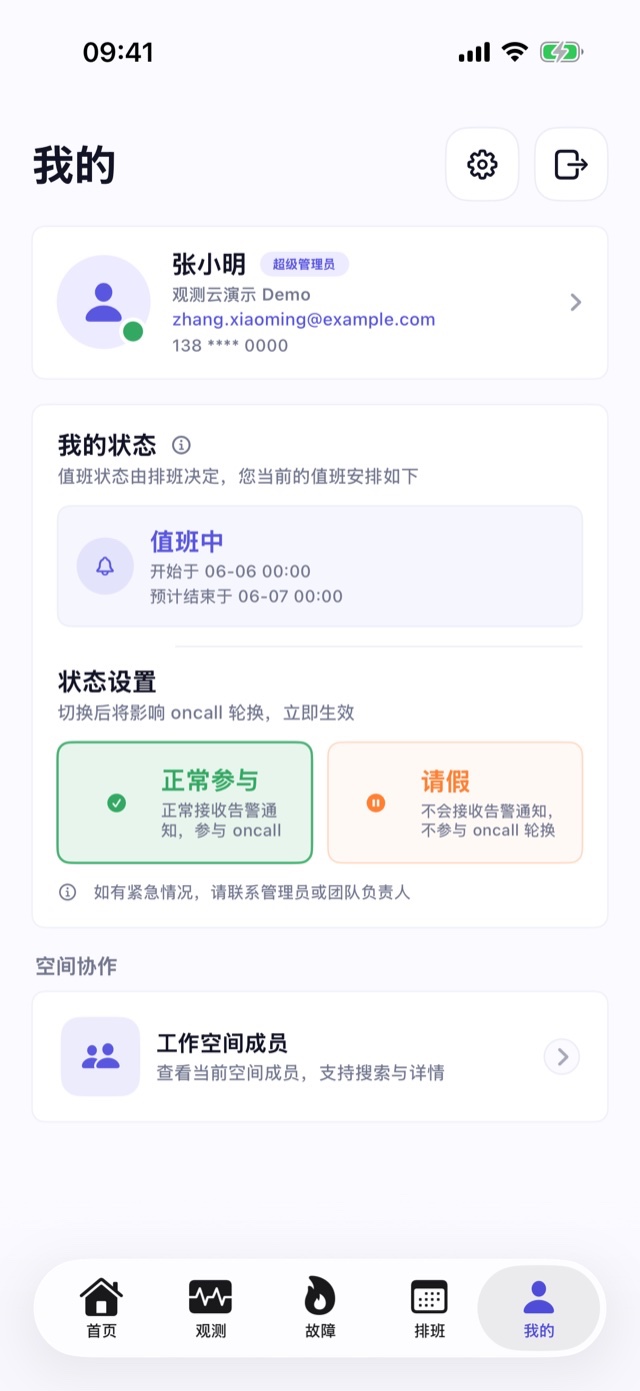
"My" is used to manage account, status, workspace collaboration, notifications, and App settings.
Account and Status
In "My", you can view the current account, email, phone number, avatar, and current workspace. You can also set your work status and view today's on-call overview. The on-call status is determined by the schedule. The App will display whether you are currently on-call based on the current schedule.
Switch Workspace
Guance App supports viewing data for all workspaces accessible by the account. You can open the workspace selector from Home, Observe, Incident, Schedule, or "My", search for workspaces, and switch.
If you currently have no workspace, you can go to the Guance web version to Create a New Workspace, or have another space's space administrator Invite You as a New Member to Another Space.
Workspace Members
In "My" - "Workspace Members", you can view current space members, search members by name, email, or account, and view member details. @mentions in incident collaboration comments also use workspace member information.
Message Notifications
Guance App provides mobile push capabilities based on workspace alerts and incident collaboration. You can view system notification permissions in "My" - "Settings" - "Push Settings", enable or disable App pushes, and manage notification preferences.
Push settings support preferences like only notifying incidents related to me, receiving unassigned incident reminders, receiving in-progress incident status changes, etc. If system notification permissions are not enabled, please go to iOS system settings to allow notifications first.
Dashboard Shortcut
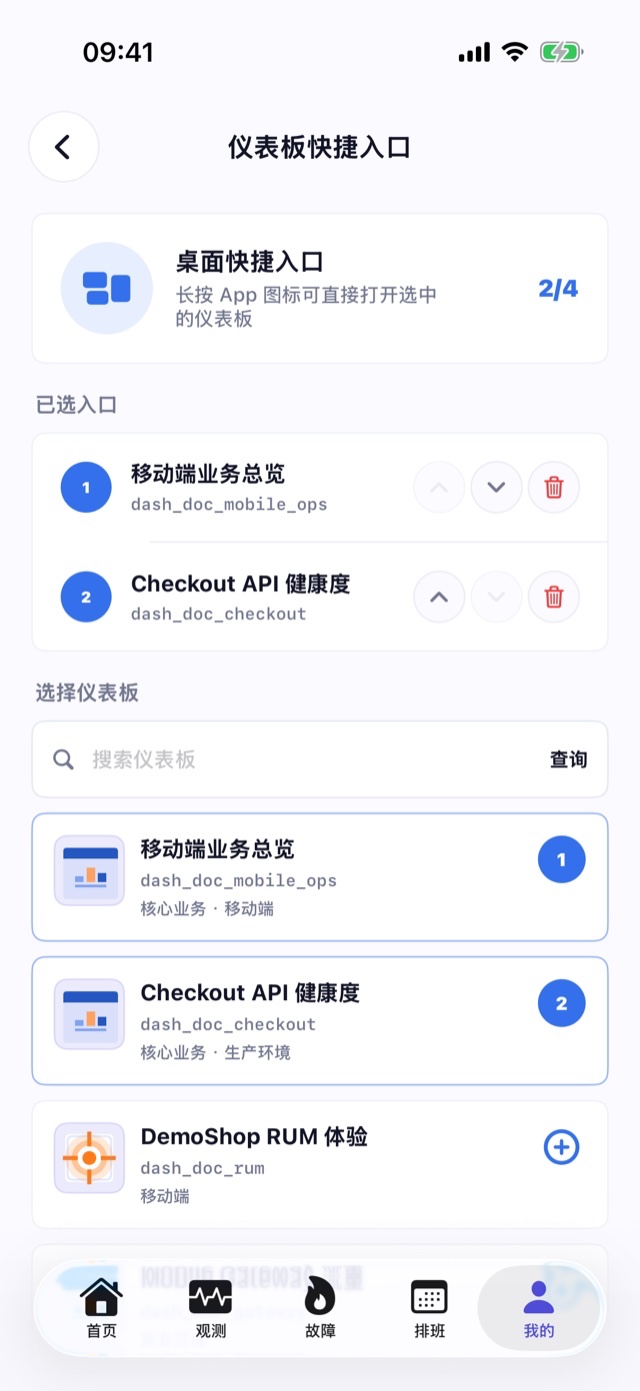
Guance App supports configuring dashboard desktop shortcuts. After configuration, you can long-press the App icon on the iOS home screen to directly open a specified dashboard. Up to 4 dashboard shortcuts can be configured per workspace.
You can search and select dashboards you want quick access to via "My" - "Settings" - "Dashboard Shortcuts", or adjust the order of selected shortcuts or remove shortcuts no longer needed.
Language, Appearance, and Account Security
In "My" - "Settings", you can also configure the following:
- Language Settings: Choose Follow System, Simplified Chinese, Traditional Chinese, or English.
- Appearance Settings: Choose Follow System, Day, or Night mode.
- Account Security: View current login method, site, workspace, recent login time, and local credential storage description.
- Debug Information: View device information for troubleshooting login, site, and push registration, without displaying tokens or keys.
- Local Data and Cache: Clear local login information, avatar cache, or all local data.
- Logout: End the current device session and return to the login page.
Common Capabilities
Time Widget
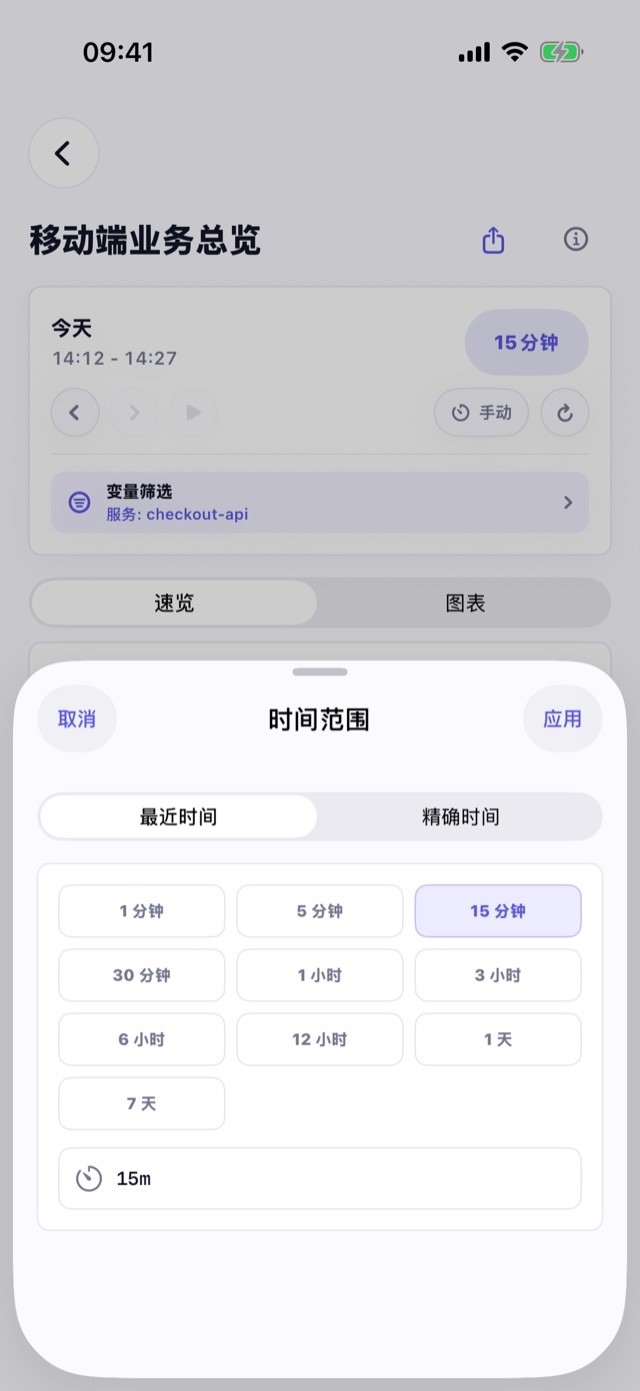
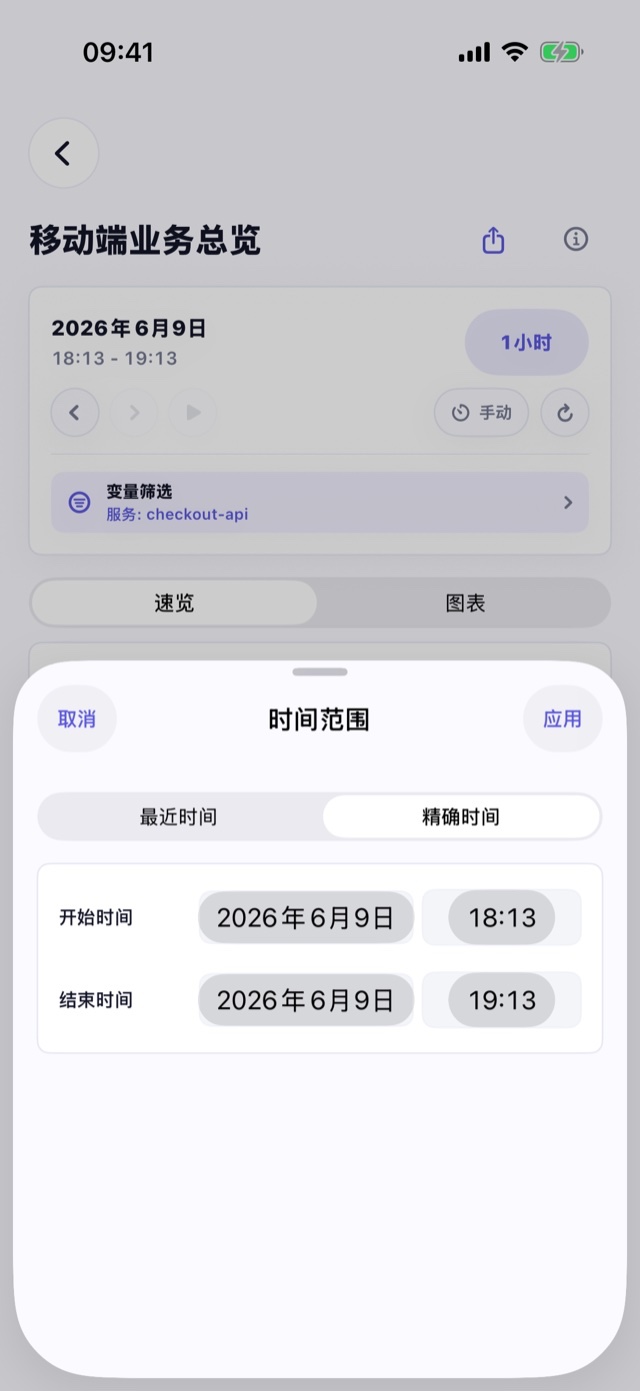
Guance App supports setting time ranges for Home incidents, observability queries, and dashboard displays via the Time Widget. You can choose preset times like last 1 minute, 5 minutes, 15 minutes, 1 hour, 1 day, 7 days, etc., or select start and end times for precise queries.
Search and Filter
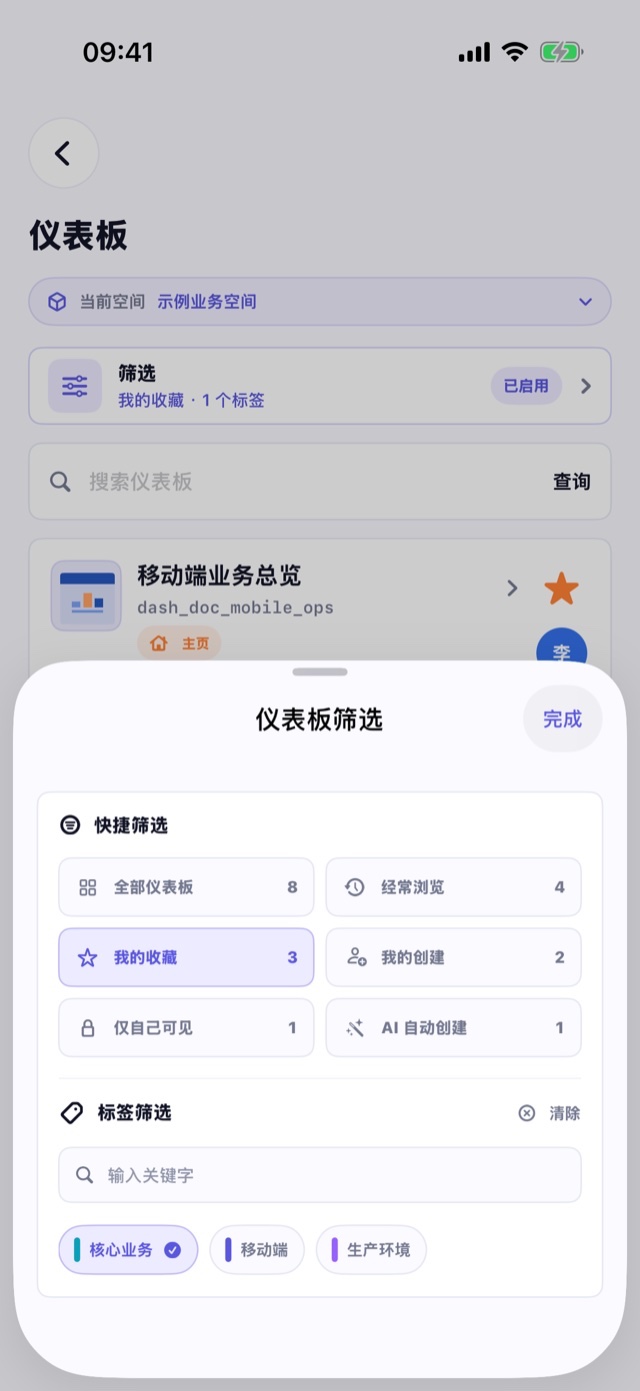
In incident, log, trace, event, RUM, and dashboard lists, you can use search and filter to quickly locate target data. Some pages support key:value field conditions, field suggestions, and value suggestions. For more field filtering details, refer to the documentation Search Instructions.
Share
Guance App supports sharing console links from incident details, dashboards, observability data details, and chart zoom pages. Click the "Share" button on the page to send the link to other collaboration members.
Note: When viewing shared link content, the recipient also needs to have access permissions to the workspace where the shared content resides.
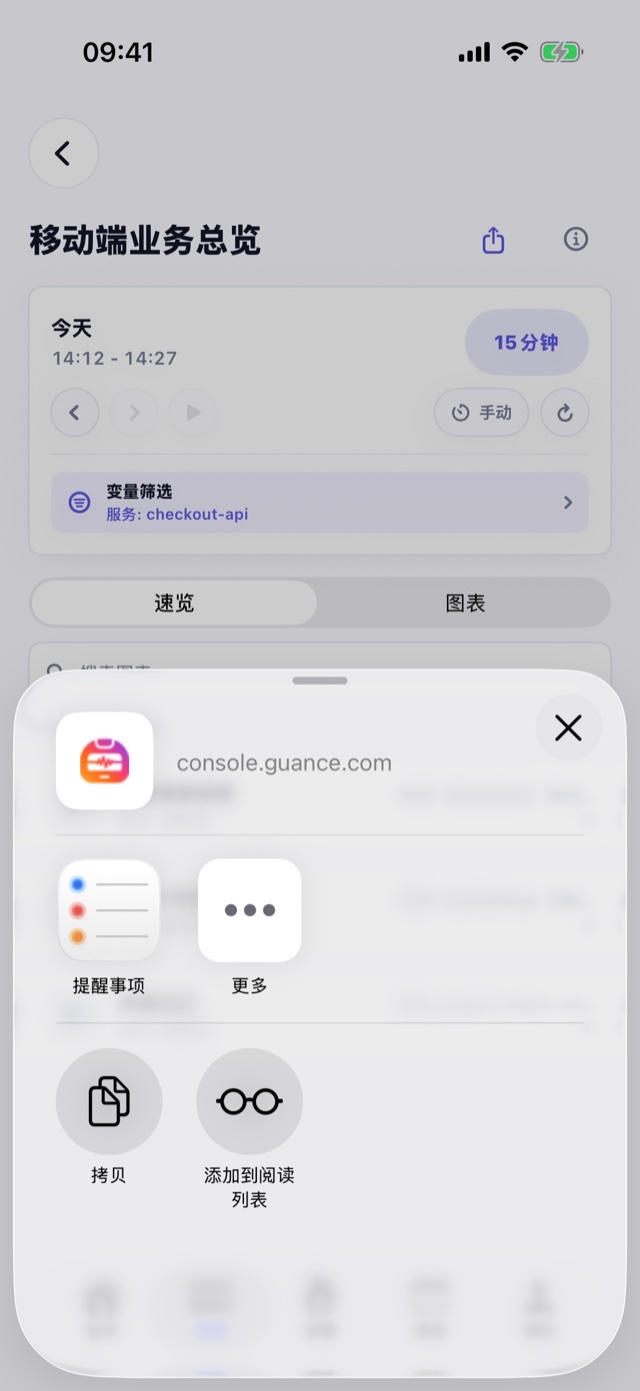
Scenario 1: Share to PC
In this scenario, you can click the received share link to log in and view the corresponding data on the PC.
Scenario 2: Share to iOS or Android Mobile Device with Guance App Installed
In this scenario, you can click the received share link to open the corresponding data page in the App. If the target site differs from the currently logged-in site, the App will prompt you to switch sites or log in again.
Link Jump
If Guance App is installed on your iOS or Android device, you can jump to the corresponding content page in the App by opening any web link from Guance anywhere, including alert notifications in DingTalk, Lark, or emails.
Currently supports opening incidents, dashboards, logs, traces, events, RUM, and related pages from links. When links contain site or workspace information, the App will attempt to enter the target context. If the target site differs from the currently logged-in site, the App will prompt to switch sites and log in again. If the current account has no permission to access the target space, please confirm account permissions first.
Handoff
Guance App supports synchronizing the viewing of incidents and observability data between mobile and computer via Handoff, helping you quickly switch devices when handling alerts, investigating issues, or following up on collaboration.
Note: To use Handoff, the computer must be macOS, the mobile device must be iOS, each device must have Handoff enabled, and use the same Apple ID logged into iCloud. The App must be installed and logged in, and the current account must also have permissions to the target workspace. For more settings, refer to the documentation How to Use Handoff.
Pages currently supporting Handoff include: incident details, dashboard details, zoomed dashboard charts, observability record details like logs/events/RUM, trace waterfall charts, and trace Span details. The App will publish the console URL corresponding to the current page, facilitating continued viewing of the same data on another device.
Scenario 1: View Data on Mobile, Continue Handling on Computer
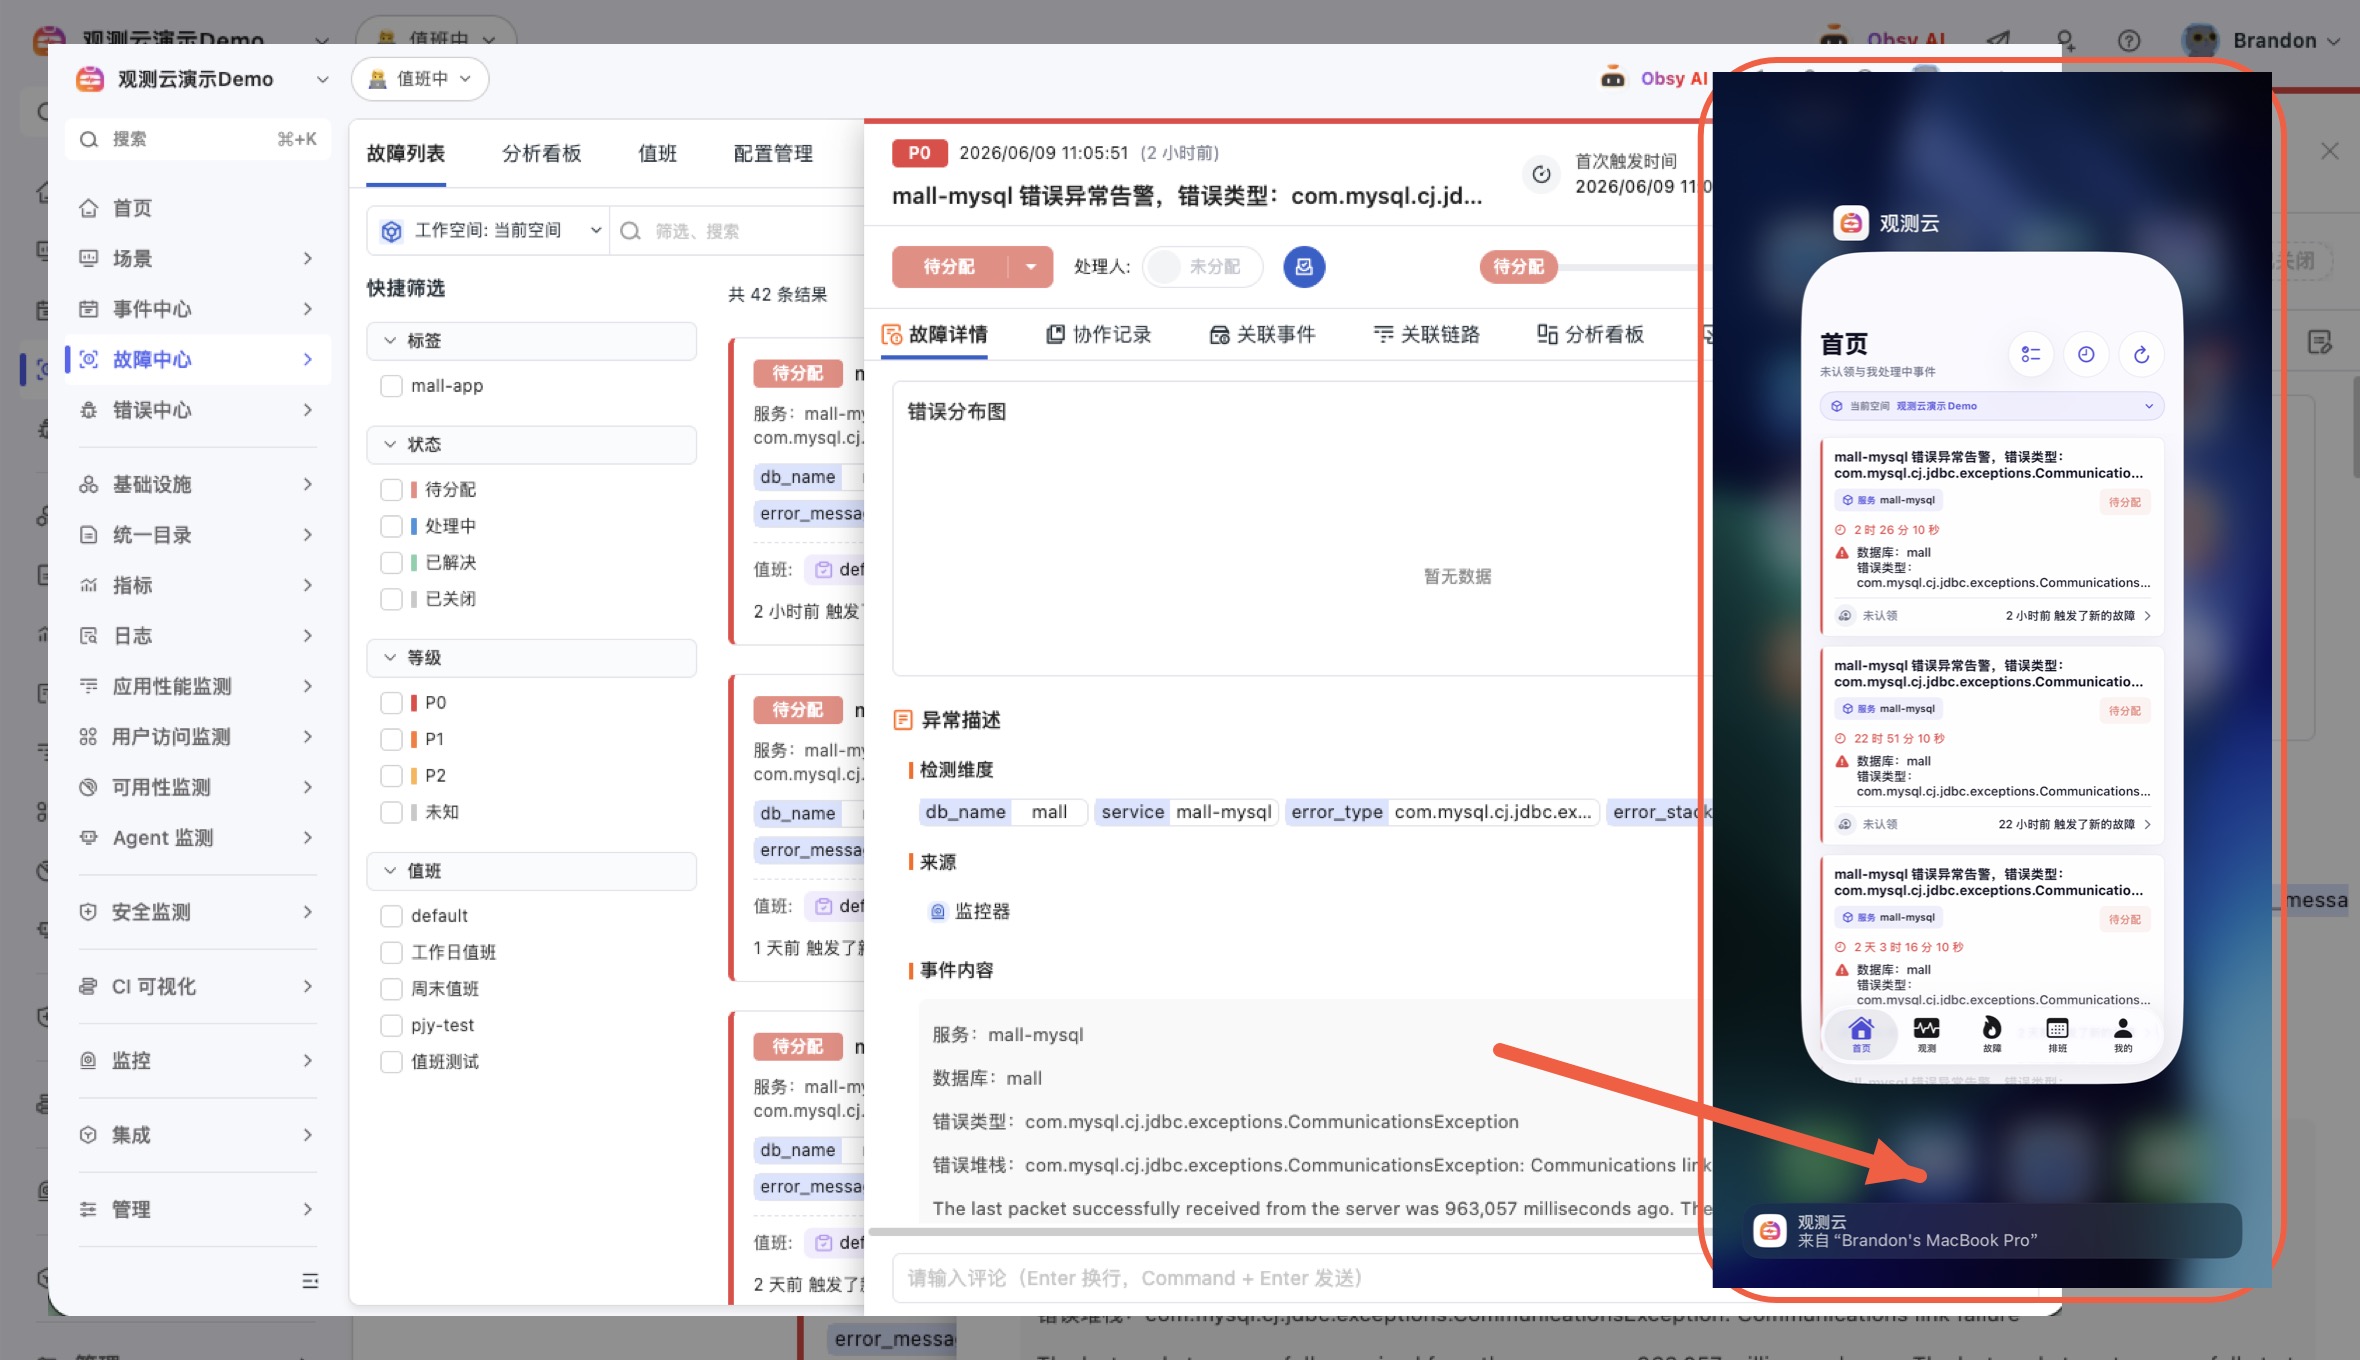
In this scenario, when you view an incident or observability data page supporting Handoff on mobile, a synchronized viewing prompt for the Guance App will appear in the macOS Dock. Click the prompt to open the corresponding console page in the browser.
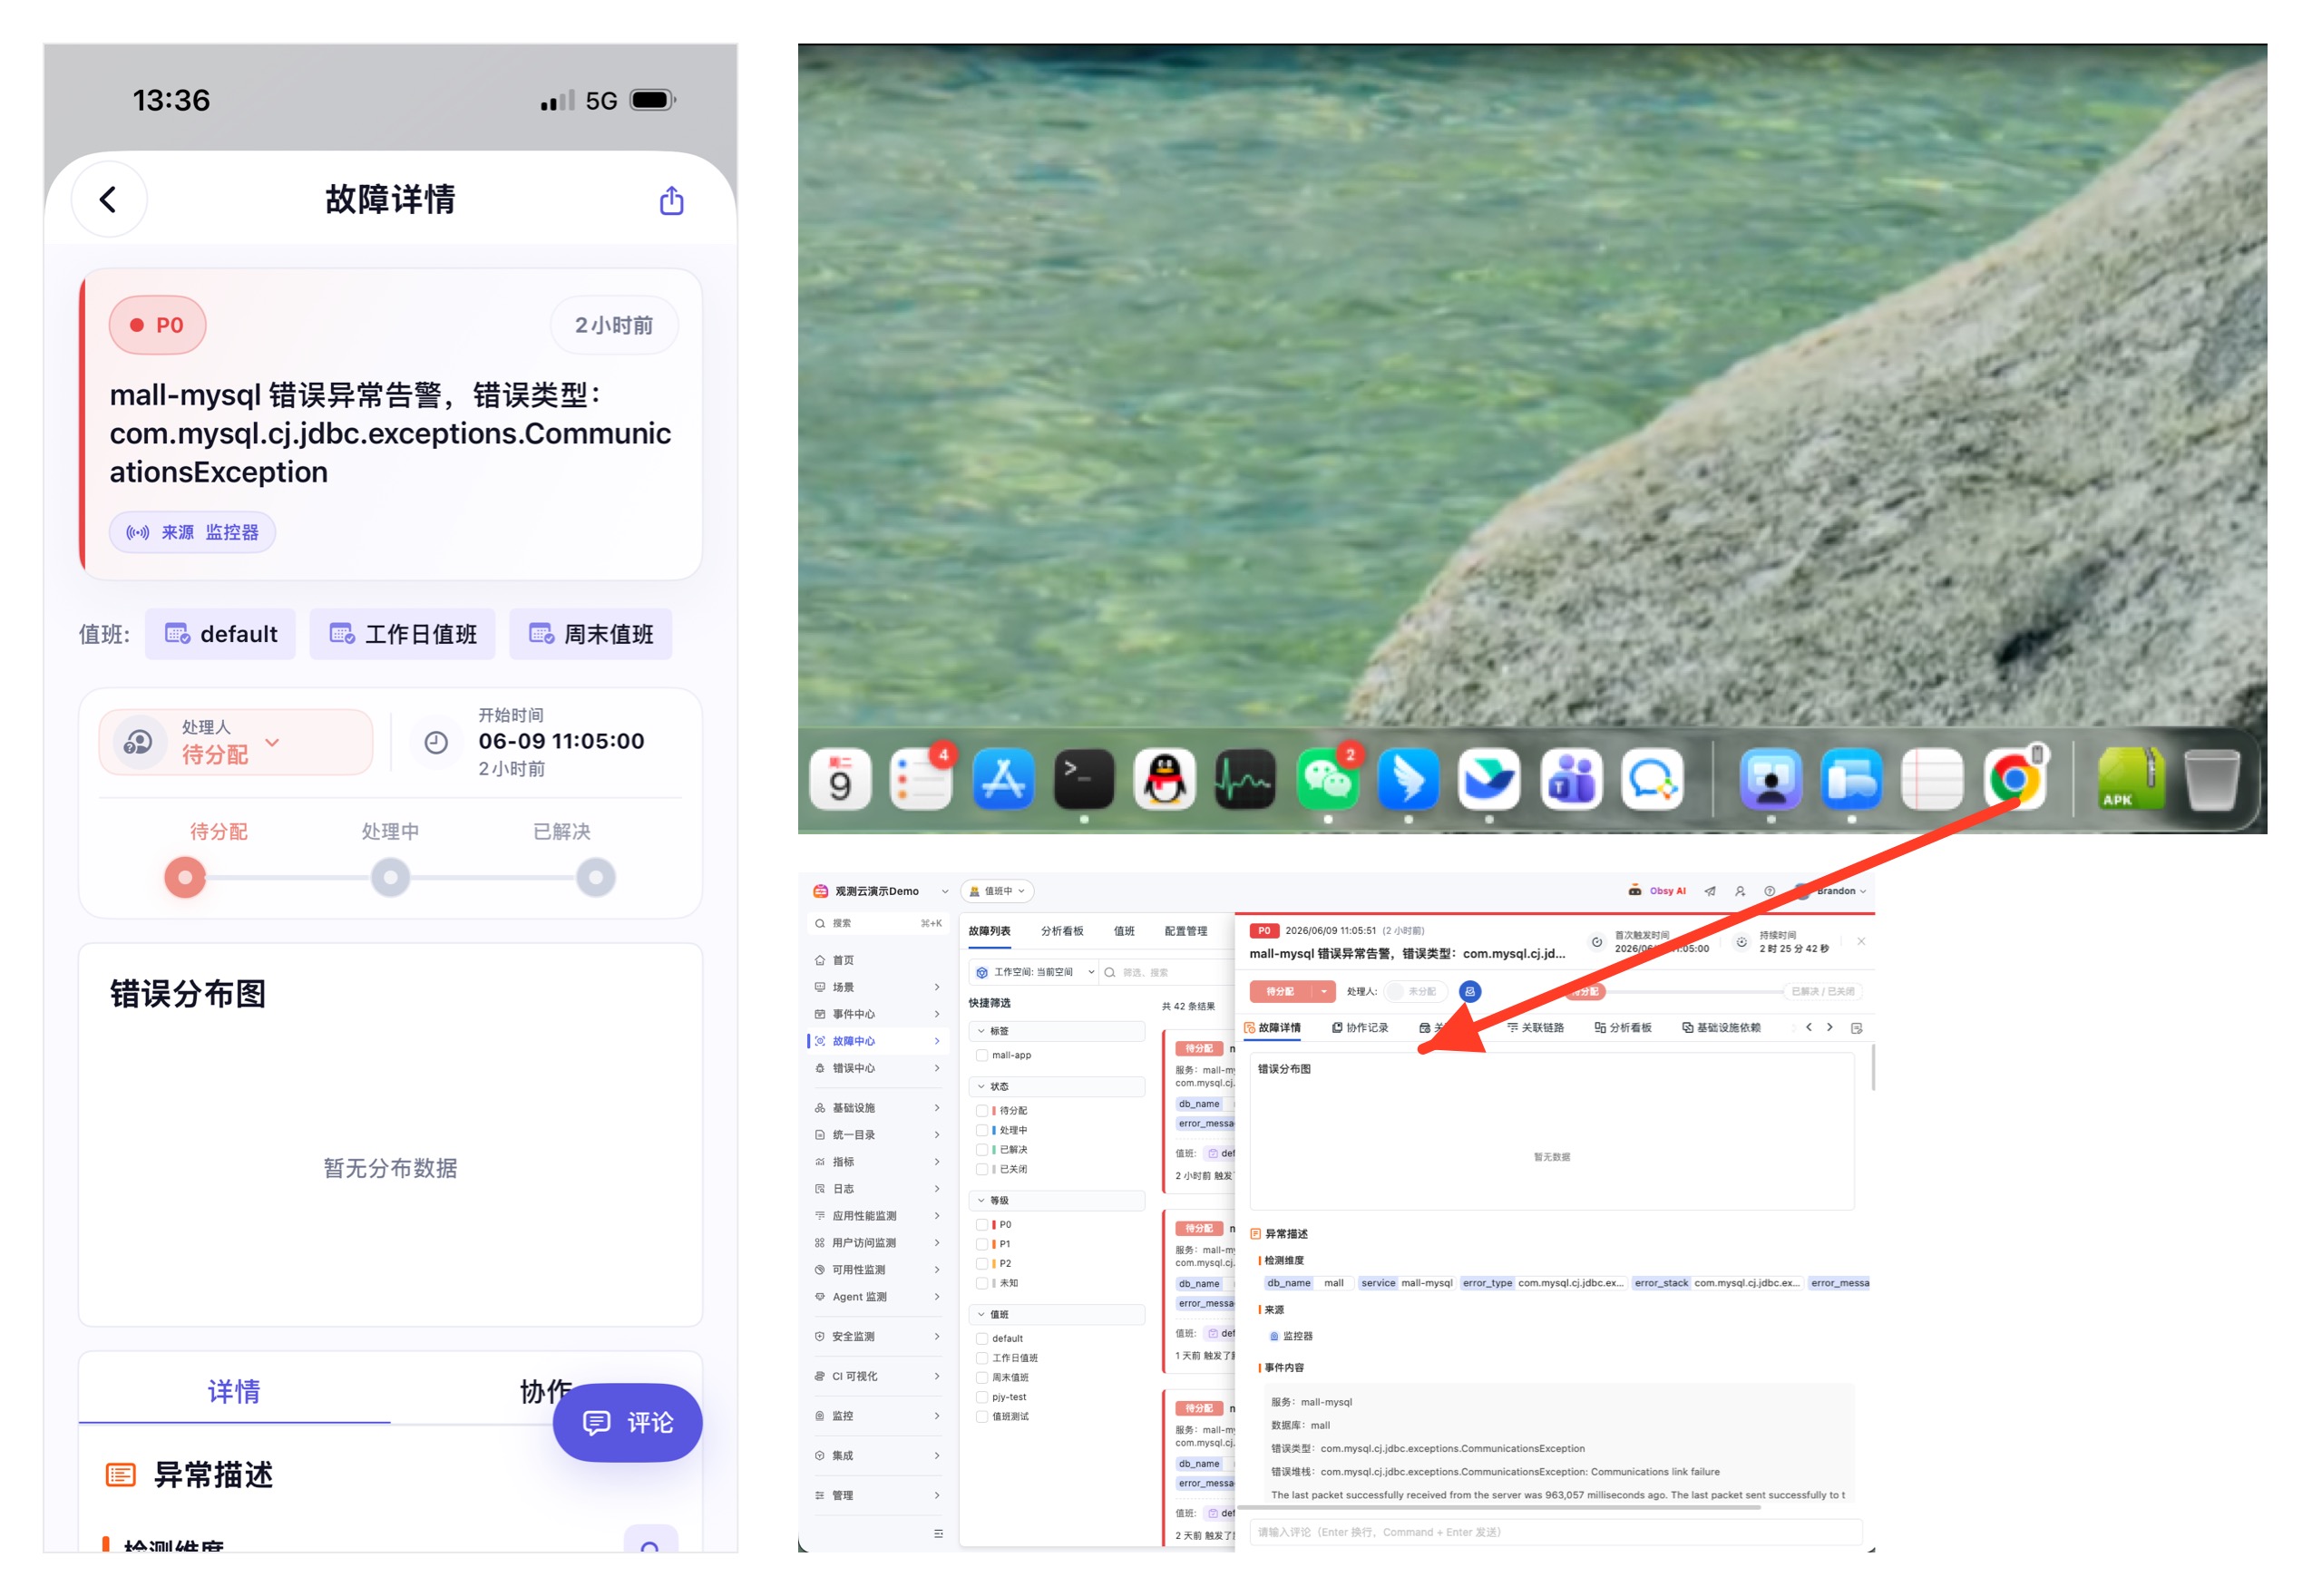
Scenario 2: View Data on Computer, Continue Handling on Mobile
In this scenario, when you view a data link on the computer that supports opening on mobile, a synchronized viewing prompt for the Guance App will appear at the bottom of the iOS device. Click the prompt to open the corresponding data page in the App. If the target site or workspace differs from the current context, the App will prompt to switch sites, log in again, or confirm workspace permissions.