Resolving Alibaba Cloud API Signature Issues for Billing Analysis
Purchasing multiple public cloud resources versus procuring private hosts has a fundamentally different impact on cost awareness. Procuring private hosts is a one-time investment; whether you use them or not, or use them well, does not have a lasting impact on your subsequent expenditure. With public cloud resources, on the other hand, you constantly need to remind yourself: although the initial investment is small, costs are incurred every day. Therefore, we urgently need a method that allows us to see at a glance the details of cost expenditures and billing analysis across multiple cloud resources.
Collecting Alibaba Cloud Billing API Data
First, let's take Alibaba Cloud billing as an example. To collect Alibaba Cloud billing information for analysis, we need to have a good understanding of the transaction and billing management APIs. The most troublesome part when calling Alibaba Cloud APIs is the signature mechanism. Alibaba Cloud has a dedicated explanation in its general documentation, but it's only a description of the signature mechanism. This makes it difficult for less experienced developers. So, how do we collect billing data based on this incomplete documentation?
API Request Principle
Simply put, calling an Alibaba Cloud API is an HTTP request (mostly GET, and we are also using GET requests here), but it requires a bunch of parameters. For example, a request to view a snapshot would be:
http://ecs.aliyuncs.com/?SignatureVersion=1.0&Format=JSON&Timestamp=2017-08-07T05%3A50%3A57Z&RegionId=cn-hongkong&AccessKeyId=xxxxxxxxx&SignatureMethod=HMAC-SHA1&Version=2017-12-14&Signature=%2FeGgFfxxxxxtZ2w1FLt8%3D&Action=DescribeSnapshots&SignatureNonce=b5046ef2-7b2b-11e7-a3c5-00163e001831&ZoneId=cn-hongkong-b
The common parameters required for the request (i.e., parameters needed for all API calls) are:
SignatureVersion # Signature algorithm version, currently 1.0
Format # Format of the returned message, JSON or XML, default is XML
Timestamp # Request timestamp in UTC, e.g., 2021-12-16T12:00:00Z
AccessKeyId # Account key ID
SignatureMethod # Signature method, currently HMAC-SHA1
Version # Version number in date format, e.g., 2017-12-14, varies by product
Signature # The most difficult part to handle
SignatureNonce # Unique random number to prevent network attacks. Use different random numbers for different requests.
Except for Signature, the other parameters are relatively easy to obtain. Some are even fixed values. For details, refer to the Alibaba Cloud documentation
. In addition to the common parameters, you also need the request parameters for the specific interface (Action). The parameters for each Action interface can be found in the product's interface documentation, such as QuerySettleBill
. Signature is based on both common parameters and interface parameters, so it is more complex.
Constructing the Canonicalized Query String
- Construct a dict
. In Python, a dict is used to represent the one-to-one correspondence of parameters. Create a dict and fill in the request parameters.
D = {
    'BillingCycle':str(time.strftime("%Y-%m", time.gmtime())),
    'Action':'QuerySettleBill',
    # 'PageNum':'5',
    'Format':'JSON',
    'Version':'2017-12-14',
    'AccessKeyId':'LTAI5tLumx55Vui4WJwZJneK',
    'SignatureMethod':'HMAC-SHA1',
    'MaxResults' : '300',
    # 'NextToken':"", #?
    'Timestamp':str(time.strftime("%Y-%m-%dT%H:%M:%SZ", time.gmtime())),
    'SignatureVersion':'1.0'
    # 'SignatureNonce':str_seed
}
- Sort
. Since the signature requires uniqueness, including the order, the parameters must be sorted by name.
  # Since the signature requires uniqueness, including the order, the parameters must be sorted by name
        sortedD = sorted(D.items(),key=lambda x: x[0])
- URL Encoding
. Since the canonicalized query string must use the UTF-8 character set, some characters in the request parameter names and values that do not conform to the standard need to be URL-encoded. The specific rules are:
Characters AZ, az, 0~9, and "-", "_", ".", "~" are not encoded;
. Other characters are encoded as %XY, where XY is the hexadecimal representation of the character's ASCII code. For example, the double quotation mark (") is encoded as %22;
. Extended UTF-8 characters are encoded as %XY%ZA…;
. Spaces ( ) are encoded as %20, not plus signs (+).Note: Libraries that support URL encoding (such as
java.net.URLEncoderin Java) generally follow the MIME type "application/x-www-form-urlencoded". When implementing, you can directly use such libraries, then replace the plus sign (+) with %20, the asterisk (*) with %2A, and %7E back to the tilde (~) to obtain the encoding string described above.
Here we use the Python urllib library for encoding:
# Use the urllib library in Python for encoding
def percentEncode(str):
    res = urllib.parse.quote(str.encode('utf8'), '')
    res = res.replace('+', '%20')
    res = res.replace('*', '%2A')
    res = res.replace('%7E', '~')
    return res
- Generate the Canonicalized Query String
# Generate the canonicalized query string
canstring = ''
for k,v in sortedD:
    canstring += '&' + percentEncode(k) + '=' + percentEncode(v)
Construct the StringToSign
The rule is:
StringToSign=
HTTPMethod + "&" +
percentEncode("/") + "&" +
percentEncode(CanonicalizedQueryString)
So in this example:
Calculate the HMAC Value
# access_key_secret
access_key_secret = '<access_key_secret>'
# Calculate the HMAC value
h = hmac.new((access_key_secret + "&").encode('utf8'), stringToSign.encode('utf8'), sha1)
Calculate the Signature Value
# Calculate the signature value and generate the signature
signature = base64.encodestring(h.digest()).strip()
At this point, the signature signature is generated.
Add the Signature
So in this example, the final request URL is:
# Final API call
url = 'http://business.aliyuncs.com/?' + urllib.parse.urlencode(D)
http://business.aliyuncs.com/?BillingCycle=2021-12&Action=QuerySettleBill&Format=JSON&Version=2017-12-14&AccessKeyId=LTAI5tLumx55Vui4WJwZJneK&SignatureMethod=HMAC-SHA1&MaxResults=300&Timestamp=2021-12-16T12%3A27%3A58Z&SignatureVersion=1.0&SignatureNonce=0.30196531140307337&NextToken=&Signature=zFb4631sSGONvAeWD3xCIovMeoM%3D
You can directly access it in a browser, and the result is:
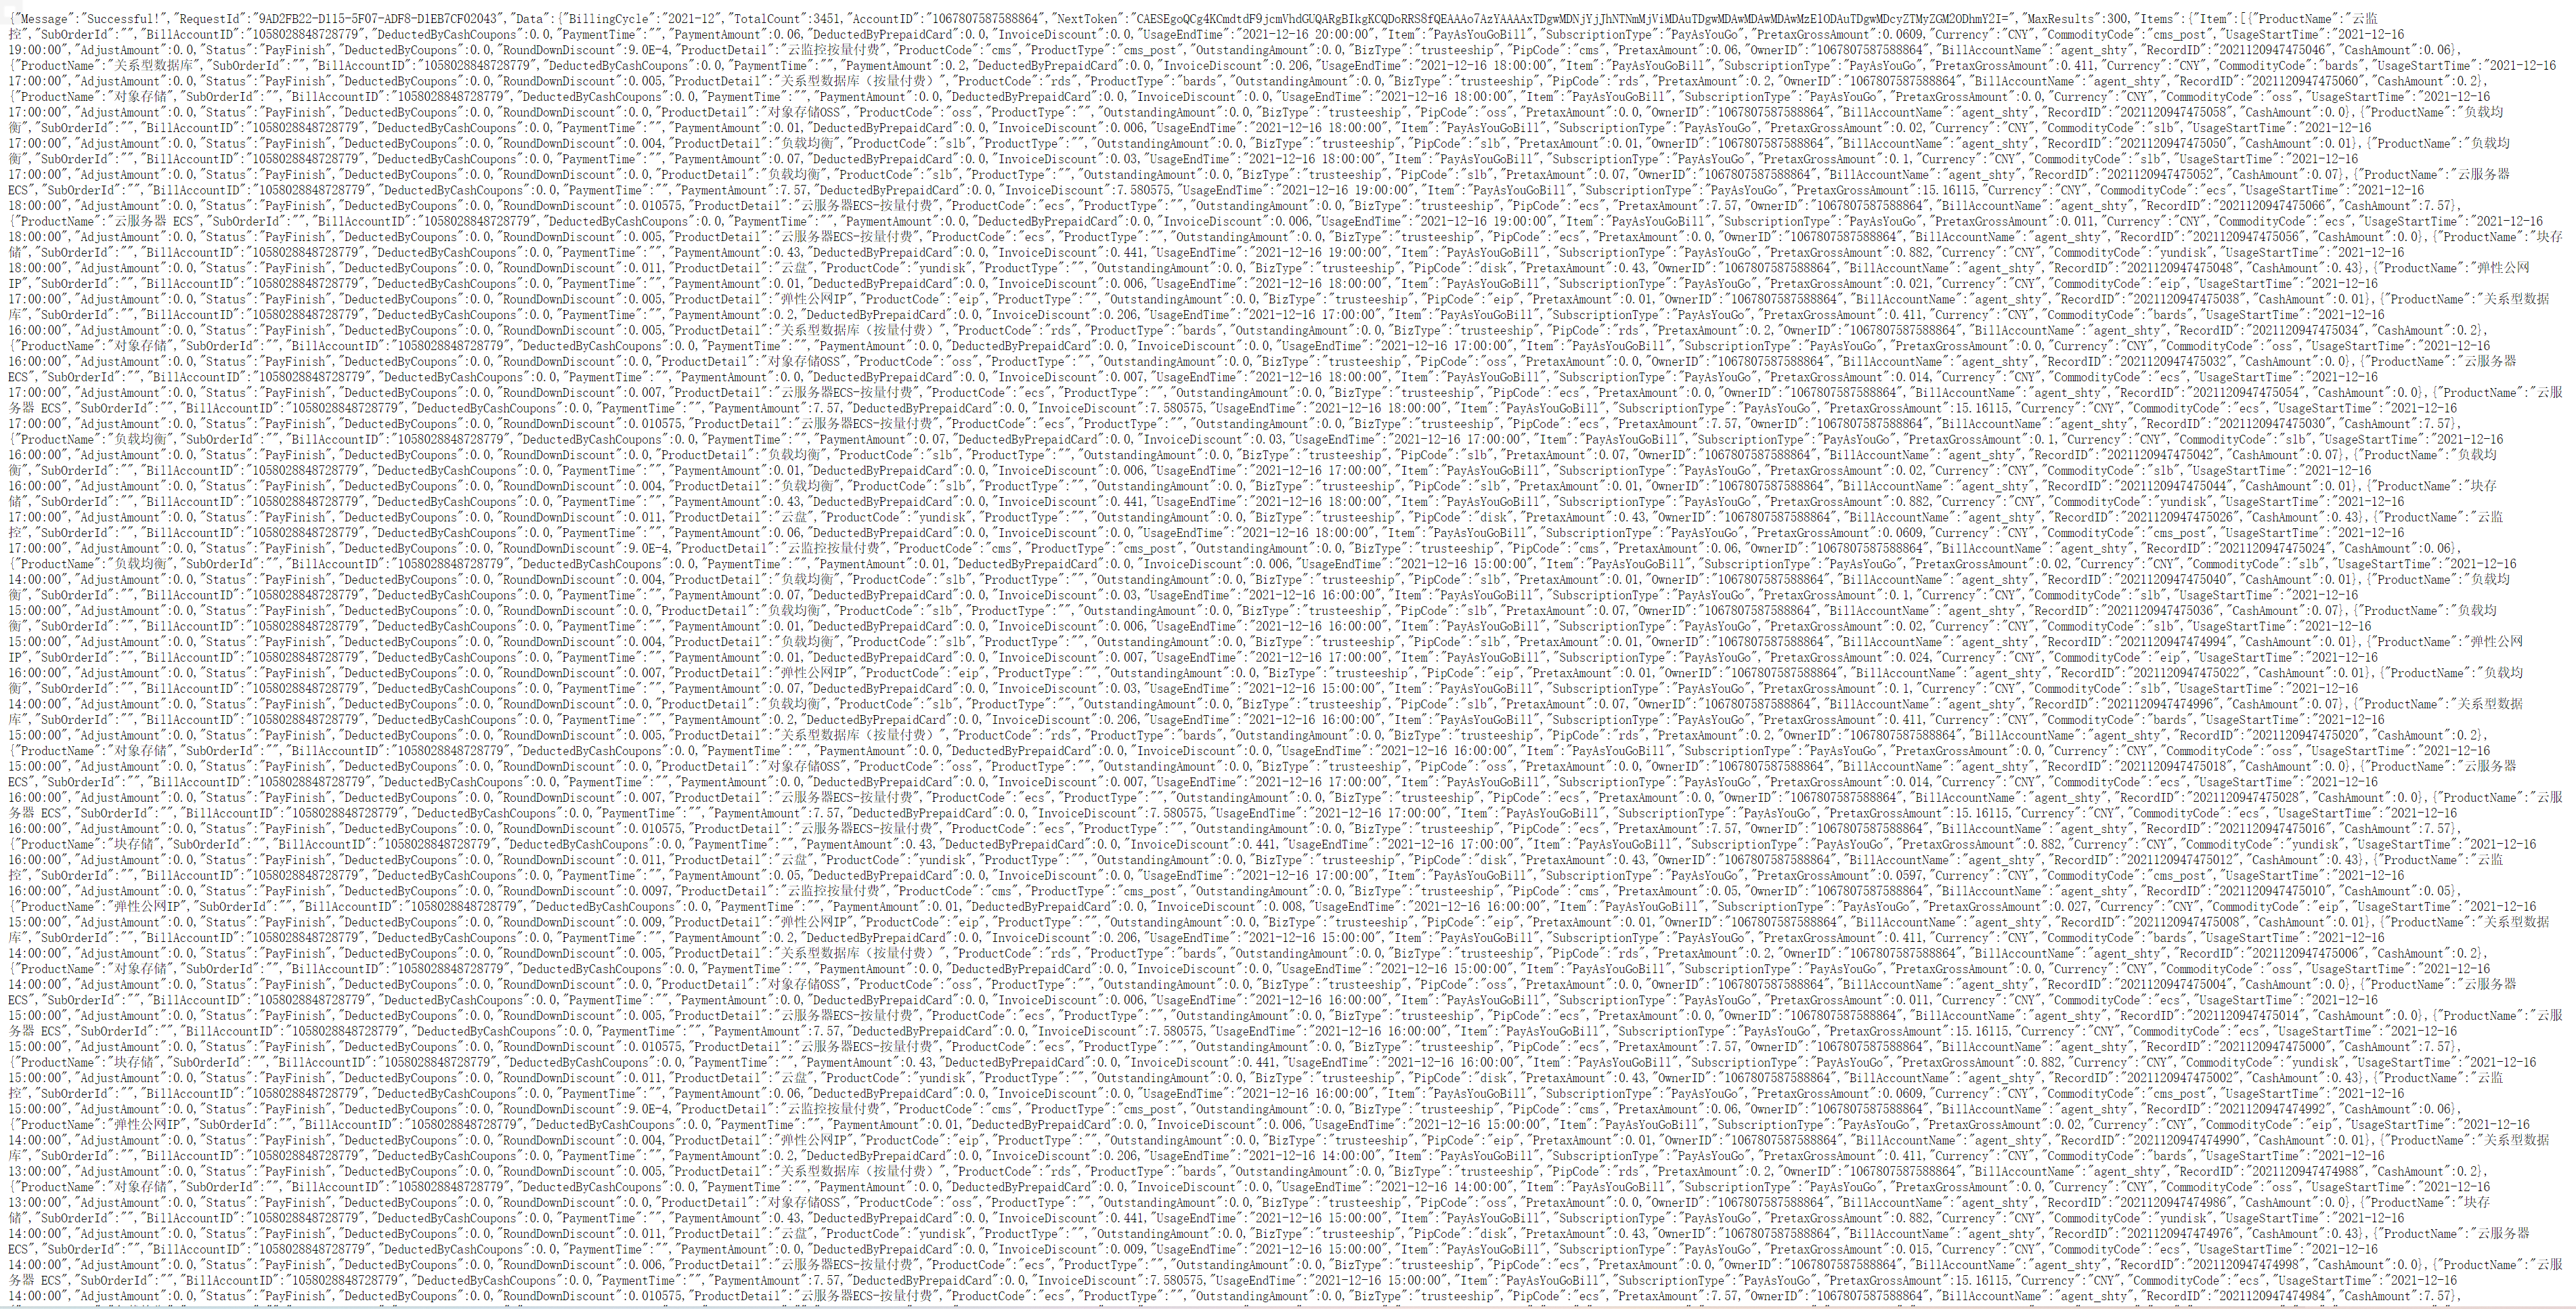
Complete Example
import sys, datetime
import time
import json
import urllib
import hmac
from hashlib import sha1
import base64
import random
import requests
# Common parameters required for the request (i.e., parameters needed for all API calls)
D = {
'BillingCycle':str(time.strftime("%Y-%m", time.gmtime())),
'Action':'QuerySettleBill',
# 'PageNum':'5',
'Format':'JSON',
'Version':'2017-12-14',
'AccessKeyId':'<AccessKeyId>',
'SignatureMethod':'HMAC-SHA1',
'MaxResults' : '300',
# 'NextToken':"", #?
'Timestamp':str(time.strftime("%Y-%m-%dT%H:%M:%SZ", time.gmtime())),
'SignatureVersion':'1.0'
# 'SignatureNonce':str_seed
}
# Current time
now_time = str(time.strftime("%Y-%m-%d", time.gmtime()))
# Connect to local Datakit
datakit = DFF.SRC('datakit')
# Use the urllib library in Python for encoding
def percentEncode(str):
res = urllib.parse.quote(str.encode('utf8'), '')
res = res.replace('+', '%20')
res = res.replace('*', '%2A')
res = res.replace('%7E', '~')
return res
# Get billing
def getBill():
# Current record position for billing
next_token = ""
# Loop to get billing and write to DataKit
for i in range(10000):
random.seed()
# Unique random number to prevent network replay attacks. Use different random numbers for different requests.
D["SignatureNonce"] = str(random.random())
D["NextToken"] = next_token
# Since the signature requires uniqueness, including the order, the parameters must be sorted by name
sortedD = sorted(D.items(),key=lambda x: x[0])
# Generate the canonicalized query string
canstring = ''
for k,v in sortedD:
canstring += '&' + percentEncode(k) + '=' + percentEncode(v)
        # Generate the canonicalized query string
        stringToSign = 'GET&%2F&' + percentEncode(canstring[1:])
# access_key_secret
access_key_secret = '<access_key_secret>'
# Calculate the HMAC value
h = hmac.new((access_key_secret + "&").encode('utf8'), stringToSign.encode('utf8'), sha1)
# Calculate the signature value and generate the signature
signature = base64.encodestring(h.digest()).strip()
# Add the signature
D['Signature'] = signature
# Final API call
url = 'http://business.aliyuncs.com/?' + urllib.parse.urlencode(D)
# Request Alibaba Cloud billing
print(url)
Selecting the Technology Roadmap
Architecture Design
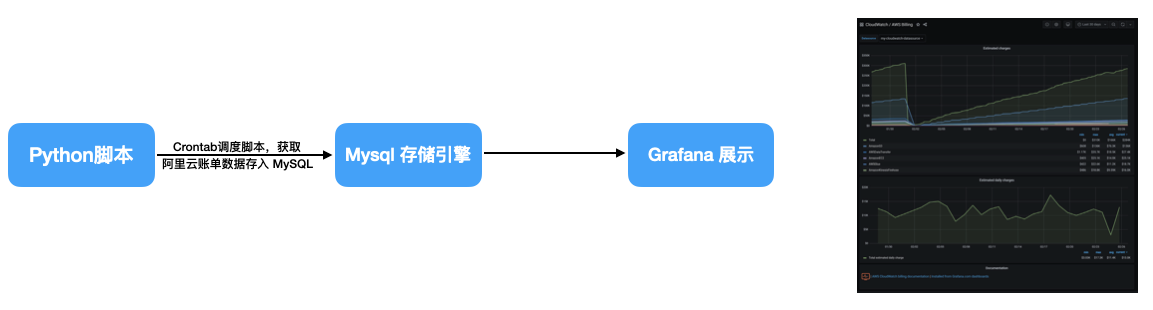
The approach is to use a Crontab scheduled Python script to periodically retrieve Alibaba Cloud billing data, write it into a MySQL storage engine, and display the billing analysis data through Grafana. You can use Grafana Dashboards to obtain corresponding Bills templates to simplify operations. Below is a technology research based on this architecture.
Technology Research
In the current open-source visualization field, the most popular and widely used with many visualization templates is Grafana. Kibana is also a good visualization platform, but compared to Grafana, Kibana is more suitable for the ELK stack. Based on our requirements, using Kibana is not quite appropriate. Grafana, on the other hand, is an open-source visualization tool that can be used with various data stores and is a feature-rich alternative to Graphite-web, helping us easily create and edit dashboards. It includes a unique Graphite target parser that makes metric and function editing easy. Users can create comprehensive charts with intelligent axis formats (such as lines and points). Additionally, Grafana comes with a built-in alerting engine, allowing us to attach condition rules to dashboard panels and send triggered alerts to selected notification endpoints (e.g., email, Slack, PagerDuty, custom Webhooks). This also meets the needs for Alibaba Cloud cost alerts. However, Grafana is designed to analyze and visualize metrics such as system CPU, memory, disk, and I/O utilization. Grafana does not support full-text data queries, which makes the user experience less friendly. After some searching on open-source communities, we discovered the product "Guance" which also meets the requirements. It not only covers all the advantages of Grafana and Kibana but also has many unique features, including Serverless online programming scheduling. This solves the pain point of managing the scheduling of Python scripts for retrieving Alibaba Cloud billing data. Moreover, as an open-source commercial product, its UI aesthetics far surpass Grafana, and the free tier it offers is sufficient for our needs. Additionally, if problems arise, we can get official product support.
Technology Comparison
| Grafana | Guance | |
|---|---|---|
| Complexity of Use | Installation and configuration are cumbersome, requiring an additional storage engine | One command installation, ready to use in 30 minutes |
| Documentation Completeness | Grafana's official website has comprehensive documentation, but Chinese documentation is scarce, which is a headache for those not proficient in English. | Very comprehensive Chinese documentation and a large number of use case tutorial courses. |
| Community Activity | Active community, strong development and maintenance team, fast version upgrades. | Commercial product, very active community, strong development and maintenance team, quick problem resolution, fast version upgrades. |
| Feature Completeness | Has 54 data sources, 173+ Dashboards, rich dashboard plugins such as heatmaps, line charts, charts, etc., supports simple alerts. | Has 200+ data sources, 200+ Dashboards, supports multiple operating systems, provides a standard unified DQL query for multiple data types, unified management of metrics, logs, APM data, infrastructure, containers, middleware, and network performance, powerful anomaly detection, advanced permission features, supports complex alert rule configuration, etc. |
| Development Trend | Market share is rising, and the product itself is rapidly developing and improving. | As a mature commercial product, a leader in the observability field, market share is rising, and the product itself is rapidly developing and improving. |
| Performance | Low resource usage | Unified management, low resource usage, data is binary files, high transmission efficiency, low bandwidth usage. |
| Serverless Programming | No | Sandbox environment based on Python 3.x |
| Cost | Free | Free |
| Service | Community support | Professional technical team support |
Requirements Matching
Through the comparison above, we found that using "Guance" can significantly reduce the cost of use. Installation, configuration, and management are very convenient. Compared to Grafana, which is only a display platform and requires an external storage engine as a data source, "Guance" is much more convenient as it unifies the collection and management of various data types, including metrics, logs, APM data, infrastructure, containers, middleware, and network performance. This eliminates the need for installing and maintaining storage engines. Grafana lacks comprehensive Chinese documentation, which can be a headache for those not proficient in English. In contrast, Guance has comprehensive Chinese documentation and a large number of use case tutorial videos, making it easier to get started and focus on the requirements themselves. "Guance", as a commercial product, even in its free version, provides professional technical team support and has a large community where you can exchange experiences with other users. Functionally, it surpasses Grafana with powerful anomaly detection, advanced permission features, and support for complex alert rule configuration, which can also handle requirements beyond cost analysis. Moreover, "Guance" allows visual management of components, has low resource usage, uses binary data files for high transmission efficiency and low bandwidth usage. For those who appreciate aesthetics, the UI design of "Guance" is refreshingly minimalist. Therefore, for our requirements, we should definitely choose "Guance" to build the solution.
Guance Implementing Cost Management
Deployment Instructions
Example Linux version: CentOS Linux release 7.8.2003 (Core)
Use one server to collect all Alibaba Cloud billing data.
Prerequisites
Install DataKit
Before starting to use "Guance" to monitor hosts, you need to install DataKit. DataKit is the official data collection application that supports collecting hundreds of data types. By configuring collection sources, you can collect various data such as hosts, processes, containers, logs, application performance, and user visits in real time.
Before installing DataKit, you need to register a "Guance" account. After registration, log in to the "Guance" workspace to obtain the DataKit installation command and deploy the first DataKit.
Get the Installation Command
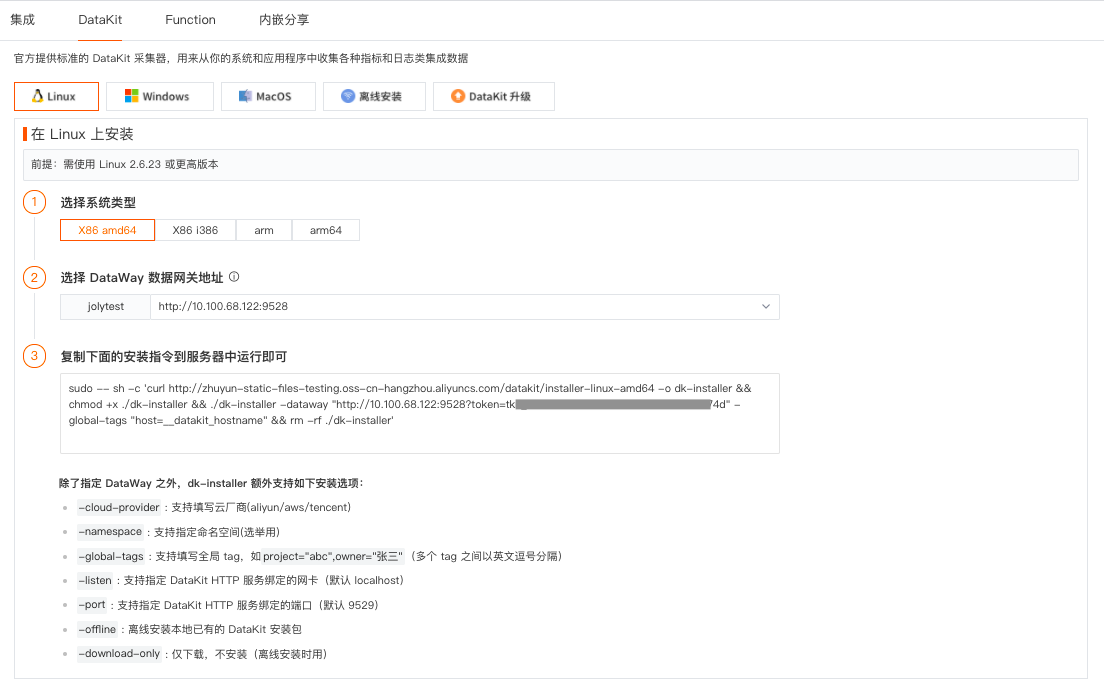
You can log in to the "Guance" workspace, click "Integrations" -> "DataKit", select the DataKit installation method, see the information below, and then copy the "Installation Command" to execute on the host.
-
Installation System: Linux
-
System Type: X86 amd64
-
DataWay Address: OpenWay
Execute the Installation Command on the Host
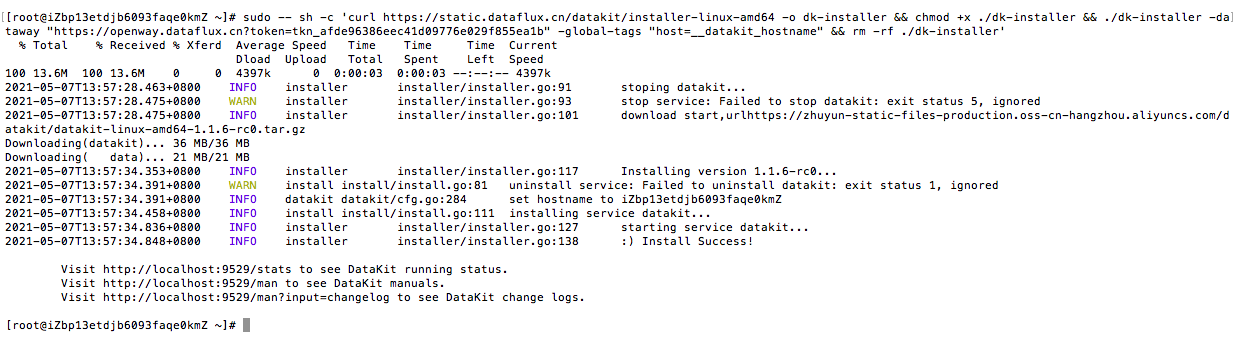
Open a command line terminal, log in to the server, and execute the copied "Installation Command". After the installation is complete, you will be prompted Install Success. You can then use the link provided in the DataKit installation result to view the DataKit installation status, manual, and update notes.
Start Using "Guance"
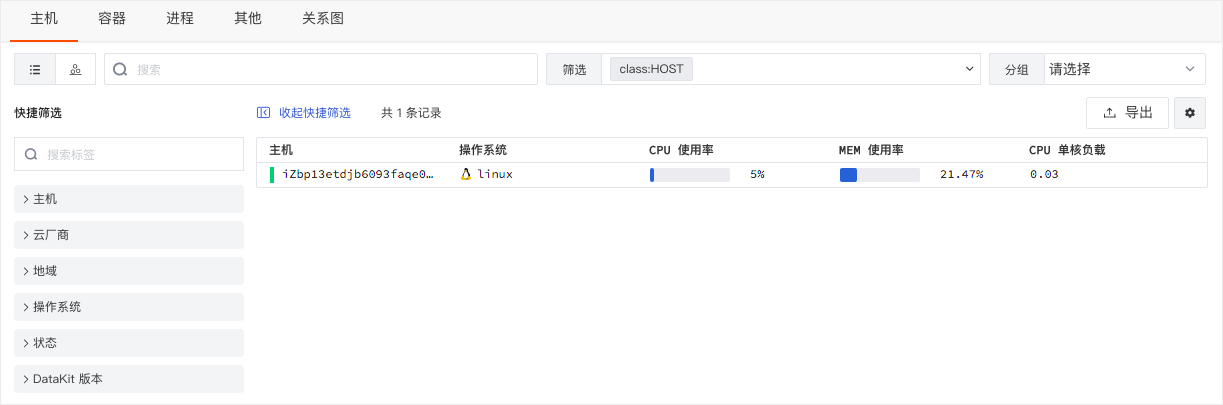
After DataKit is successfully installed, the host object collector hostobject is enabled by default. You can directly view the host where DataKit was installed in the "Guance" workspace under "Infrastructure" -> "Hosts", including host status, hostname, operating system, CPU usage, MEM usage, CPU single-core load, etc. You can also click on the host to view more details.
Install Func Portable Edition
System and Environment Requirements
The host running DataFlux Func must meet the following requirements:
-
CPU cores >= 2
-
Memory >= 4GB
-
Disk space >= 20GB
-
Network bandwidth >= 10 Mbps
-
Operating system: Ubuntu 16.04 LTS / CentOS 7.2 or higher
-
Clean system (no operations other than network configuration after OS installation)
-
Open port
8088(this system uses port8088by default. Ensure firewall, security group, etc., allow8088inbound access) -
When using an external MySQL, MySQL version must be 5.7 or higher
-
When using an external Redis, Redis version must be 4.0 or higher
Note: DataFlux Func does not support MacOS or Windows. You can choose to install DataFlux Func on a virtual machine or cloud host.
Note: DataFlux Func does not support Redis cluster. For high availability, choose the master-slave version.
Note: If installing DataFlux Func on Alibaba Cloud ECS with Alibaba Cloud Shield enabled, system configuration should be appropriately increased due to the resource usage of Cloud Shield.
Portable Edition Download Command
Note: All shell commands mentioned in this article can be run directly as root. For non-root users, add sudo to run.
Note: This article only provides the most common steps. For detailed installation and deployment, refer to the "Maintenance Manual".
Install Using the Automatic Installation Script
In the downloaded dataflux-func-portable directory,
run the following command to automatically configure and finally start the entire DataFlux Func:
Note: Before installation, confirm system requirements and server configuration.
Note: DataFlux Func does not support Mac. Copy it to a Linux system before running the installation.
Using the automatic installation script, you can achieve rapid installation and operation in minutes. The automatic configuration includes:
-
Running MySQL, Redis, DataFlux Func (including Server, Worker, Beat)
-
Automatically creating and saving all data in the
/usr/local/dataflux-func/directory (including MySQL data, Redis data, DataFlux Func configuration, logs, etc.) -
Randomly generating MySQL
rootuser password, system Secret, and saving them in the DataFlux Func configuration file. -
Redis is not password protected.
-
MySQL and Redis do not provide external access.
After execution, you can use a browser to access http://{服务器IP地址/域名}:8088 for the initialization interface.
Note: If the runtime environment has poor performance, use the _
_docker ps_command to confirm that all components have successfully started before accessing (see the list below)._
-
dataflux-func_mysql -
dataflux-func_redis -
dataflux-func_server -
dataflux-func_worker-0 -
dataflux-func_worker-1-6 -
dataflux-func_worker-7 -
dataflux-func_worker-8-9 -
dataflux-func_beat
Obtain RAM Access Control
-
Log in to the RAM console https://ram.console.aliyun.com/users
-
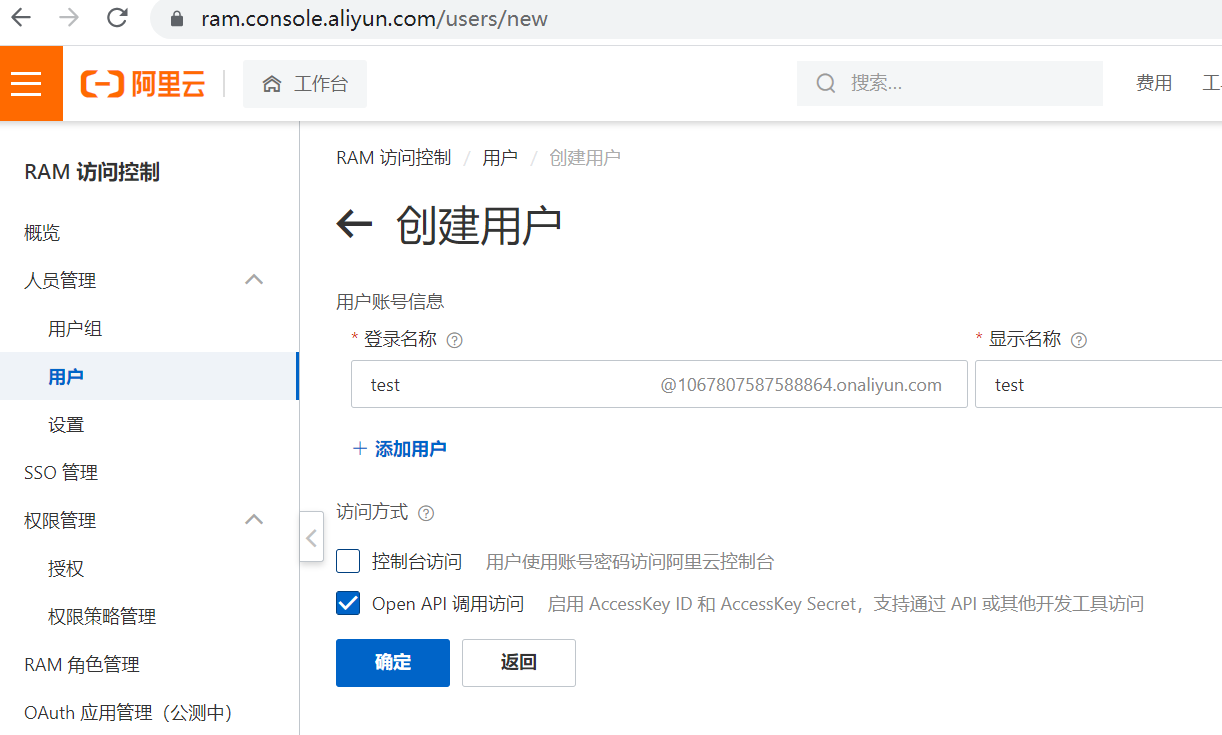
Create a new user: Personnel Management -> Users -> Create User
-
Save or download the CSV file for AccessKeyID and AccessKey Secret (will be used in configuration)
-
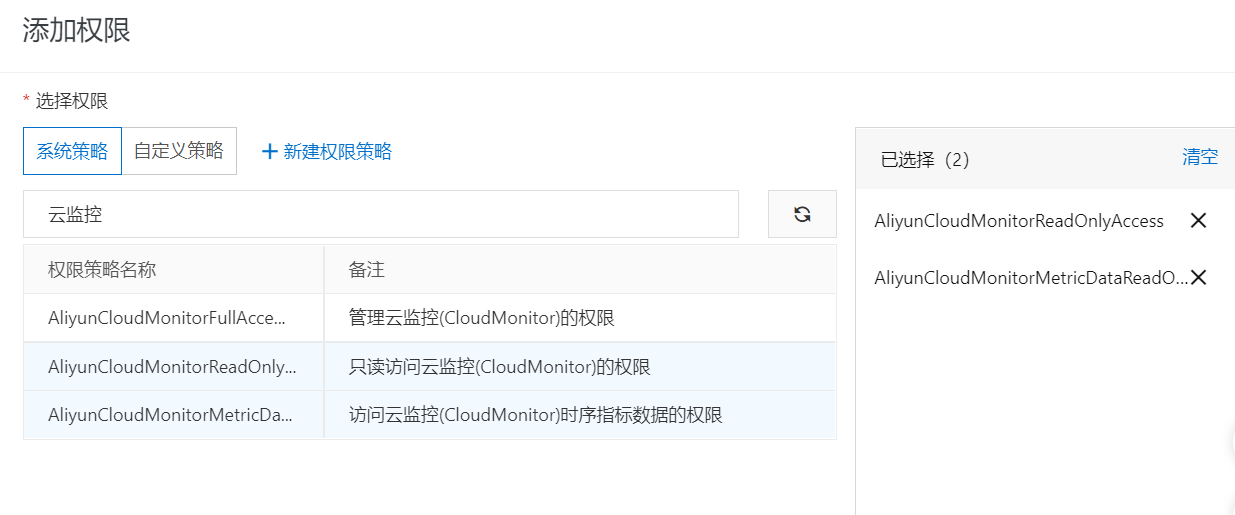
Authorize the user (billing permissions)
Configuration Implementation
Log in to DataFlux Function
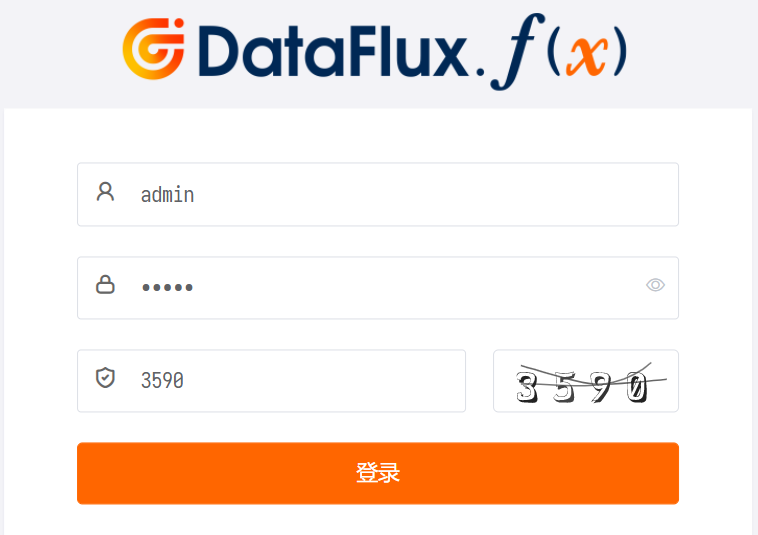
Log in to Func, address http://ip:8088 (default admin/admin)
Create a Script Set
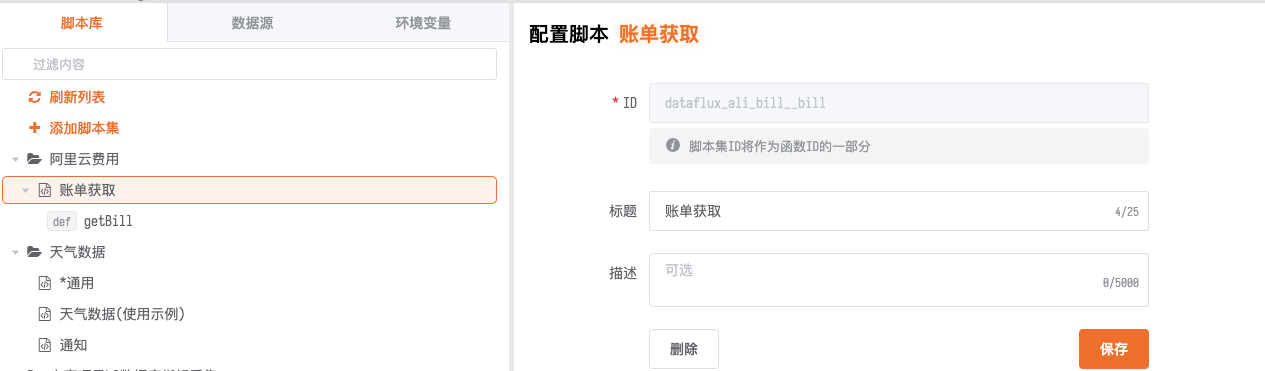
Enter a title/description
Edit the Script
Write the script to write billing data to DataKit for report creation.
The complete script is as follows:
import sys, datetime
import time
import json
import urllib
import hmac
from hashlib import sha1
import base64
import random
import requests


# Common parameters required for the request (i.e., parameters needed for all API calls)
D = {
    'BillingCycle':str(time.strftime("%Y-%m", time.gmtime())),
    'Action':'QuerySettleBill',
    # 'PageNum':'5',
    'Format':'JSON',
    'Version':'2017-12-14',
    'AccessKeyId':'<AccessKeyId>',
    'SignatureMethod':'HMAC-SHA1',
    'MaxResults' : '300',
    # 'NextToken':"", #?
    'Timestamp':str(time.strftime("%Y-%m-%dT%H:%M:%SZ", time.gmtime())),
    'SignatureVersion':'1.0'
    # 'SignatureNonce':str_seed
}
# Current time
now_time = str(time.strftime("%Y-%m-%d", time.gmtime()))

# Connect to local Datakit
datakit = DFF.SRC('datakit')

# Use the urllib library in Python for encoding
def percentEncode(str):
        res = urllib.parse.quote(str.encode('utf8'), '')
        res = res.replace('+', '%20')
        res = res.replace('*', '%2A')
        res = res.replace('%7E', '~')
        return res


# Get billing
@DFF.API('getBill')
def getBill():
    # Current record position for billing
    next_token = ""
    # Loop to get billing and write to DataKit
    for i in range(10000):
        random.seed()
        # Unique random number to prevent network replay attacks. Use different random numbers for different requests.
        D["SignatureNonce"] = str(random.random())
        D["NextToken"] = next_token
        # Since the signature requires uniqueness, including the order, the parameters must be sorted by name
        sortedD = sorted(D.items(),key=lambda x: x[0])
        canstring = ''
        for k,v in sortedD:
            canstring += '&' + percentEncode(k) + '=' + percentEncode(v)
        # Generate the canonicalized query string
        stringToSign = 'GET&%2F&' + percentEncode(canstring[1:])
        # access_key_secret
        access_key_secret = '<access_key_secret>'
        # Calculate the HMAC value
        h = hmac.new((access_key_secret + "&").encode('utf8'), stringToSign.encode('utf8'), sha1)
        # Calculate the signature value and generate the signature
        signature = base64.encodestring(h.digest()).strip()
        # Add the signature
        D['Signature'] = signature
        # Final API call
        url = 'http://business.aliyuncs.com/?' + urllib.parse.urlencode(D)
        # Request Alibaba Cloud billing
        response = requests.get(url)
        billing_cycle = response.json()["Data"]["BillingCycle"]
        account_id = response.json()["Data"]["AccountID"]
        next_token = response.json()["Data"]["NextToken"]
        if next_token is not None:
            bill = response.json()["Data"]["Items"]["Item"]
            print(bill)
            # Write today's billing to Guance
            for i in bill:
                print(i["UsageEndTime"])
                time = i["UsageEndTime"].split(" ")[0]
                print(time,now_time)
                if time == now_time:
                    measurement = "aliyunSettleBill"
                    tags = {
                        "BillingCycle":billing_cycle,
                        "AccountID":account_id
                    }
                    fields = {
                        "ProductName":i["ProductName"],
                        "SubOrderId":i["SubOrderId"],
                        "BillAccountID":i["BillAccountID"],
                        "DeductedByCashCoupons":i["DeductedByCashCoupons"],
                        "PaymentTime":i["PaymentTime"],
                        "PaymentAmount":i["PaymentAmount"],
                        "DeductedByPrepaidCard":i["DeductedByPrepaidCard"],
                        "InvoiceDiscount":i["InvoiceDiscount"],
                        "UsageEndTime":i["UsageEndTime"],
                        "Item":i["Item"],
                        "SubscriptionType":i["SubscriptionType"],
                        "PretaxGrossAmount":i["PretaxGrossAmount"],
                        "Currency":i["Currency"],
                        "CommodityCode":i["CommodityCode"],
                        "UsageStartTime":i["UsageStartTime"],
                        "AdjustAmount":i["AdjustAmount"],
                        "Status":i["Status"],
                        "DeductedByCoupons":i["DeductedByCoupons"],
                        "RoundDownDiscount":i["RoundDownDiscount"],
                        "ProductDetail":i["ProductDetail"],
                        "ProductCode":i["ProductCode"],
                        "ProductType":i["ProductType"],
                        "OutstandingAmount":i["OutstandingAmount"],
                        "BizType":i["BizType"],
                        "PipCode":i["PipCode"],
                        "PretaxAmount":i["PretaxAmount"],
                        "OwnerID":i["OwnerID"],
                        "BillAccountName":i["BillAccountName"],
                        "RecordID":i["RecordID"],
                        "CashAmount":i["CashAmount"],
                    }
                    try:
                        status_code, result = datakit.write_logging(measurement=measurement, tags=tags, fields=fields)
                        print(status_code,result)
                    except:
                        print("Insert failed!")
                else:
                    break
            else:
                continue
            break
        else:
            break
Publish the Script
Save the configuration and Publish

Create a Scheduled Task
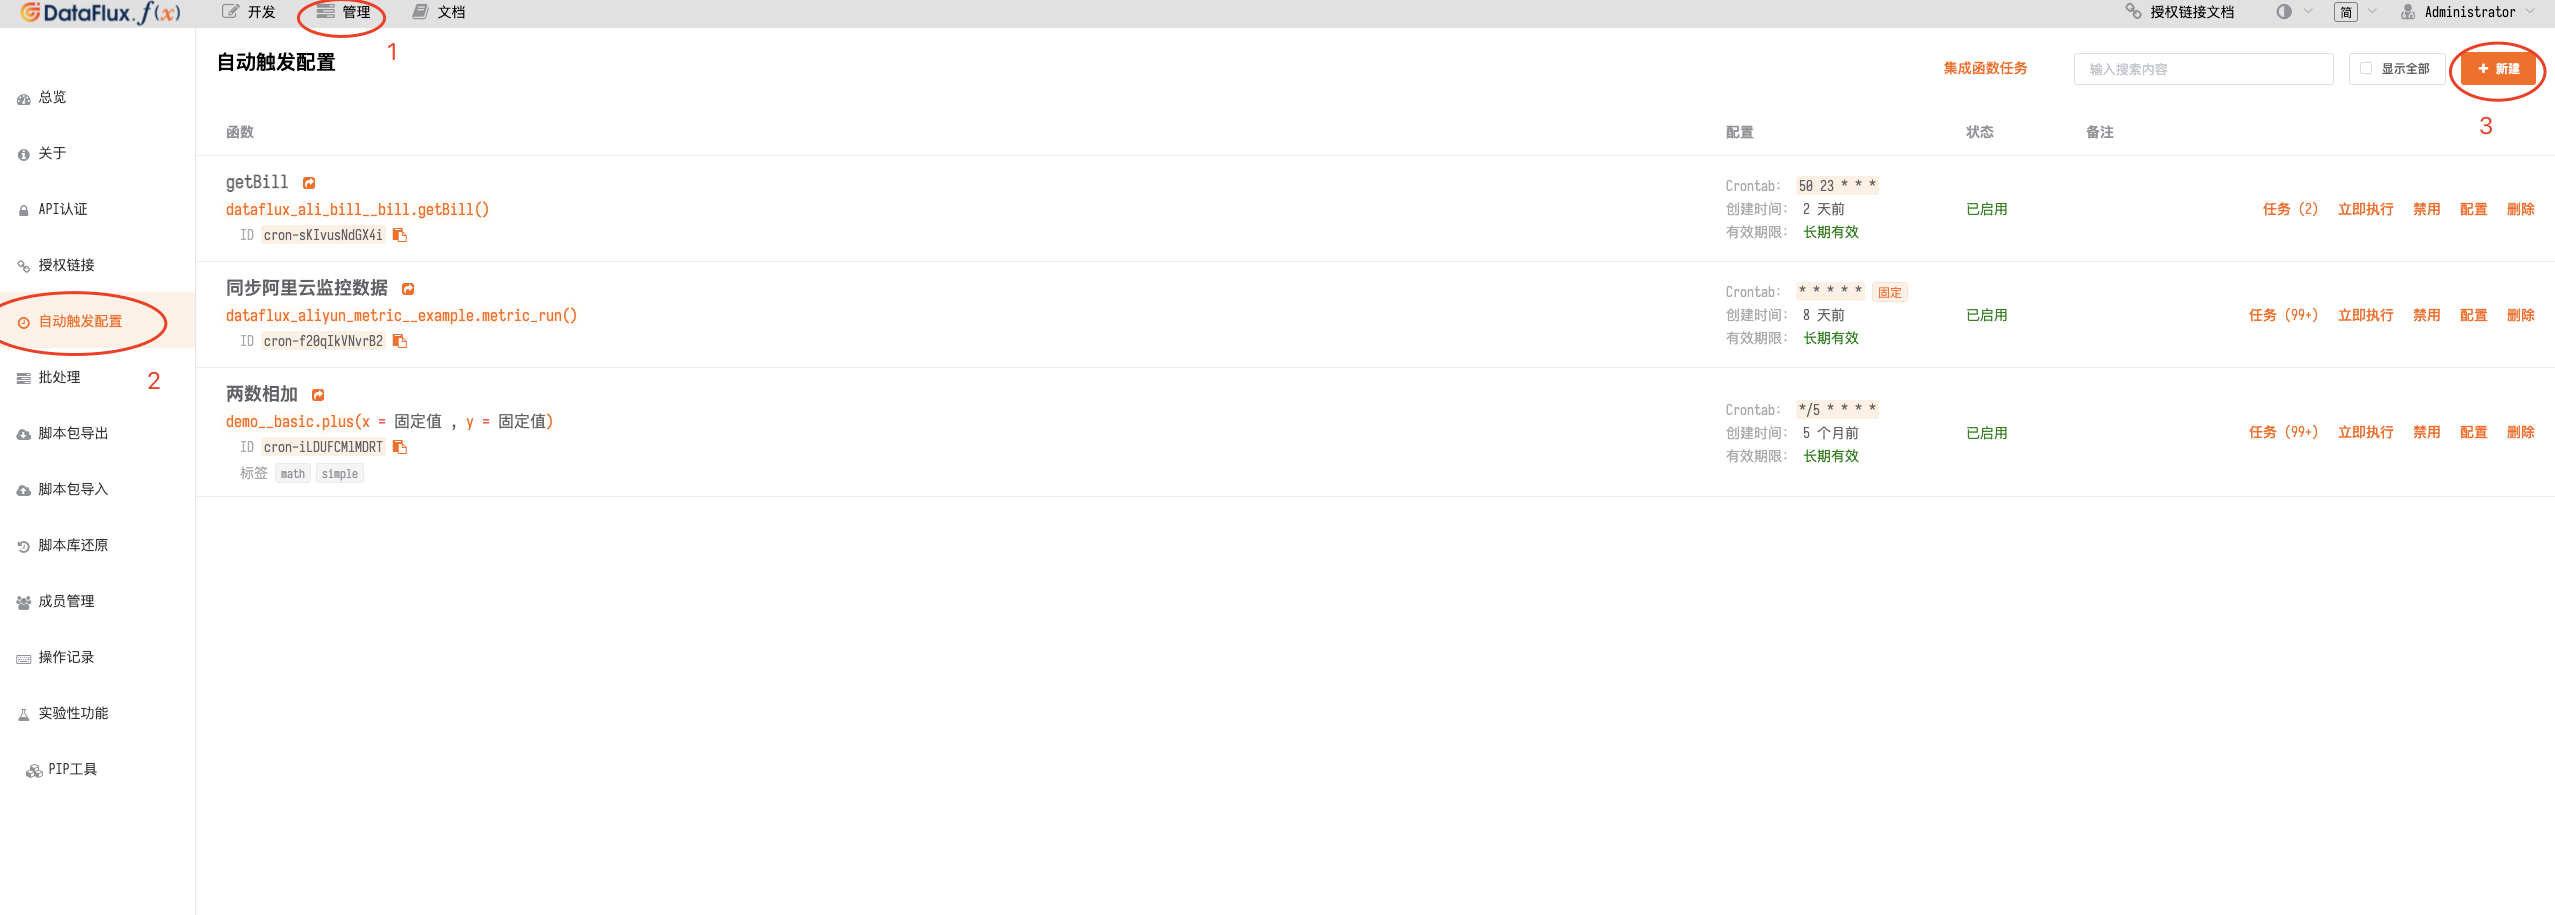
Add an automatic trigger task: Manage -> Automatic Trigger Configuration -> Create Task. Since the billing is daily, setting the collection frequency to once a day is sufficient.
View the Uploaded Data
Log Preview

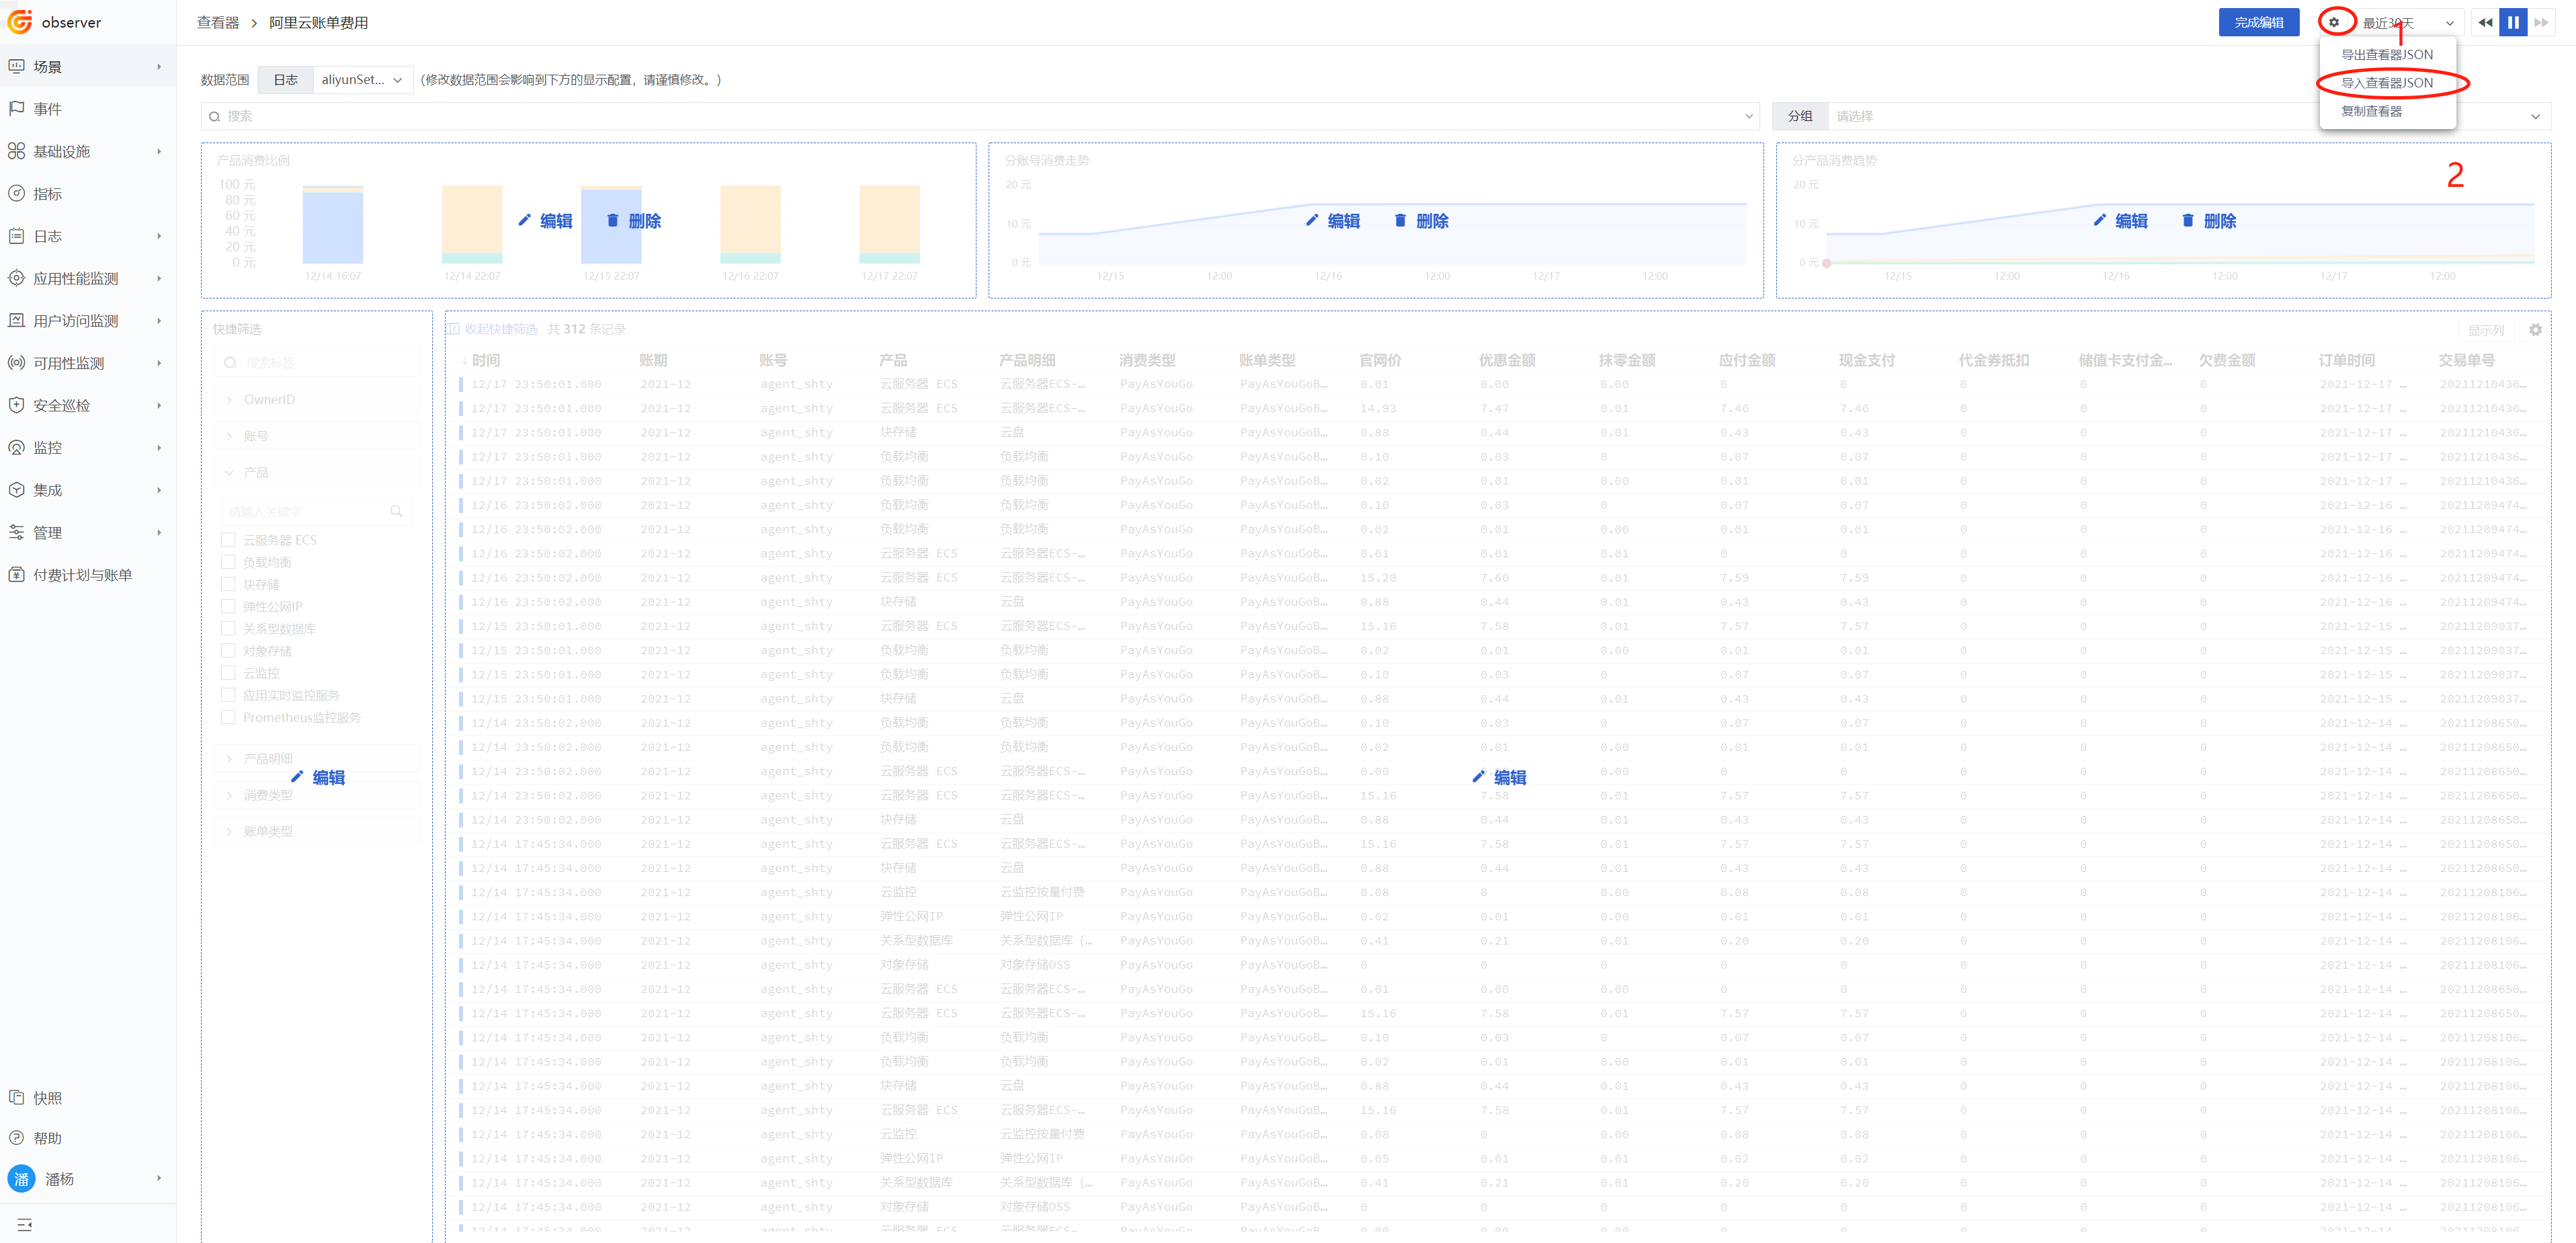
Create an Explorer
Import the Explorer