Detection Rules
The system provides rich built-in detection rules that precisely match the monitoring needs of various data types, effectively preventing false alerts and missed alerts.
Configuration Process
To create a monitor, complete the configuration in the following order:
- Select Rule Type: Determines the data scope and algorithm logic of the detection configuration;
- Detection Configuration: Different types correspond to different configuration items;
- Event Notification: Defines the event title, content, related information, and data gap handling;
- Alert Configuration: Sets the notification policy and mute period;
- Link to Dashboard: Configures dashboard association;
- Permissions: Sets operation permissions.
Except for Detection Configuration, which varies by rule type, the configuration logic for Event Notification, Alert Configuration, Link to Dashboard, and Permissions is consistent across all rule types.
Rule Types
You can select the appropriate detection logic based on your monitoring targets:
Rule Name |
Data Scope |
Description |
|---|---|---|
| Threshold Detection | All | Performs anomaly detection on metric data based on configured thresholds |
| Mutation Detection | Metrics (M) | Performs anomaly detection on sudden abnormal behavior of metrics based on historical data; mostly suitable for scenarios with short time windows in business data |
| Interval Detection | Metrics (M) | Detects abnormal metric data points based on dynamic threshold ranges; mostly suitable for time series with stable trends |
| Interval Detection V2 | Metrics (M) Tracing (T) RUM data (R) |
Detects abnormal metric data points based on dynamic threshold ranges; mostly suitable for time series with stable trends |
| Outlier Detection | Metrics (M) | Detects whether the metrics/statistics of monitored objects in a specific group have outlier deviations |
| Log Detection | Logs (L) | Performs anomaly detection for business applications based on log data |
| Process Anomaly Detection | Process objects (O::host_processes) |
Periodically checks process data to identify process anomalies |
| Infrastructure Liveness Detection V2 | Objects (O) | Sets liveness conditions based on infrastructure object data to monitor infrastructure stability |
| APM Metric Detection | Tracing (T) | Sets threshold rules based on Application Performance Monitoring (APM) data to detect anomalies |
| RUM Metric Detection | RUM data (R) | Sets threshold rules based on Real User Monitoring (RUM) data to detect anomalies |
| Composite Detection | All | Combines the results of multiple monitors into one monitor using expressions and alerts based on the combined result |
| Synthetic Testing Anomaly Detection | Synthetic data (D::type) |
Sets threshold rules based on Synthetic Monitoring data to detect anomalies |
| Network Data Detection | Network (N) | Sets threshold rules based on network data to detect network performance stability |
| External Event Detection | Other | Generates event data by sending abnormal events or records generated by third-party systems to an HTTP server via POST requests to a specified URL |
| Infrastructure Change Detection | Objects (O) | Tracks the infrastructure lifecycle, monitors various change behaviors, and accurately identifies abnormal conditions such as configuration drift and unauthorized operations |
| Programmable Detection | All | Writes detection rules using scripts; mostly suitable for complex monitoring scenarios with frequently changing rules |
After selecting a rule type, the available parameters in the Detection Configuration module change accordingly. Event Notification and subsequent configurations remain consistent across all types.
Detection Configuration
Depending on the rule type, you can configure the corresponding detection frequency, detection range, and detection metrics.
Detection configurations vary significantly across rule types. Refer to the detailed configuration documentation for the corresponding type.
Data Waiting Window
The data waiting window applies to all monitor types. After the scheduled execution time is reached, the monitor waits for the specified duration before performing the monitoring evaluation, reducing the chance of false alerts caused by data latency.
- Default: No wait;
- Optional wait durations are 1 minute, 2 minutes, 3 minutes, 5 minutes, 10 minutes, 15 minutes, and 30 minutes;
- The wait duration must be shorter than the interval between two adjacent scheduled execution times. Otherwise, the monitor cannot be saved and the message "The data waiting window must be shorter than the monitoring execution interval" is displayed. Crontab mode is validated in the same way based on adjacent scheduled execution times.
For example, if a monitor is scheduled to run at 10:00 and the data waiting window is set to 5 minutes, the task starts around 10:05. The wait only delays the execution time and does not change the query time range. If the detection range is the last 1 hour, data from 09:00 ~ 10:00 is still queried.
For detailed execution logic, see Monitor Internals.
Event Notification
Defines the event title, content, notified members, and related handling when a monitor is triggered.
Event Title
Defines the event name for the alert trigger condition. Predefined template variables can be used.
Note
In the latest version, the monitor name is generated in sync after the event title is entered. Older monitors may have inconsistencies between the monitor name and the event title. We recommend syncing to the latest version.
Event Content
Write the event notification content. When the trigger condition is met, the system sends this content externally. It generally includes the following:
- Markdown-formatted body;
- Insertable related links and template variables;
- Related logs or error information can be added via Advanced Settings;
- Target notification members who receive the event content.
Event content supports syntax validation and template preview, allowing you to check the rendering of variables and conditional branches before saving.
Related Links
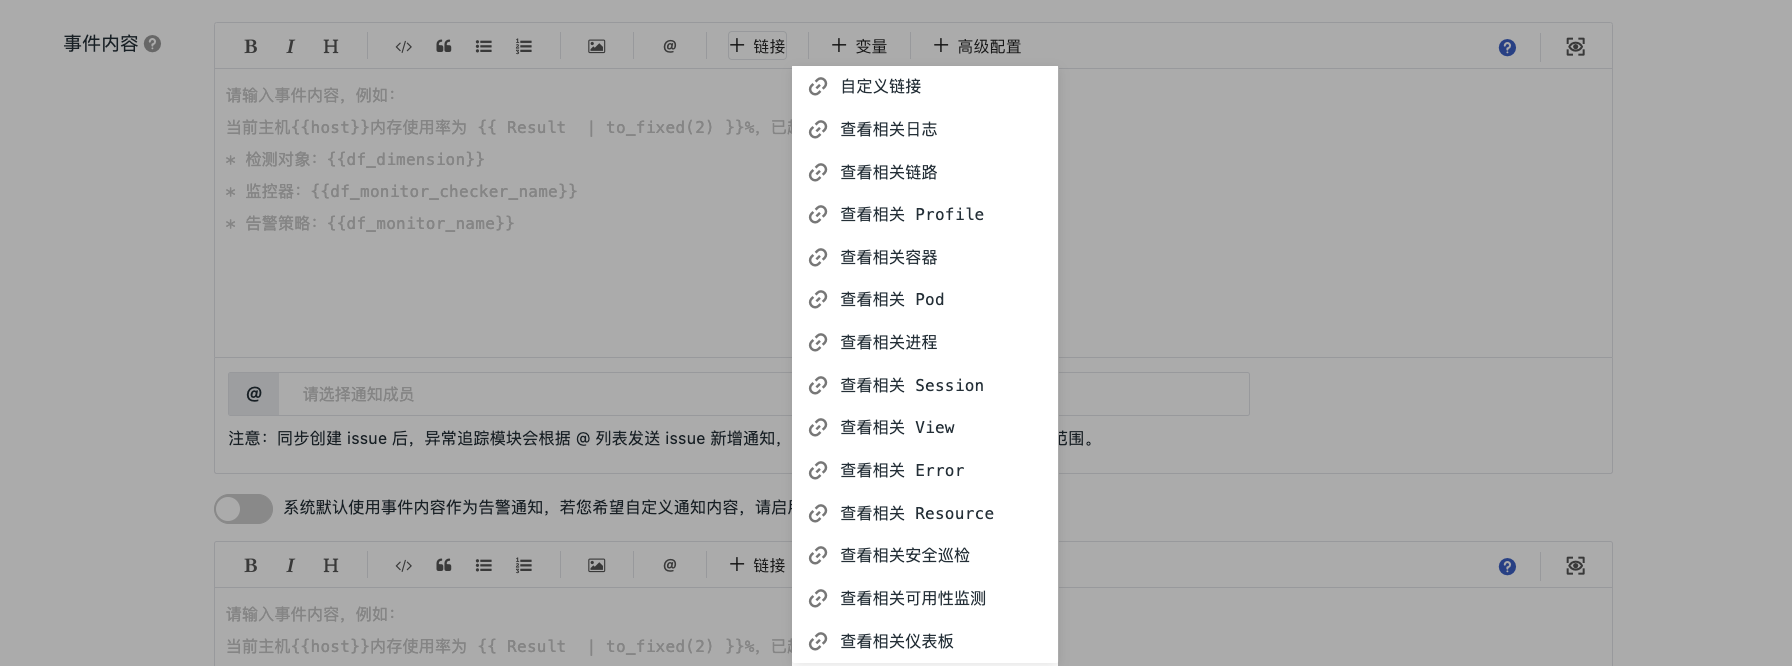
Click + Link. The system automatically generates jump links based on the current detection metric. The link address includes the current domain, workspace ID, detection time range ({{df_check_range_start}} ~ {{df_check_range_end}}), and dynamic filter conditions.
| Link Type | Description | Configuration Requirement |
|---|---|---|
| Custom Link | Supports any URL and template variables | The complete link address must be manually entered |
| View Related Logs | Jump to Log Explorer | Auto-generated; filter conditions and time range can be adjusted after insertion |
| View Related Traces | Jump to Trace Explorer | Auto-generated; automatically correlates the current trace_id or service name |
| View Related Profile | Jump to Profile Explorer | Auto-generated; service name and time range are automatically filled in |
| View Related Containers | Jump to Container object details | Auto-generated; automatically matches container name and host tags |
| View Related Pod | Jump to Pod object details | Auto-generated; Pod name and namespace are automatically filled in |
| View Related Process | Jump to Process object details | Auto-generated; automatically matches host and process name |
| View Related Session | Jump to RUM Session Replay | Auto-generated; Session ID is automatically filled in |
| View Related View | Jump to RUM View Explorer | Auto-generated; view path is automatically filled in |
| View Related Error | Jump to RUM Error Explorer | Auto-generated; error type and time range are automatically filled in |
| View Related Resource | Jump to RUM Resource Explorer | Auto-generated; resource path is automatically filled in |
| View Related Synthetic Monitoring | Jump to Synthetic Test details | Auto-generated; automatically correlates the Synthetic Test name |
| View Related Dashboard | Jump to the specified dashboard | You must manually provide the dashboard ID and name; view variables and time range are adjustable |
Link format examples:
Log Explorer: [View Related Logs](<{{STUDIO_CONSOLE_BASE_URL}}/logIndi/log/all?time={{df_check_range_start}},{{df_check_range_end}}&w={{df_workspace_uuid}}>)
Trace Explorer: [View Related Traces](<{{STUDIO_CONSOLE_BASE_URL}}/tracing/link/all?time={{df_check_range_start}},{{df_check_range_end}}&w={{df_workspace_uuid}}>)
Template Variables
Click + Variable to insert predefined template variables. When an event is triggered, variables are dynamically replaced with actual values:
| Variable | Description |
|---|---|
{{df_dimension}} |
Detection dimension object |
{{df_monitor_checker_name}} |
Current monitor name |
{{df_monitor_name}} |
Alert policy name |
{{Result}} |
Detection result value |
{{df_status}} |
Event status (error/warning/ok) |
{{df_event_id}} |
Unique event ID |
Click to view all supported template variables.
Advanced Settings
With Advanced Settings, you can use DQL to embed related data context into events.
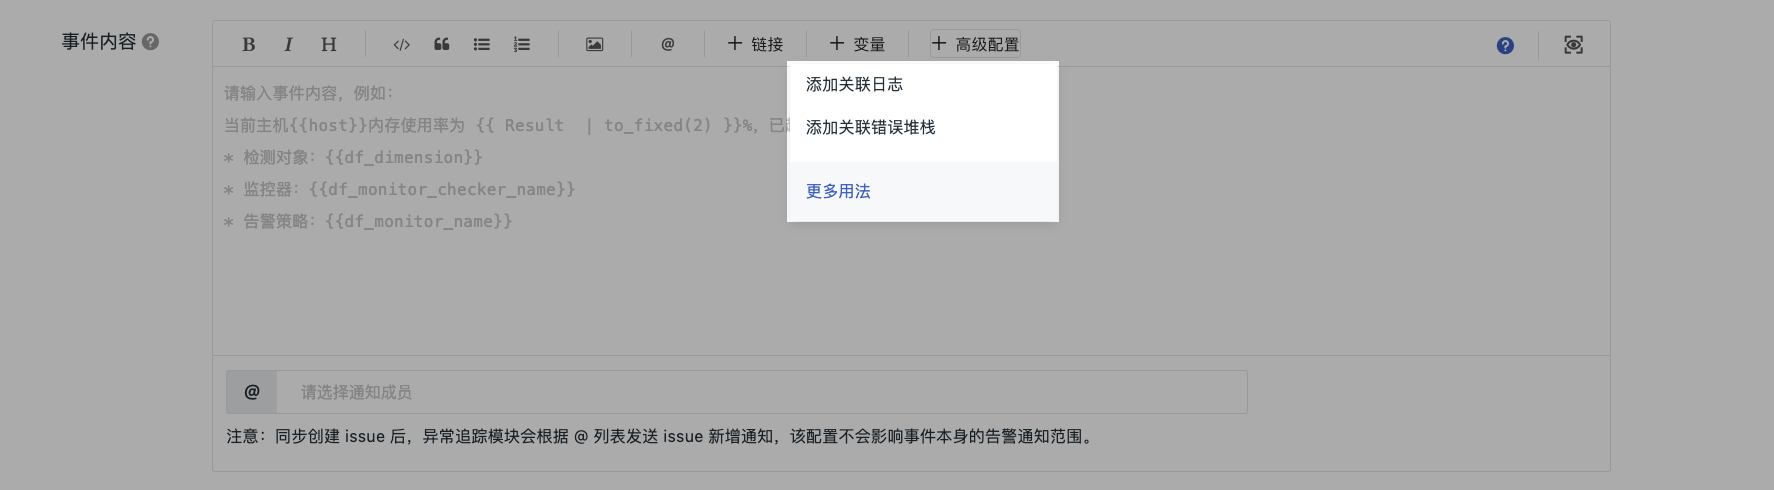
1. Add Related Logs
Click to auto-generate the template:
{% set dql_data = DQL("L::RE(`.*`):(`message`) { `index` = 'default' } LIMIT 1") %}
{{ dql_data.message | limit_lines(10) }}
Configuration notes:
- Replace
{index= 'default' }with the actual index name RE(``.*``)supports regex matching, e.g.,RE(``error\|exception``)limit_lines(10)limits the number of output lines to avoid overly long notifications
2. Add Related Error Stack
Click to auto-generate the template:
{% set dql_data = DQL("T::re(`.*`):(`error_message`,`error_stack`){ (`source` NOT IN ['service_map', 'tracing_stat', 'service_list_1m', 'service_list_1d', 'service_list_1h', 'profile']) AND (`error_stack` = exists()) } LIMIT 1") %}
{{ dql_data.error_message | limit_lines(10) }}
{{ dql_data.error_stack | limit_lines(10) }}
Configuration notes:
source NOT IN [...]excludes statistical aggregated data and keeps only raw traces(error_stack= exists())ensures that only errors containing stack information are returned
Notify Members (@)
Click to select workspace members.
How it works:
- Only when Incident Association is enabled, the
@ membersconfiguration takes effect and sends the event content to the specified members. - This configuration is independent of the notification targets in Alert Configuration and does not affect the alert notification scope.
Custom Notification Content
By default, the system uses the event content as the alert notification content. If you need to customize the notification actually sent externally, enable the toggle here and enter the notification information.
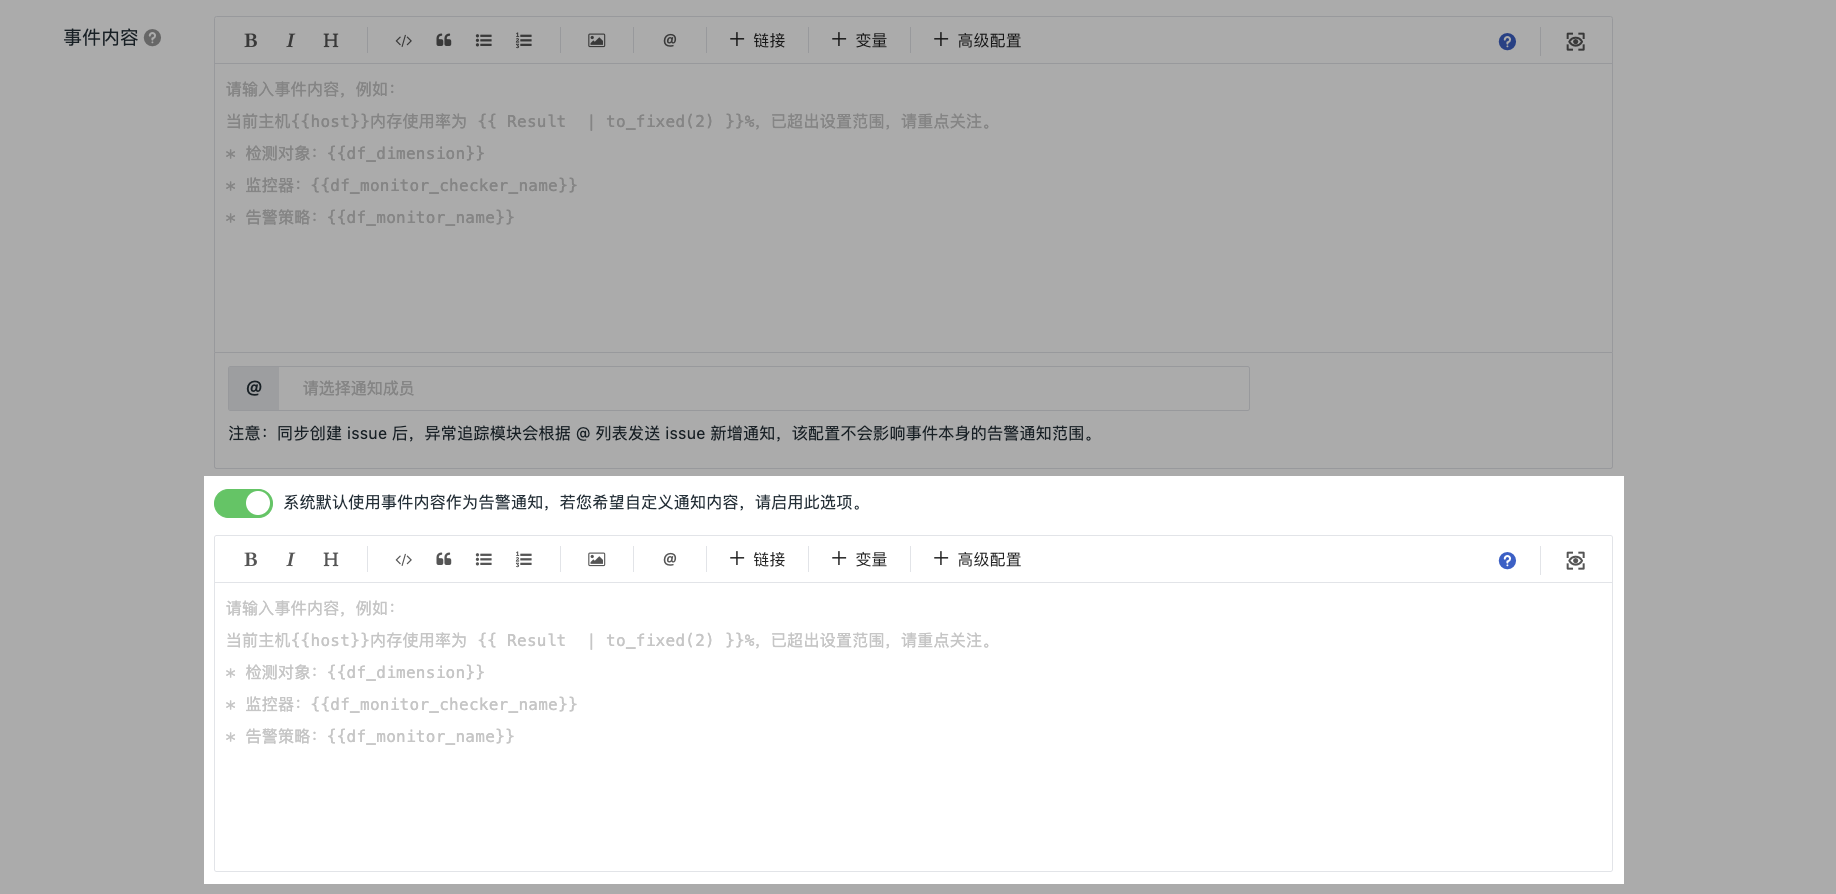
- Expand an independent editor to separately define the notification content sent externally;
- The original event content remains in the platform for event details display;
- The independent editor also supports Markdown, template variables, related links, and advanced settings.
Data Gap Events
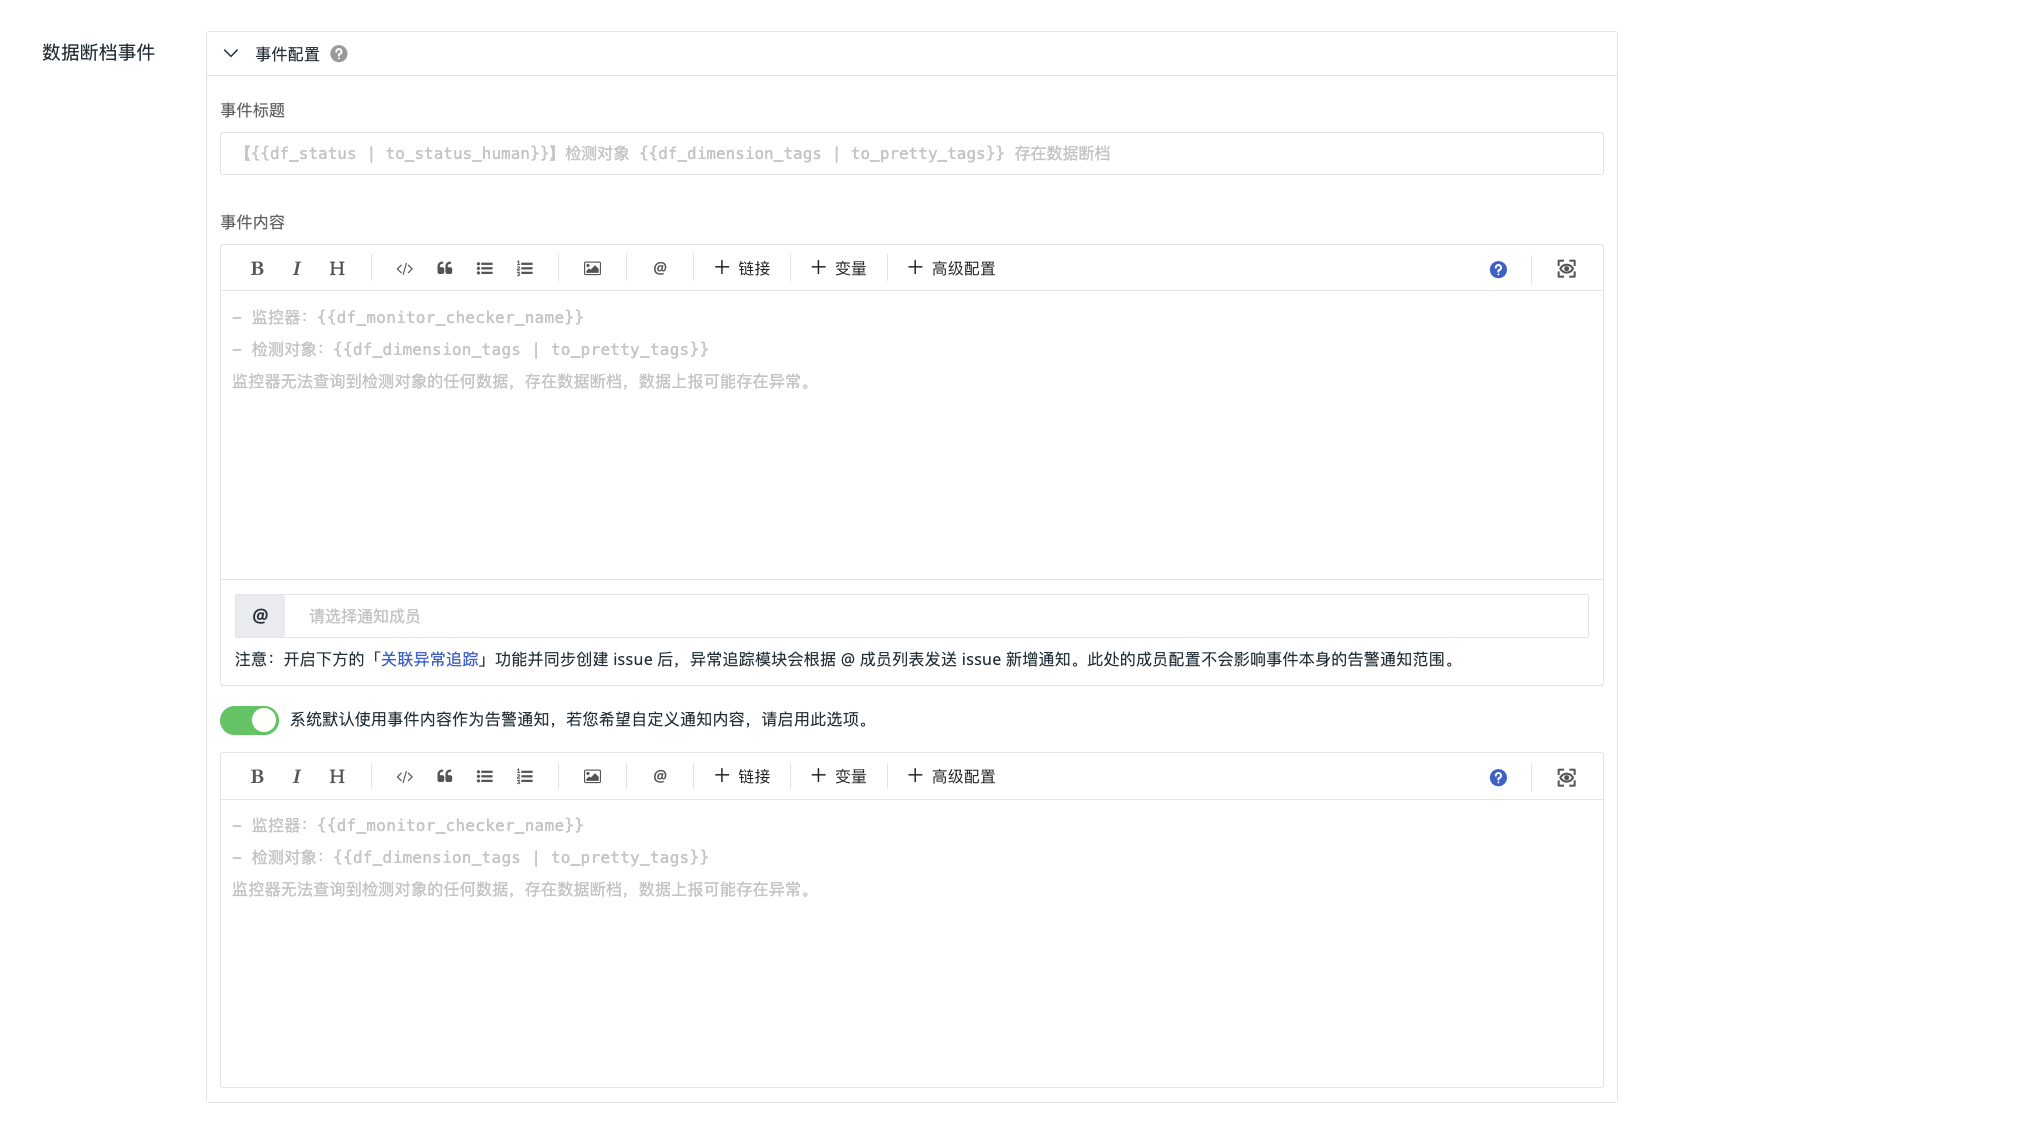
Customize the notification content for data gaps (no data reported). You can also configure the title, content, and other information for these events when they are sent externally.
If not customized, the system sends data gap alerts using the official default template.
Custom data gap event content also supports syntax validation and template preview. The preview uses the current data gap title and content you entered.
Incident Association
When association is enabled, if an abnormal event is generated by this monitor, an Incident is created accordingly.
Configuration Items
- Add tags to automatically created incidents to facilitate classification and filtering in the Incident Center.
- Configure the mapping between event levels and incident levels. Multiple rules are supported.
- When events at the levels Fatal/Critical/Important/Warning/Data Gap are generated, incidents at the new levels P0/P1/P2/P3/... are created accordingly.
Incidents generated here can be viewed in the Incident Center. (❗️ Such incidents include tag filter conditions.)
Linkage Mechanism
- When an event is triggered, an incident record is automatically created in the Incident Center, and the incident description is automatically synchronized with the event content.
- A notification about the new incident is sent based on the @ members list in the event content.
- You can view incident details in the Incident Center. The system automatically correlates and displays all related data for the incident, including performance metrics, error logs, call traces, and infrastructure topology.
Alert Configuration
When a monitor meets the trigger condition, an alert message is immediately sent to the specified notification targets.
Alert Policy
Select one or more existing alert policies. Click a policy name to expand and view details. Click Edit Alert Policy to modify the configuration:
| Configuration Item | Description |
|---|---|
| Notification Configuration | Displays the notification target groups bound to this policy (e.g., All) |
| Duplicate Alerts | No duplicate alert notification is sent for the same event within a specified period (e.g., 10 minutes) |
| Alert Aggregation | Aggregation method, e.g., AI aggregation |
| Aggregation Period | New events within a specified period (e.g., 5 minutes) are aggregated into one alert notification. New events beyond the period are aggregated into a new alert notification |
Link to Dashboard
Select an existing dashboard to establish an association between the monitor and the dashboard, allowing quick jumps and visual inspection of monitoring data.
Permissions
Set operation permissions for the monitor to ensure that different users can perform operations according to their roles and permission levels. The Owner of the current workspace is not affected by these operation permission settings.
- When disabled: follows the default permissions of Monitor Configuration Management;
- When enabled and custom permission subjects are selected: only the creator and the assigned subjects can enable/disable, edit, or delete the rules configured for this monitor;
- When enabled but no custom permission subjects are selected: only the creator has permissions to enable/disable, edit, and delete this monitor.
In addition, the Workspace Owner can grant monitor operation permissions to admins, roles, or members through Unified Permission Configuration. Authorized subjects can operate all monitors with custom operation permissions enabled without being added to the custom permission subjects of each monitor individually.
Trigger Detection Now
After the rule configuration is complete, click Trigger Detection Now to manually run a test and verify the overall effect of the current rule configuration. The test execution does not generate actual alert notifications.
Alert Cache Protection Mechanism
After configuration is complete, the monitor executes the following protection strategies during operation. The system prevents system pressure caused by excessive detection objects from high-cardinality aggregation through the following mechanisms:
| Stage | Trigger Condition | System Behavior |
|---|---|---|
| Threshold Warning | Number of detection objects reaches 80% of the system limit (80,000 entries) | Triggers a system notification (at most once per day) to remind you to check query conditions and grouping settings |
| Over-Limit Protection | Number of detection objects reaches the system maximum of 100,000 entries | Automatically pauses the monitor and sends a notification. The monitor stops running while paused |
The alert cache limit is 100,000 entries, and the warning threshold is 80%.
Pause Recovery Mechanism
After a monitor is paused by the system due to alert cache overflow, performing either of the following operations automatically recovers it:
-
Modify the query conditions and save the monitor again
-
Directly save the monitor again
The system automatically clears the alert cache marker and restores the monitor to normal operation. No additional action is required.
Further Reading
After a monitor rule is successfully created, you may need to: