Change OpenSearch Disk Type on Huawei Cloud
Overview
When deploying a production environment, to save costs, you might choose disks with lower I/O and throughput when the OpenSearch cluster is not heavily used. However, as the data volume grows, performance bottlenecks can appear. At that point, you may consider changing the disk type to improve I/O and throughput.
Prerequisites
- Huawei Cloud CCE v1.23
- Use of the Huawei Cloud built-in StorageClass
csi-disk-topology - A highly available OpenSearch cluster deployed
Flowchart
Refer to the following operation steps in conjunction with this diagram.
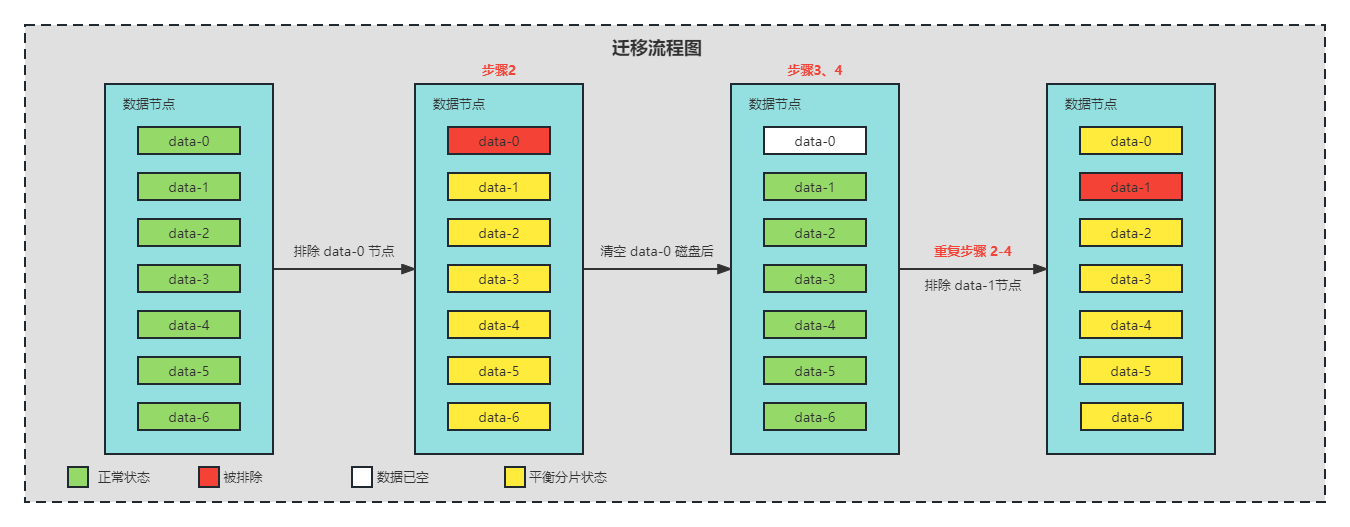
Operation Steps
Step 1: Change the Default Disk Type of csi-disk-topology
Since you are using the StorageClass that comes with the Huawei Cloud CCE cluster, you need to modify it to ensure that the default disk type created meets your requirements.
---
allowVolumeExpansion: true
apiVersion: storage.k8s.io/v1
kind: StorageClass
metadata:
  name: csi-disk-topology
parameters:
  csi.storage.k8s.io/csi-driver-name: disk.csi.everest.io
  csi.storage.k8s.io/fstype: ext4
  everest.io/disk-volume-type: SSD    ## Modify the disk type
  everest.io/passthrough: "true"
provisioner: everest-csi-provisioner
reclaimPolicy: Delete
volumeBindingMode: WaitForFirstConsumer
- Parameter description
| Parameter | Description |
|---|---|
| everest.io/disk-volume-type | Cloud disk type, in uppercase. SAS: High I/O, SSD: Ultra-high I/O, GPSSD: General-purpose SSD, ESSD: Extreme SSD |
Step 2: Migrate Shards and Adjust the Rate
- Exclude nodes by node name, proceeding sequentially from smallest to largest. After excluding a node, shards will no longer be written to this data node. Additionally, shards that were originally on this node will be migrated to other nodes due to the cluster's self-balancing principle.
Note: When performing this operation, ensure that the storage capacity of other nodes can accommodate the data from the excluded node.
PUT _cluster/settings
{
  "persistent" : {
    "cluster.routing.allocation.exclude._name" : "opensearch-cluster-data-0"
  }
}
- Configure the maximum number of concurrent shards for balancing.
incoming: the maximum number of shards being written, typically representing the number of shards that nodes other than the excluded node accept for writing.outgoing: the maximum number of shards being output, typically representing the number of shards output by the excluded node. It is recommended to set it to the number of remaining nodes × the maximum number of incoming shards.
PUT _cluster/settings
{
  "persistent": {
    "cluster.routing.allocation.node_concurrent_incoming_recoveries": 2,
    "cluster.routing.allocation.node_concurrent_outgoing_recoveries": 12
  }
}
- Configure the maximum transfer rate during the shard balancing process.
- You can limit the throughput during migration based on your usage. For example, set it lower during the day to avoid affecting business and higher at night.
Note: Adjust according to the actual disk throughput.
- Check the migration status
GET _cluster/health  ## Check cluster status
GET _cat/tasks?v     ## View detailed shard information
GET _cat/indices?v&s=health:desc     ## View index health status in order
Step 3: Change the Disk
- Delete the PVC and Pod of the previously excluded data node so that they automatically use the modified StorageClass from Step 1.
- Note: The deletion order must not be incorrect.
kubectl delete pvc -n middleware opensearch-cluster-data-opensearch-cluster-data-0
kubectl delete pods -n middleware opensearch-cluster-data-0
If the PVC deletion hangs, press Ctrl + C to skip it.
Step 4: Expand the New Disk
-
On the Huawei Cloud console, directly expand the newly created disk to the desired size.
-
Change the PVC size of the corresponding data node to match the size of other nodes.
spec:
  accessModes:
  - ReadWriteOnce
  resources:
    requests:
      storage: 2500Gi    ## Modify to the same size as other nodes.
  storageClassName: csi-disk-topology
  volumeMode: Filesystem
  volumeName: pvc-7025138f-04e0-4d5b-879d-7cf998f54628
Note: Disks can only be expanded, not shrunk. Choose the size carefully.
Step 5: Remove the Node Exclusion
Since the entire cluster migration involves repeating Steps 2-4 for each data node to change the disk type, you need to repeat Steps 2-4 until all nodes have their disk types changed. After that, execute the following command to clear the excluded node list. Due to the cluster's self-balancing feature, shards will automatically be balanced to the previously empty node.
Verification Method
If the cluster health status is fine, remember to release the old disks to avoid additional charges.