On-Call
The On-Call feature helps teams establish a 7×24 incident response mechanism, ensuring that every incident has a clear owner and is automatically escalated when not handled within the timeout, so that "alerts always reach the right person."
Core Concepts
On-Call Rule
An On-Call Rule defines who is responsible for what types of incidents during which time period. Each rule includes the following elements:
- On-call personnel: members, teams, or notification targets;
- Working hours: the effective period of on-call duty (time zone configurable);
- Effective scope: the validity period of the scheduling rule;
- Matching tags/dimensions: determine which incidents are routed to this rule;
- Escalation policy: the notification escalation rules applied when incidents are not handled within the timeout.
Escalation Policy
An escalation policy is a multi-level notification mechanism attached to an on-call rule. When an incident is not acknowledged or resolved within the specified time, the system expands the notification scope level by level according to the preset levels, ensuring that incidents are not missed.
Escalation Policy Level 0 rules support selecting the "current on-call person", pointing to the on-call person who is in effect in real time when rotation is enabled in the on-call policy.
Matching Tag Logic
Incidents are automatically matched to on-call rules based on their tags. Matching rules support:
- AND: multiple tags must be satisfied simultaneously (all match)
- OR: any one of multiple tags is sufficient (partial match)
- Wildcards:
key:value*supports prefix matching
Example:
Incident tags: {service:payment, env:prod, team:backend}
- On-Call Rule A: tags
service:payment AND env:prod→ matched ✓ - On-Call Rule B: tags
team:frontend→ not matched ✗ - On-Call Rule C: no tags (global) → matched ✓ (fallback)
Note
If no matching tags are set, the on-call rule is considered a "global match" and receives all incidents not matched by other rules.
On-Call Overview
After entering the On-Call page, on-call rules are displayed in card view by default. The top of the page shows your current on-call status, including the name of the active rule, end time, and remaining duration.
You can use "All / Mine" to quickly switch the view scope, displaying either all on-call rules or only the on-call duties you participate in. The current list count is displayed to the right of the filter results. You can also search by on-call name using the search box. If you are currently on call, the corresponding rule is pinned to the top and labeled with "On-Call".
Card View
On-call rules are displayed as cards. Each card contains the on-call name, current on-call person, next on-call person, matching dimensions, and bound escalation policy. Click any on-call card to enter the rule's detail configuration page.
Calendar View
Click "Calendar" to switch to calendar view. Your current filter and search conditions are preserved.
- The left side lists the on-call rules within the current filter scope, where you can select the rules to display in the calendar;
- The right side is a monthly calendar view, supporting month switching, returning to today, and time zone switching.
The calendar displays on-call schedules by day, with each on-call person on their own row, showing the person's name and start time. Click to expand the entire row and display complete information. Hover over the on-call person's name to view detailed on-call information.
The built-in "Default On-Call" is always displayed in the on-call list and cannot be deleted or hidden. Click an on-call person's name in the calendar to view detailed information, including the associated on-call rule, escalation policy, and specific on-call time period. The top-left corner supports switching time zone and date to view historical or upcoming schedules.
On-Call Management
The "On-Call Management" page displays all on-call rules in a list. Each rule lists key information such as on-call time zone, execution cycle, on-call personnel, matching tags, and escalation policy. The list includes both the system default on-call and custom on-call rules. Click any entry to enter its detail page for in-depth configuration.
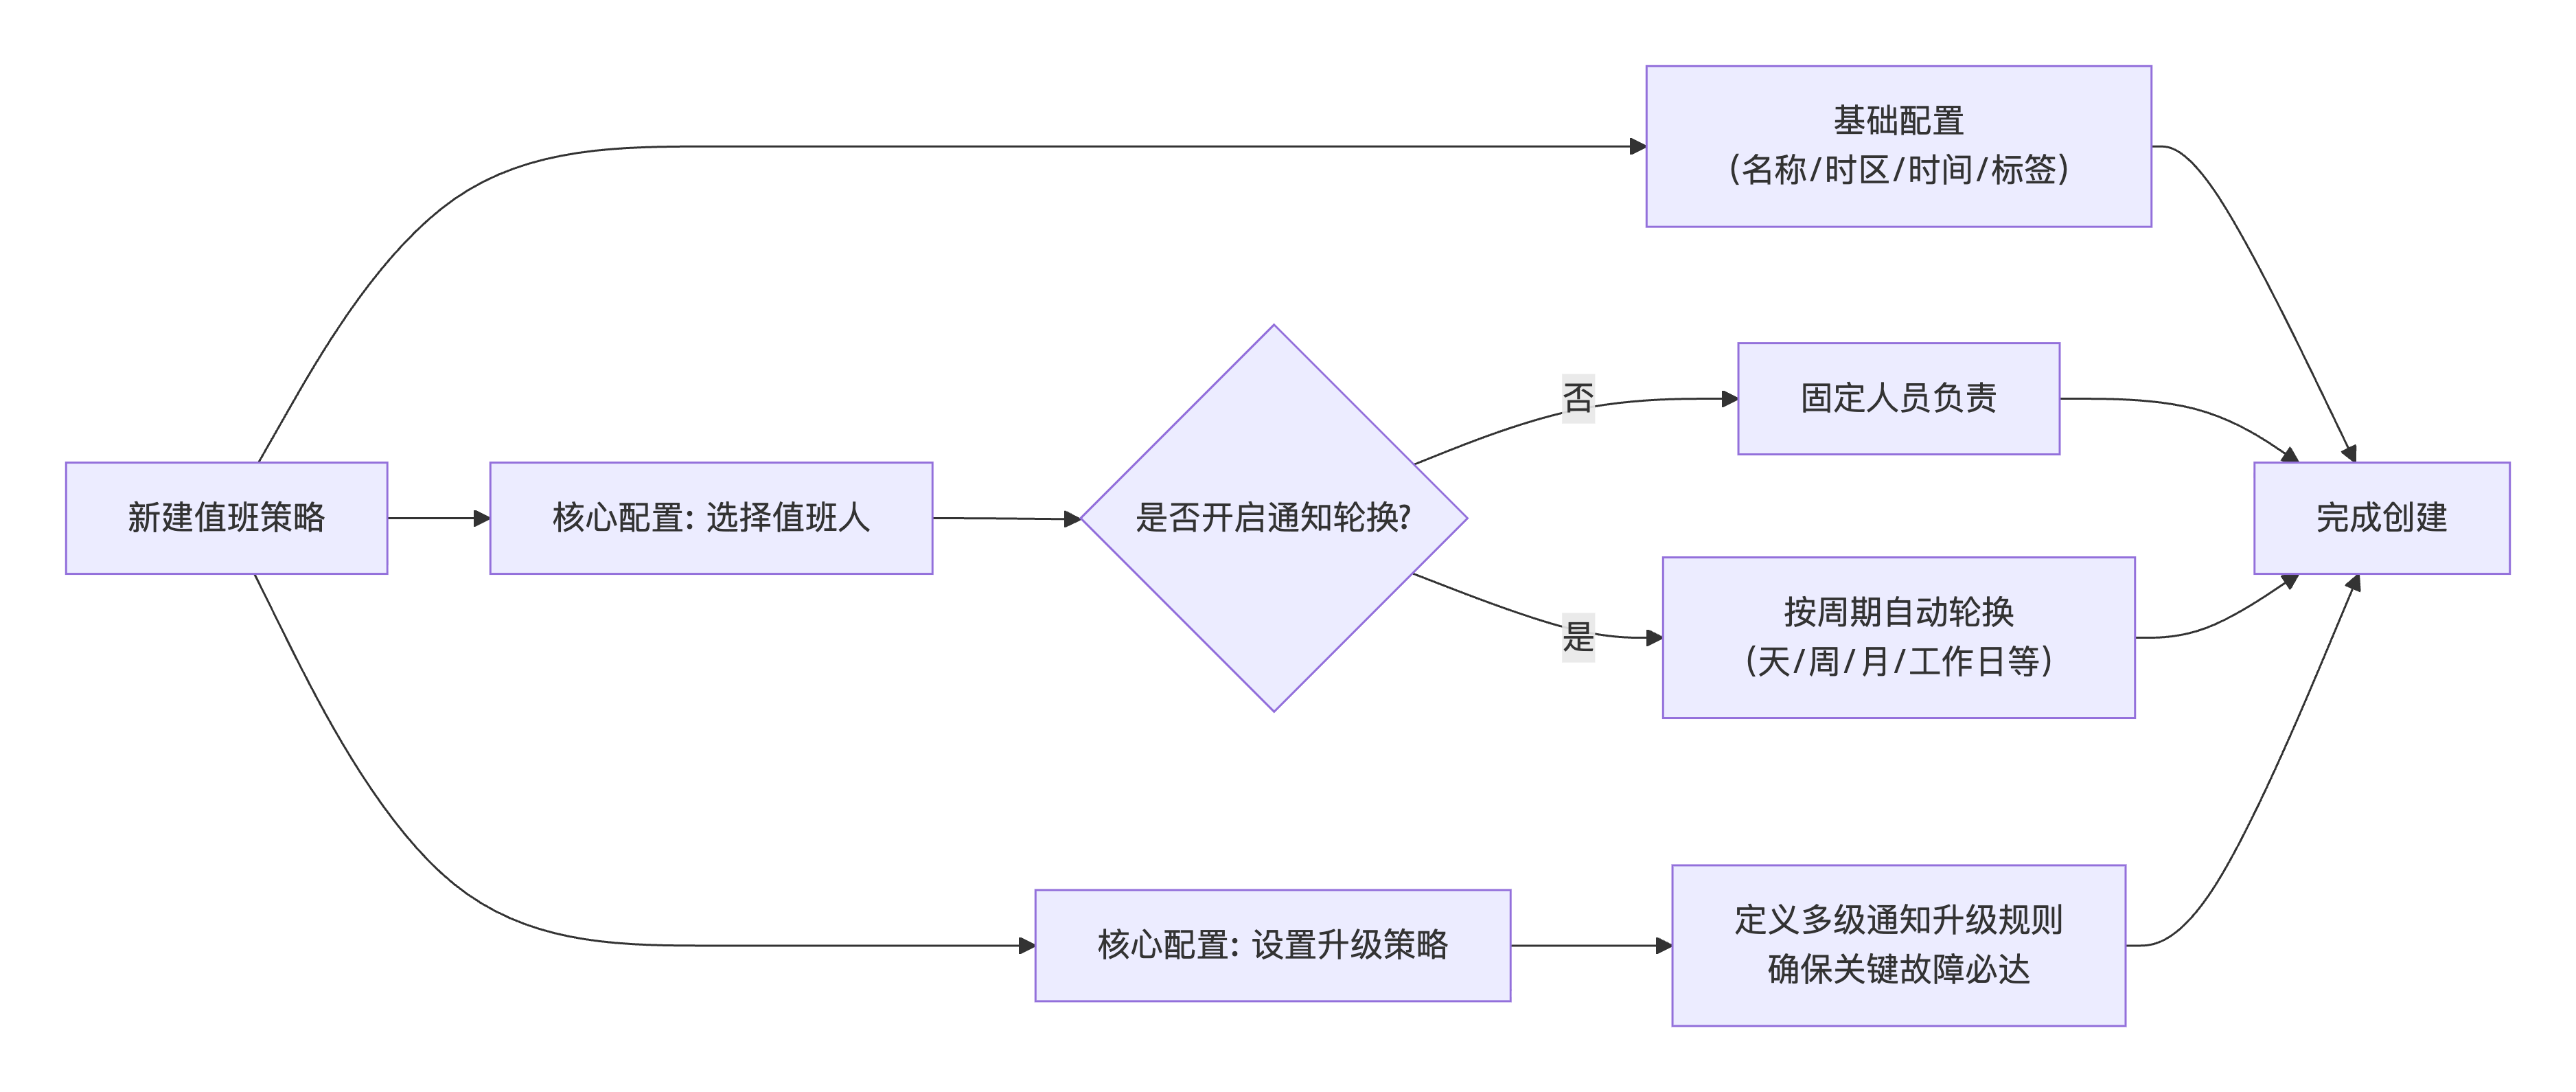
To ensure that incident notifications precisely reach the right people and responsibility is closed loop, the core of on-call policy configuration is to establish the following two layers of assurance mechanisms:
-
Clarify "who is responsible when": by setting on-call personnel, effective periods, and enabling notification rotation (supporting automatic handover by day, week, and other cycles), the system achieves clear scheduling and automatic rotation of responsibility, ensuring a clear "first responder" at any point in time;
-
Preset the escalation path ("how to escalate if there is no response"): by configuring an escalation policy, build a "T+N minute" level-by-level notification timeline. When an incident is not handled within the configured time, the system automatically notifies members at other levels or a broader team according to this rule, ensuring that critical incidents always reach their target.
Create On-Call Rule
Creating an on-call rule requires the following configuration steps.
Basic Information
- Enter the on-call name;
- Select the time zone on which the on-call is based;
-
Configure working hours: define the time periods during which the on-call takes effect.
- All day: covers the whole day
- Specified time: configure multiple time periods by day of week and start/end time; the final effective time is the union of these periods
-
Configure the effective scope: define the validity period of the scheduling rule.
- Long-term: no end time limit
- Specified dates: configure a start date and an end date; the start date cannot be earlier than today
Matching Tags/Dimensions (Optional)
This section determines which incidents are handled by this rule. If no tags/dimensions are added, the rule is globally matched.
-
Matching tags:
- Select an existing tag from the dropdown list.
- You can directly enter a new tag to create it quickly, or go to "Global Tags" to manage them.
-
Matching dimensions:
-
Select detection dimensions (such as
service,host) and set specific matching values; -
Logical relationships are supported: AND (all match; all conditions must be met) or OR (partial match; any one condition is sufficient), with AND as the default.
-
Values support wildcards in the format
key:value*. For example,service:auth*matchesauth-api,auth-service, and so on.
-
On-Call Personnel Settings
- Select on-call personnel: one or more members, or an entire team;
-
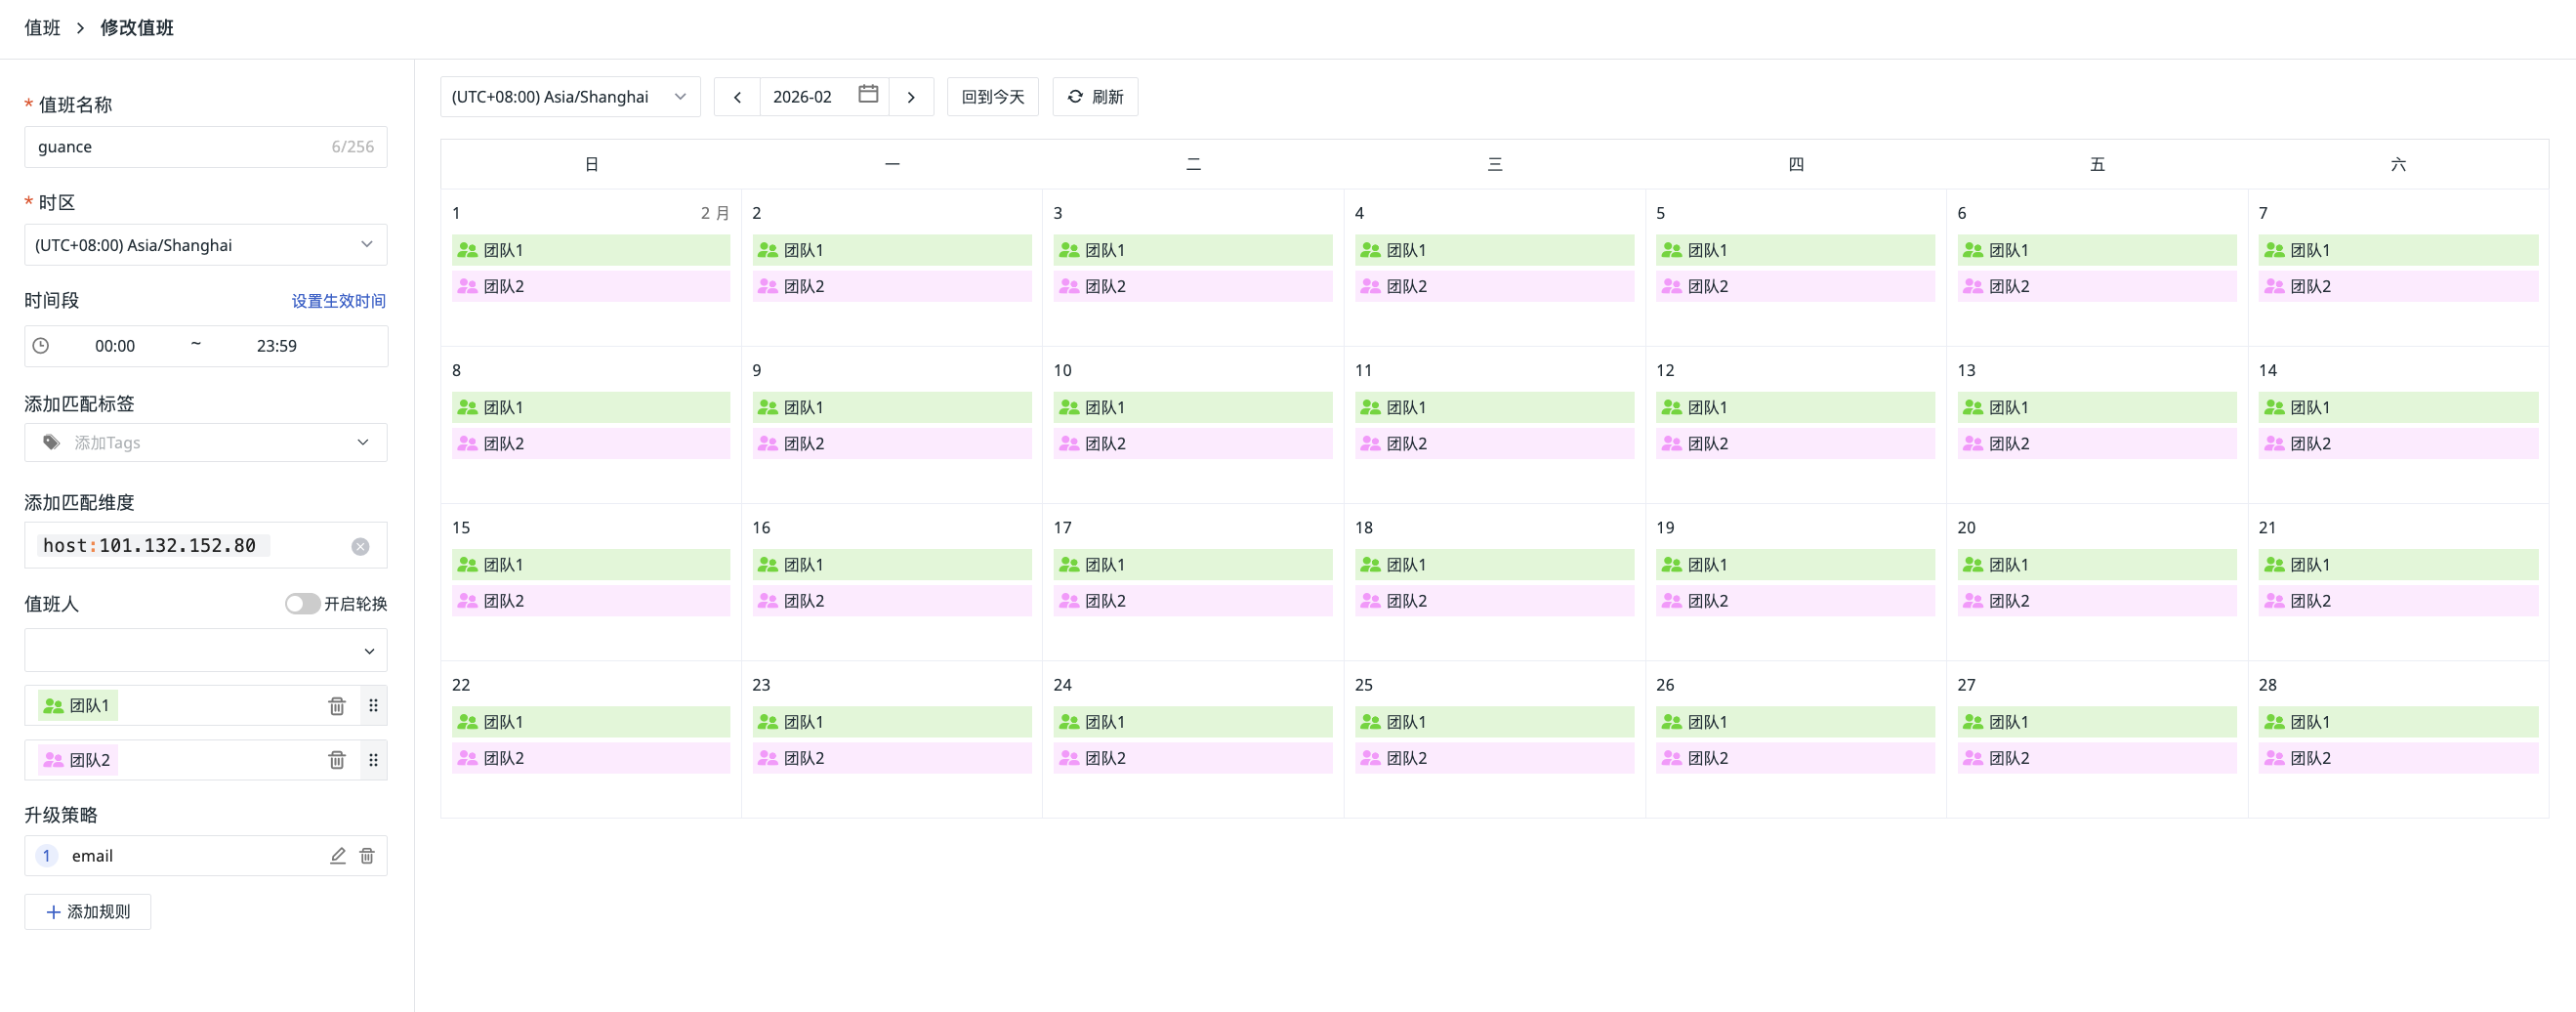
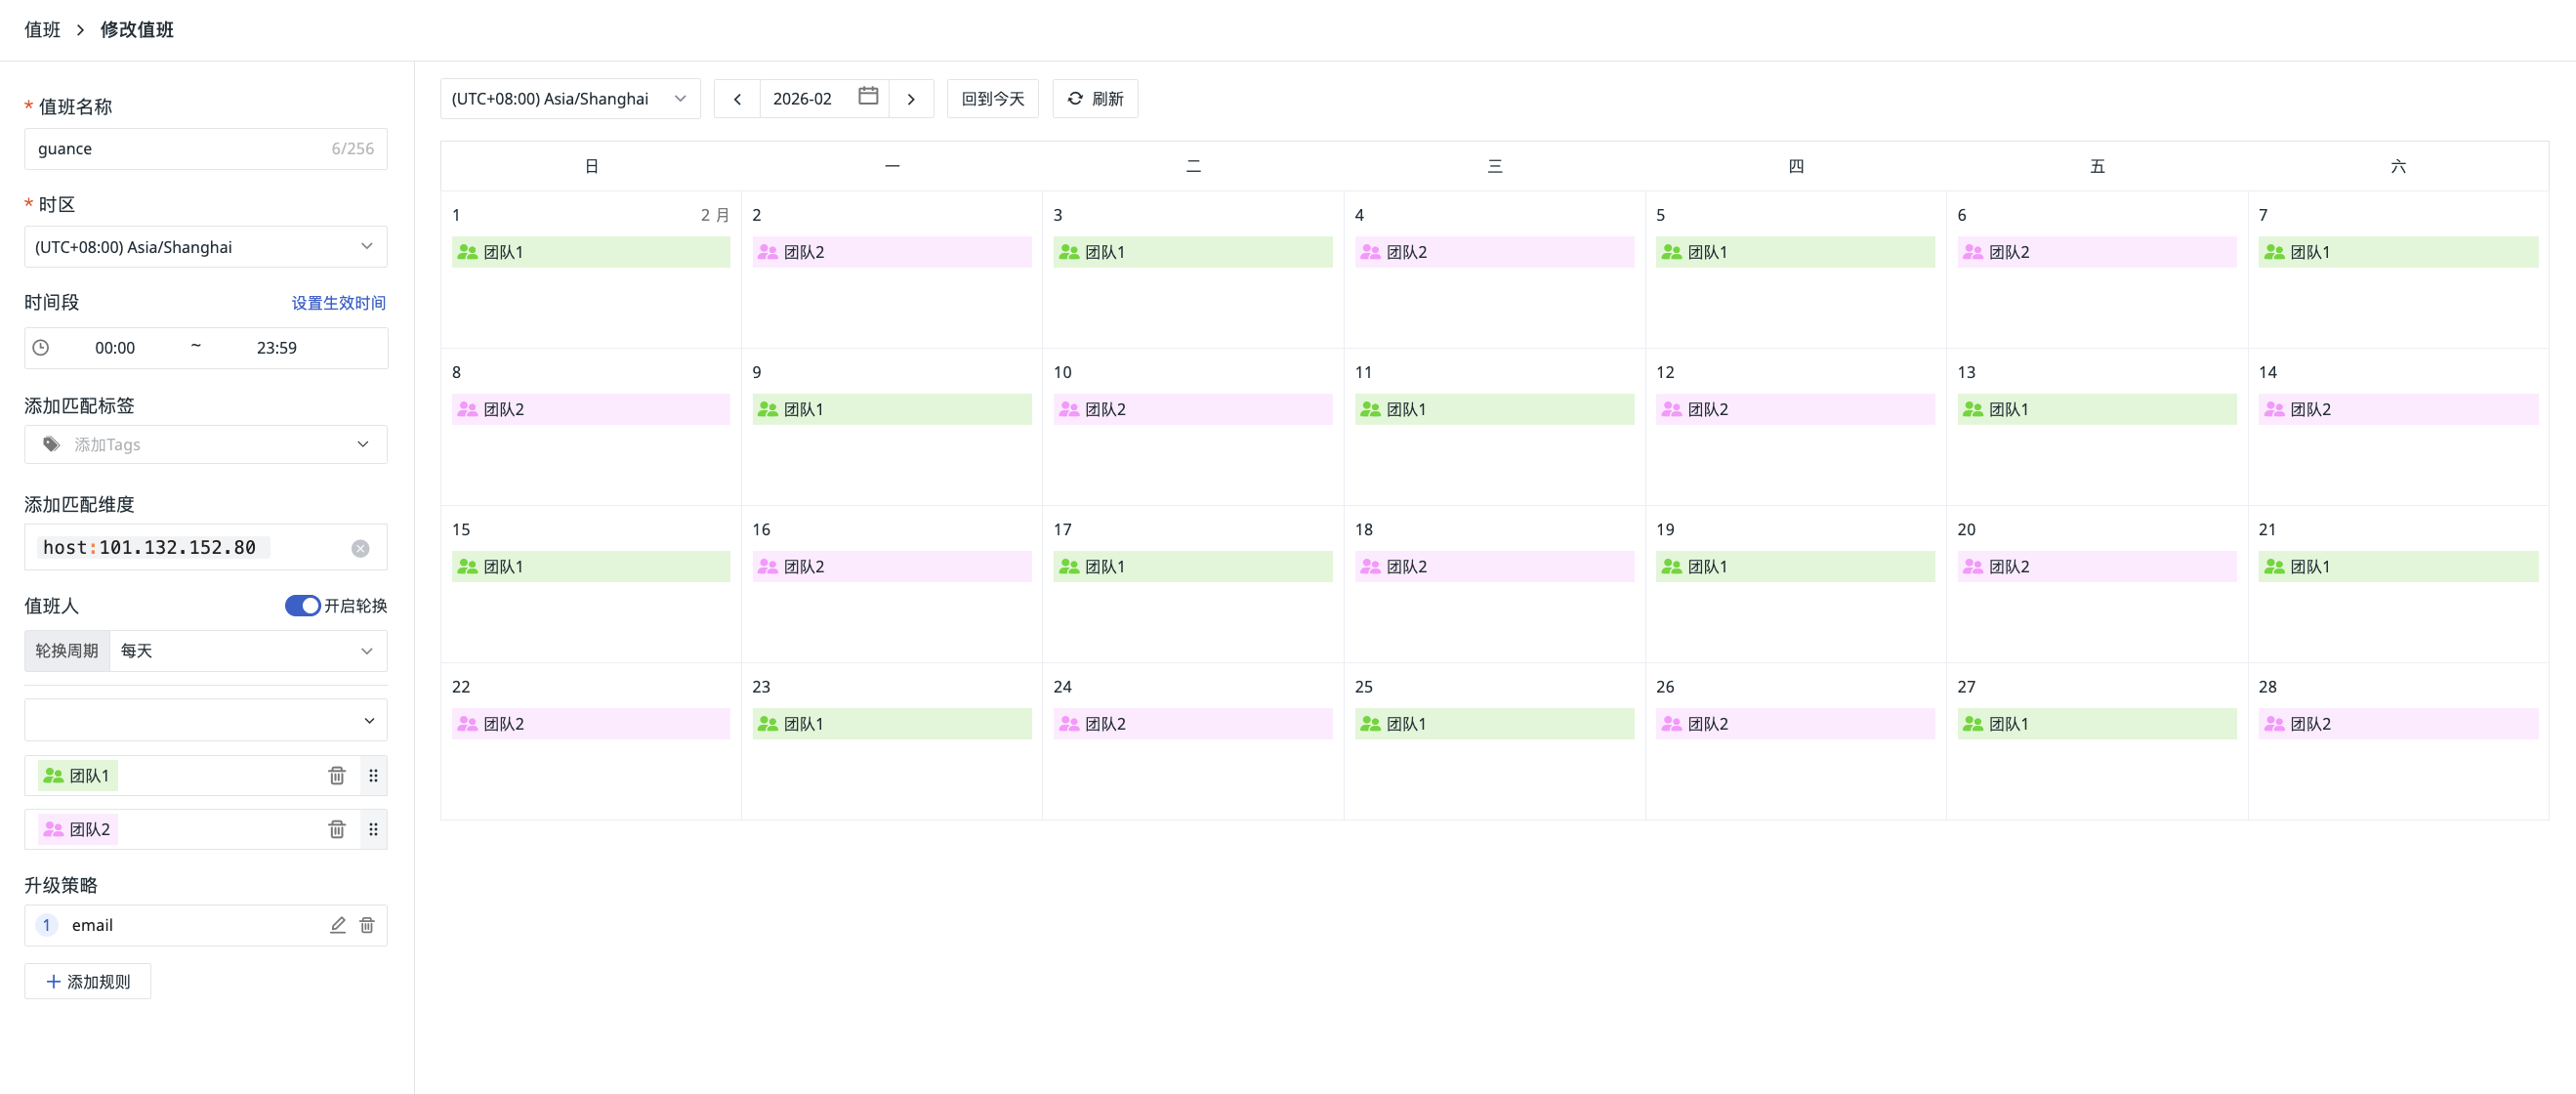
Enable rotation: if round-robin on-call duty is needed, enable rotation and set the rotation cycle (for example, daily, weekly, or monthly). The system automatically cycles through the member list in order and displays the schedule visually in the calendar on the right;
- Custom rotation cycle: supports entering 1–31 days or 1–4 weeks. The system automatically calculates the actual rotation effect based on working hours. For example, if working hours are set to Monday through Friday and rotation is every 4 days, the actual effect is: Monday to Thursday A is on call, and Friday and the next Monday to Wednesday B is on call.
-
Auto-acknowledgment: when enabled, if an incident matches only one on-call person, that member is automatically assigned as the incident handler and the incident status is updated to "Working". Escalation Policy Level 0 notifications are still sent normally.
Rotation example:
- Before rotation is enabled:
- After rotation is enabled:
Note
If the current rule has no on-call personnel configured, you cannot add an escalation policy.
Temporary On-Call Substitution
Used to temporarily adjust on-call personnel during a specific time period.
- Select the substitute and the substituted person (both single-select), and specify the start and end time of the substitution;
- The calendar on the right previews the substitution effect in real time. The top displays the substitute, the substituted person, and the substitution start/end time and duration;
- After the substitution is created, the substituted person no longer receives incident alert notifications during that period; the substitute receives them instead;
- In the calendar, effective substitutions are displayed directly on the corresponding dates, with the original on-call person shown with a strikethrough. Click the substitution block to view a details popup containing both parties and the start/end time, with options to "adjust substitution" or delete;
- After the substitution takes effect, the system sends an email notification to the substitute. After the substitution is deleted, the system sends an email notification to the substituted person.
Configure Escalation Policy
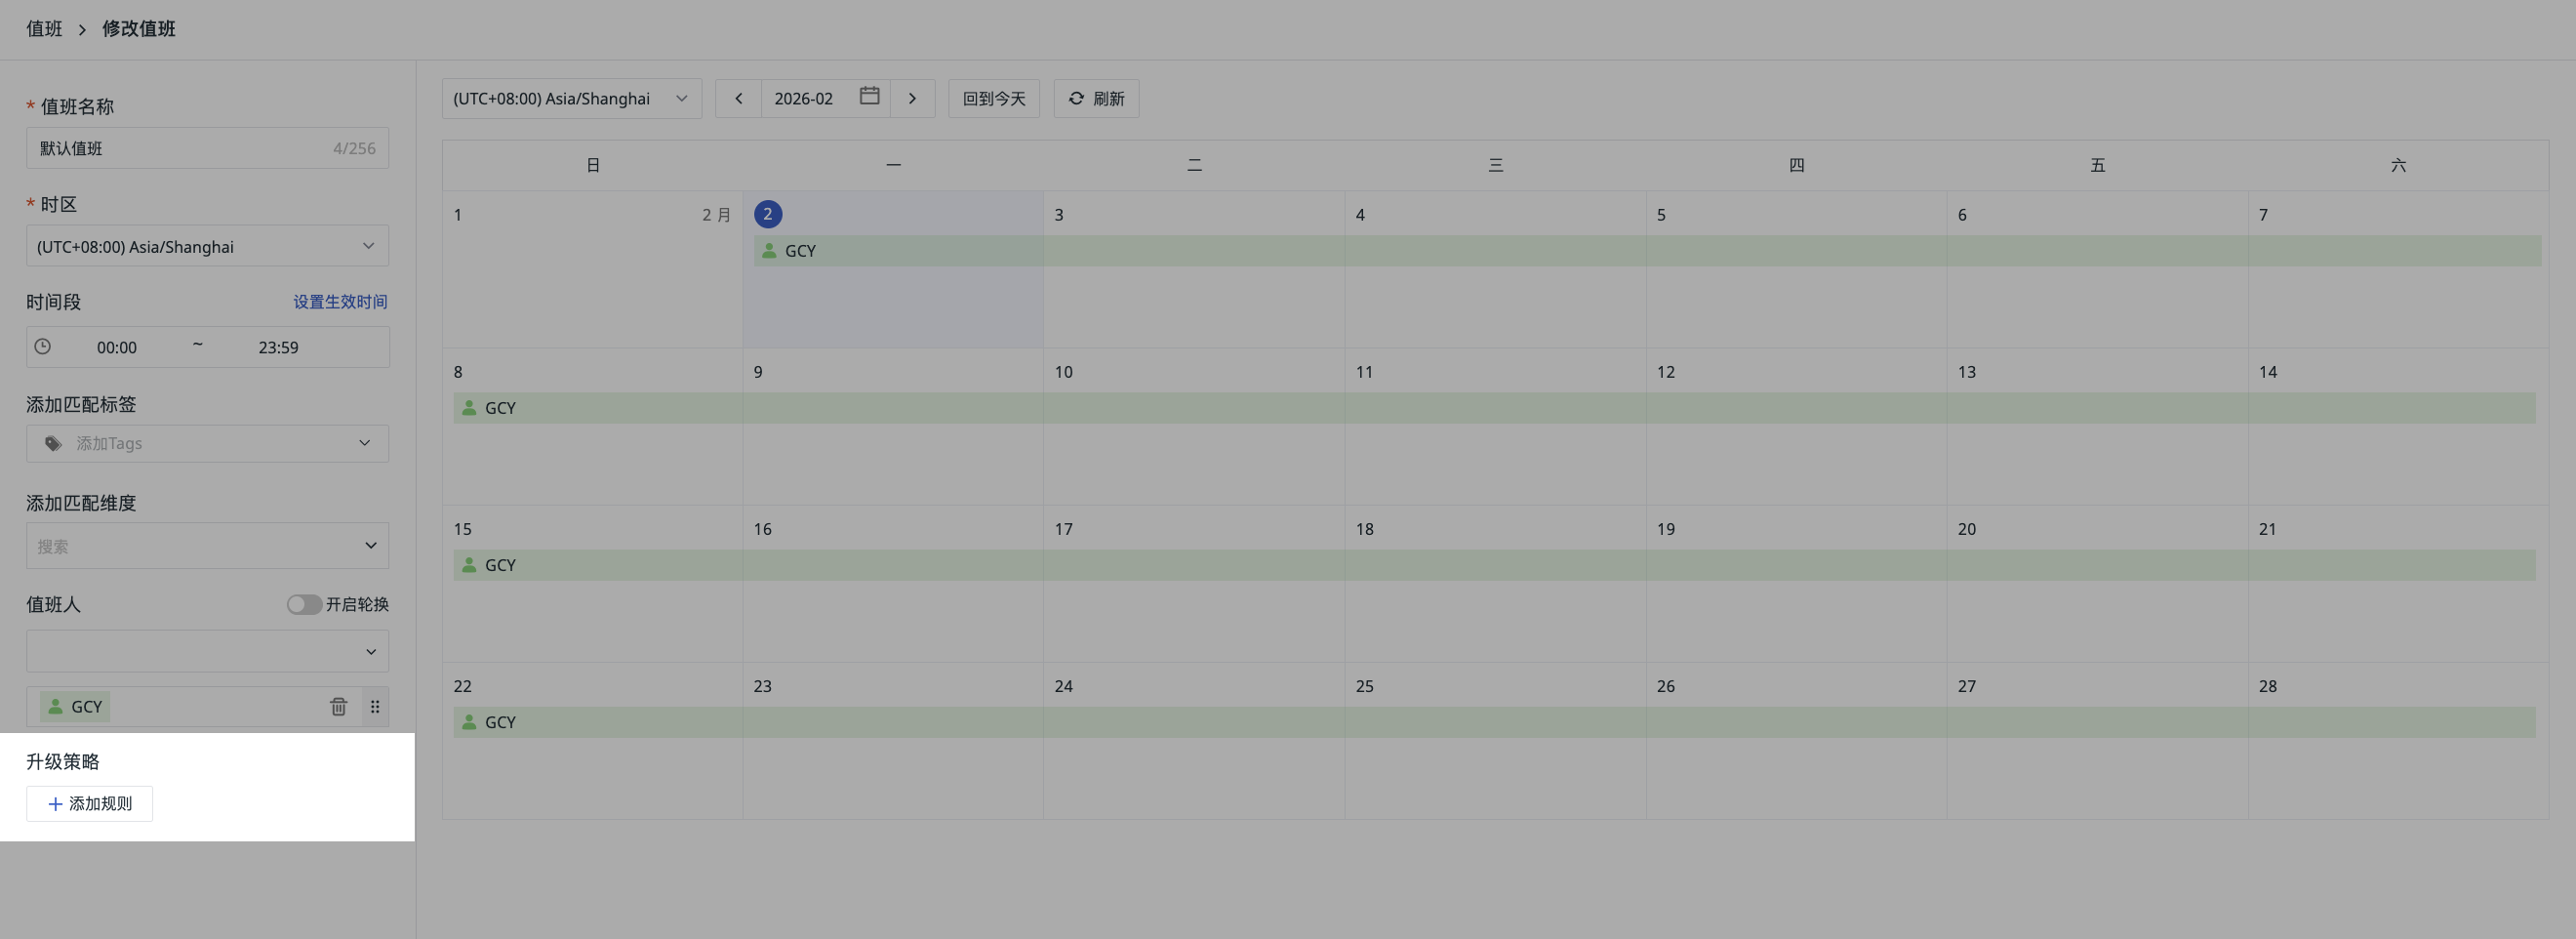
An escalation policy ensures that when an incident is not handled within the timeout, notifications are automatically expanded to more people or higher levels (❗️the escalation policy is the core of an on-call rule, and configuration is strongly recommended).
Timeline Mechanism (T+N)
All time points are calculated based on the incident creation time (recorded as T=0). The system triggers notifications level by level according to the preset intervals:
| Trigger Time | Level | Description |
|---|---|---|
| T+0 | Level 0 | Notify immediately when the incident occurs (initial) |
| T+5 minutes | Level 1 | First escalation |
| T+15 minutes | Level 2 | Second escalation |
| T+30 minutes | Level 3 | Third escalation |
Level Configuration Details
1. Level 0 (Initial Notification) (Required)
- Trigger timing: notify immediately when the incident occurs (T=0);
- Notification targets: defaults to the current on-call person (that is, the person currently on call in the rule). Additional members or teams can also be added;
- Notification methods: select for each notification target individually (email, SMS, phone; multiple selections allowed).
2. Levels 1–10 (Escalation Levels) (Optional)
-
Trigger conditions: all of the following conditions must be met for this level to be triggered:
-
The incident duration has reached the configured wait time (for example, T+20 minutes)
-
The incident severity is within the specified range (for example, applies only to P0 and P1)
-
The incident status is one of the specified values (such as Open or Working)
-
-
Notification targets: only the members or teams configured at this level are notified; personnel configured at Level 0 are not notified;
-
Notification methods: set notification methods separately for newly added personnel.
Note
The incident severity and status range of a higher level must not exceed the range selected at a lower level. For example, if Level 0 applies to P0/P1, then Level 1 can only select a subset of P0 or P1 (it cannot be expanded to P2).
Repeated Notification Mechanism
Within each level, you can choose whether to enable repeated notifications:
-
Repeated notifications disabled: the level sends only one notification and then waits to enter the next level;
-
Repeated notifications enabled: notifications are sent periodically at the configured frequency (for example, every 5 minutes) until the incident status changes or the next level is entered.
Note
The repeat interval must be shorter than the wait time before entering the next level; otherwise, it cannot be configured.
Example:
-
Level 1 wait time: 30 minutes
-
Repeat interval: 5 minutes
-
Final effect: a notification is sent at T+5, T+10, T+15, T+20, T+25, and T+30 minutes.
Note
If repeated notifications are enabled on the last level (for example, Level 10) and the incident is never handled, the system will repeat notifications indefinitely until someone acknowledges or resolves it.
Handling On-Call Handovers
If the incident duration spans an on-call handover time, subsequent escalation notifications are transferred to the new on-call person and executed according to the new on-call person's escalation policy.
Example:
-
The incident occurs at 23:55, when person A is on call.
-
In the escalation policy, Level 1 has a wait time of 15 minutes and is configured to repeat every 5 minutes.
-
The first repeated notification is triggered 5 minutes after the incident occurs (that is, at 0:00). At this point, the on-call person has already switched to B, so the notification is sent to B, and all subsequent escalation notifications (including the remaining repeats and the next level) are executed according to B's escalation policy.
After the day changes, the system continues handling the incident based on the new on-call person B's escalation rules.
Note
We recommend considering cross-day scenarios when configuring escalation policies to ensure that incidents are effectively responded to at any time.
Deduplication Across Multiple Escalation Policies
When the same incident matches multiple on-call rules (and therefore multiple escalation policies), the system automatically deduplicates notifications to ensure that the same user does not receive duplicate notifications. Deduplication logic is based on user, incident, and notification content.
Escalation Policy Configuration Example
Scenario: Escalation policy for a P0 incident of a core service
| Level | Wait Time | Applicable Conditions | Notification Targets | Notification Methods |
|---|---|---|---|---|
| Level 0 | T+0 | Severity = P0 | Current on-call person A | SMS + Email |
| Level 1 | T+5 minutes | Severity = P0, Status = Open/Working | + On-call team lead B | B: Phone |
| Level 2 | T+15 minutes | Severity = P0, Status = Open/Working | + Department manager C | C: Phone |
| Level 3 | T+30 minutes | Severity = P0, Status = Open/Working | + CTO D | D: Phone + SMS |
In this example:
- When the incident occurs, the current on-call person A is notified immediately;
- If the incident is not handled after 5 minutes, on-call team lead B is additionally notified (notification targets are A + B);
- If it is still not handled after 15 minutes, department manager C is additionally notified (notification targets are A + B + C);
- If it is still not handled after 30 minutes, CTO D is additionally notified, and Level 3 has repeated notifications enabled (for example, every 10 minutes) until someone responds.
Notification Methods
Prerequisites
-
Notified personnel must configure their corresponding contact methods (email, mobile number) in Preferences; otherwise, they cannot receive notifications through the corresponding channel;
-
If an "on-call phone number" or "on-call email address" is additionally configured in "Preferences", the system prioritizes these dedicated contact methods for notifications to improve reliability and distinguishability.
The system supports three notification channels. You can select them for each notification target individually:
| Method | Description | Use Cases |
|---|---|---|
| Sends an email notification containing incident details and a link | Non-urgent incidents and scenarios that require detailed information | |
| SMS | Sends a concise SMS notification containing only key information and a link | Scenarios that require timely awareness but do not require an immediate phone response |
| Phone | IVR voice call; after connection, the alert content is played and keypress confirmation is required ❗️If you need to configure on-call phone numbers for contacts in different time zones/regions, be sure to use the +area code format |
Urgent incidents that must reach the target; suitable for nighttime or high-priority scenarios |
Phone broadcasts use the character limit corresponding to the current Workspace language. For word count and truncation rules, see Phone Broadcast Character Limit.
Default On-Call
The system provides a built-in "Default On-Call", a simplified on-call rule suitable for simple scenarios. Its characteristics are as follows:
- Only on-call personnel, on-call rotation, and escalation policies can be configured;
- Time zone cannot be configured (fixed as empty and follows the system time zone); matching tags/dimensions cannot be configured (not supported; defaults to global match);
- The Default On-Call always appears in the on-call list and cannot be deleted.
Rule Limitations
-
An on-call rule can have up to 10 escalation levels (Level 0 + Levels 1–10);
-
The maximum single wait time is 360 minutes (6 hours); values beyond this cannot be saved;
-
The incident severity and status range of a higher level must be a subset of the range selected at a lower level.
Configuration Checklist
Before saving an on-call rule, we recommend checking the following items one by one:
- Does Level 0 include the current on-call person (included by default)?
- Is the wait time at each level reasonable? (Consider that nighttime response may require more time)
- Does the final level include a contact who "must be reached no matter what"?
- If repeated notifications are enabled, is the repeat interval shorter than the wait time of the next level?
- Have all notification targets configured their corresponding contact methods (especially phone)?
- For cross-day scenarios, does the continuity of the escalation policy meet requirements?
Next Steps
After configuring the on-call rule, you can see the automatically associated on-call information in the Incident List. When an incident occurs, the system automatically notifies the relevant personnel according to your rules and executes the escalation policy after a timeout, ensuring that every incident receives a timely response.