SAML
This article describes how to configure single sign-on (SSO) based on the SAML 2.0 protocol in a Guance workspace.
Prerequisites
Before you begin configuration, make sure you have the following ready:
| Item | Description |
|---|---|
| IdP administrator privileges | You need to create a SAML application in your enterprise identity provider (such as Azure AD, Okta, OneAuth, Keycloak, etc.) |
| Metadata XML file | SAML metadata document exported from the IdP, containing key information such as login URL and public key certificate |
| Corporate email domain | Email suffix used to identify SSO users, for example example.com |
Configuration Steps
Step 1: Go to the Configuration Page
- Go to Management > Member Management > SSO Management > User SSO;
- Select the SAML access type;
- Click Add Identity Provider.
Step 2: Fill in Basic Information
- Identity provider: a platform that provides identity management services and is used to manage user identities and authentication information. Define a name here (❗️ This custom display name will be presented as the IdP alias on the login selection screen. We recommend a name that is easy to recognize, such as
Company Azure AD); - Metadata document: upload the XML metadata file provided by the IdP. The system will automatically parse the login URL, public key, and other information;
- Remarks: custom description used to record notes about this identity provider;
Step 3: Configure Field Mapping
Configure the mapping between the user attributes returned by the IdP and the Guance account information.
| Mapping Field | Required | Description |
|---|---|---|
| Username | Required | Enter the username attribute name returned by the IdP to obtain the user name |
| Required | Enter the email attribute name returned by the IdP to obtain the user email | |
| Phone Number | Optional | Enter the phone number attribute name returned by the IdP to populate the number when the account does not have a phone number set |
The mapping value should be the attribute name returned by the IdP, not your actual name, email address, or phone number. Configure it according to what the IdP actually returns.
Phone Number Sync Rules
When logging in via SAML, the account phone number is handled according to the following rules:
| Account phone number | IdP return | Handling |
|---|---|---|
| Already set | Phone number returned or not returned | Keep the existing number on the account; do not overwrite or clear it |
| Not set | Number obtained through phone number mapping | Write the number returned by the IdP to the account |
| Not set | No phone number returned | No phone number is written; login is not affected |
SSO users can also set or change their phone number in Account Settings. Once the number is saved to the account, subsequent SAML logins will not overwrite or clear it.
Voice call (IVR) notifications make calls using the phone number saved in the account. When the IdP does not return a phone number and the account has no number set, users can log in normally, but must add a phone number before they can receive voice notifications.
Step 4: Login Control
- Access restriction: enter the corporate email domain (for example,
example.com). The system will verify that the login email suffix matches. An email that logs in for the first time can automatically create a member account in the workspace; -
Role authorization: assign a default role (Administrator/Standard Member/Read-Only Member) to SSO users who log in for the first time. Users who have already logged in are not affected;
- If SAML mapping is enabled in the workspace, the system will assign roles according to the mapping rules first. The default role configured here only applies to users who do not match any mapping rule.
-
Session Duration: set the idle timeout and the maximum duration of the SSO login session.
Session Duration
Set a unified login session duration for enterprise members who log in via SSO.
| Configuration Item | Range | Default | Description |
|---|---|---|---|
| Idle session timeout | 180–1440 min | 180 min | Time after which the user is automatically logged out when idle |
| Maximum session duration | 0–7 days | 7 days | Forces logout after this duration regardless of activity. 0 means never expires |
After you change the session duration, members who are already logged in keep their original settings, while members who log in afterward use the latest settings.
Example
After the SSO login session duration is updated:
- Members already logged in: the expiration time of their login session remains unchanged.
- Members who log in afterward: the latest login session duration settings apply.
For example:
- When SSO was initially configured, the idle session timeout was 30 minutes. If Member A logs in at that time, their idle session timeout is 30 minutes.
- The administrator then updates the idle session timeout to 60 minutes. Member A's idle session timeout remains 30 minutes, while Member B, who logs in after this update, will have an idle session timeout of 60 minutes, and so on.
Step 5: Obtain SP Configuration Information
After the identity provider is added successfully, scroll down to the Service Provider details section on the edit page to obtain the configuration information of Guance as the SP (Service Provider):
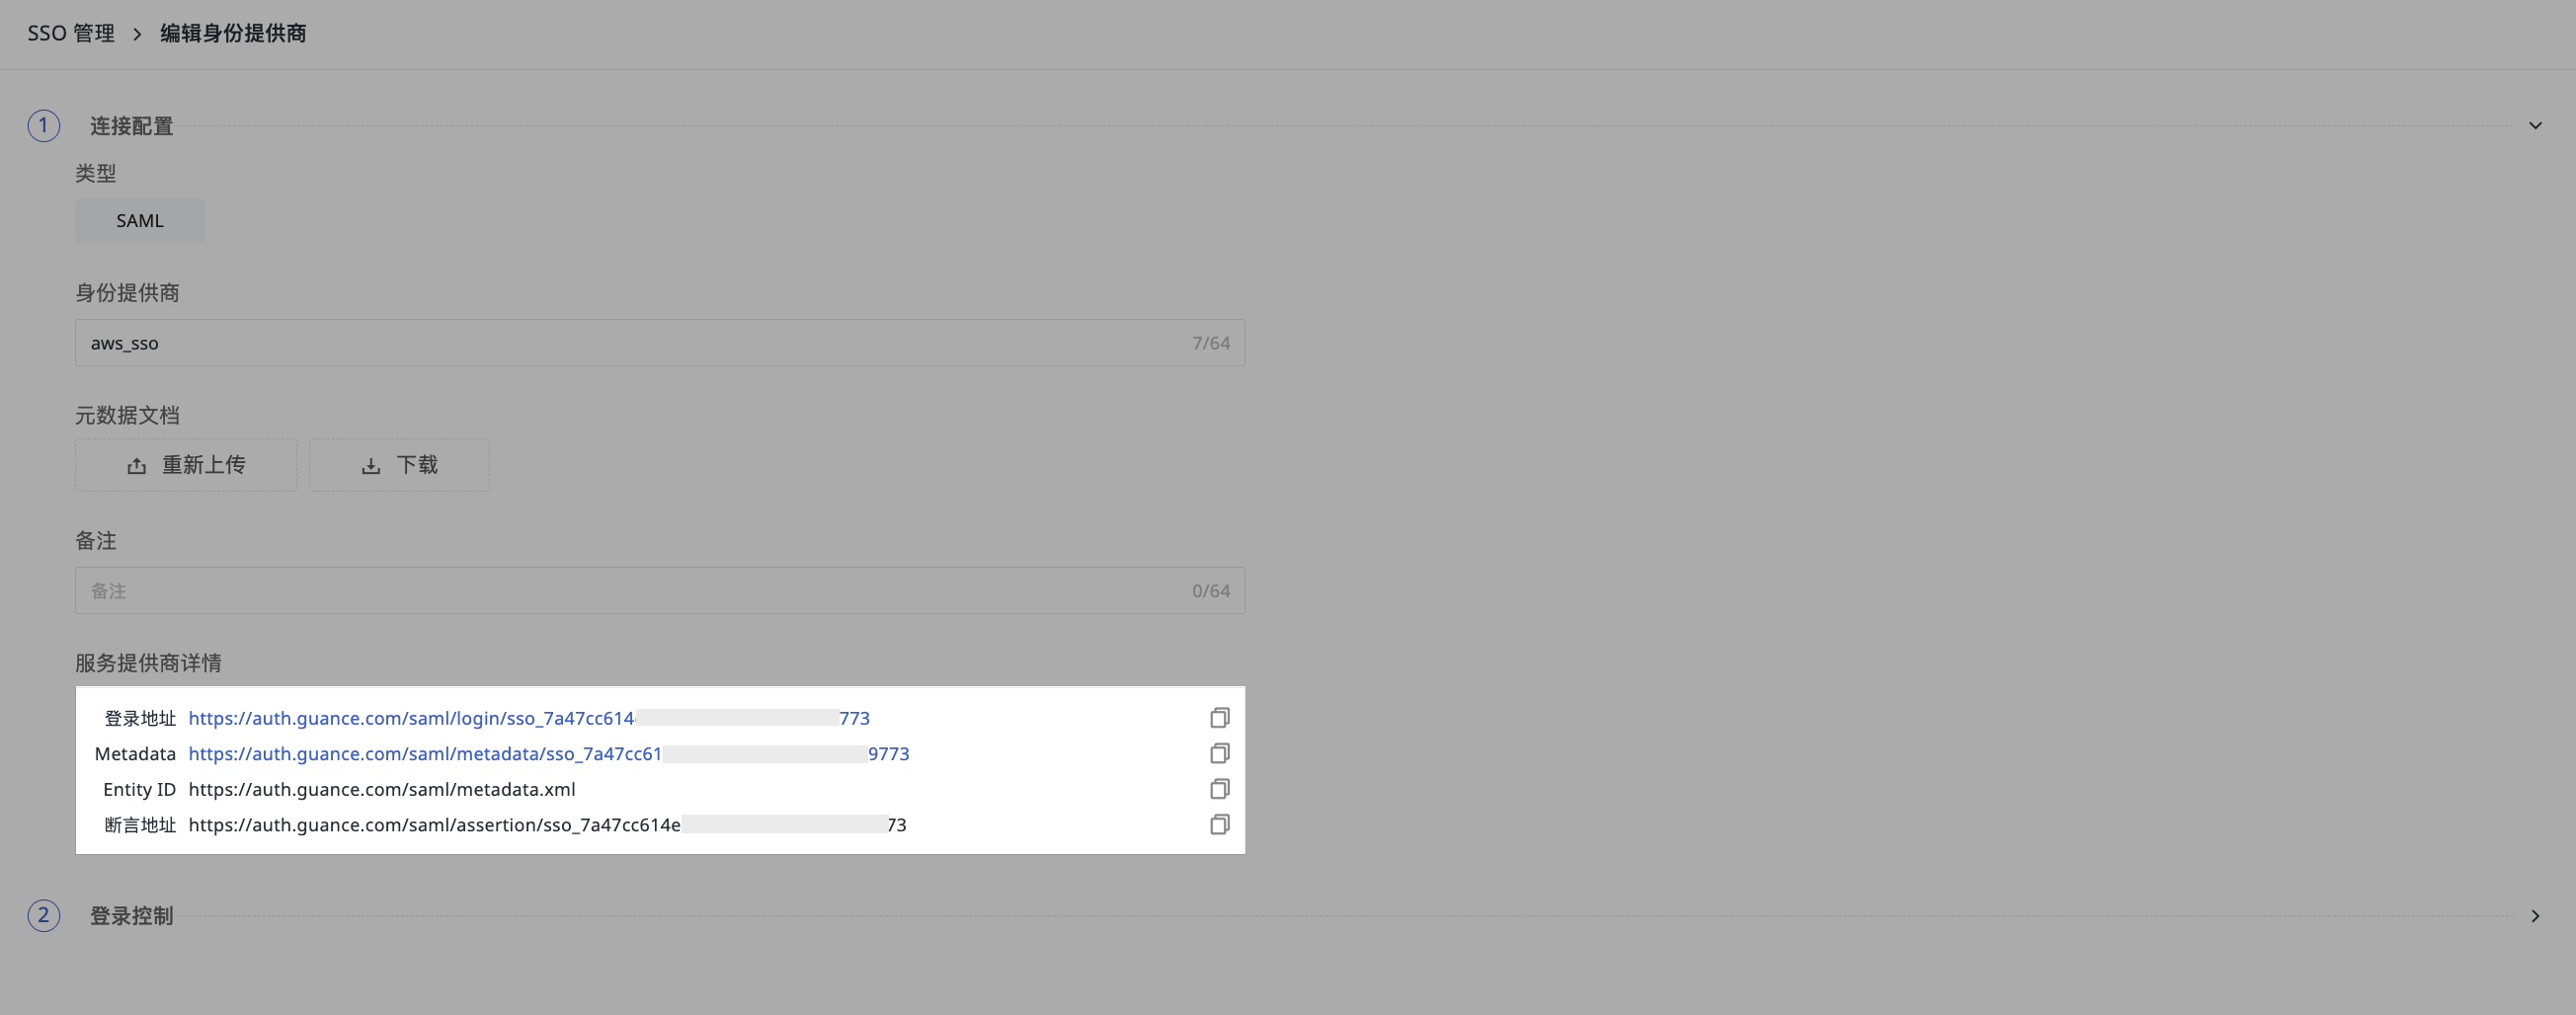
| Field | Description |
|---|---|
| Login URL | The Guance SSO login entry. Each address can only access one workspace. Format: https://<auth-domain>/saml/login/sso_<id> |
| Metadata | The Guance SP metadata file, which can be downloaded and imported into the IdP |
| Entity ID | The unique identifier of the Guance SP, which must be configured in the IdP. Usually http://<auth-domain>/saml/metadata.xml |
| Assertion URL | The address (ACS URL) where the IdP submits the SAML assertion to Guance after a successful login. Format: https://<auth-domain>/saml/assertion/sso_<id> |
Step 6: Configure SP Information in the IdP
Based on the information obtained in Step 5, complete the following configuration in your IdP:
- Entity ID: enter the Entity ID provided by Guance;
- ACS URL (Assertion URL): enter the assertion URL provided by Guance;
- Name ID format: make sure the IdP returns the user email (EmailAddress format);
- Signing certificate: upload the certificate from the Guance metadata (if required).
Common IdP Configuration Reference
User Login Verification
- Use email login to enter the Guance SSO page: https://auth.guance.com/login/sso;
- Enter the email address configured when creating the SSO, and select the IdP of the workspace you want to log in to;
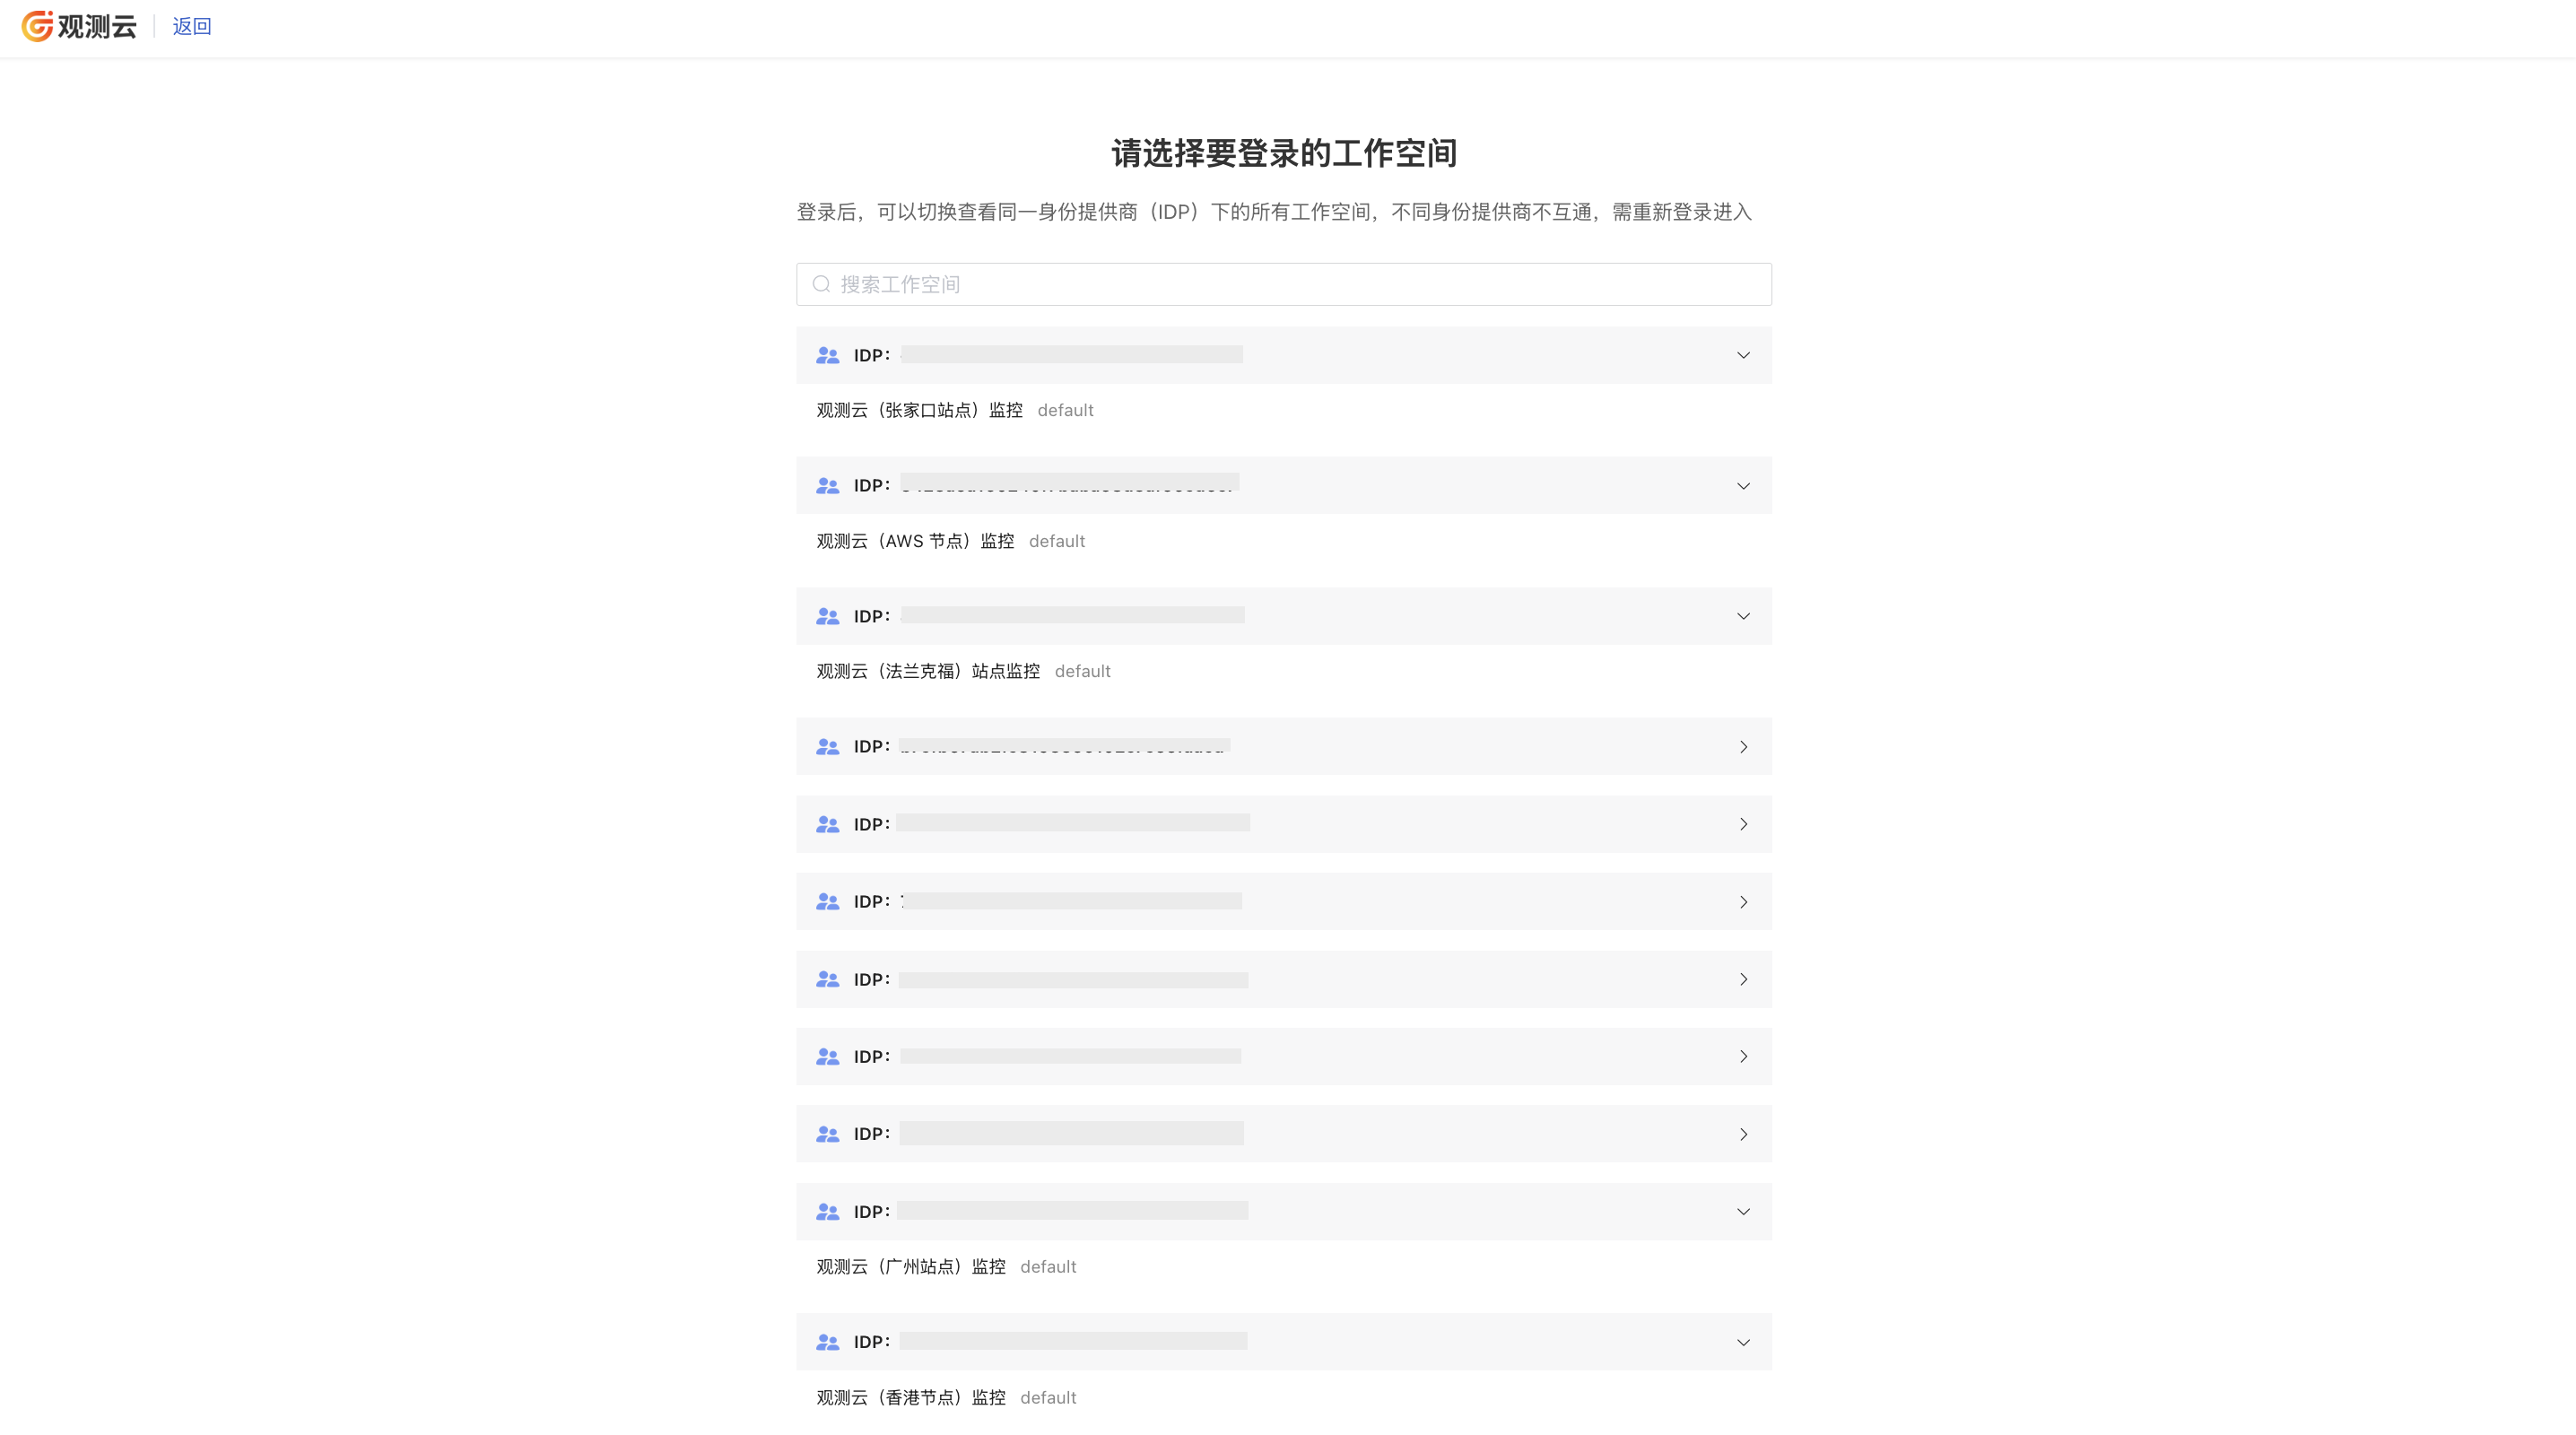
- After successful authentication, you will be redirected to the workspace selection screen;
- Log in to that address;
- Enter your username, password, and other information;
- Login successful.
Notes
- When role mapping is enabled: if a user does not match any role mapping rule, or when role mapping is disabled, the user will be prompted with a "No access permission" message after login;
- After an identity provider is deleted, users logging in via SSO will no longer see the workspace corresponding to the deleted IdP;
- Multiple IdP configuration: a single workspace supports up to 10 IdPs. Users can log in as long as their email domain matches any one of the IdPs;
- Account binding: on the first SSO login, if the email matches an existing Guance account, the account is automatically bound and historical data is retained.
Further Reading
You may be interested in the following topics: