Data Forwarding to AWS S3
- Complete the rule name and filter condition settings;
- Proceed to configure archiving.
Configure
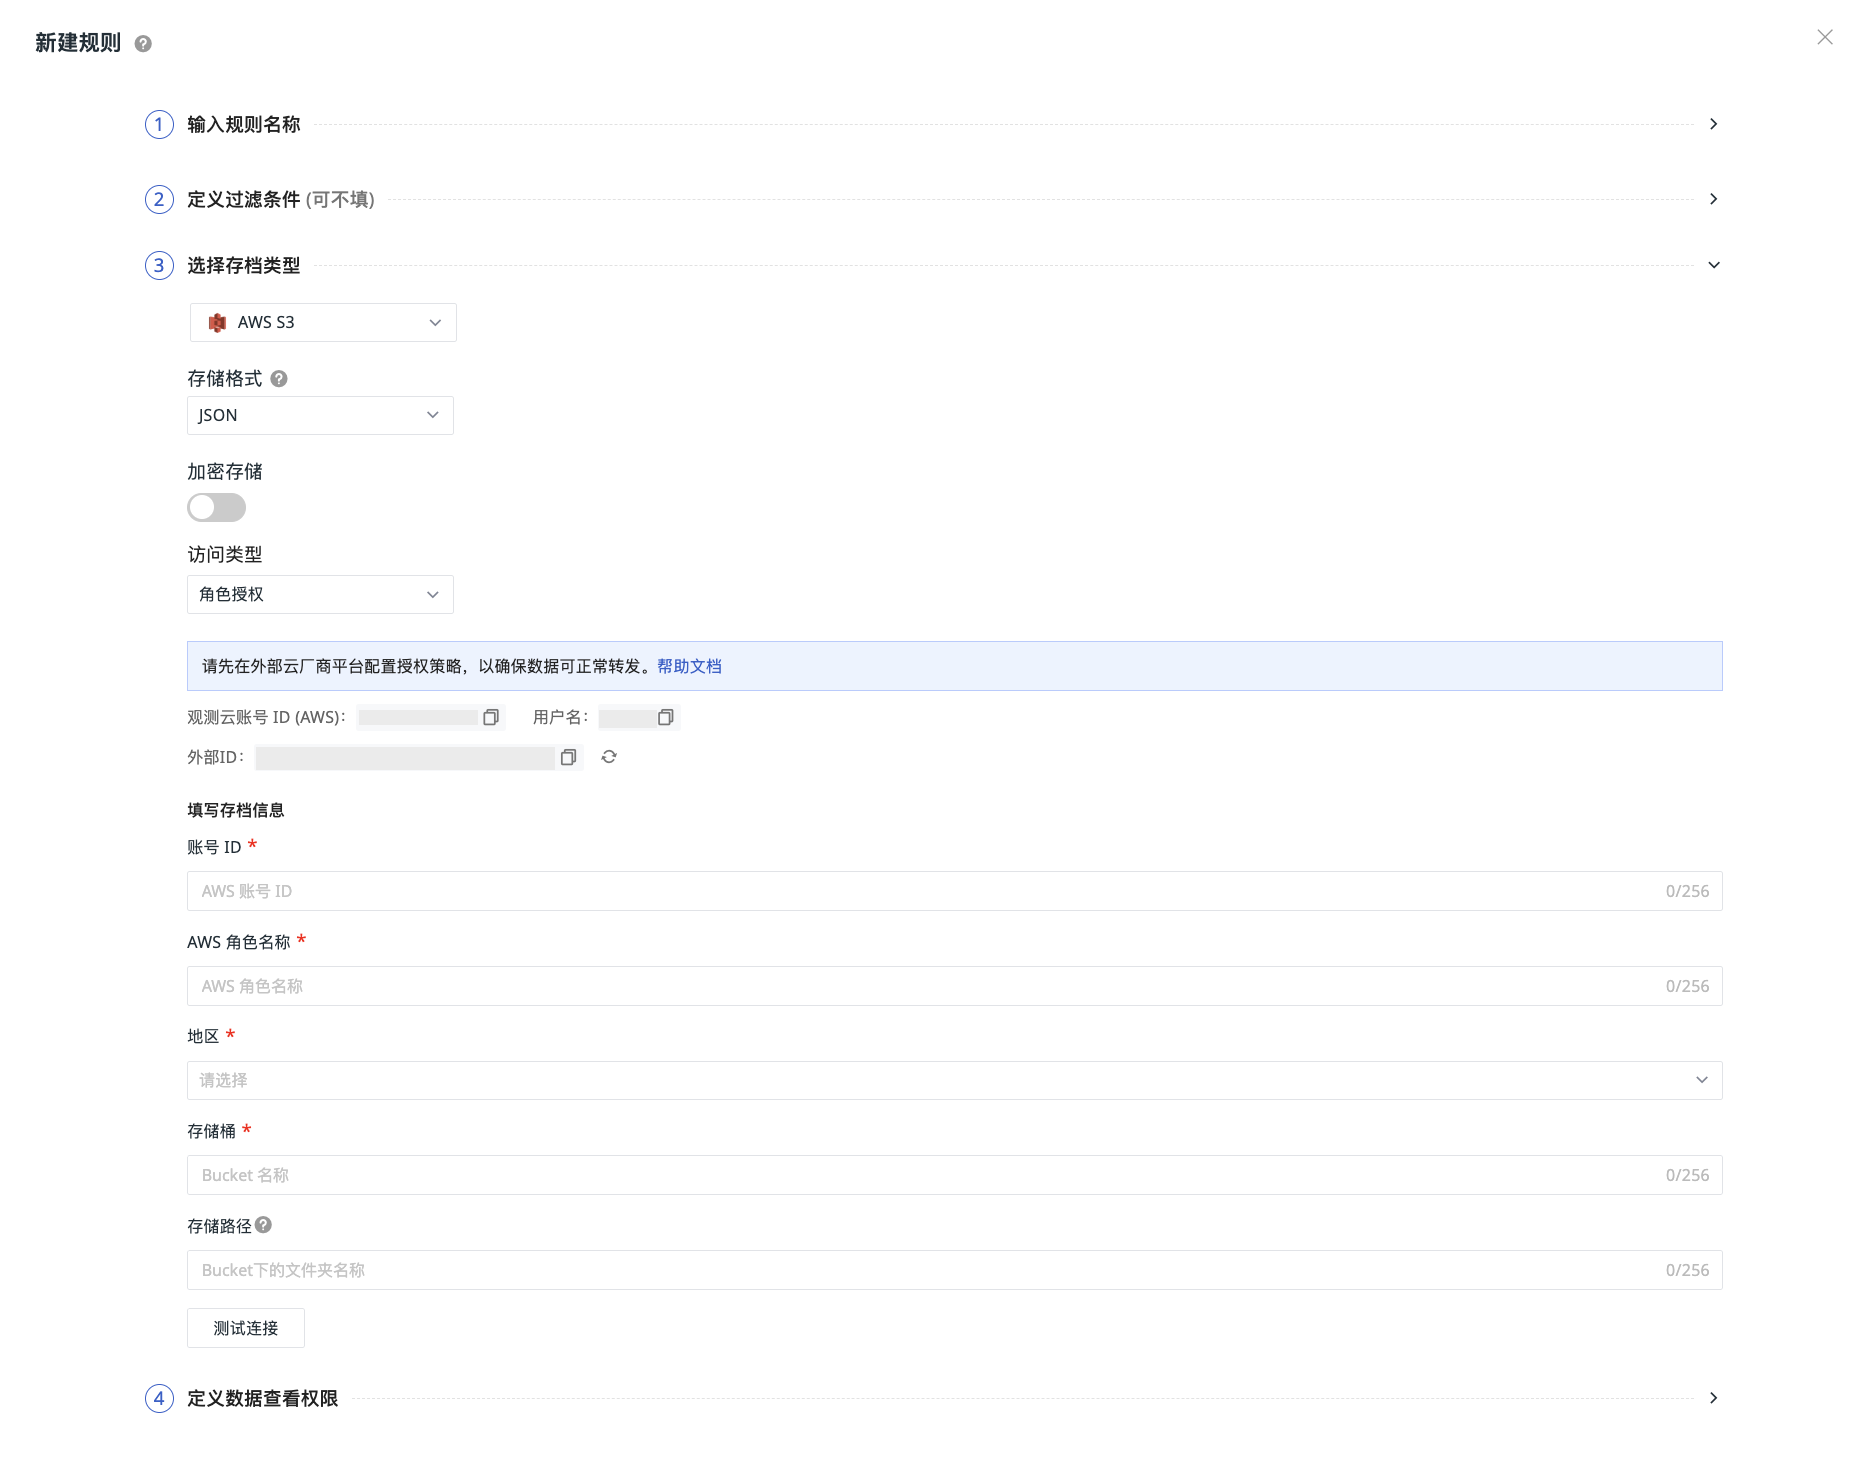
- Select AWS S3 as the archive type to save matched data to this object storage;
-
Select a storage format;
- If you select Apache Iceberg, additional configuration is required;
-
Choose whether to encrypt the storage;
- Select an access type;
- Click OK to create the rule.
Note
If the archive type information changes, confirm that the associated platform configuration is updated accordingly to avoid data write failures due to configuration changes. The new configuration rule will take effect within 5 minutes.
Apache Iceberg
Apache Iceberg is an open table format. When you select Apache Iceberg as the storage format, Guance writes data as Parquet files to your Iceberg table via the REST Catalog. The data can be directly read by data lake engines such as Spark, Trino, and Flink, and supports table capabilities like Schema evolution and snapshots.
Note
The Iceberg format currently supports write-only operations. Archived data cannot be queried within Guance, and this rule is not selectable on the Data Explorer page. To query the data, connect to the same Catalog using an external query engine.
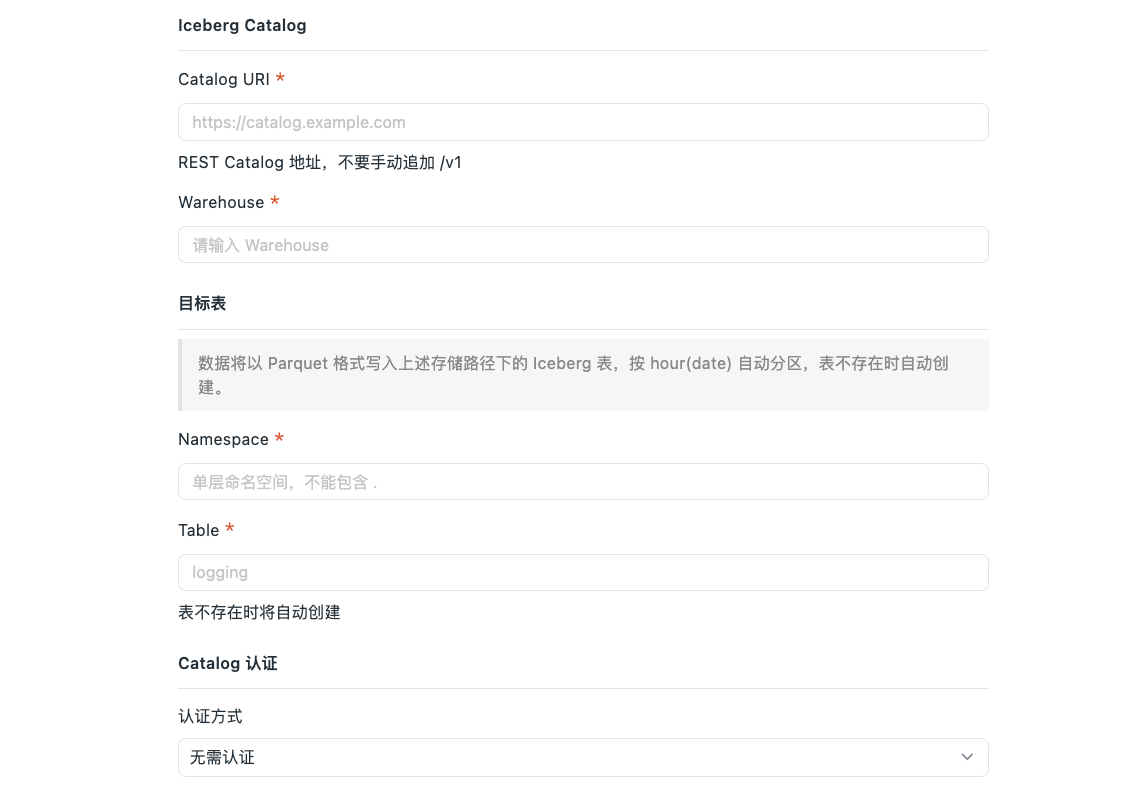
- Select Apache Iceberg as the storage format (❗️after selection, the "Encrypt Storage" and "Data Wait Time" configuration items are no longer displayed);
-
In Iceberg Catalog, select the Catalog Provider, and fill in the Catalog URI and Warehouse (both required). The value formats differ by Provider:
Catalog Provider Catalog URI Warehouse Value Generic REST Catalog REST Catalog address, e.g., https://catalog.example.com. Do not manually append/v1Warehouse storage address, e.g., s3://warehouse/observabilityAWS S3 Tables https://s3tables.<region>.amazonaws.com/icebergFull Table Bucket ARN, e.g., arn:aws:s3tables:<region>:<account-id>:bucket/<bucket-name>(ARN prefix for China regions isarn:aws-cn)AWS Glue https://glue.<region>.amazonaws.com/iceberg12-digit AWS main account ID (not IAM user ID), e.g., 294654068288- If you select Generic REST Catalog, you can optionally fill in the Endpoint: To forward data to a private cloud or custom S3 endpoint, fill in the endpoint; for public cloud scenarios, it is recommended to leave this blank, and the system will automatically determine whether to use internal network forwarding. If an endpoint is filled, data forwarding will be billed at public network rates.
-
In Target Table, enter the Namespace (single-level namespace, cannot contain
.) and Table (table name); if the table does not exist, it will be created automatically, and data will be partitioned byhour(date); -
Select Catalog Authentication and fill in the corresponding credentials:
-
Generic REST Catalog supports the following authentication methods:
- No Authentication: No credentials required;
- Basic Auth: Fill in the Credential (
username:password); - Bearer Token: Fill in the Token;
- OAuth2: Fill in the Credential (
client-id:client-secret), optionally fill in the OAuth2 Server URI (if not provided, the Catalog's default address is used);
-
AWS S3 Tables / AWS Glue: Uses SigV4 by default; no additional configuration is needed; the AWS access credentials configured above are reused automatically.
-
-
Complete the authorization and archive information configuration according to the access type instructions below;
-
Click Test Connection to verify connectivity between the storage bucket and the Catalog. After the test passes, click OK to save the current rule.
Note
- After the rule is created, the storage format, region, Catalog URI, Warehouse, Namespace, and Table cannot be modified. The storage bucket and storage path can be modified, following the same change logic as existing rules;
- Custom partition rules, file formats, table properties, etc., are not supported;
- The storage path naming convention is the same as existing rules.
Access Type
Role Authorization
-
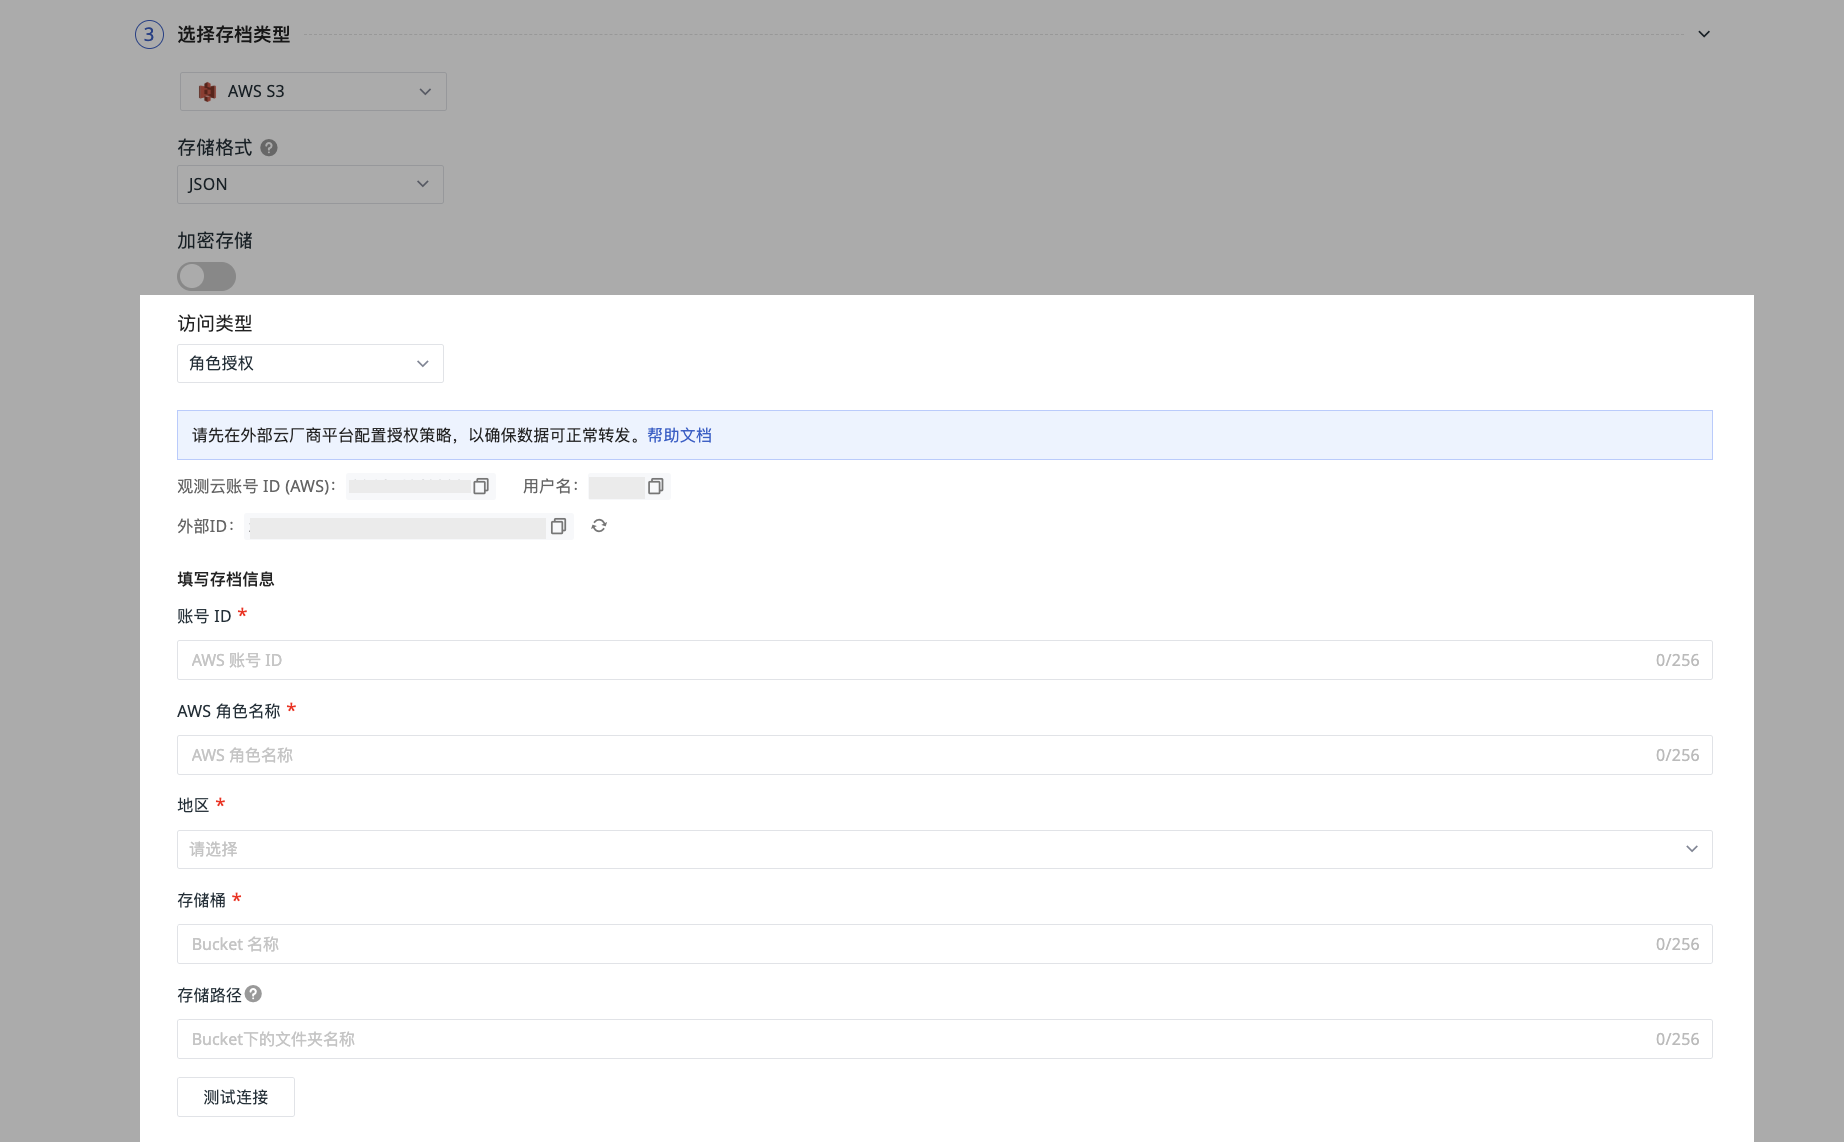
Use the external ID generated by Guance by default to configure third-party access to AWS resources;
-
After configuring the Guance IAM role in AWS, fill in the archive information: AWS account ID, AWS role name, region, and bucket name;
-
Enter a storage path to distinguish and locate the specific data forwarding location later;
-
Click Test Connection. If the information meets the specifications, the test connection succeeds. Click OK to save the current rule.
Storage Path Naming Convention
- Create single or multi-level folders; a slash (
/) indicates a multi-level folder. - Folder names cannot start or end with a slash (
/). - Cannot contain two or more consecutive slashes (
/). - Applies to all access types.
Note
- If the folder does not exist, Guance will create it directly, and data will still be written to the specified path.
- Be careful when changing the storage path. Due to a configuration update delay of about 5 minutes, some data may still be forwarded to the original directory after the change.
If the test fails:
Confirm the following:
- Whether the external ID is still valid;
- Whether the account ID is correct;
- Whether the account role exists;
- Whether the bucket exists;
- Whether the region is inconsistent.
Proceed with caution in the following cases:
- If you click Regenerate External ID, the old ID will expire after 24 hours. Update it in the AWS console as soon as possible;
- Do not click Generate External ID multiple times. Proceed with caution!
Access Keys
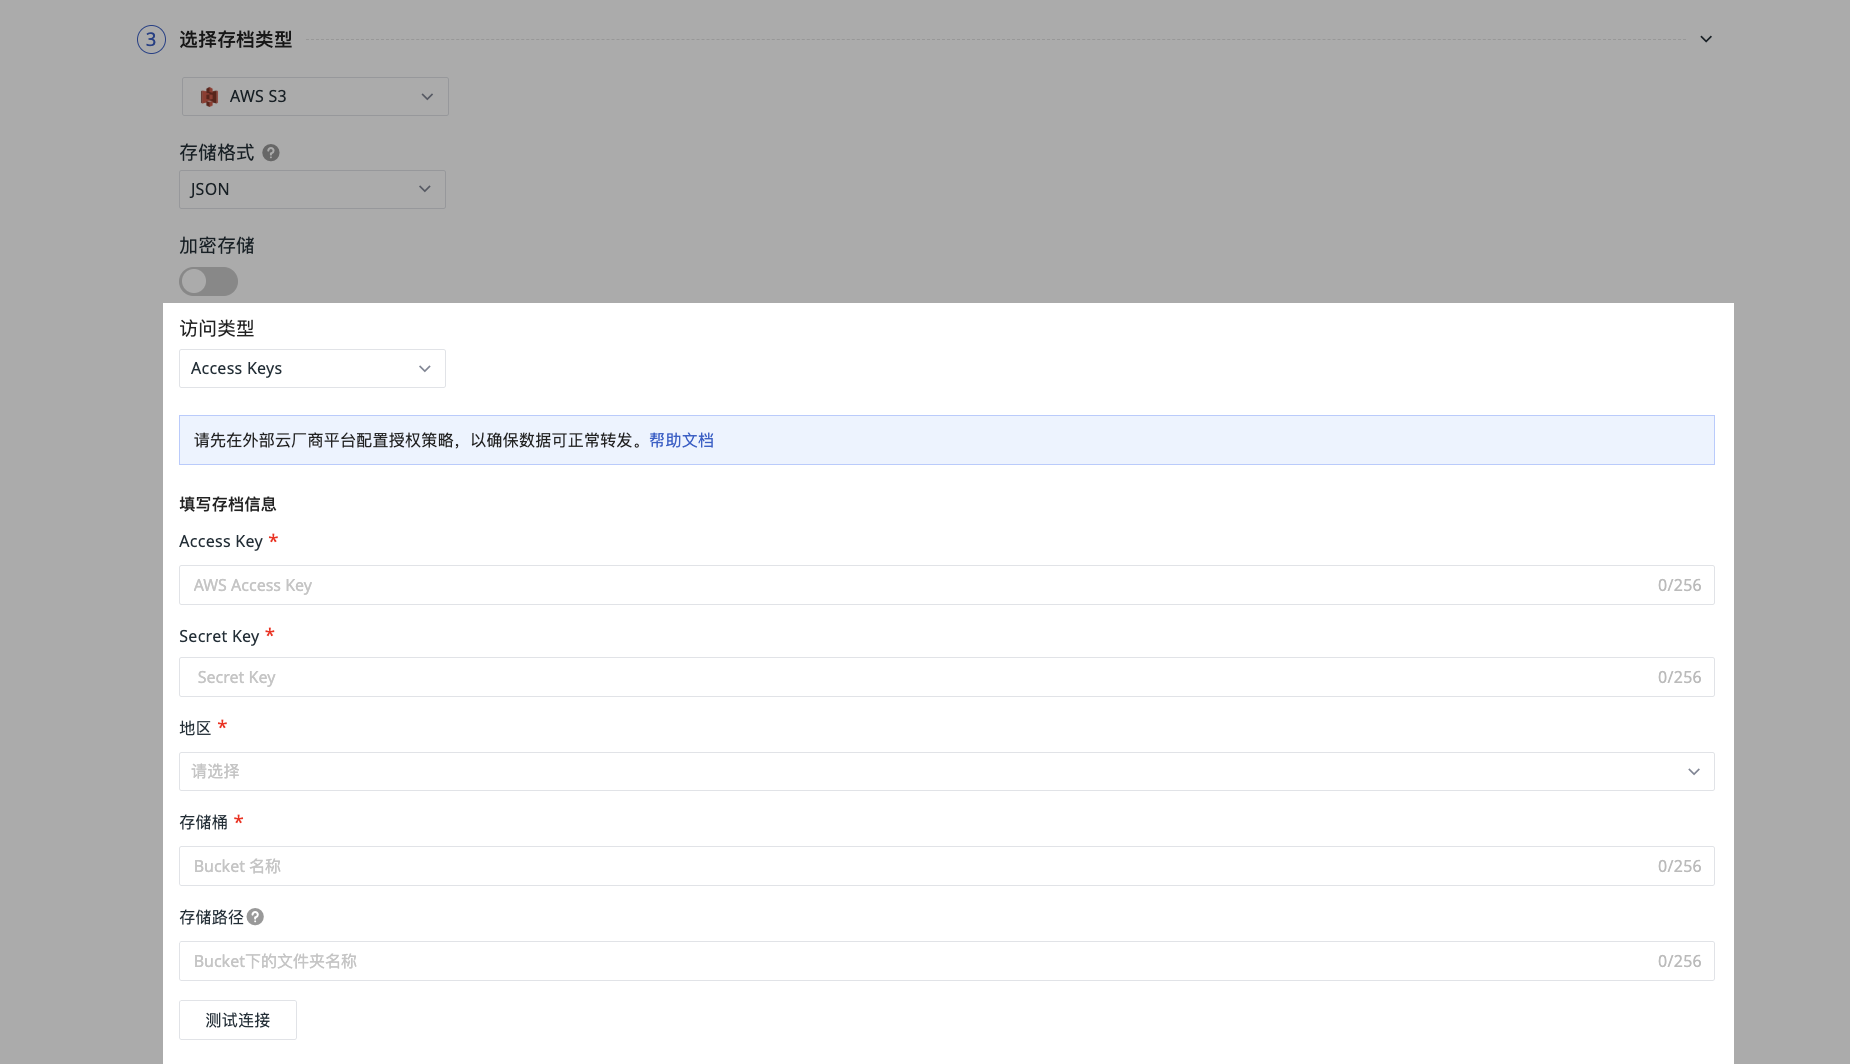
- Click to download the AWS resource authorization template, then configure the Guance IAM policy in AWS;
- After configuration, fill in the account information: AWS Access Key & Secret Key, region, and bucket name;
- Enter a storage path to distinguish and locate the specific data forwarding location later;
- Click Test Connection. If the information meets the specifications, the test connection succeeds.
If the test fails:
Confirm the following:
- Whether the account ID is correct
- Whether the AK/SK exist
- Whether the bucket exists
- Whether the region is inconsistent
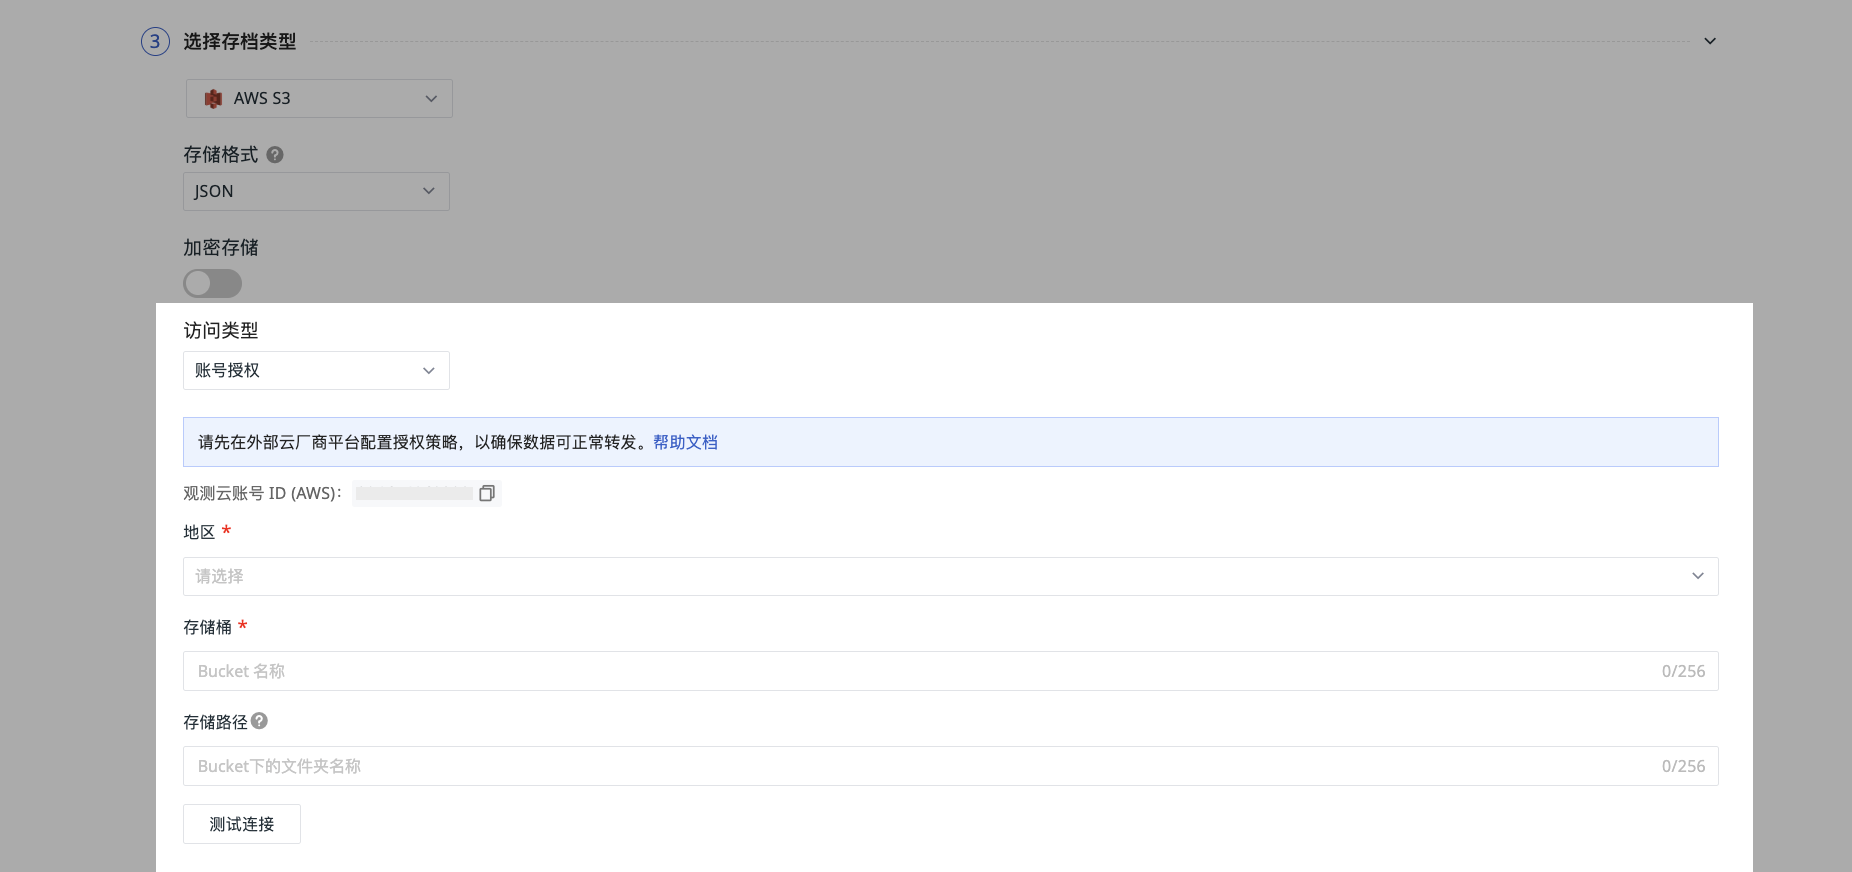
Account Authorization
-
AWS provides cross-account authorization. Use the Guance-specific account ID and add a cross-account access authorization policy according to the configuration instructions;
-
After configuration, select the region and enter the bucket name;
-
Enter a storage path to distinguish and locate the specific data forwarding location later;
-
Click Test Connection. If the information meets the specifications, the test connection succeeds. Click OK to save the current rule.
If the test fails:
Confirm the following:
- Whether the account ID is correct
- Whether the bucket exists
- Whether the region is inconsistent
Data Wait Time
Data is first written to local temporary files. When the file size reaches 256 MB or the wait time reaches the set value, the system automatically compresses and uploads the data. You can adjust the wait time as needed: 15 minutes, 30 minutes, or 1 hour.
- Shorter times reduce downstream data latency but generate more files
- Longer times reduce the number of files but increase downstream data latency
Note
This configuration does not apply when the storage format is Apache Iceberg.
Next Steps
Continue to configure the data access permissions for the current forwarding rule.
Note
When the storage format is Apache Iceberg, write-only is supported, and data access permission configuration is not required.