Azure AD SSO (Deployment Plan)
Azure Active Directory (Azure AD) is Microsoft's cloud-based identity and access management service that helps enterprises manage internal and external resources.
1. Obtaining the Key Configuration Information for SSO
To implement SSO via Azure AD for the Guance Deployment Plan, three key configuration items are required:
| Configuration | Description |
|---|---|
| wellKnowURL | The OIDC Endpoints configuration URL for the application, i.e., the complete https://xxx.xxx.com/xx/.well-known/openid-configuration address. |
| clientSecret | The client secret value. |
| clientId | The Application (Client) ID |
1.1. Create an Azure AD Application
1) Create an Azure account in the Microsoft portal.
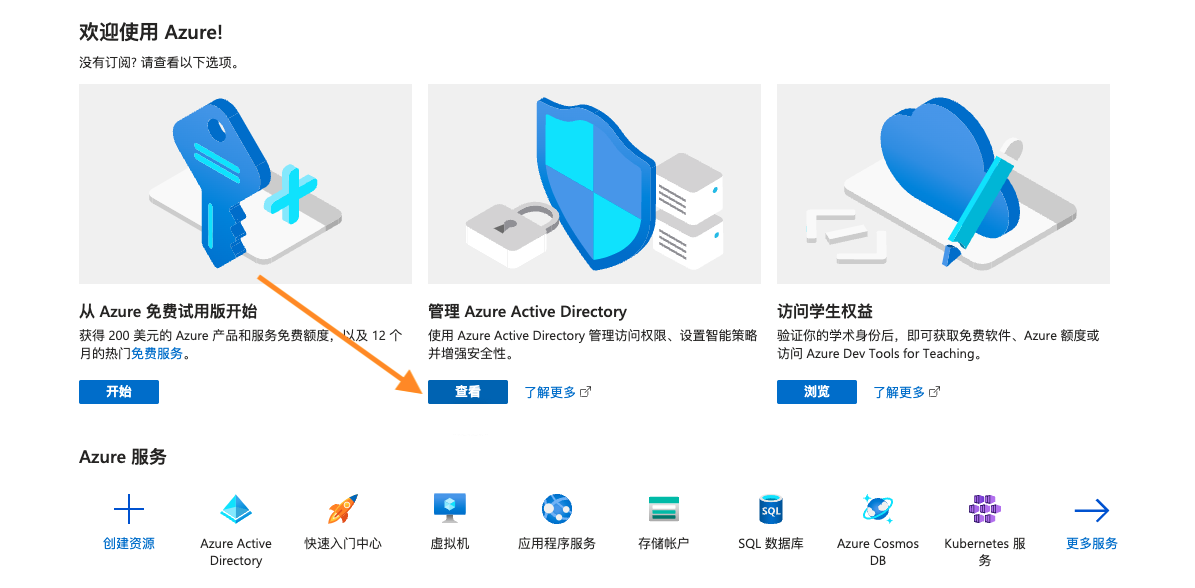
Go to the Azure Active Directory admin center, click View > App registrations under Manage Azure Active Directory:
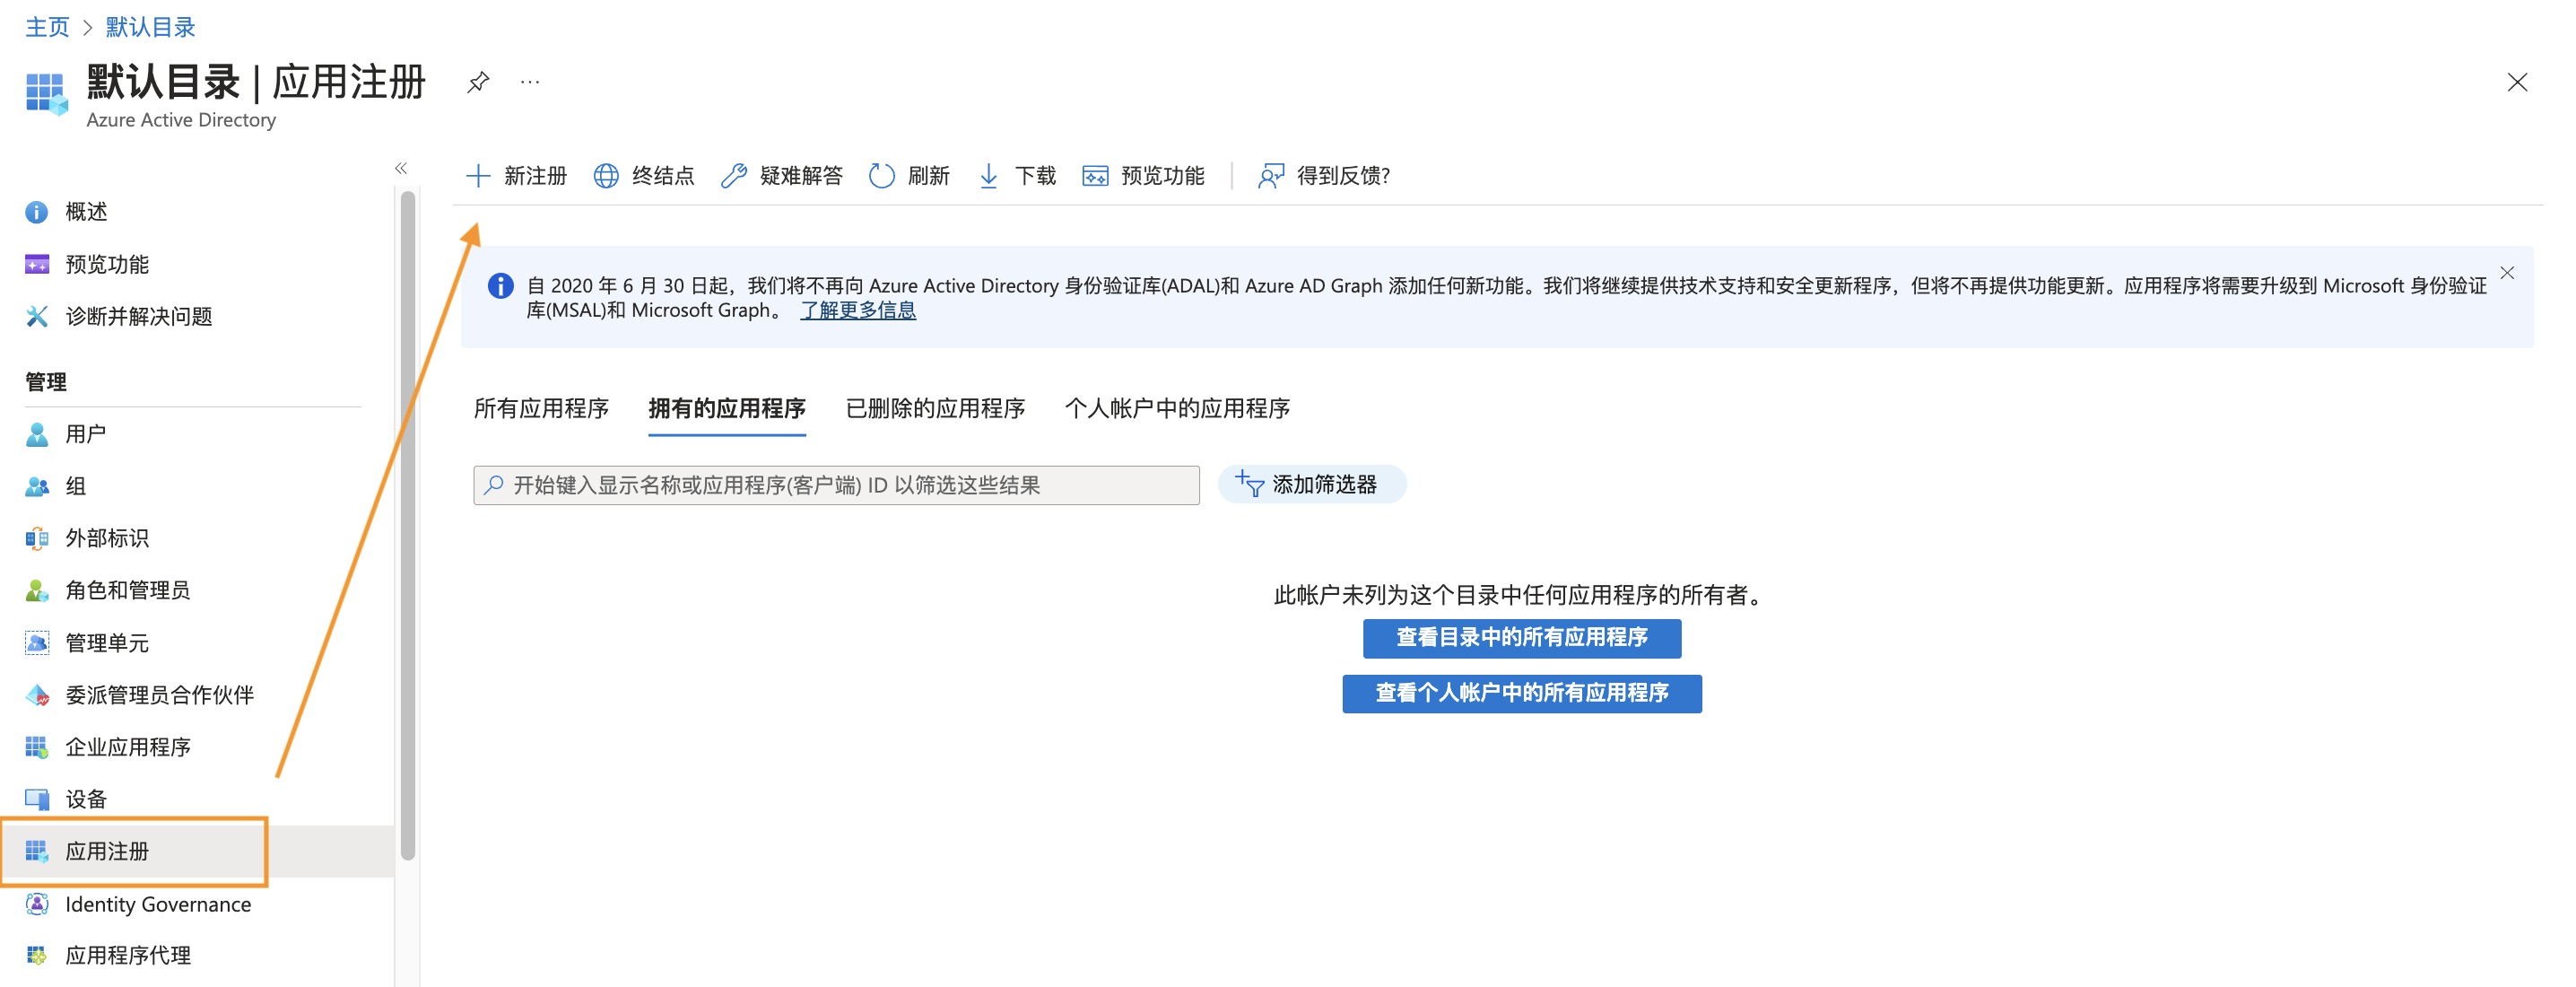
On the App registrations page, click New registration:
2) Create a new application
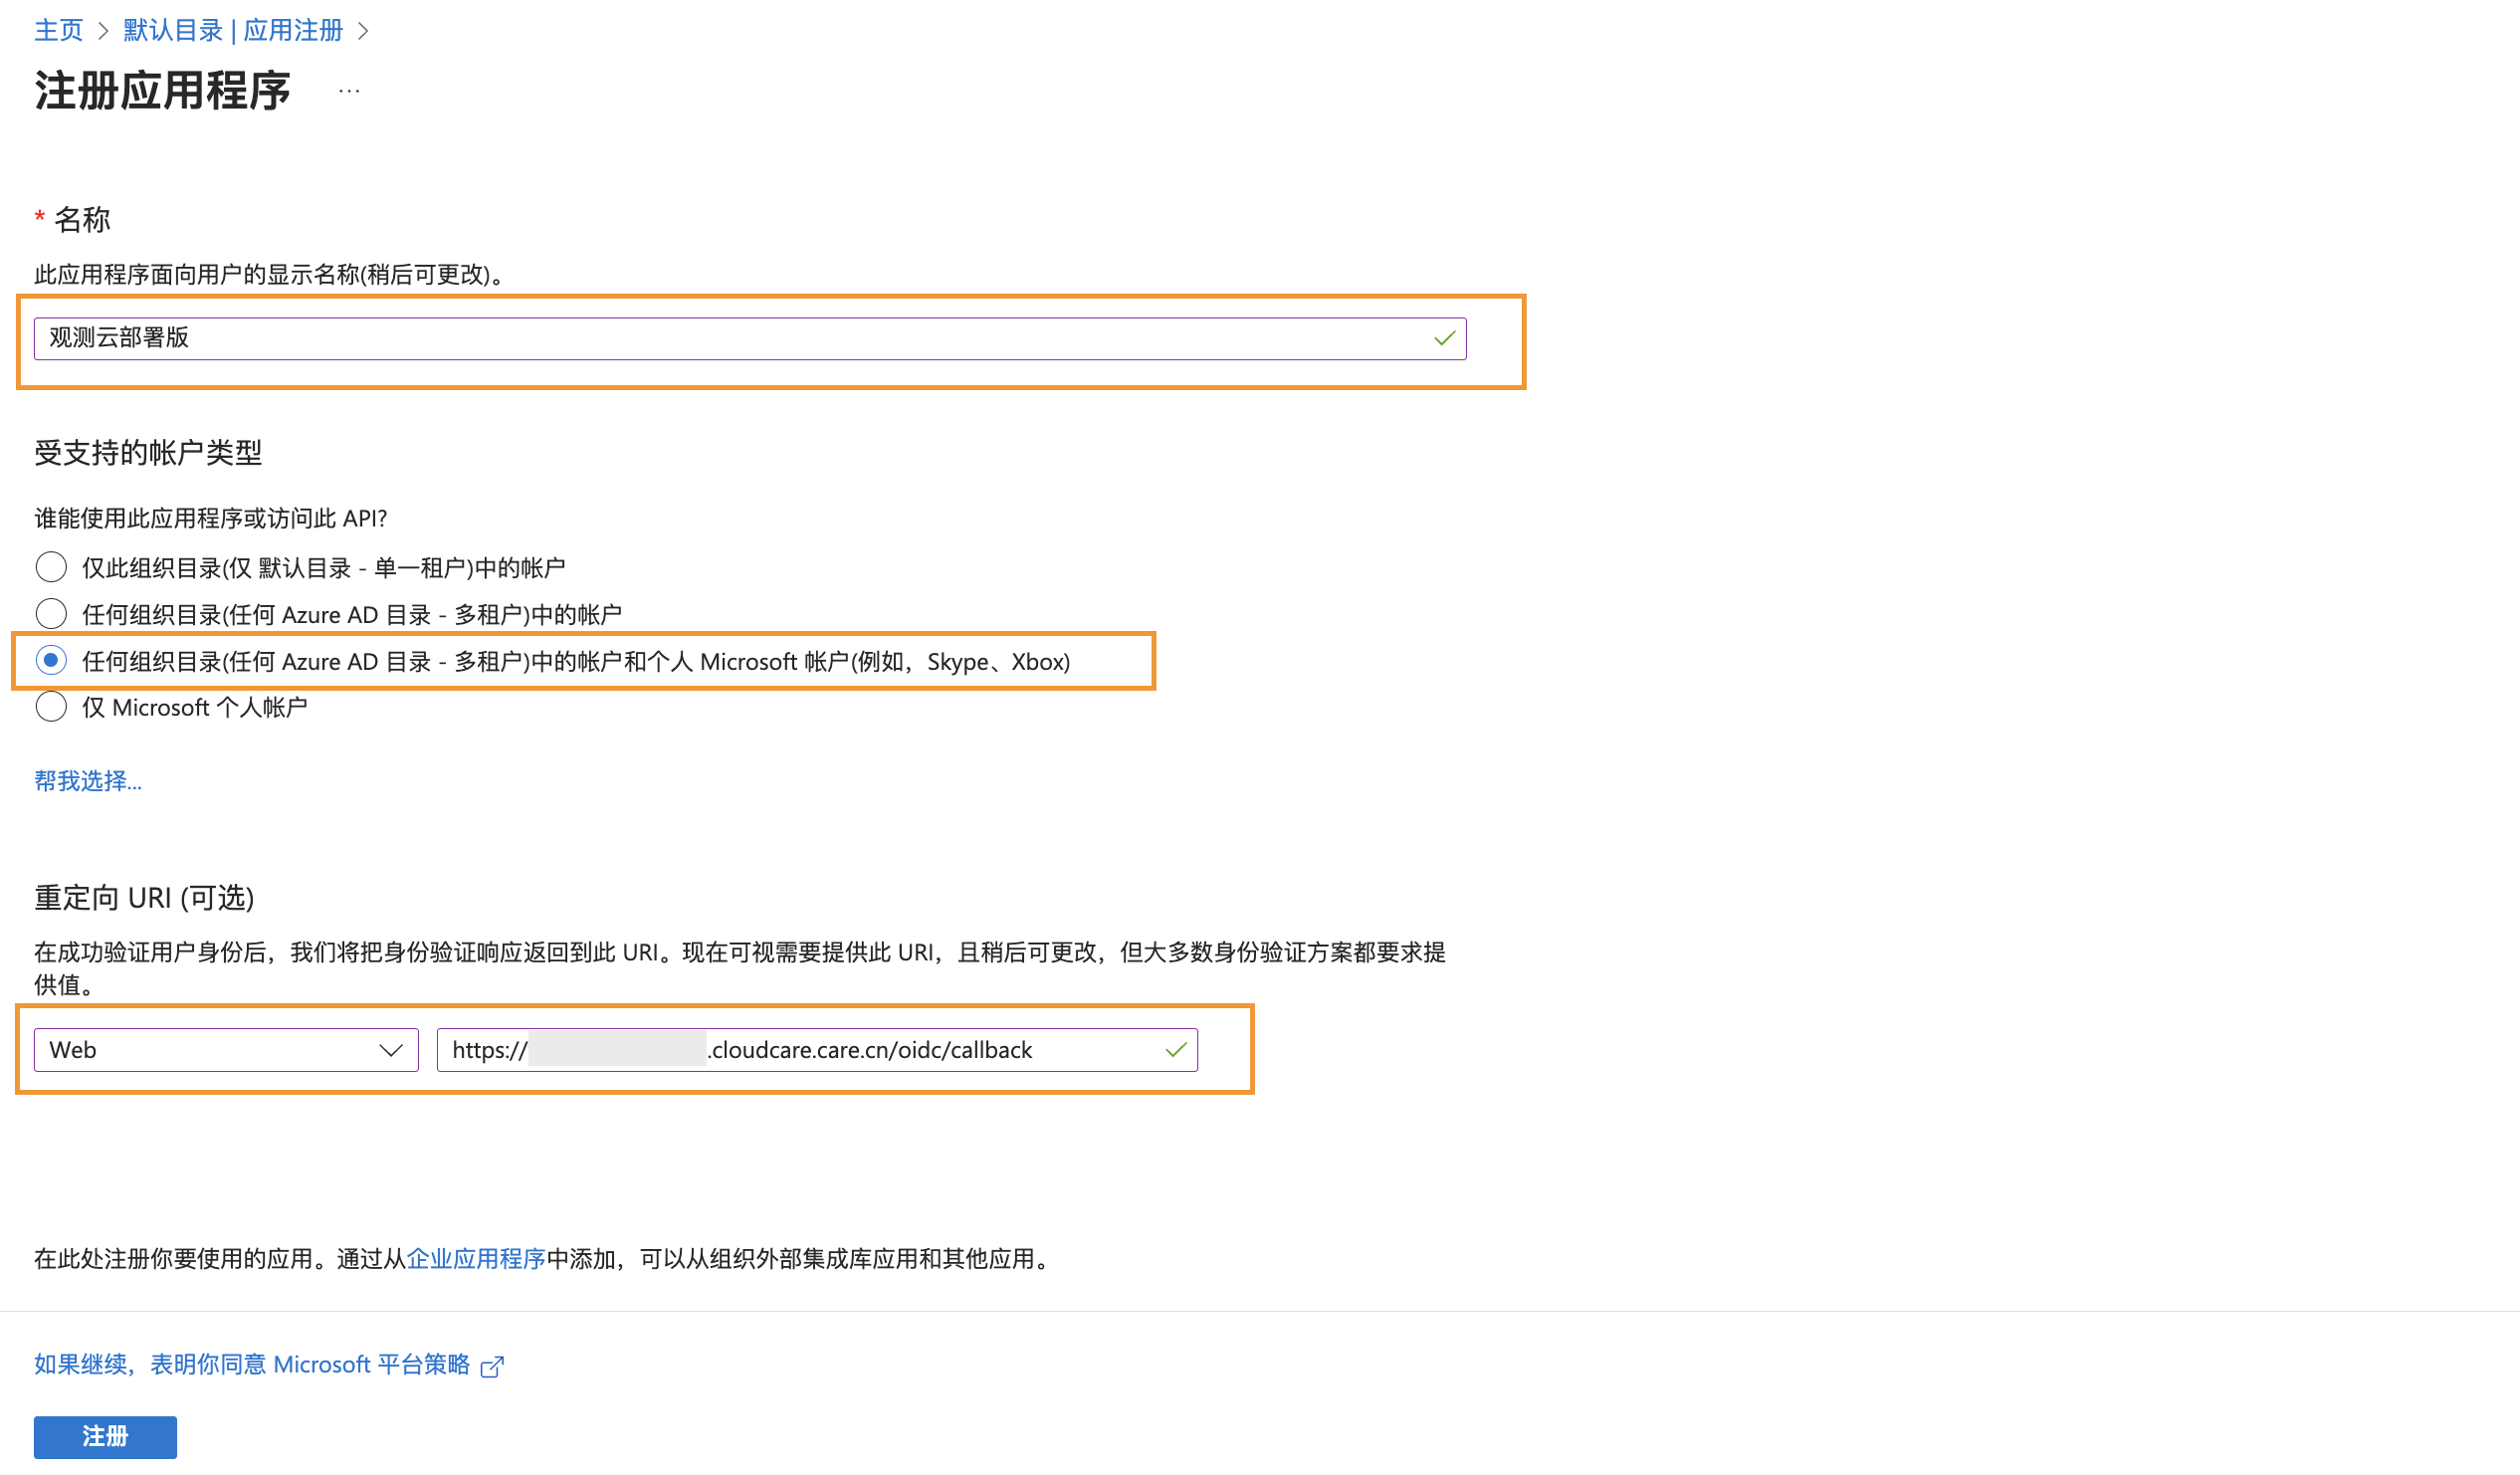
On the Register an application page, enter a Name, select Accounts in any organizational directory for supported account types, and choose Web for the Redirect URI. Click Register to create a new application. In the example below, the application is named "Guance Deployment Plan".
1.2. Complete Basic Configuration for the New Application
1) After creating the new application, you are taken to the Overview page by default. You can view the created application under App registrations > All applications.
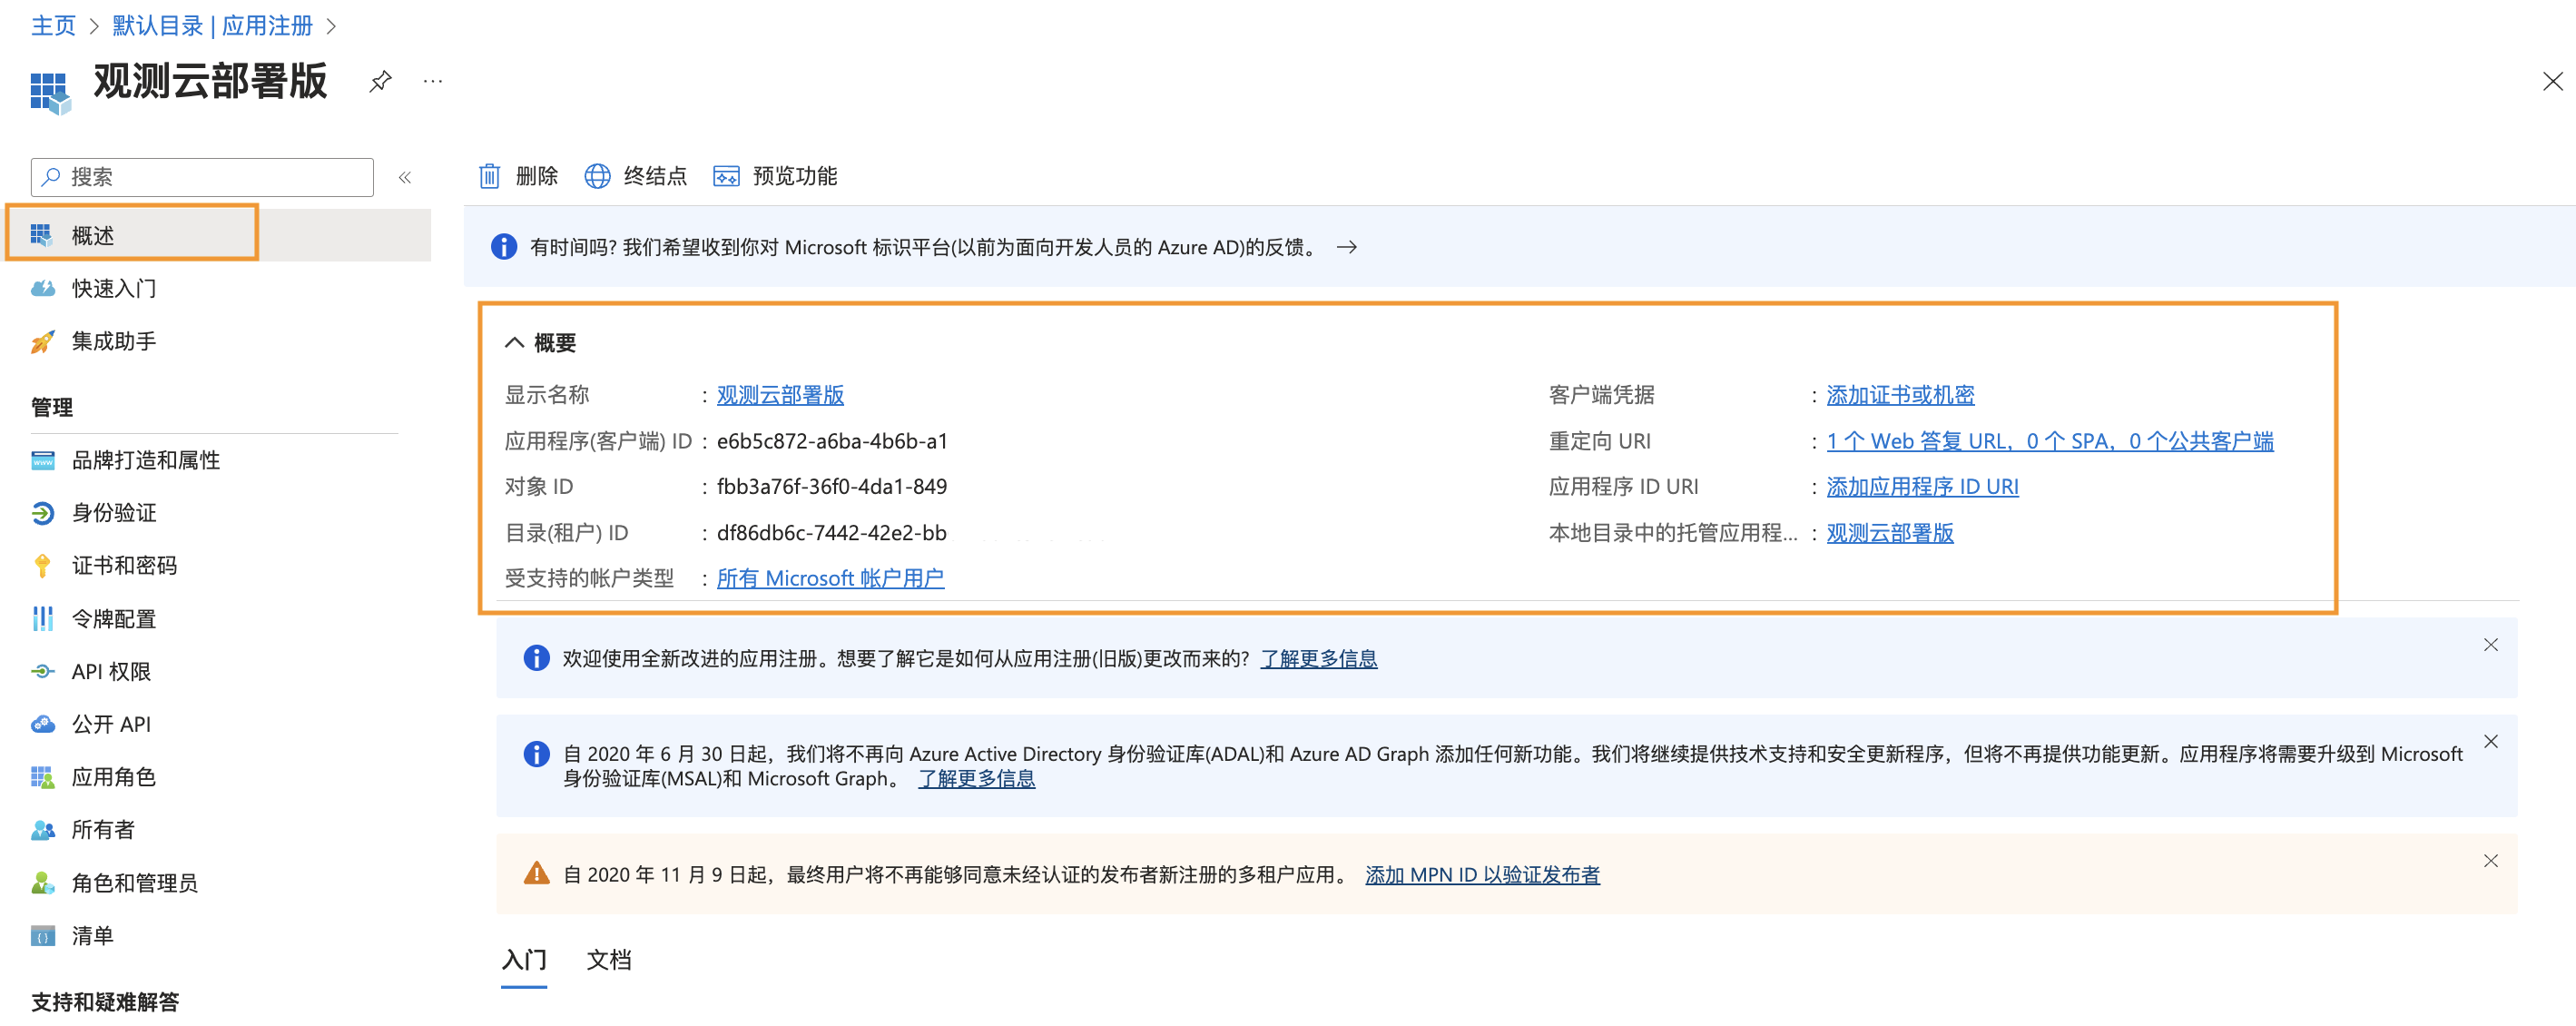
Note: The Application (Client) ID here is the clientId in the OIDC client configuration.
2) Add client credentials:

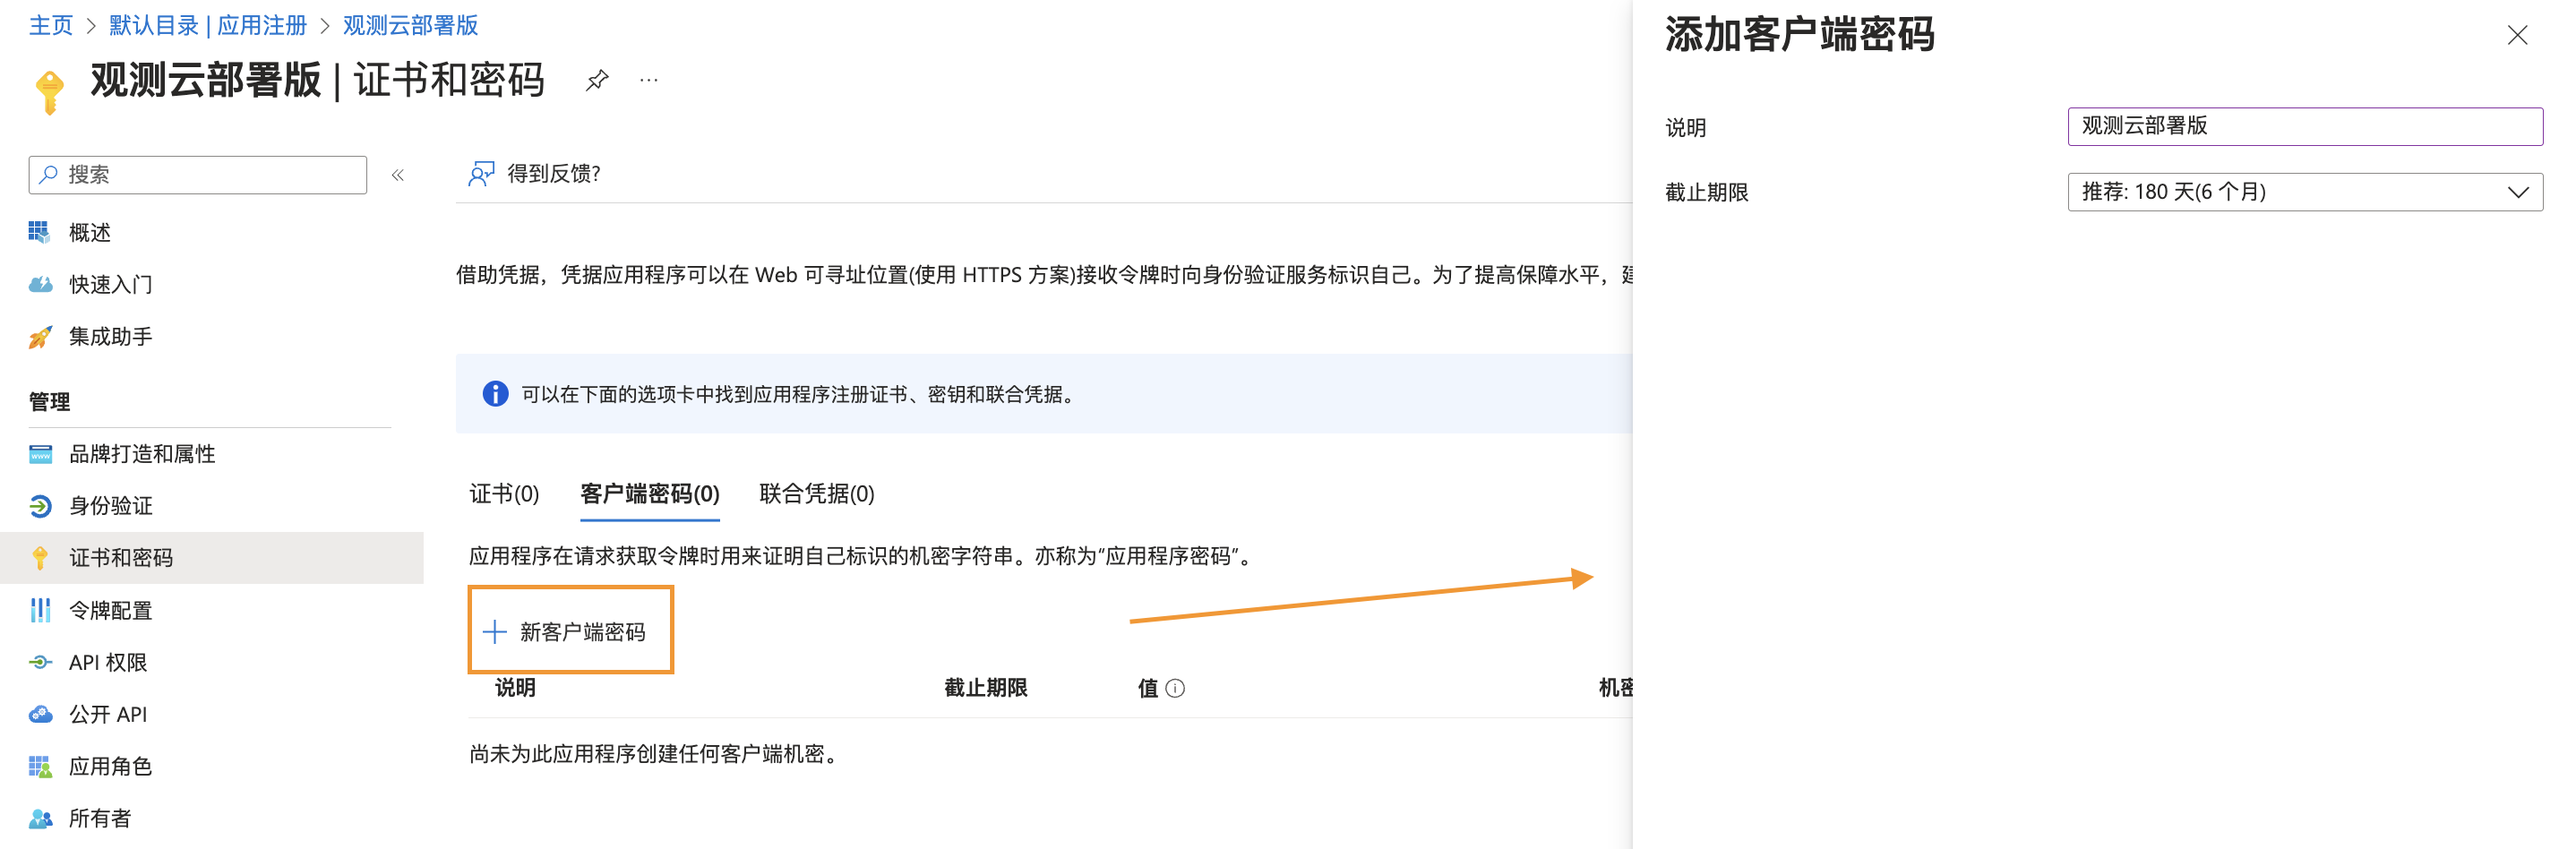

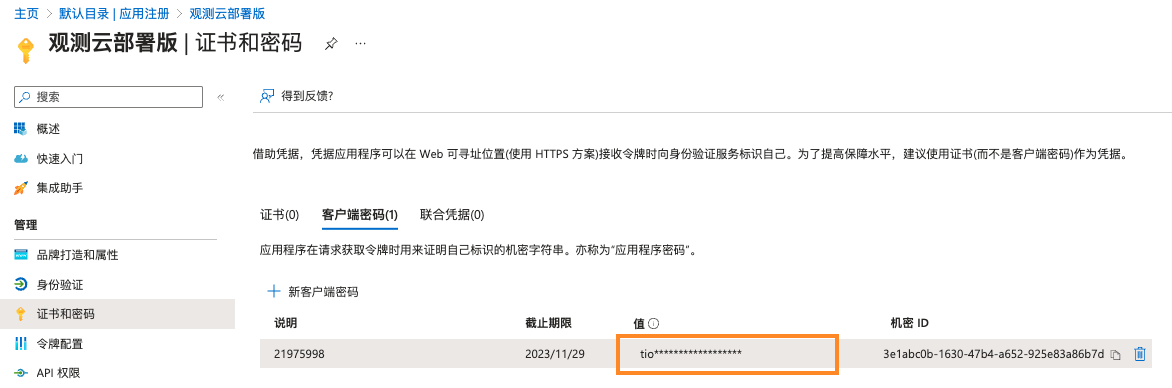
Note: The Value in the list here is the clientSecret value in the OIDC client configuration. Please save it immediately!
3) Go to Token configuration > Add optional claim, then Add group claim. After adding, a groups record will be created.
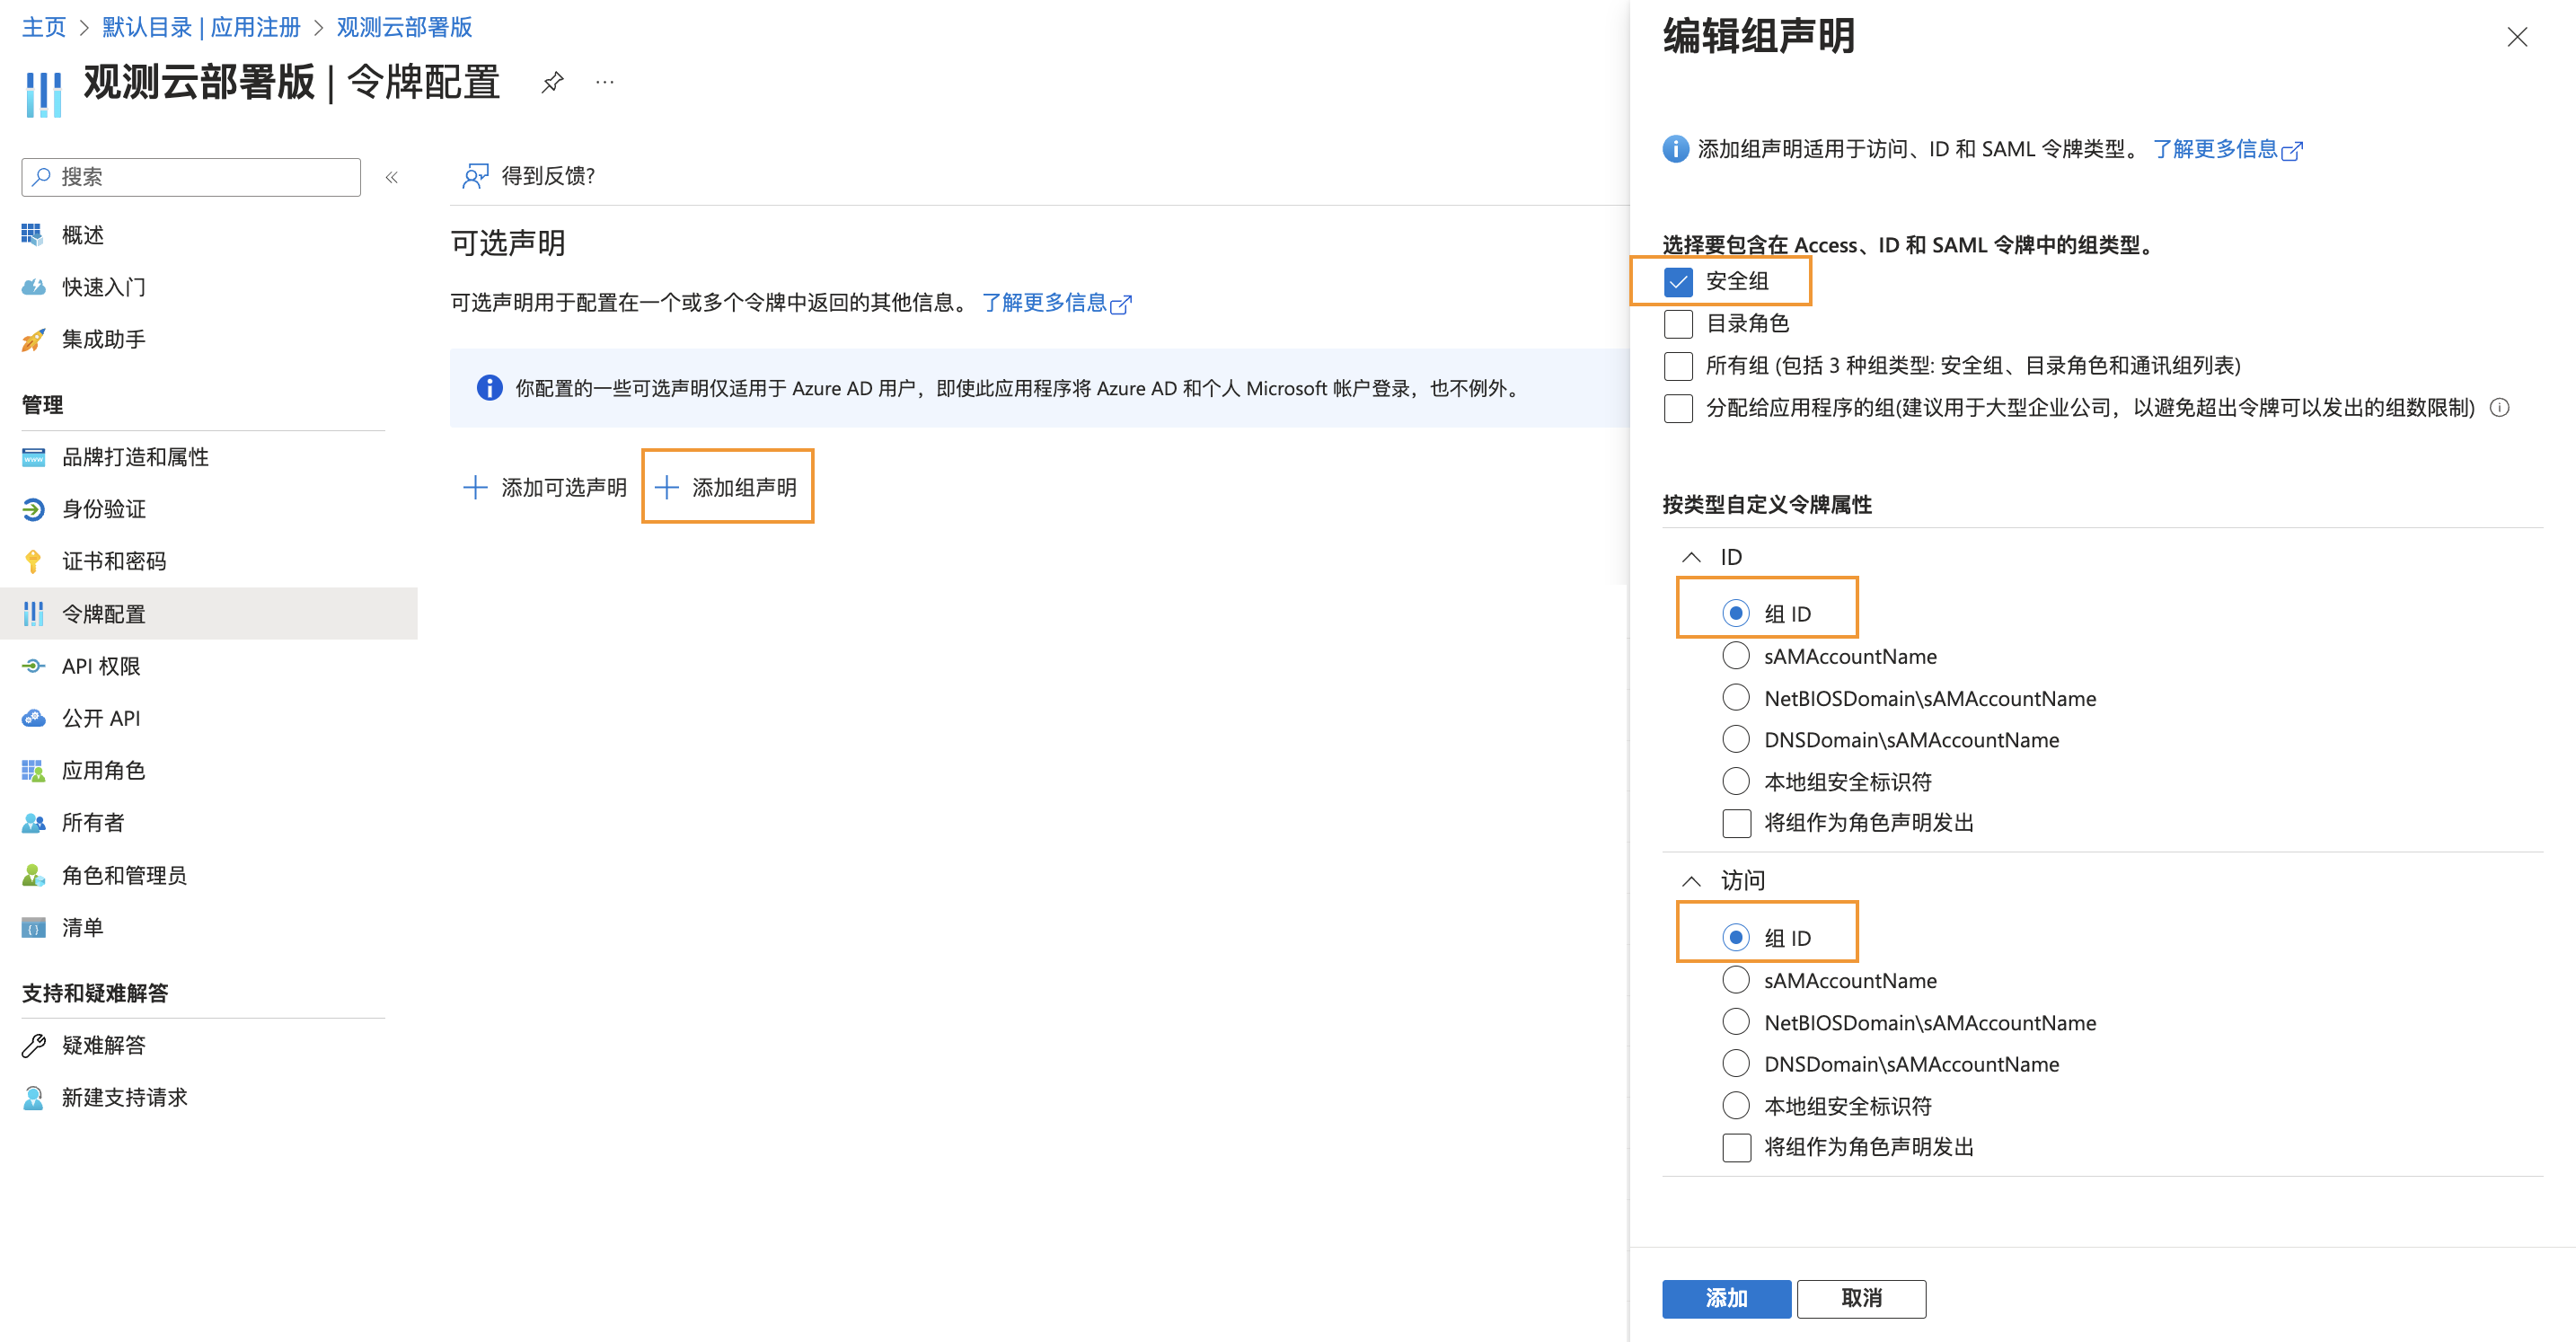
Also select the claims shown in the diagram for token types ID and Access, so that the client can obtain the relevant token data upon login.
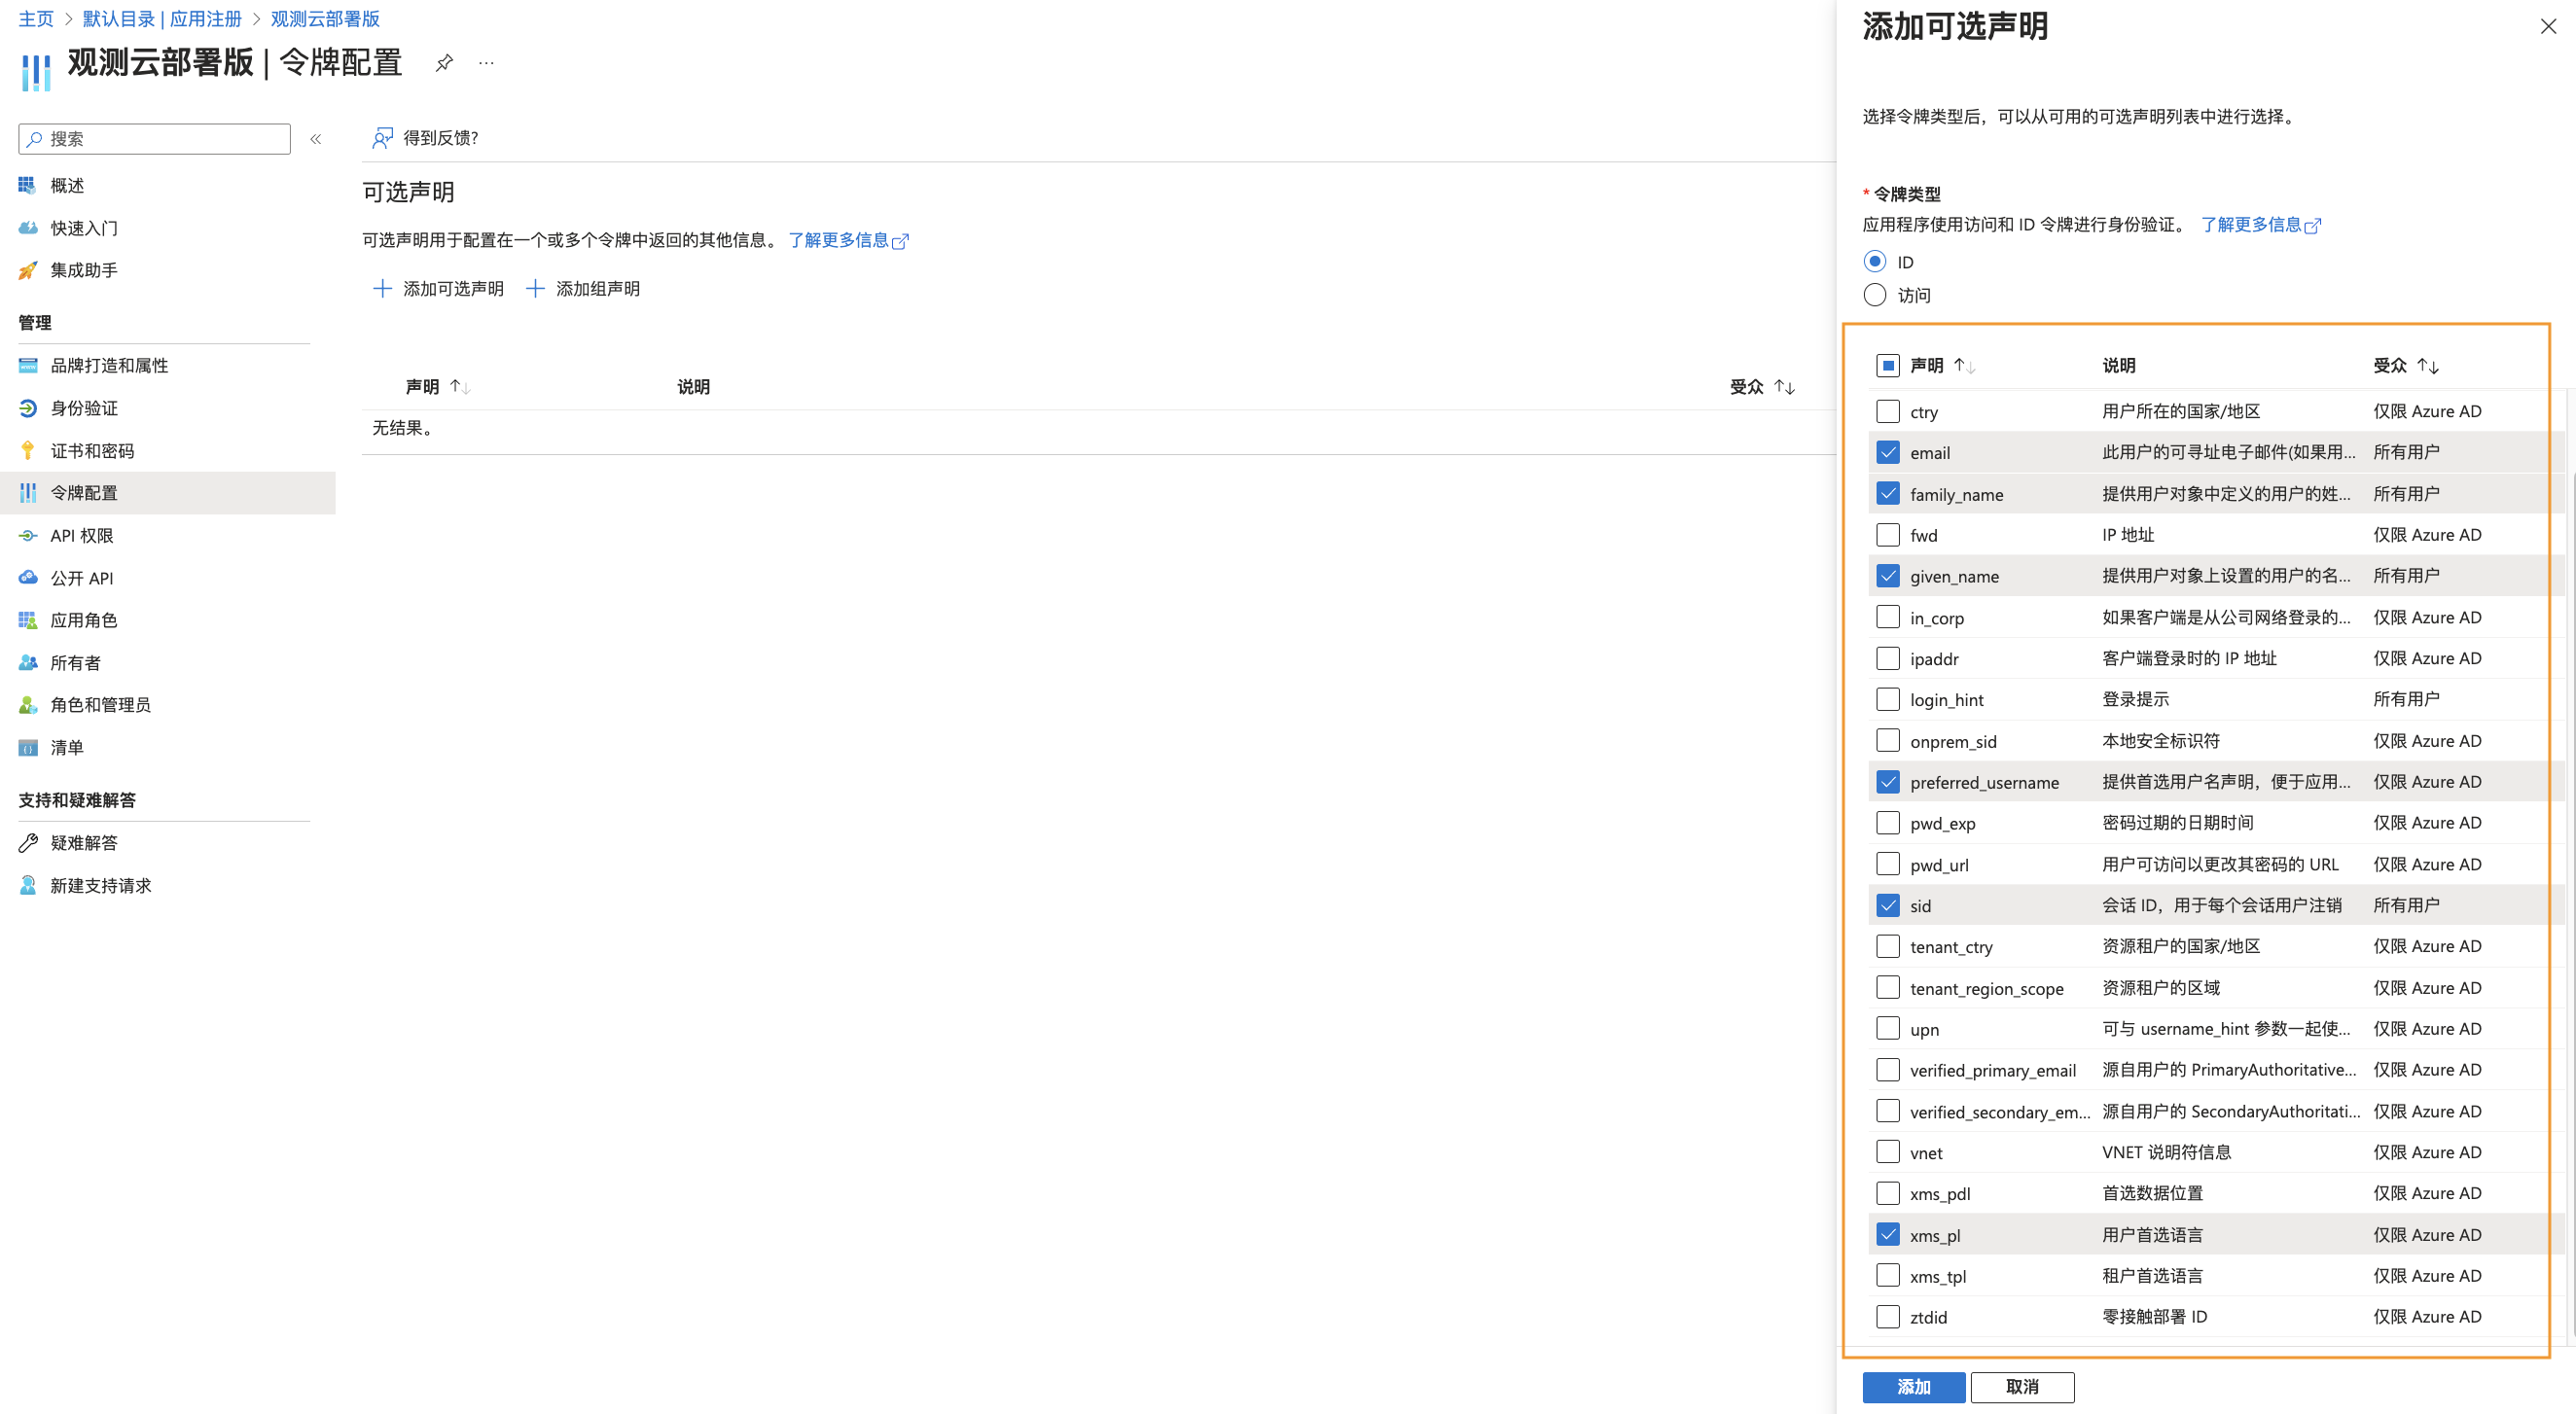
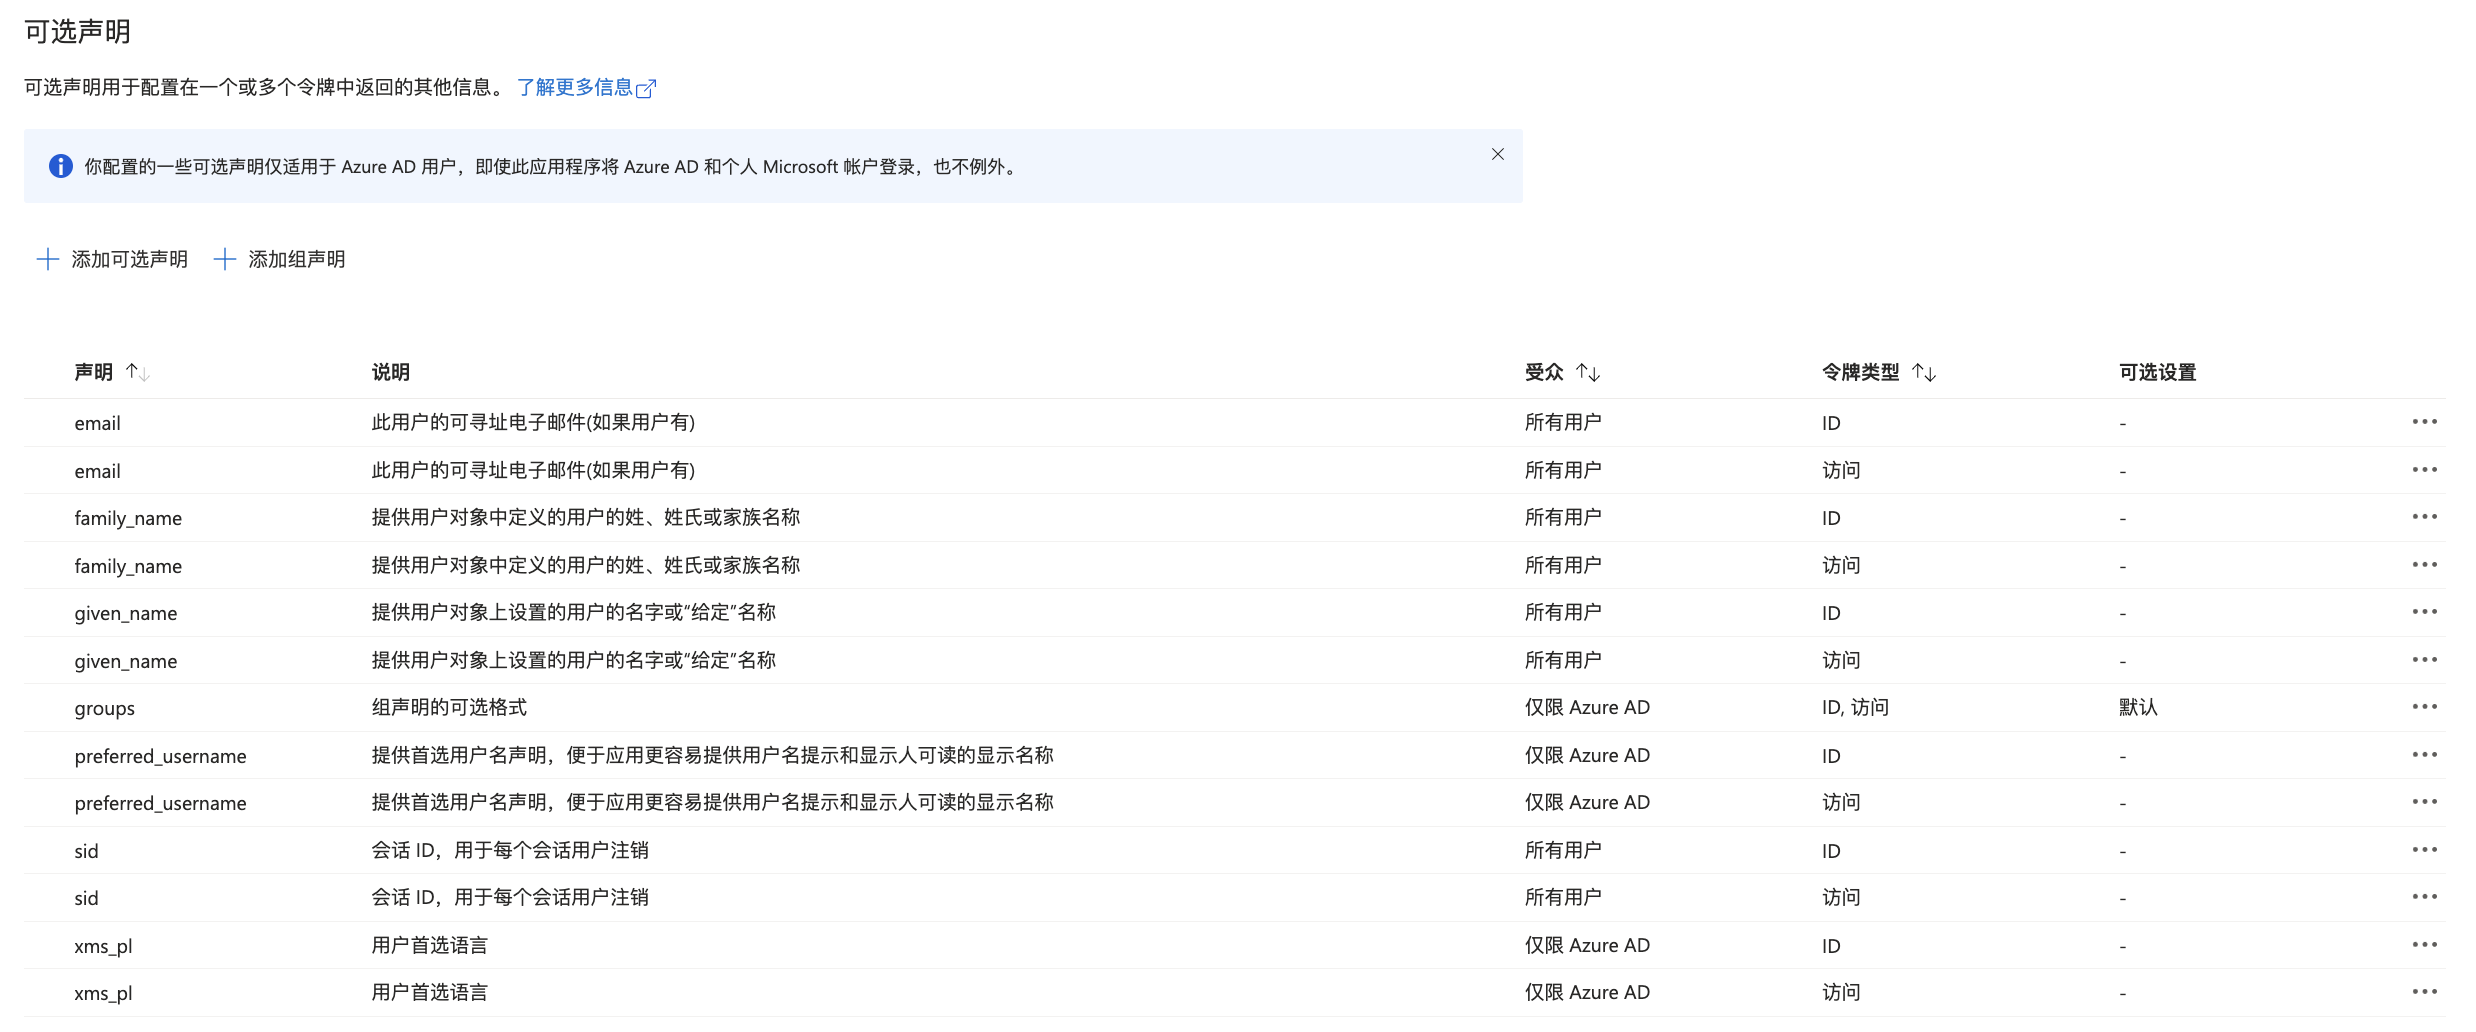
4) Add API scopes. Go to Expose an API, and add the scopes: User.Read, User.Read.All, GroupMember.Read.All, Group.Read.All. Click Add a scope to expose the four permissions shown in the diagram for the current application client:
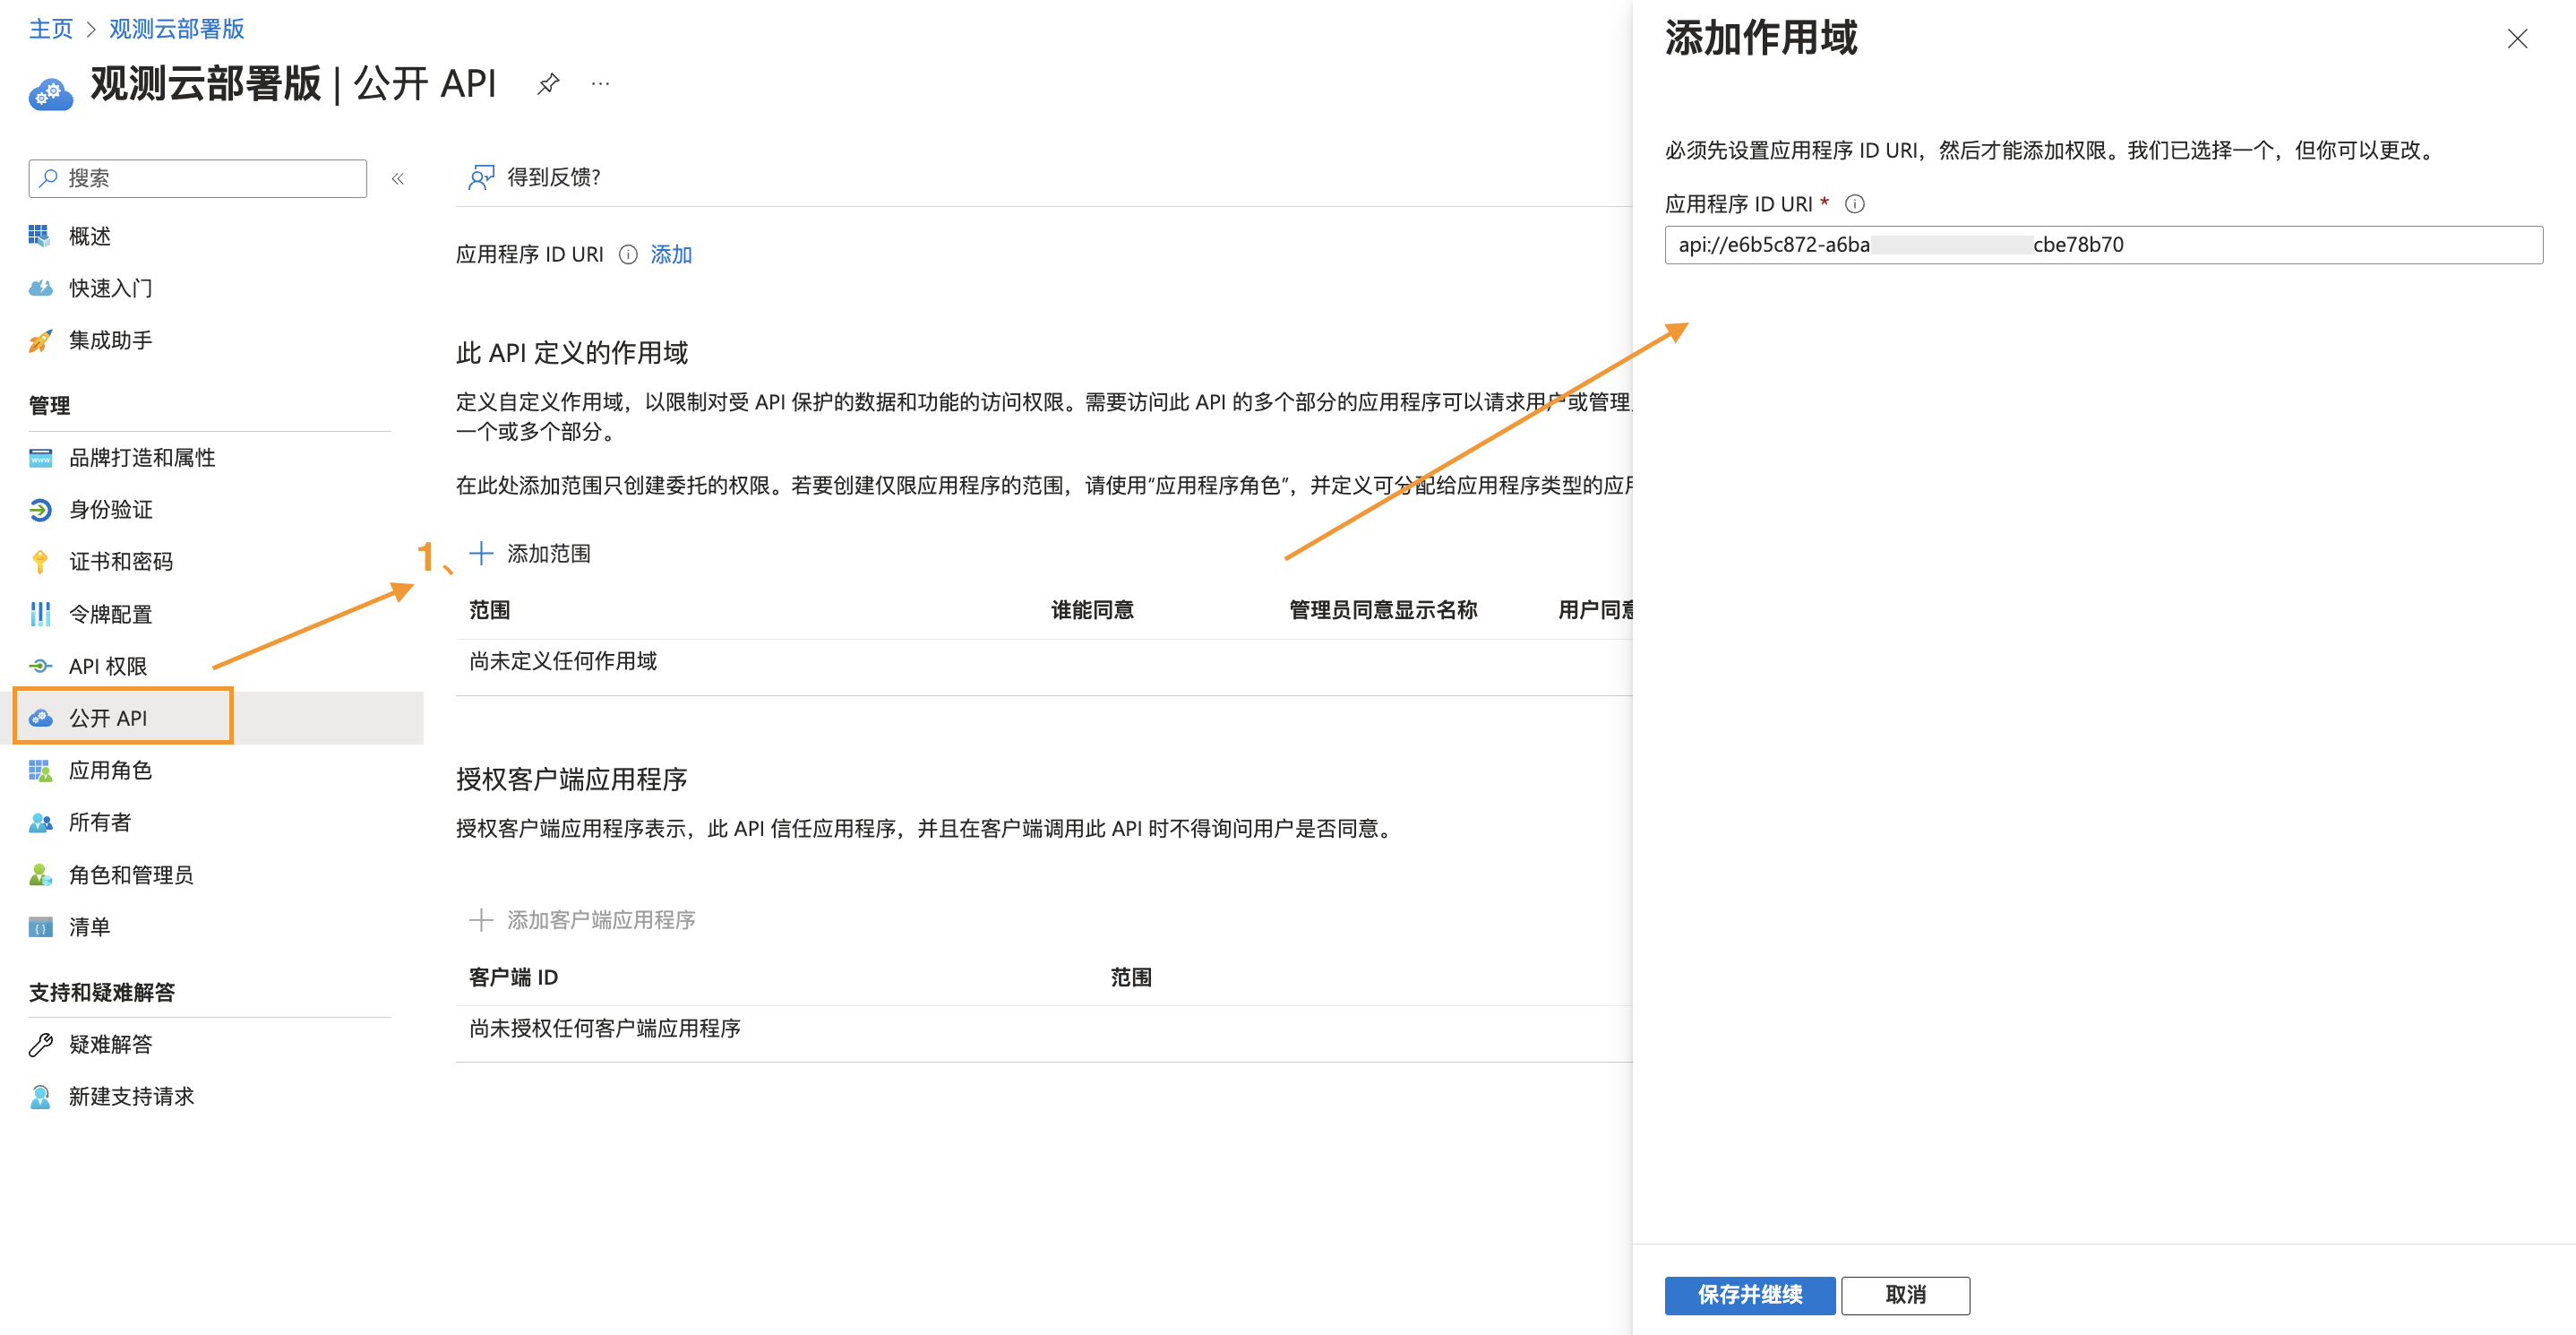
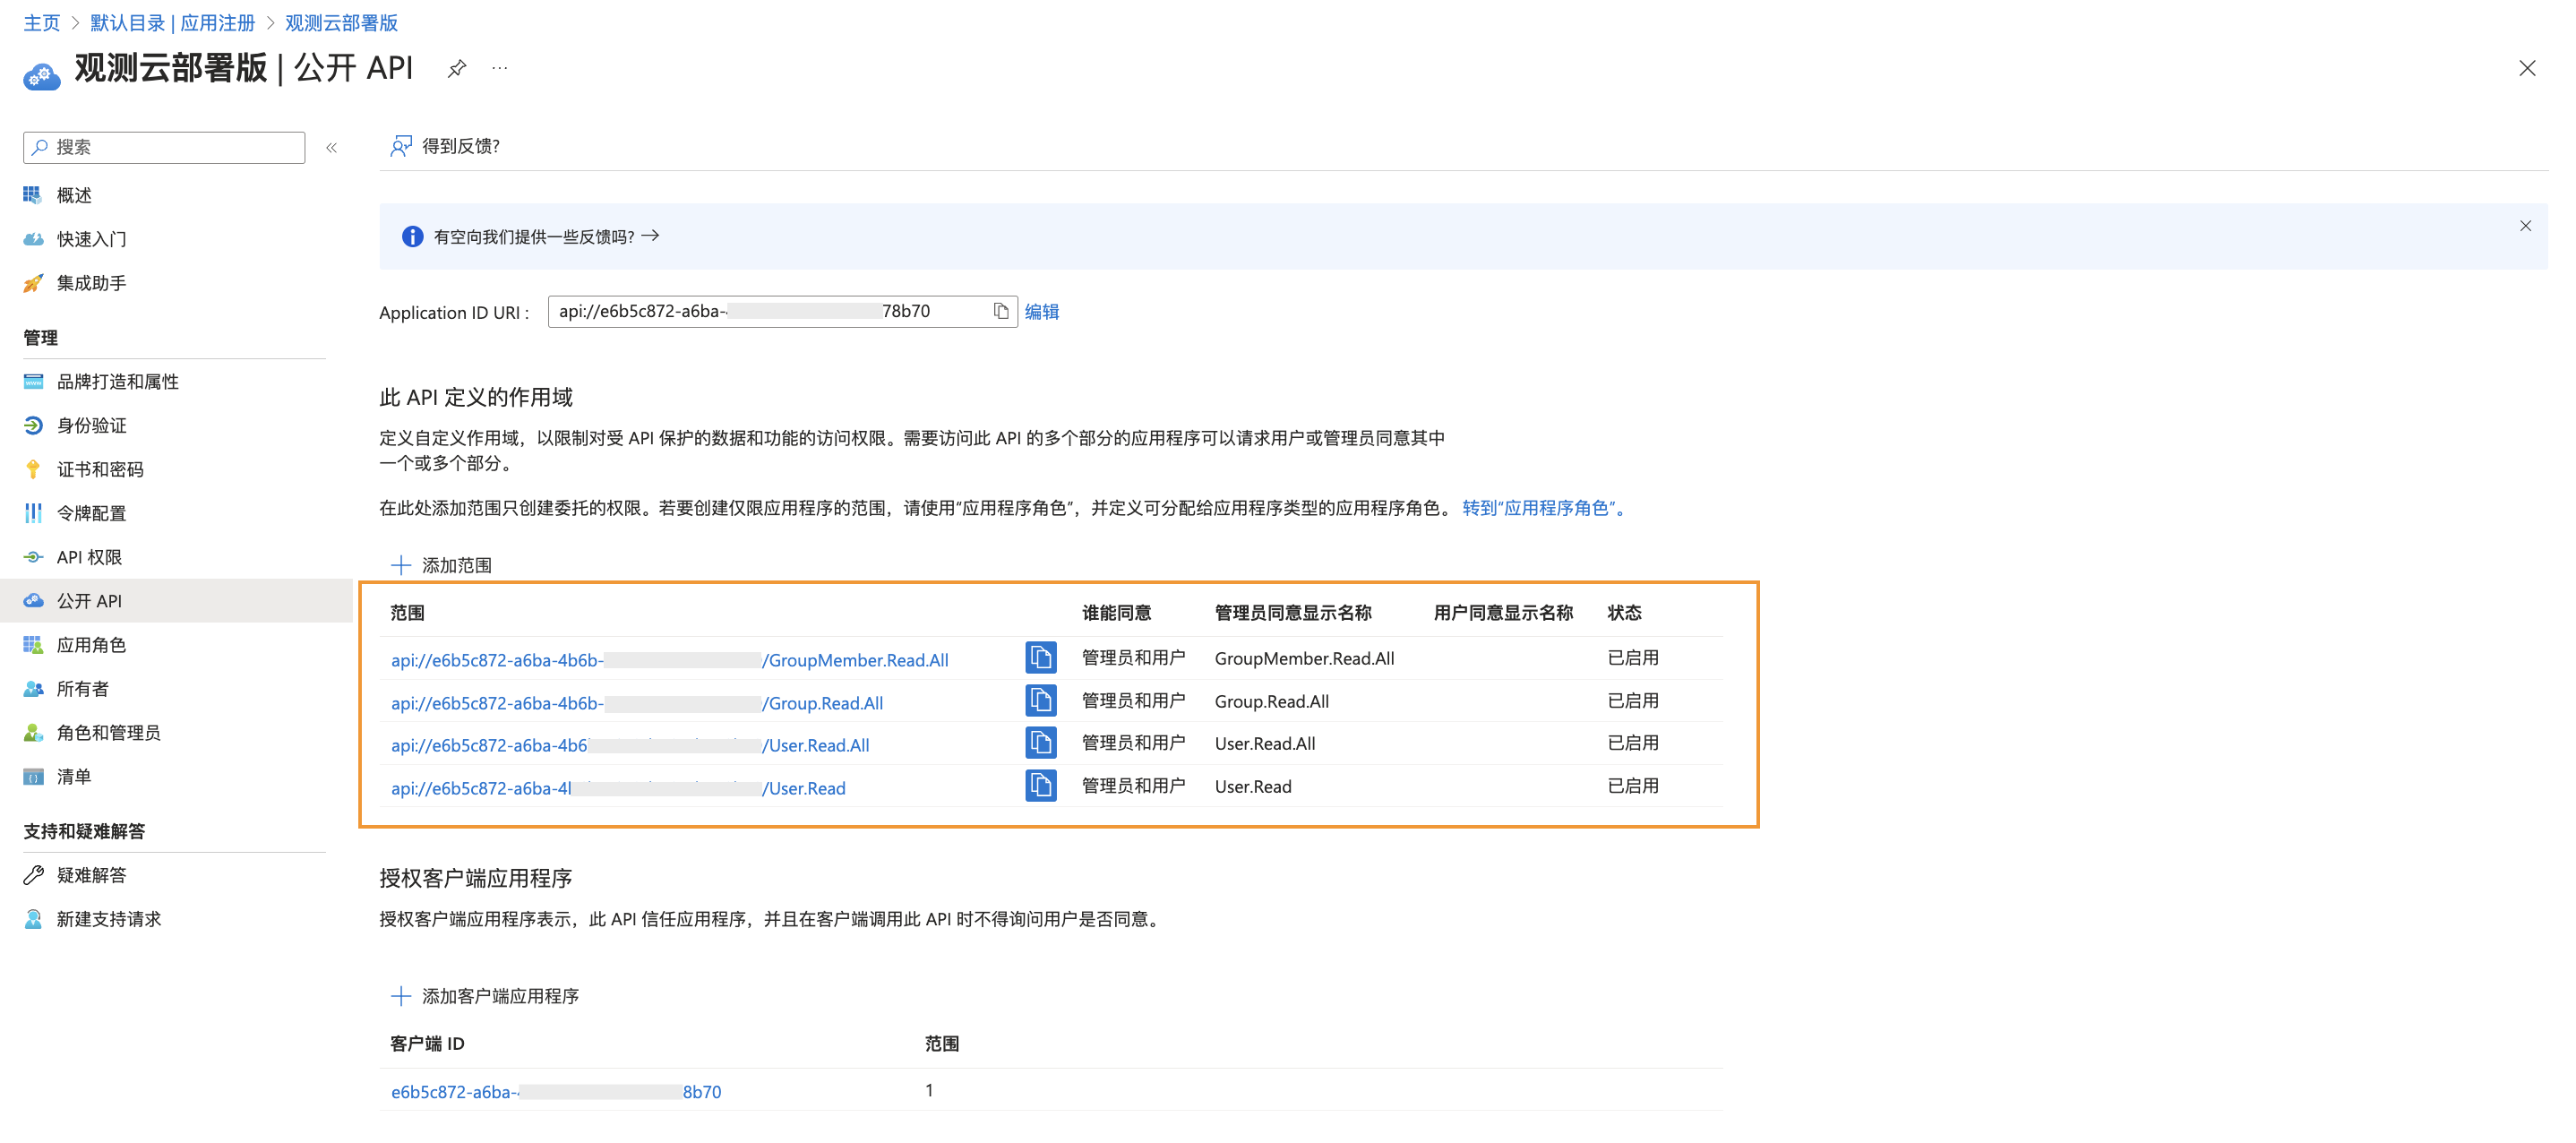
5) After adding the four scopes in the previous step, add authorization for the client application. Go to API permissions:
- First, select Microsoft API permissions:
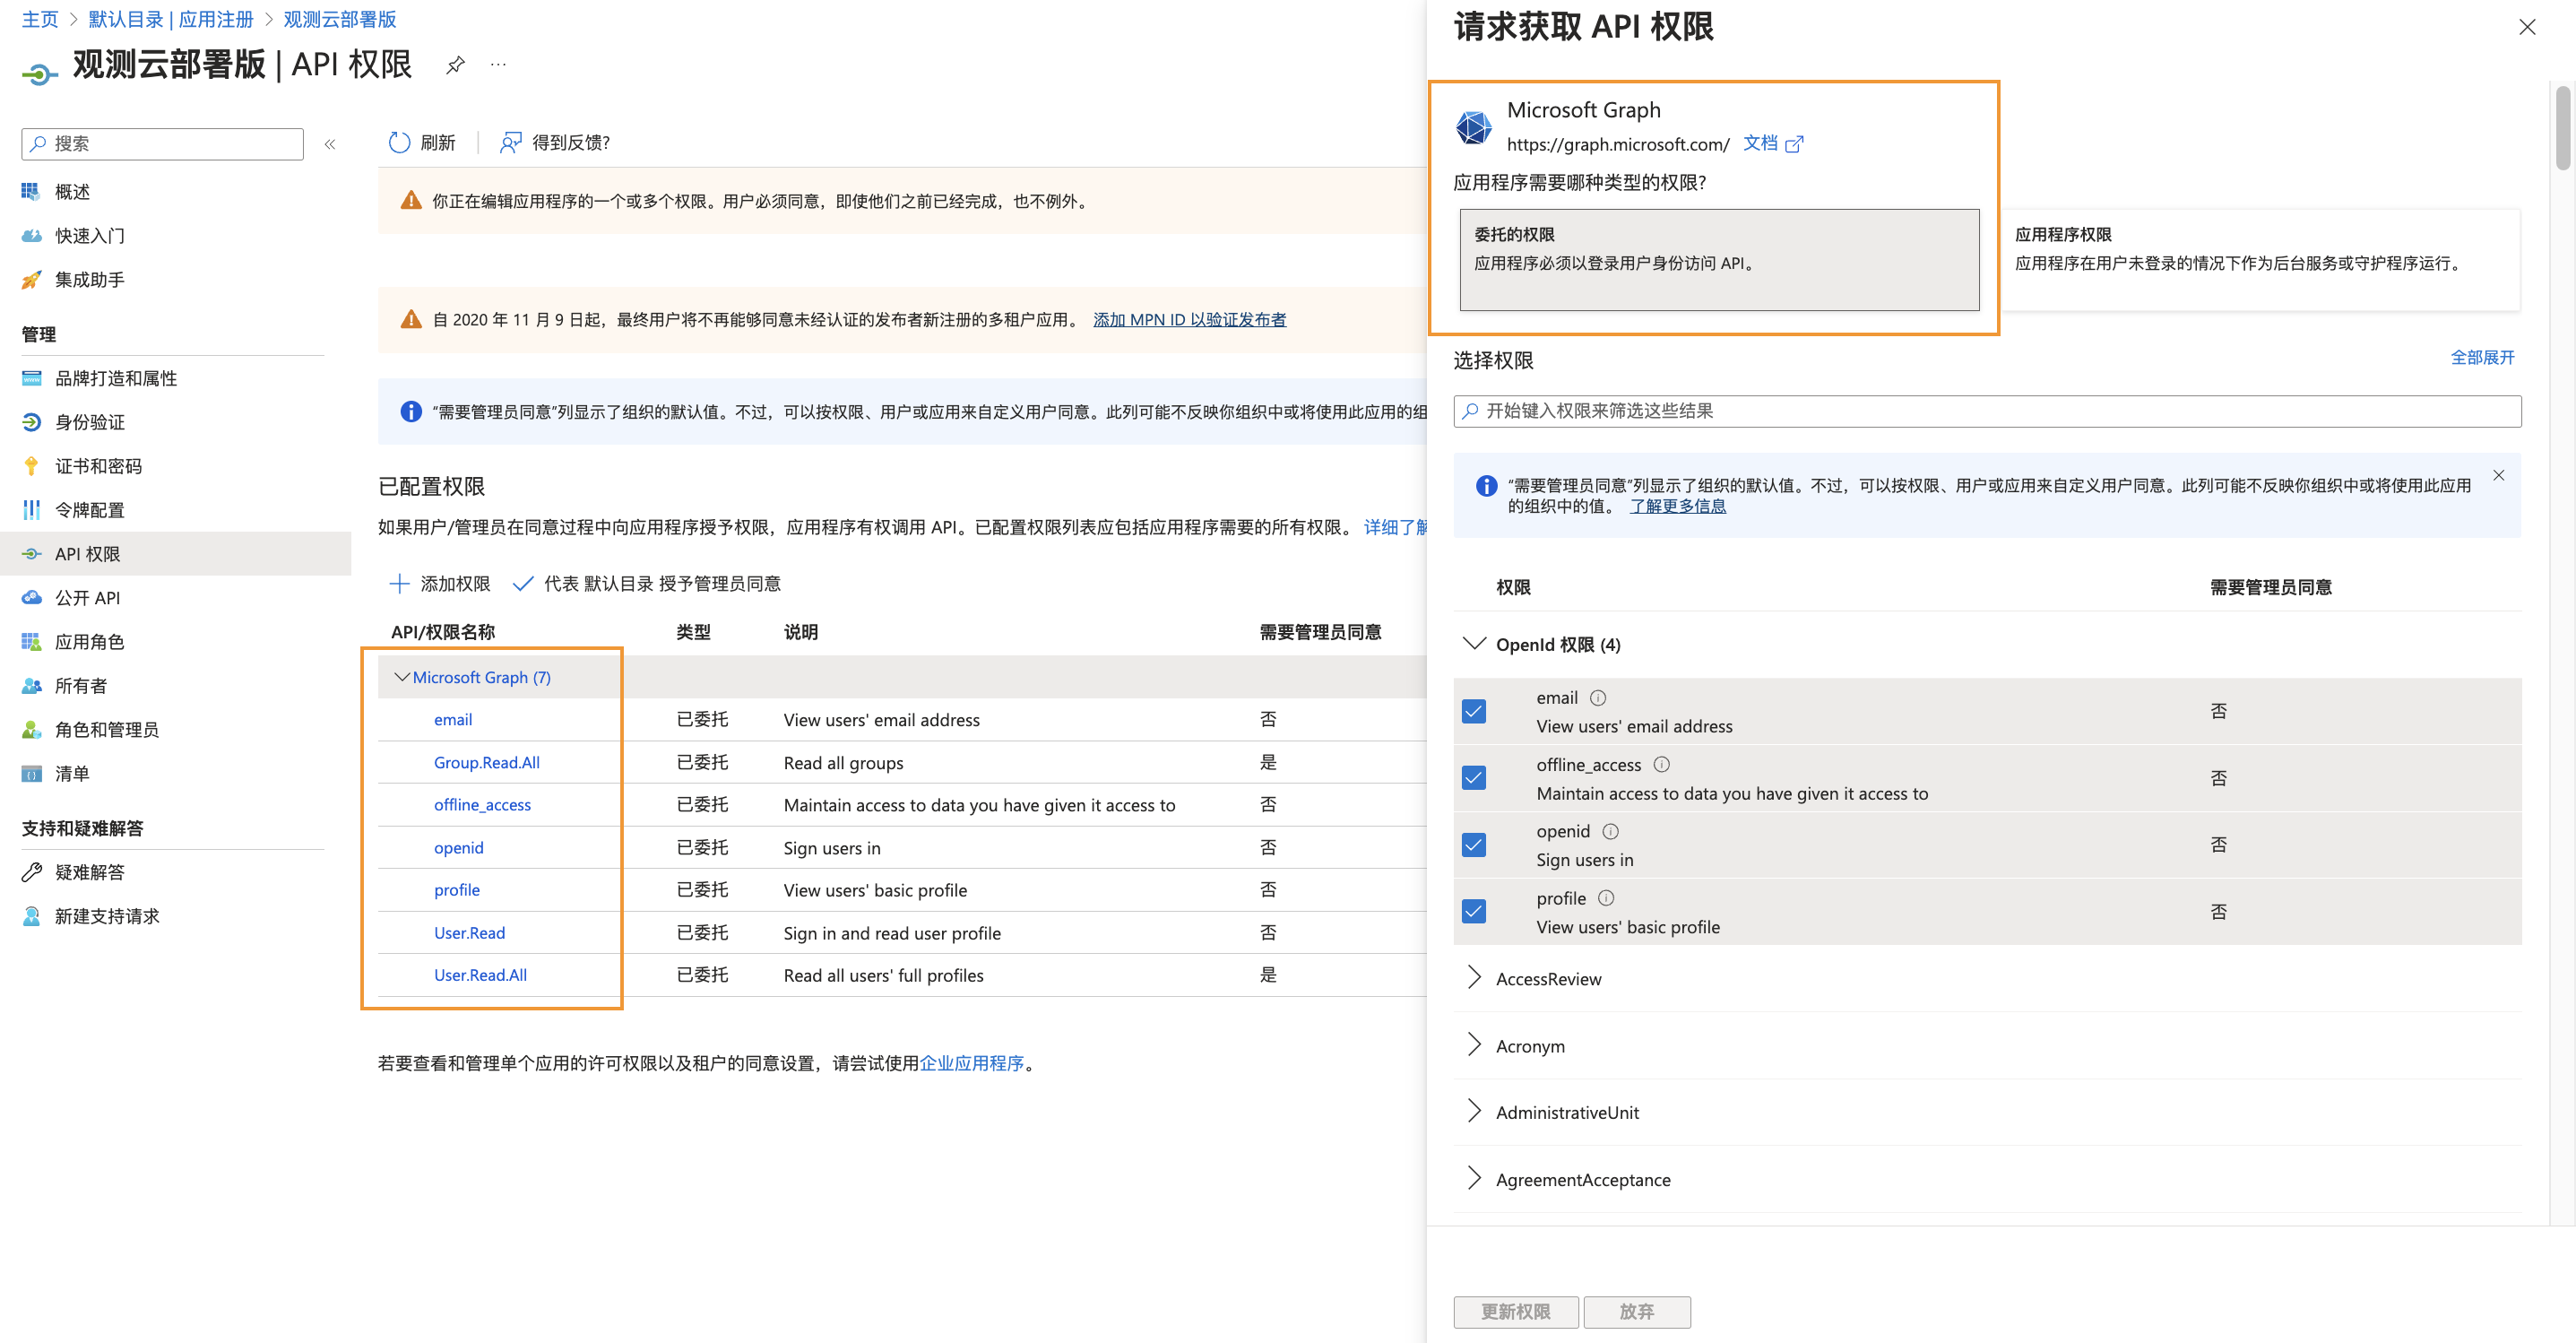
- Then, select the required permissions for the application:
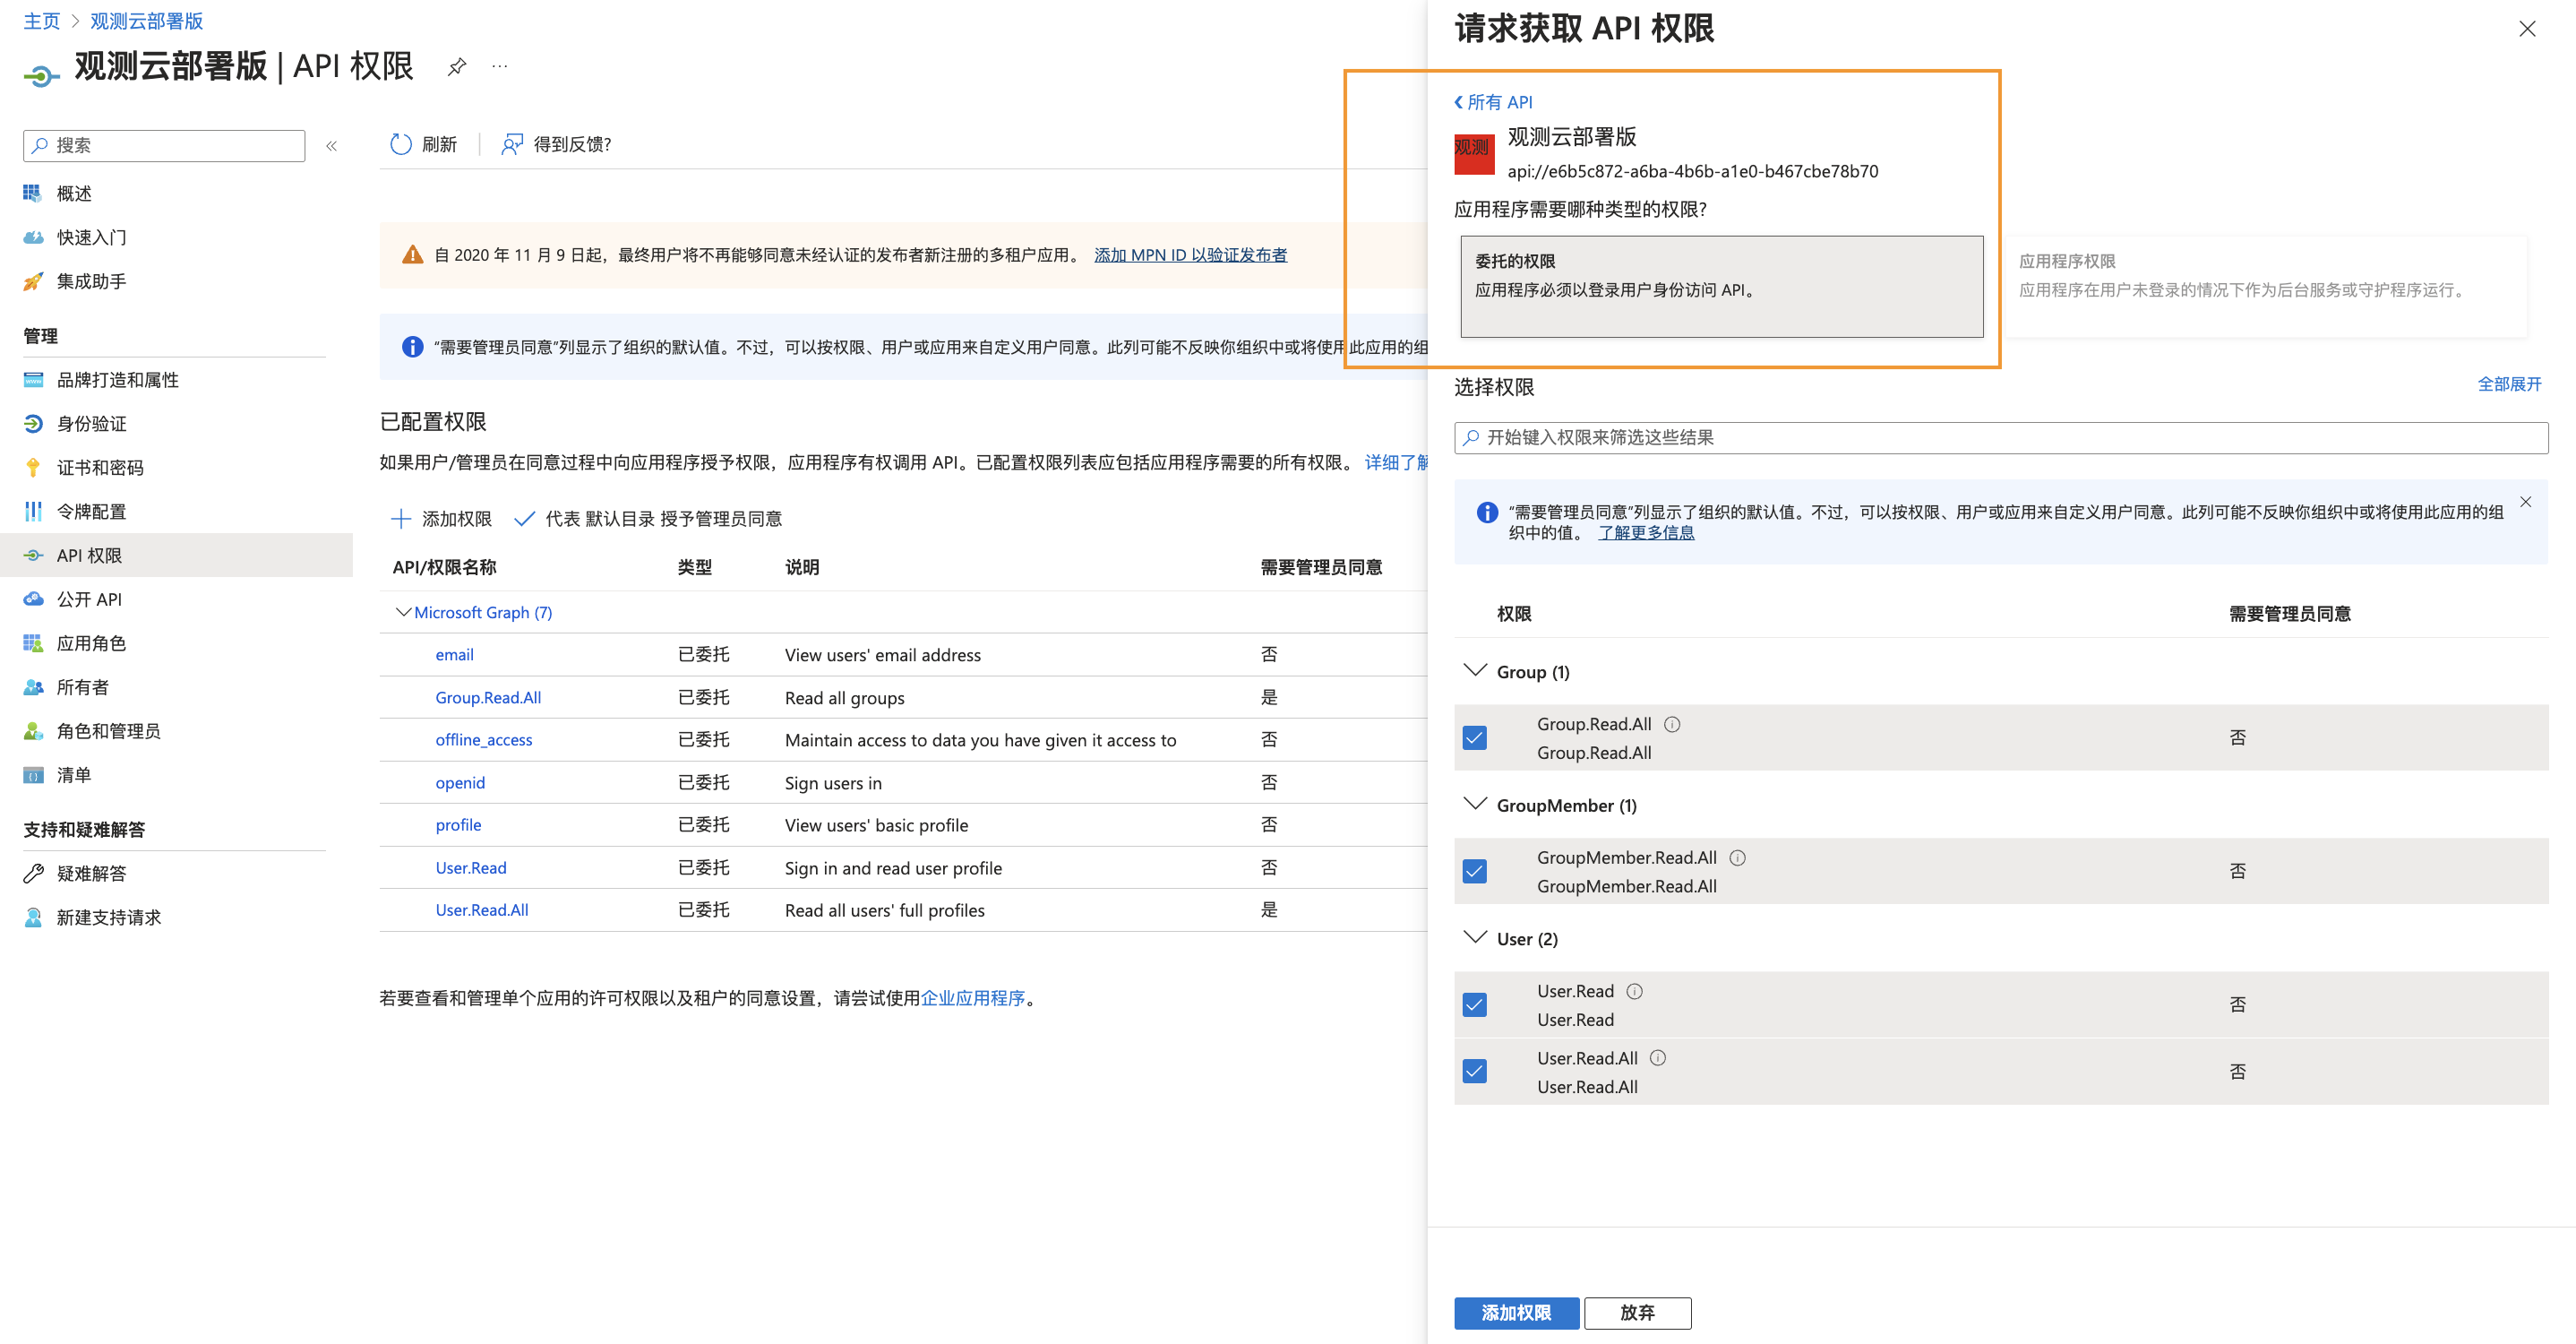
Grant admin consent for the current tenant:
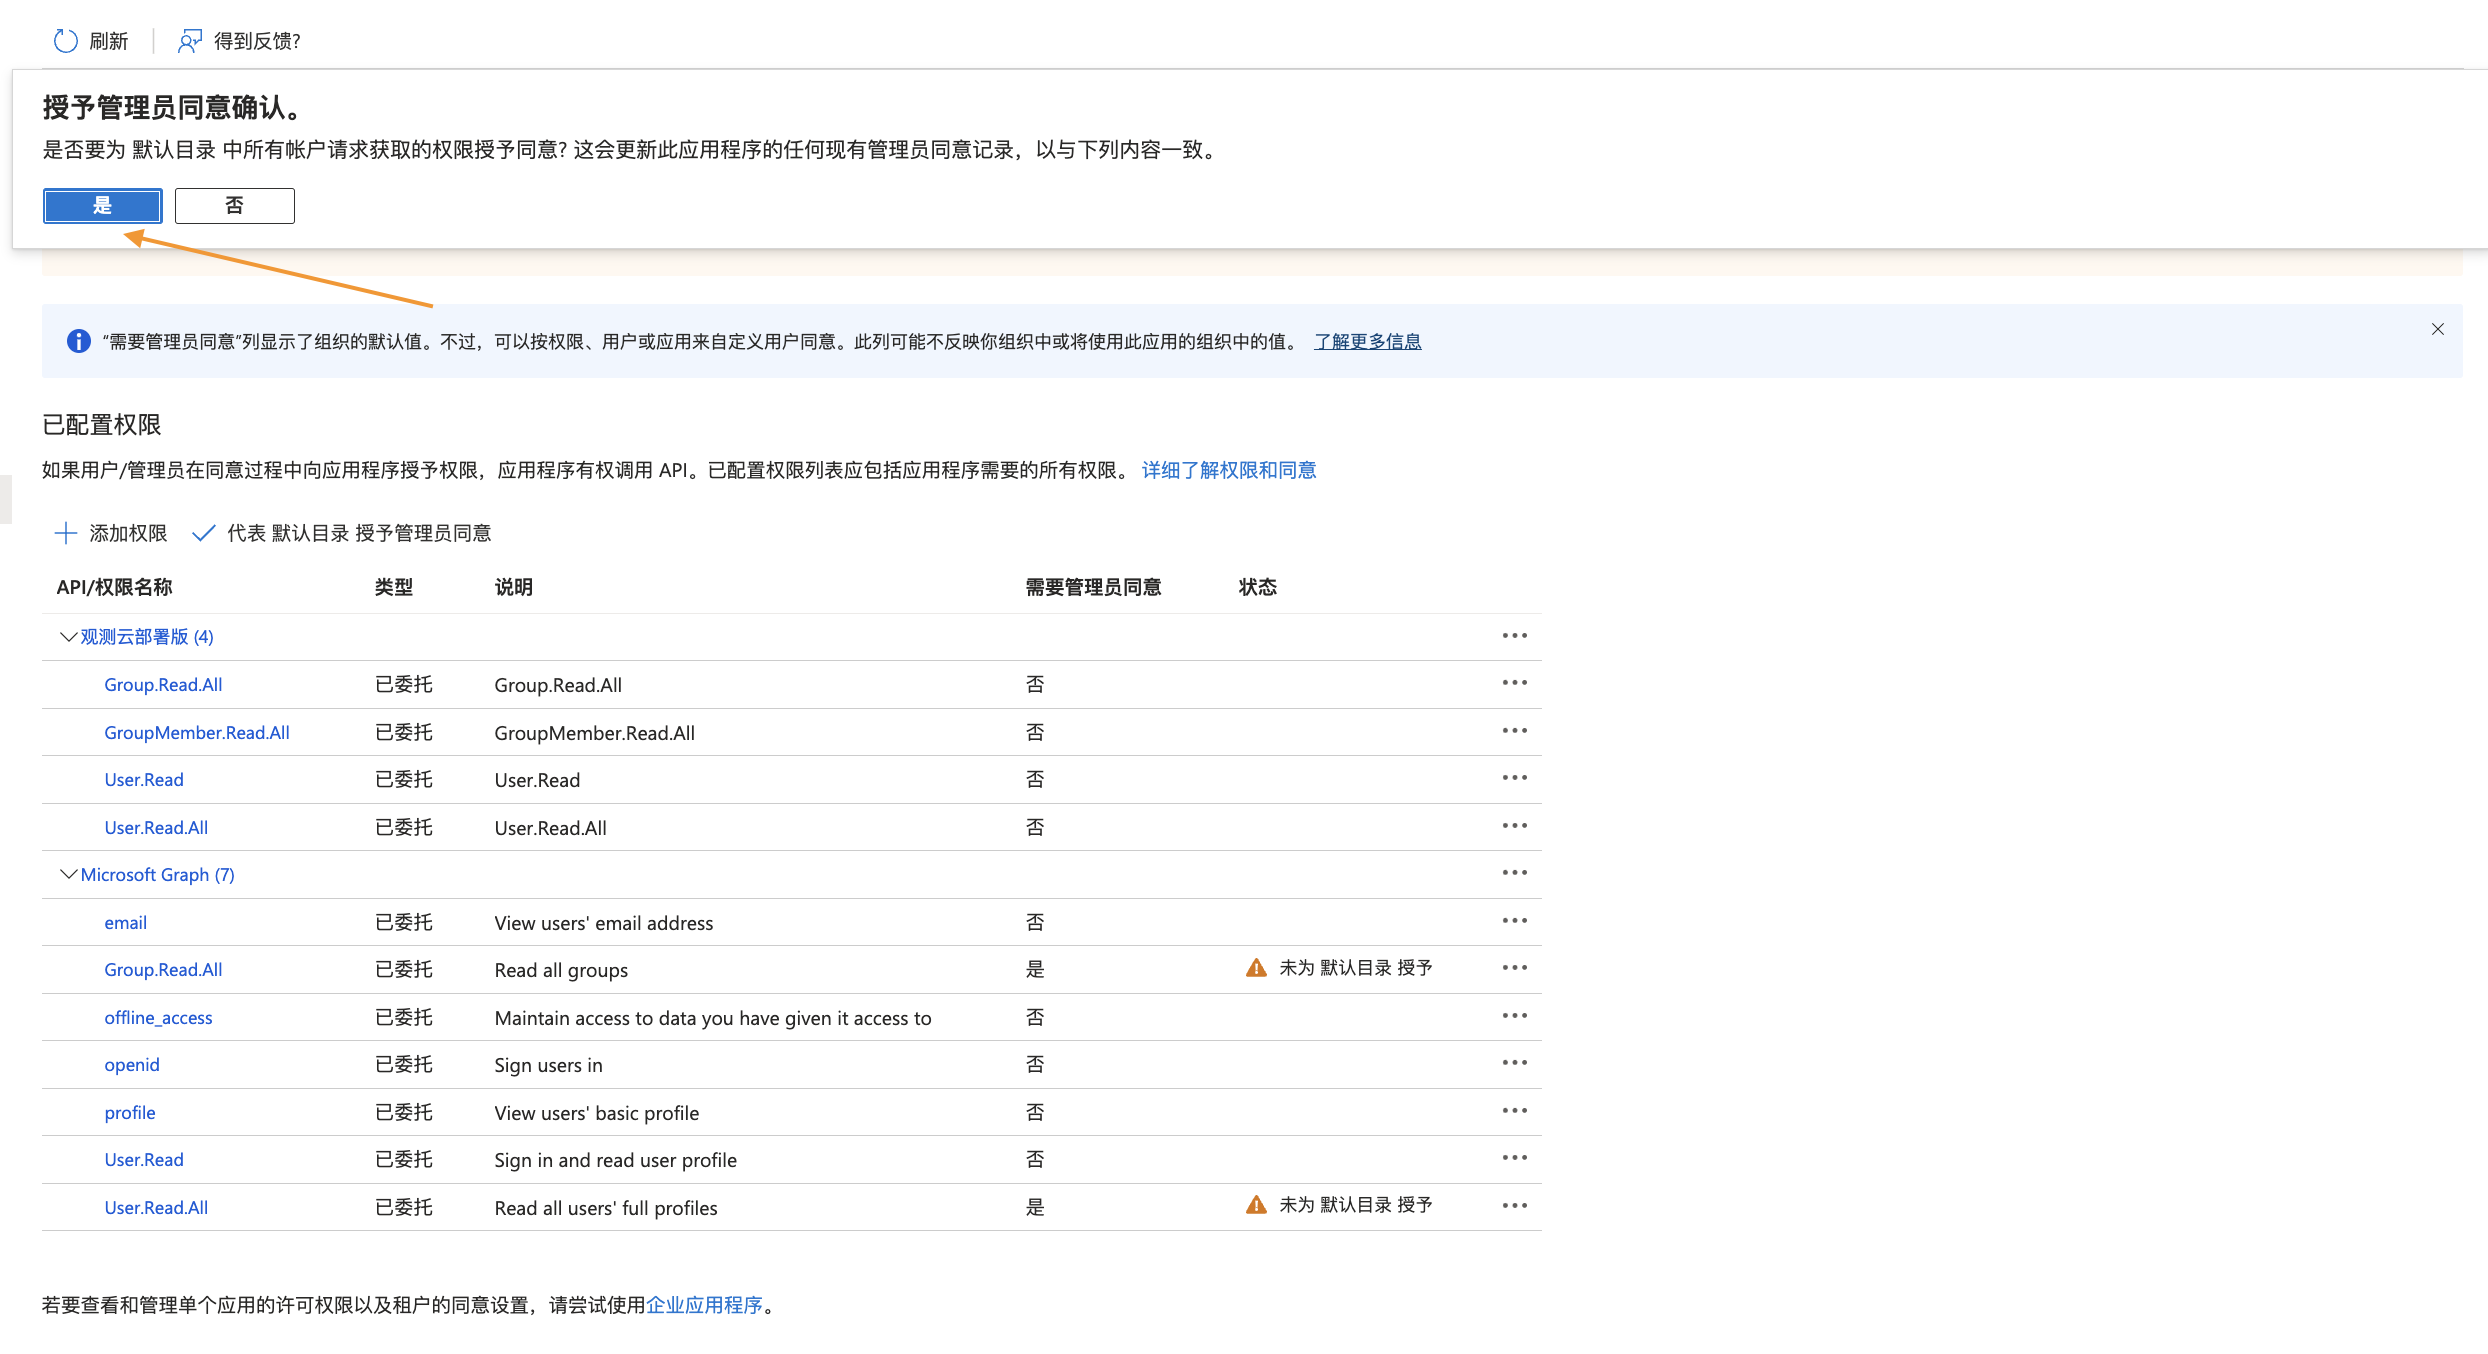
Note: The client ID is the Application (Client) ID.
1.3. Obtain the OIDC Protocol Endpoint Access URL for the Application
Under App registrations > Endpoints, the WellKnowURL in the OIDC client configuration takes the value: https://login.microsoftonline.com/consumers/v2.0/.well-known/openid-configuration.
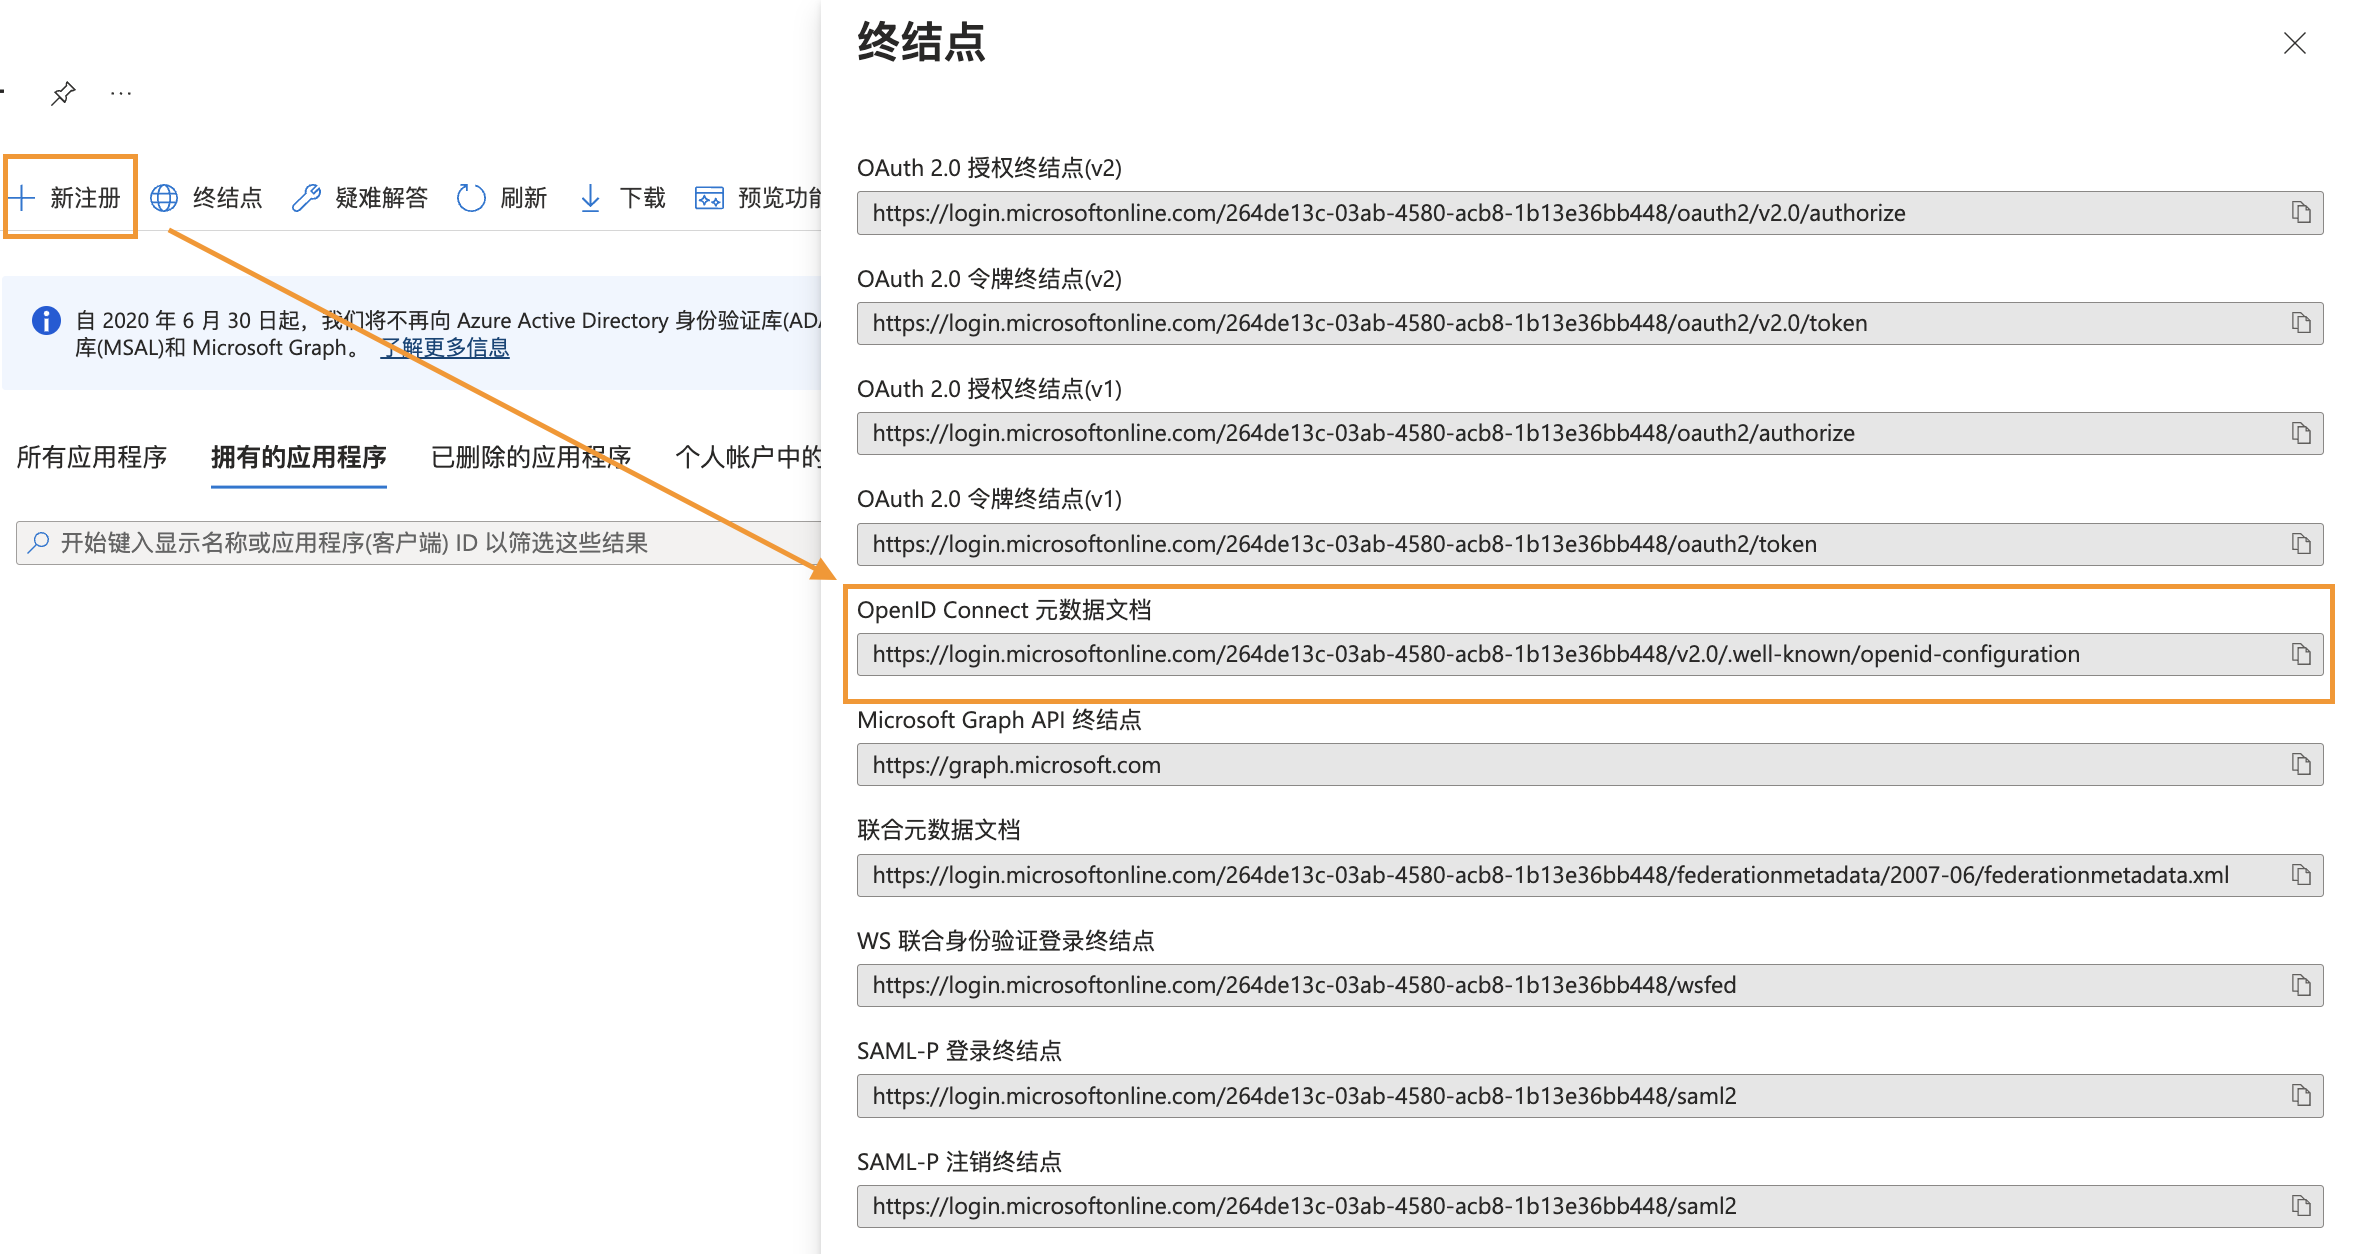
For more information about the OpenID Configuration document URI, see OpenID Connect on the Microsoft identity platform.
At this point, the three key configuration items have been obtained.
2. Configure User Groups in the Azure AD Application
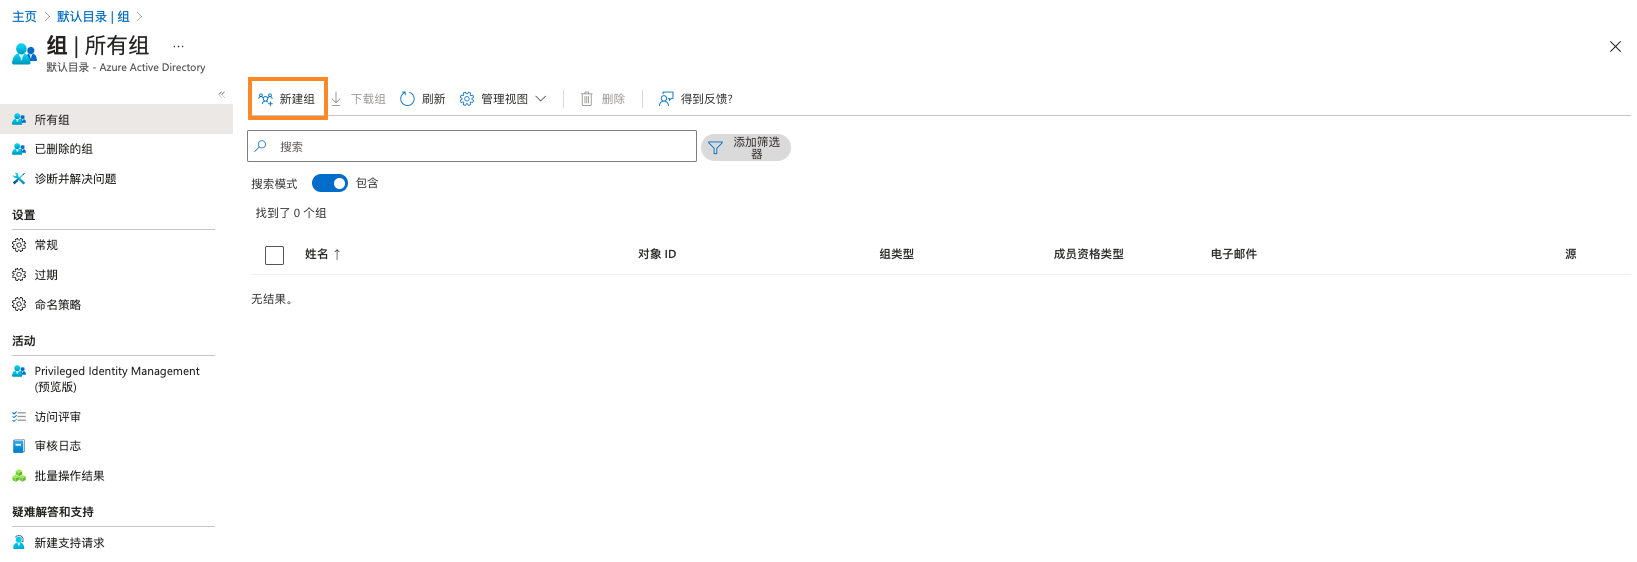
1) Go back to the home page, navigate to Groups > New group;
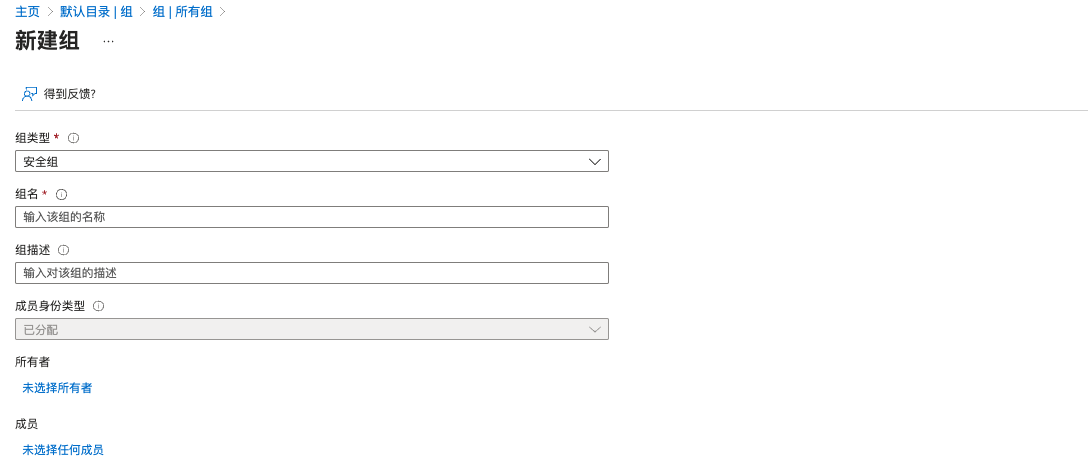
2) Select Group type:
-
Security: Used to manage user and computer access to shared resources.
-
Microsoft 365: Provides collaboration opportunities by granting members access to shared mailboxes, calendars, files, SharePoint sites, etc.
3) Enter a Group name and optionally add a group description;
4) Add Owners or Members:
- Click the link under "Owners" or "Members" to populate the list of users in the directory;
- Select users from the list, then click the "Select" button at the bottom of the window.
5) Click Create.
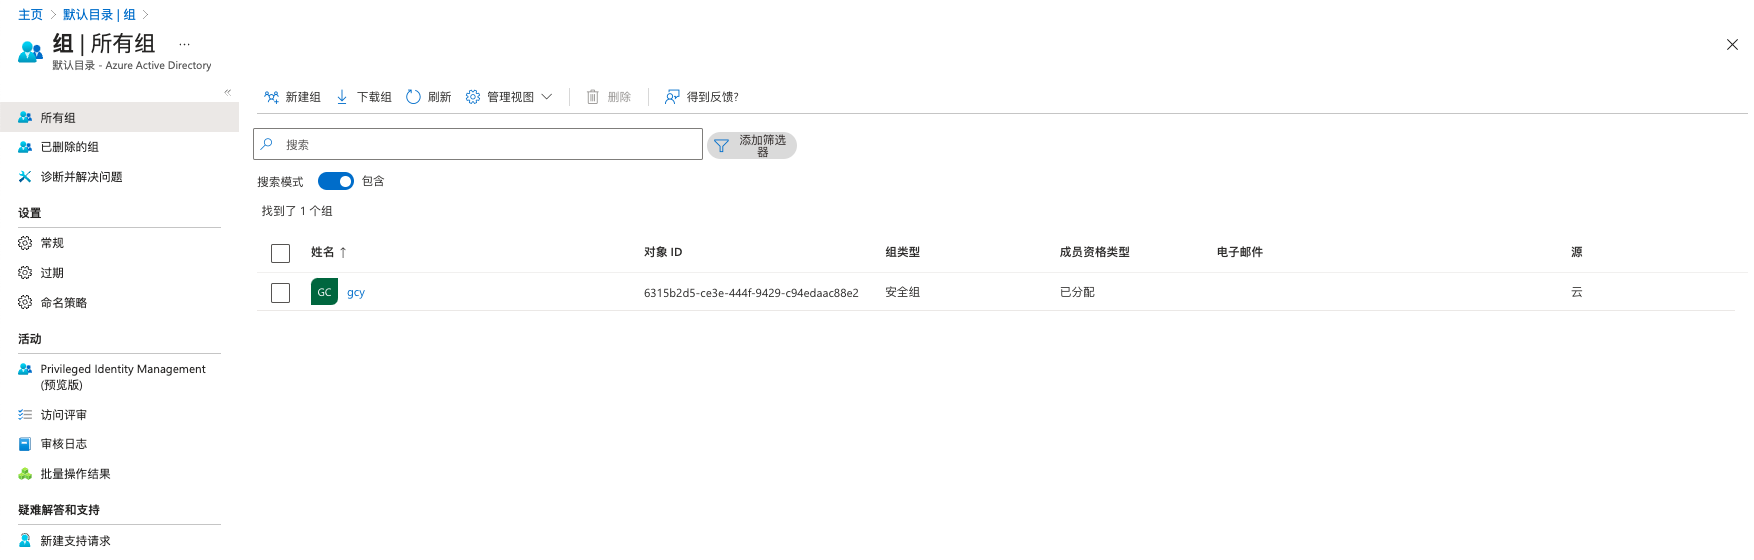
3. Configure Enterprise Application Settings
1) Go to your application, select Overview > Self-service.
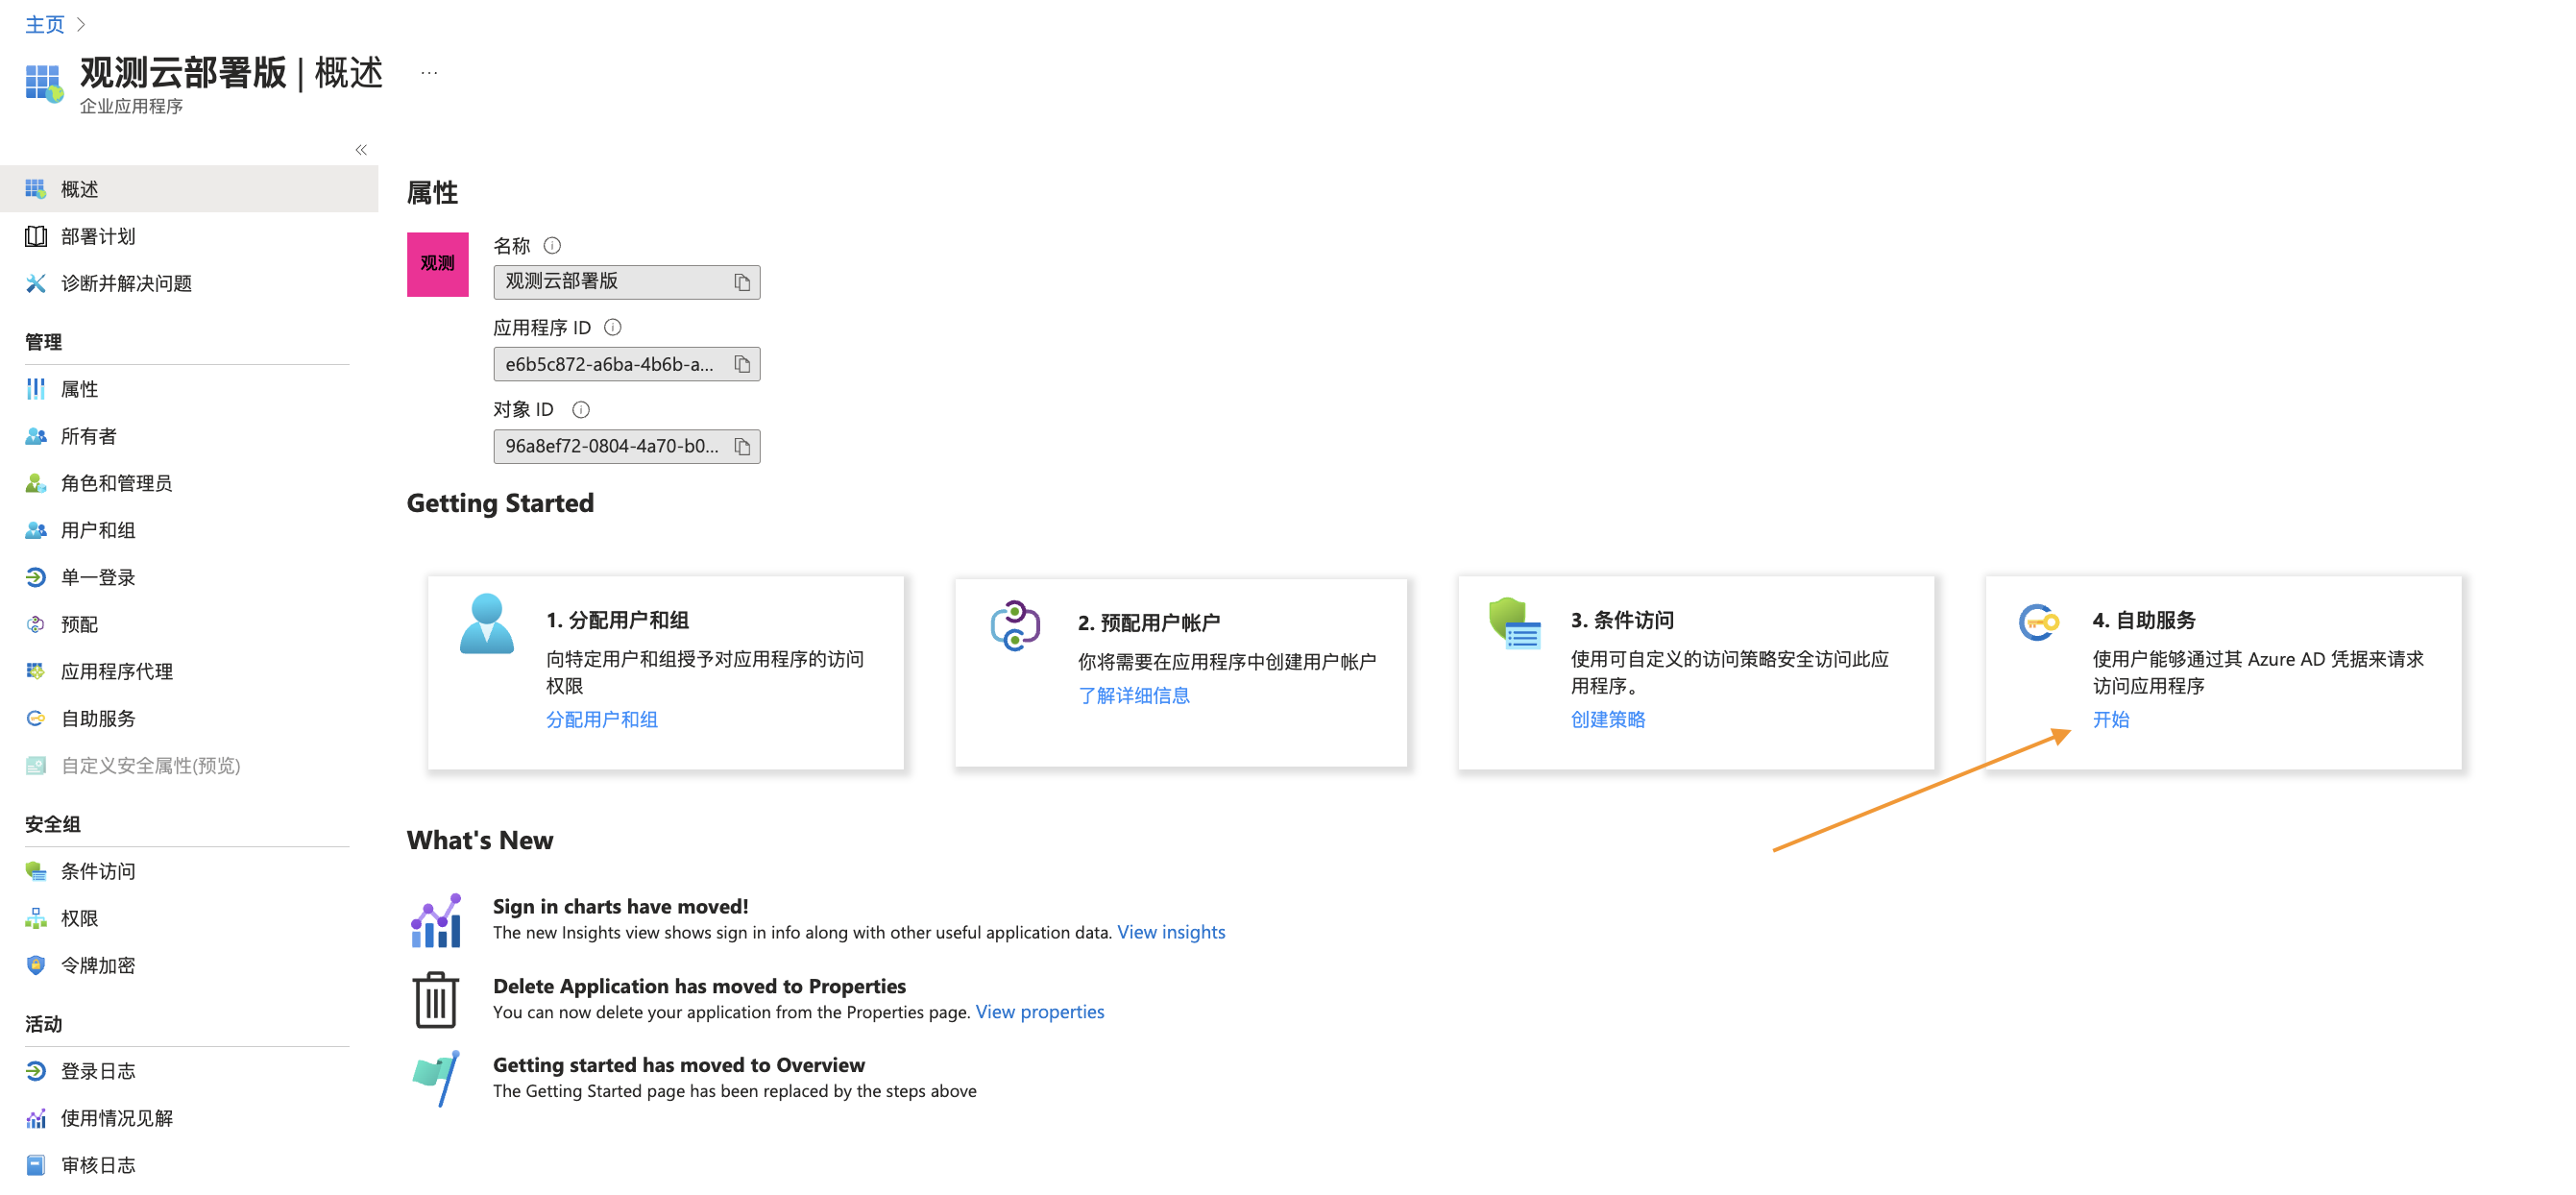
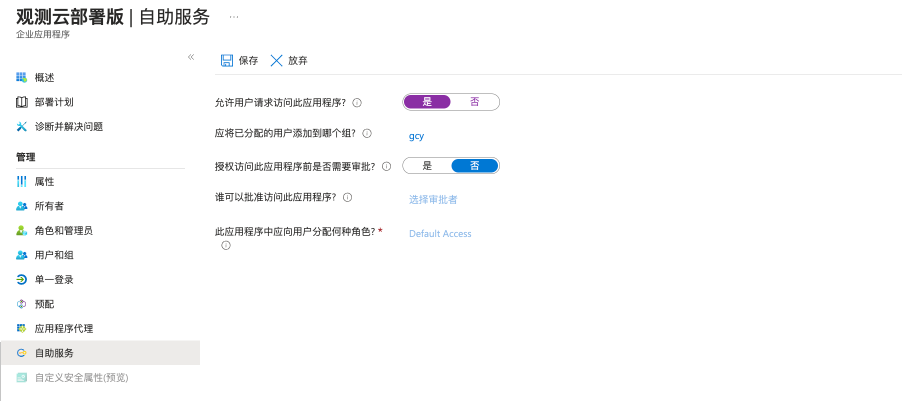
2) Select Allow users to request access to this application, and decide which group to add assigned users to.
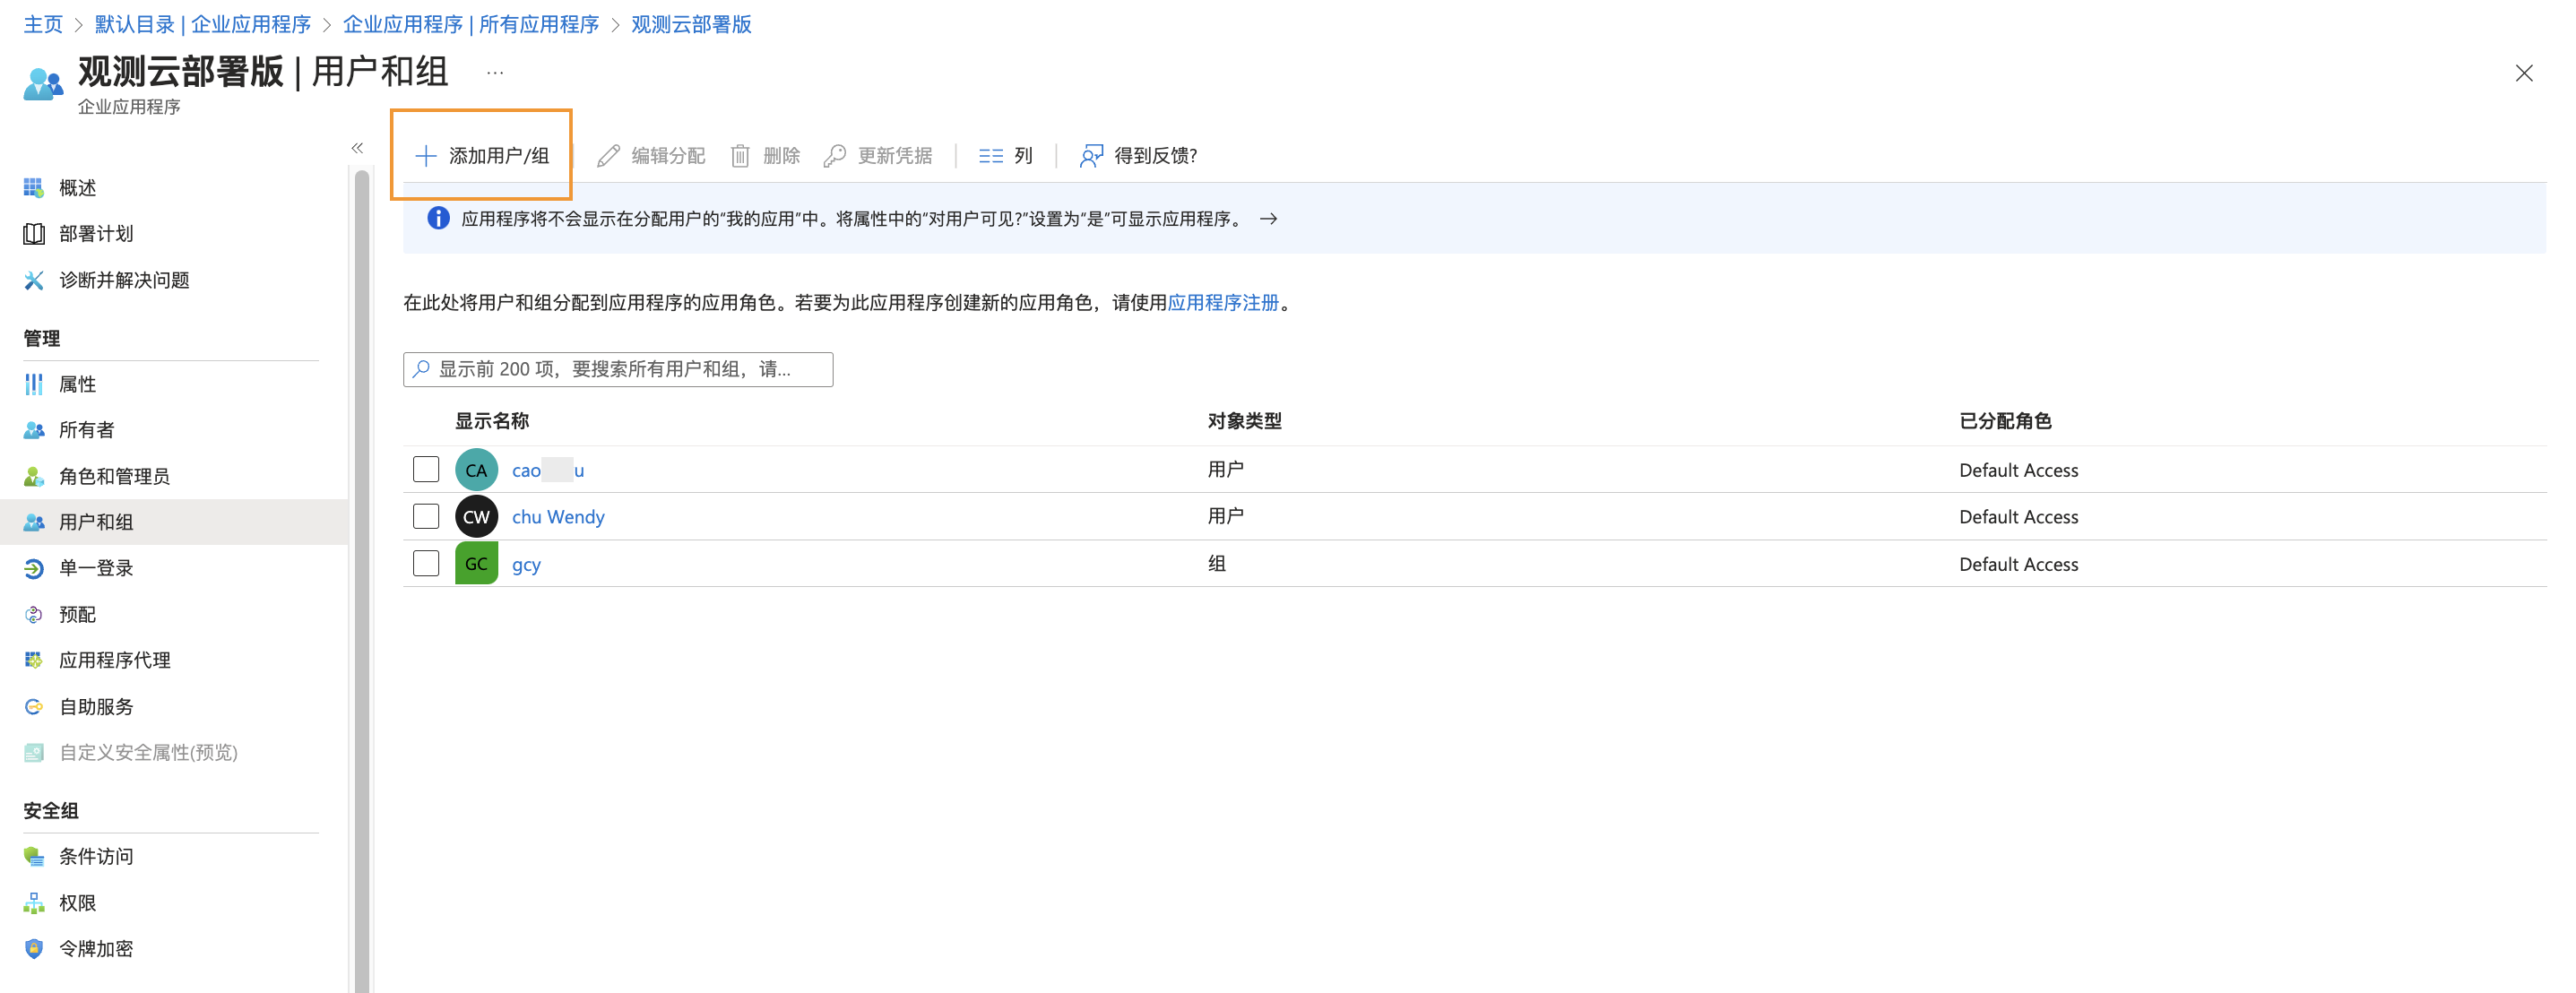
3) Under Your Application > Users and groups, add the groups and users that need to log in.
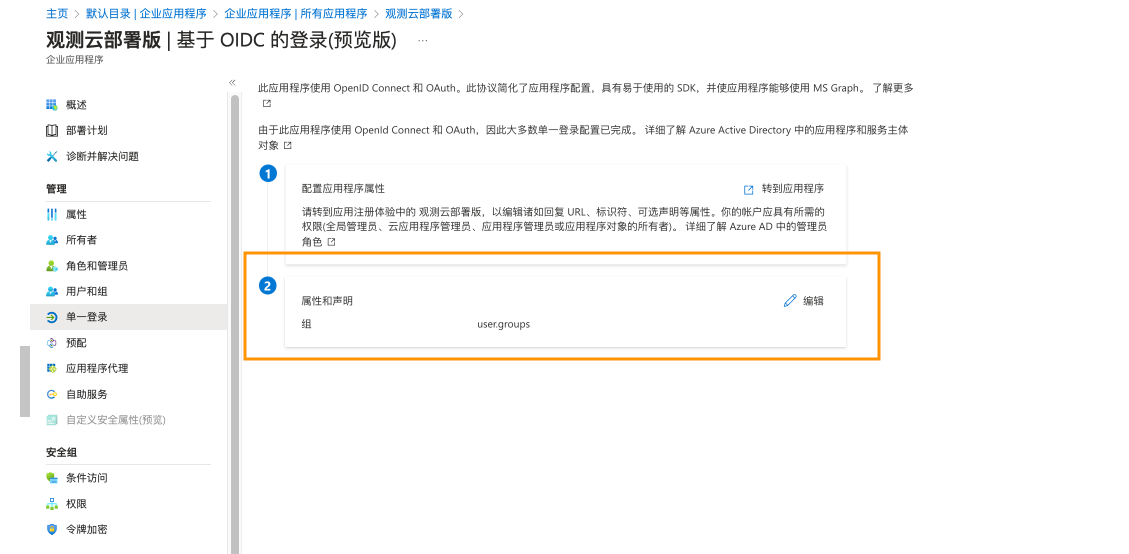
4) Under Your Application > Single sign-on, you can see the groups attribute claims.
3. Configure the Association in the Guance Launcher
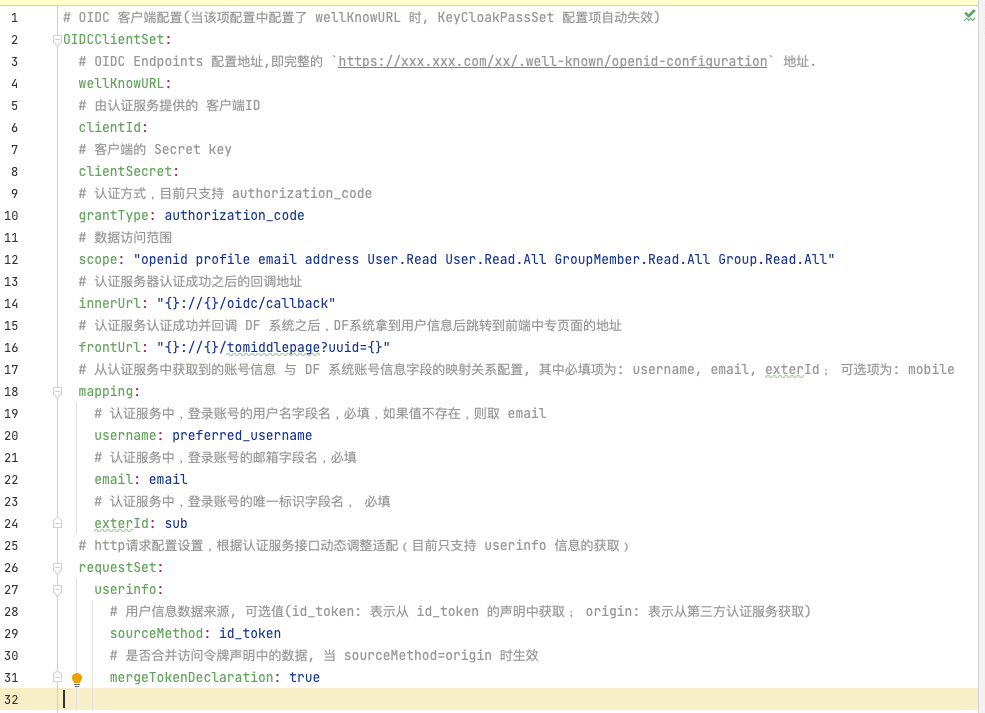
1) Configure the basic Azure AD information in the Guance Launcher Namespace: forethought-core > core.
# OIDC client configuration (when wellKnowURL is configured in this item, the KeyCloakPassSet configuration item is automatically disabled)
OIDCClientSet:
  # OIDC Endpoints configuration URL, i.e., the complete `https://xxx.xxx.com/xx/.well-known/openid-configuration` address.
  wellKnowURL:
  # Client ID provided by the authentication service
  clientId:
  # Client secret key
  clientSecret:
  # Authentication method, currently only supports authorization_code
  grantType: authorization_code
  # Certificate verification switch in the request
  verify: false
  # Certificate path list, enter the .crt and .key file paths in order
  cert:
  # Authentication method for the token endpoint: basic (in the Authorization header) or post_body (in the request body)
  fetchTokenVerifyMethod: basic
  # Data access scope
  scope: "openid profile email address"
  # [Internal configuration, no user adjustment needed] Callback URL after successful authentication by the authentication server
  innerUrl: "{}://{}/oidc/callback"
  # [Internal configuration, no user adjustment needed] After the authentication server successfully authenticates and calls back to the DF system, the DF system retrieves user information and redirects to the frontend intermediate page
  frontUrl: "{}://{}/tomiddlepage?uuid={}"
  # Mapping configuration between account information obtained from the authentication service and the DF system account information fields. Required fields: username, email, exterId; Optional: mobile
  mapping:
    # Field name for the login account username in the authentication service, required; if the value does not exist, the email is used
    username: preferred_username
    # Field name for the login account email in the authentication service, required
    email: email
    # Field name for the login account phone number in the authentication service, optional
    mobile: phone_number
    # Field name for the unique identifier of the login account in the authentication service, required
    exterId: sub
Reference example image:
Client ID and Client Secret Value can be obtained from the locations shown in the images below

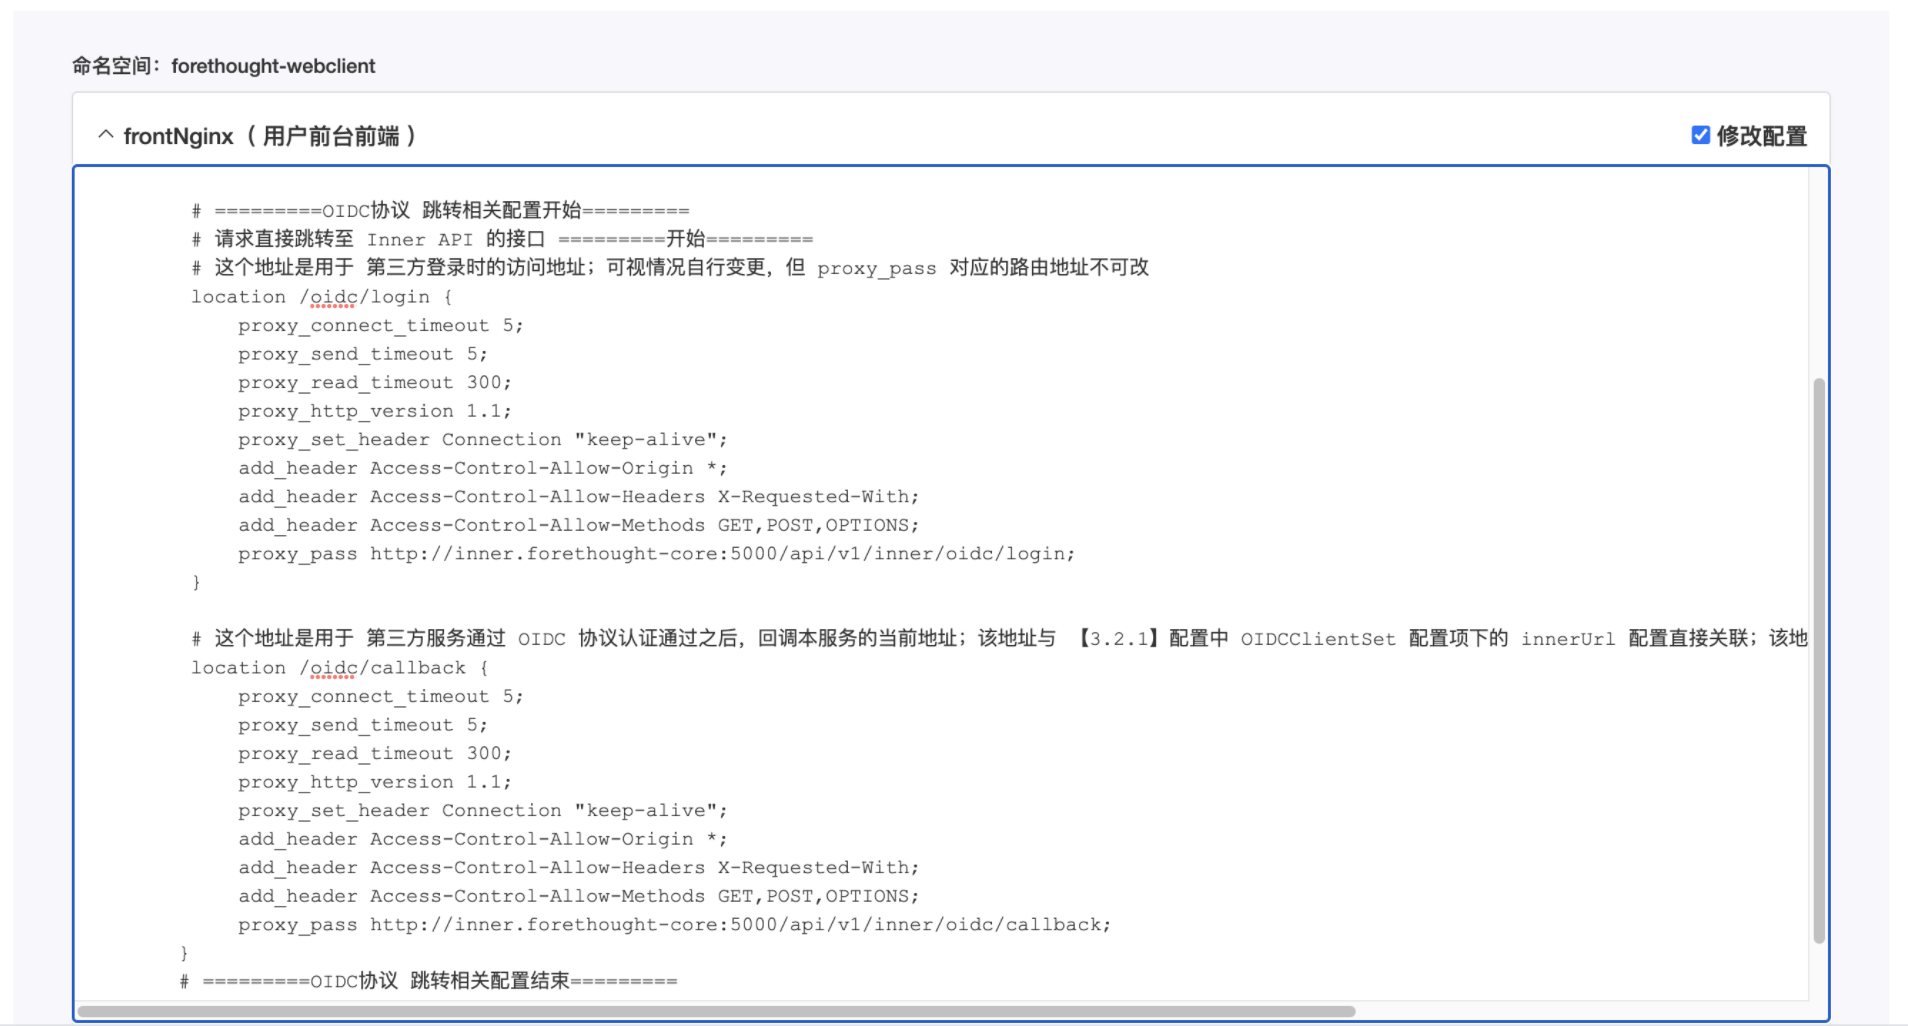
2) Configure the redirect information in the Guance Launcher Namespace: forethought-webclient > frontNginx.
server {
        listen 80;
        # Note: the server_name here is the frontend access domain name
        server_name cloudcare.cn, daily-ft2x.cloudcare.cn;
        location / {
           root /config/cloudcare-forethought-webclient;
           index index.html;
           try_files $uri $uri/ /index.html;
           if ($request_filename ~* .*\.(?:htm|html)$)
            {
                add_header Cache-Control "no-cache, no-store";
            }
        }

        # =========OIDC protocol redirect related configuration start=========
        # Request direct redirect to Inner API endpoint =========Start=========
        # This address is used for third-party login; can be changed as needed, but the route corresponding to proxy_pass must not be changed
        location /oidc/login {
            proxy_connect_timeout 5;
            proxy_send_timeout 5;
            proxy_read_timeout 300;
            proxy_http_version 1.1;
            proxy_set_header Connection "keep-alive";
            add_header Access-Control-Allow-Origin *;
            add_header Access-Control-Allow-Headers X-Requested-With;
            add_header Access-Control-Allow-Methods GET,POST,OPTIONS;
            proxy_pass http://inner.forethought-core:5000/api/v1/inner/oidc/login;
        }

        # This address is used for the callback URL of this service after third-party authentication via OIDC protocol; it is directly related to the innerUrl configuration under the OIDCClientSet configuration item in [3.2.1]; when this address is changed, it should be updated synchronously with innerUrl; the value corresponding to proxy_pass must not be changed
        location /oidc/callback {
            proxy_connect_timeout 5;
            proxy_send_timeout 5;
            proxy_read_timeout 300;
            proxy_http_version 1.1;
            proxy_set_header Connection "keep-alive";
            add_header Access-Control-Allow-Origin *;
            add_header Access-Control-Allow-Headers X-Requested-With;
            add_header Access-Control-Allow-Methods GET,POST,OPTIONS;
            proxy_pass http://inner.forethought-core:5000/api/v1/inner/oidc/callback;
       }
       # =========OIDC protocol redirect related configuration end=========
}
Reference example image:
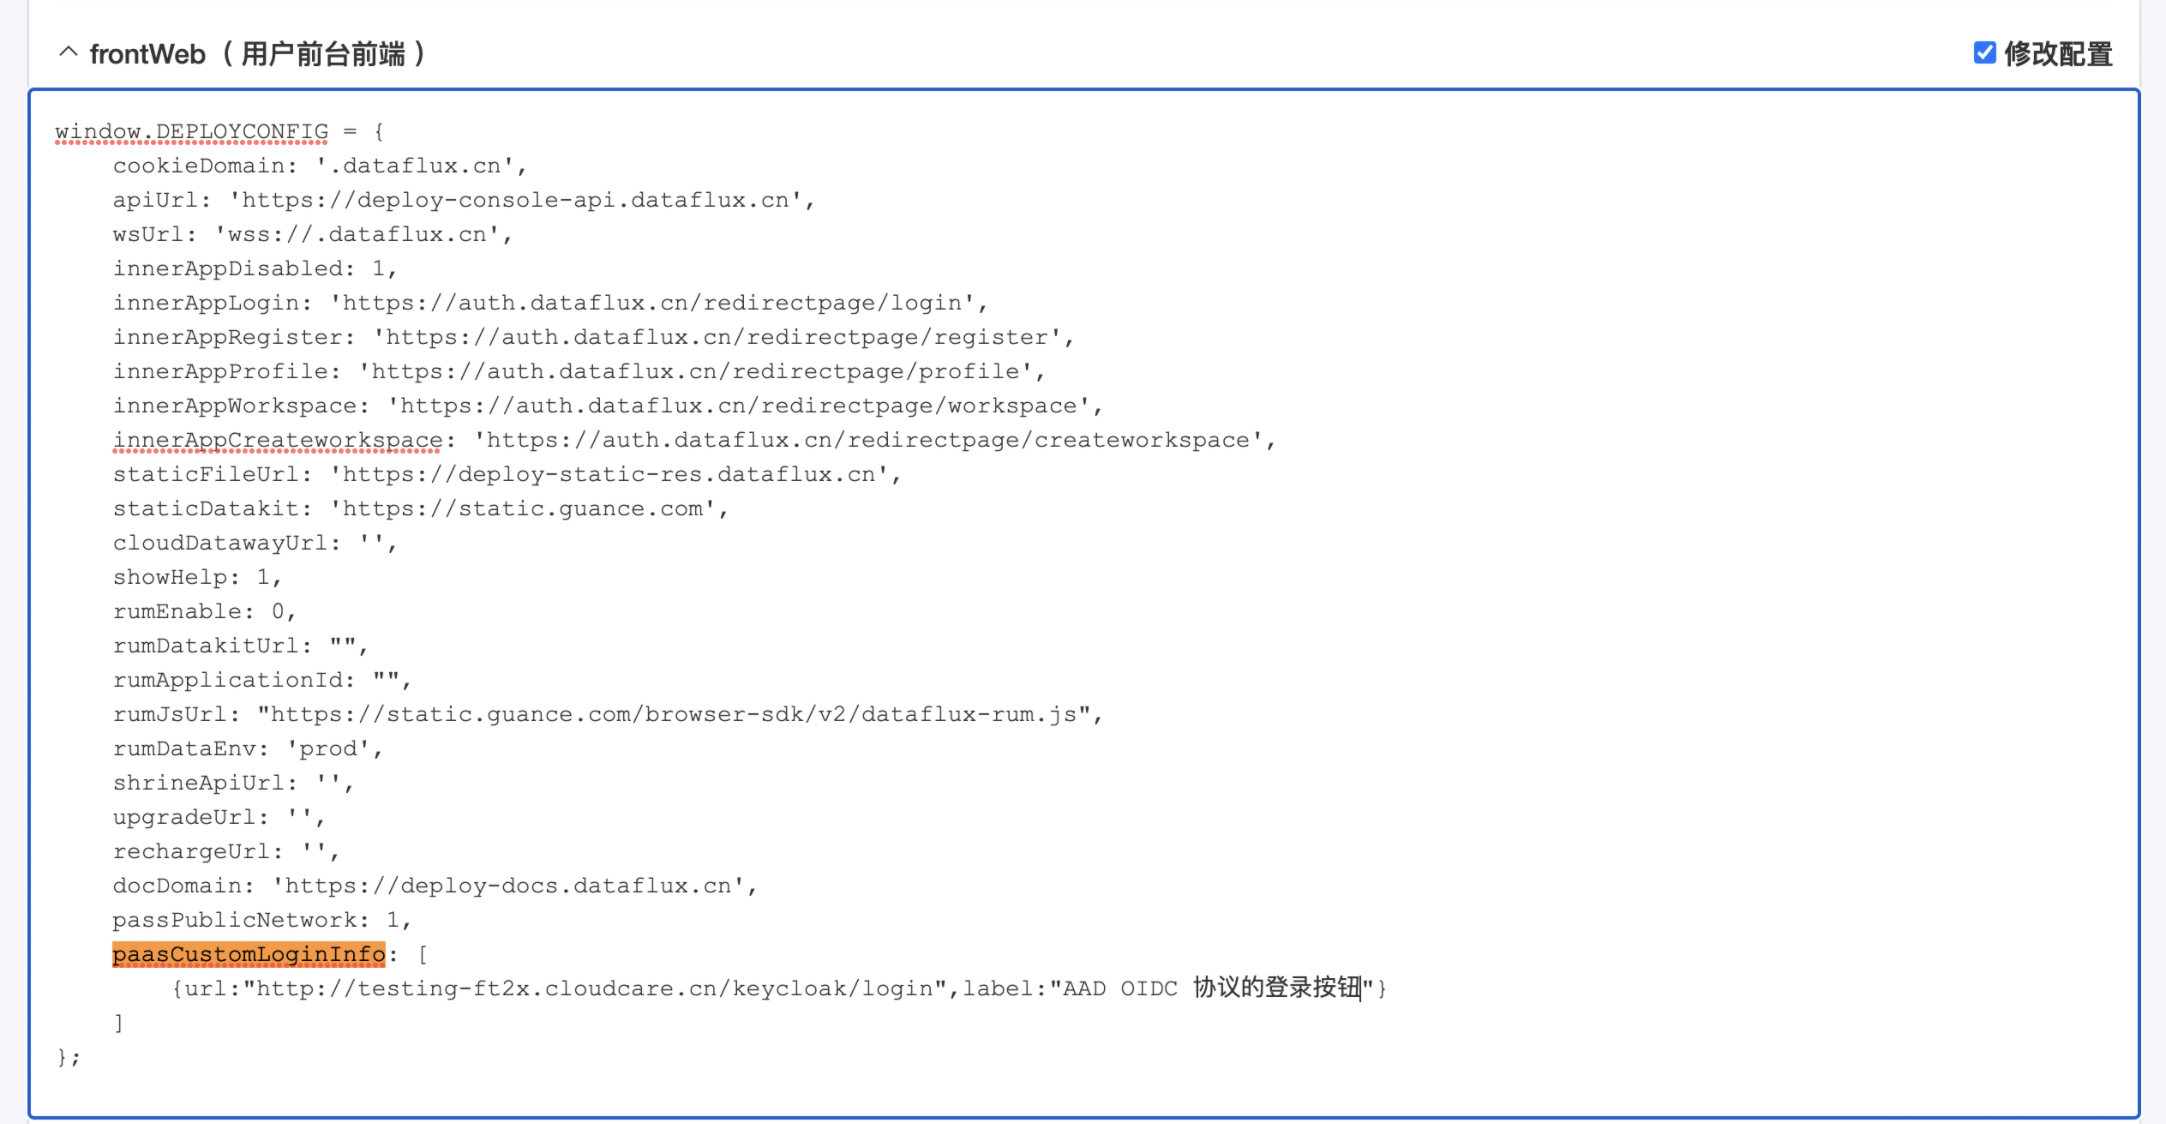
3) Configure the entry URL for Azure AD user login to the Guance Deployment Plan in the Guance Launcher Namespace: forethought-webclient > frontWeb.
window.DEPLOYCONFIG = {

    ......
    paasCustomLoginInfo:[
        { "iconUrl":"xxx", "label": "xxx", "url": "xxxx" ,desc:"xxx"}
    ]

    ......

};
Note: server_name is the domain name in the Guance login page URL.
Reference example image:
1) After configuration, check the updated Modify Configuration and confirm the restart.

4. Use Azure AD Account for SSO to Guance
After all configurations are complete, you can use SSO to log in to Guance.
1) Open the Guance Deployment Plan login address, and select Azure AD SSO on the login page.
2) Enter the email address configured in Azure AD.
3) Update the login password.
4) Log in to the corresponding workspace in Guance.
Warning
- If the message "The current account has not been added to any workspace. Please go to the management console to add this account to a workspace." appears, you need to log in to the Guance management console to add a workspace for the user.
For more details, see Deployment Plan Workspace Management.

After adding a workspace for the user in the Guance management console, the user can start using Guance.
