OpenSearch High-Availability Deployment
Overview
OpenSearch is an open-source, distributed search and analytics suite derived from Elasticsearch OSS 7.10.2. It provides foundational capabilities for performing interactive log analysis, real-time application monitoring, and data analytics.
| Node Type | Description | Best Practice for Production |
|---|---|---|
| Cluster manager | Manages the overall operation of the cluster and tracks the cluster state. This includes creating and deleting indices, tracking nodes that join and leave the cluster, checking the health of each node in the cluster (by running ping requests), and assigning shards to nodes. | Dedicated cluster manager nodes in three different zones is the correct approach for almost all production use cases. This configuration ensures your cluster never loses quorum. Two nodes are idle most of the time, unless one fails or requires maintenance. |
| Cluster manager eligible | One of these nodes is elected as the cluster manager node through a voting process. | For production clusters, ensure you have dedicated cluster manager nodes. The way to achieve a dedicated node type is to mark all other node types as false. In this case, you must mark all other nodes as ineligible for cluster manager. |
| Data | Stores and searches data. Performs all data-related operations (indexing, search, aggregation) on local shards. These are the worker nodes of your cluster and require more disk space than any other node type. | When adding data nodes, keep them balanced across zones. For example, if you have three zones, add data nodes in multiples of three, one per zone. We recommend using nodes with large storage and RAM. |
| Ingest | Preprocesses data before storing it in the cluster. Runs ingest pipelines to transform data before adding it to the index. | If you plan to ingest large amounts of data and run complex ingest pipelines, we recommend using dedicated ingest nodes. You can also choose to offload indexing from data nodes so that data nodes are dedicated to search and aggregation. |
| Coordinating | Delegates client requests to shards on data nodes, collects and aggregates the results into a final result, and sends that result back to the client. | A pair of dedicated coordinating-only nodes can prevent bottlenecks for search-heavy workloads. We recommend using CPUs with as many cores as possible. |
| Dynamic | Delegates specific nodes to custom workloads, such as machine learning (ML) tasks, preventing resource consumption from data nodes without affecting any OpenSearch functionality. |
Prerequisites
- A Kubernetes cluster must be deployed.
- The storage component must be determined (based on the actual environment):
- Cloud block storage component (for public cloud)
- OpenEBS storage plugin
Resource List
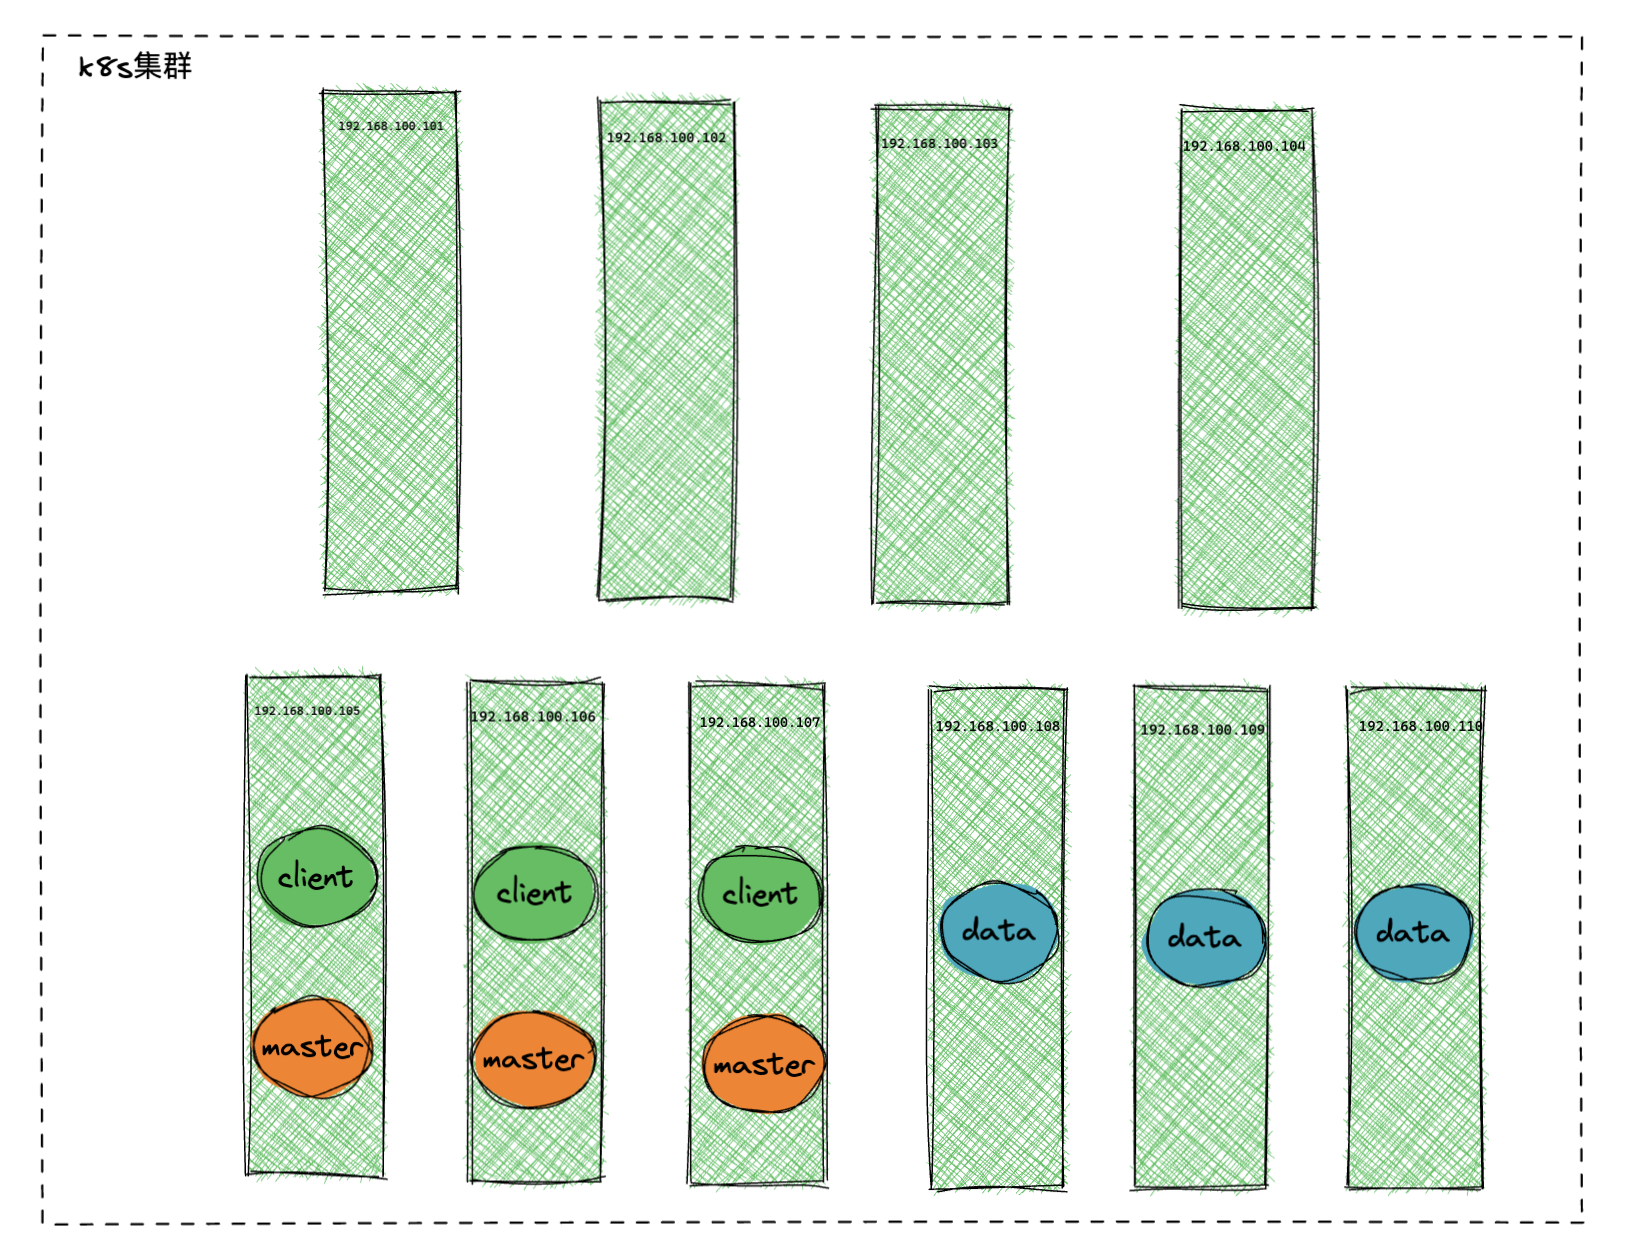
| Hostname | IP Address | Roles | Kubernetes Configuration | Data Storage |
|---|---|---|---|---|
| k8s-master | 192.168.100.101 | k8s, master | 4 CPU, 16G MEM, 100G DISK | |
| K8s-node01 | 192.168.100.102 | k8s, node01 | 4 CPU, 16G MEM, 100G DISK | |
| K8s-node02 | 192.168.100.103 | k8s, node02 | 4 CPU, 16G MEM, 100G DISK | |
| K8s-node03 | 192.168.100.104 | k8s, node03 | 4 CPU, 16G MEM, 100G DISK | |
| K8s-node04 | 192.168.100.105 | openes, master, client | 4 CPU, 16G MEM, 100G DISK | /data:200G |
| K8s-node05 | 192.168.100.106 | openes, master, client | 4 CPU, 16G MEM, 100G DISK | /data:200G |
| K8s-node06 | 192.168.100.107 | openes, master, client | 4 CPU, 16G MEM, 100G DISK | /data:200G |
| K8s-node07 | 192.168.100.108 | openes, data | 8CPU, 32G MEM, 100G DISK | /data:1T |
| K8s-node08 | 192.168.100.109 | openes, data | 8CPU, 32G MEM, 100G DISK | /data:1T |
| K8s-node09 | 192.168.100.110 | openes, data | 8CPU, 32G MEM, 100G DISK | /data:1T |
Default Configuration
| OpenSearch URL | opensearch-cluster-client.middleware |
|---|---|
| OpenSearch Port | 9200 |
| OpenSearch Account | openes / kJMerxk3PwqQ |
| Master JVM Size | 2G |
| Client JVM Size | 4G |
| Data JVM Size | 20G |
Deployment Architecture Diagram
Installation Preparation
Since OpenSearch is resource-intensive and requires exclusive cluster resources, cluster scheduling must be configured in advance.
Cluster Label Configuration
Run the following commands to label the nodes:
kubectl label node 192.168.100.105 192.168.100.106  192.168.100.107 openes=master-client
kubectl label node 192.168.100.108 192.168.100.109 192.168.100.110  openes=data
Verify the labels:
Cluster Taint Configuration
Run the following commands to set taints on the nodes:
kubectl taint node 192.168.100.105 192.168.100.106 192.168.100.107 192.168.100.108 192.168.100.109 192.168.100.110 app=openes:NoExecute
Configure OpenEBS StorageClass
If using a public cloud, refer to the cloud block storage component.
Deploy the following YAML configuration:
apiVersion: storage.k8s.io/v1
allowVolumeExpansion: true
kind: StorageClass
metadata:
  annotations:
    cas.openebs.io/config: |
      - name: StorageType
        value: "hostpath"
      - name: BasePath
        value: "/data/opensearch"
  name: openebs-opensearch
provisioner: openebs.io/local
reclaimPolicy: Retain
volumeBindingMode: WaitForFirstConsumer
Ensure the
/datadirectory has sufficient disk capacity.
Installation
Modify Configuration
The infrastructure-related charts are located in the /etc/kubeasz/guance/infrastructure/charts directory. Navigate to this directory and proceed.
$ cd /etc/kubeasz/guance/infrastructure/charts
$ ls
localpv-provisioner-3.3.0.tgz  opensearch-cluster-0.0.1.tgz  tdengine-0.4.0.tgz
Extract the default configuration from the chart for customization.
Modify the
values.yamlfile in theopensearch-clusterdirectory. Pay attention to theopensearchJavaOpts,nodeSelector,tolerations, andstorageClassparameters for each node type. AdjustresourcesandopensearchJavaOptsaccording to the actual situation. The memory allocated by Kubernetes should not be less than the JVM heap memory. An odd number ofreplicasis recommended to prevent cluster split-brain.
opensearch-master:
...
  replicas: 3
  # Use init container to set kernel parameters
  # sysctlInit:
  #   enabled: true
  opensearchJavaOpts: "-Xmx2g -Xms2g"
  nodeSelector:
    openes: master-client # client and master are scheduled on similar machines
  tolerations:
  - effect: NoExecute
    key: app
    operator: Equal
    value: openes
  persistence:
    ...
    storageClass: openebs-opensearch

opensearch-client:
...
  replicas: 3
  # sysctlInit:
  #   enabled: true
  opensearchJavaOpts: "-Xmx2g -Xms2g"
  nodeSelector:
    openes: master-client # client and master are scheduled on similar machines
  tolerations:
  - effect: NoExecute
    key: app
    operator: Equal
    value: openes
  persistence:
    ...
    storageClass: openebs-opensearch

opensearch-data:
...
  replicas: 3
  # sysctlInit:
  #   enabled: true
  opensearchJavaOpts: "-Xmx20g -Xms20g"
  nodeSelector:
    openes: data
  tolerations:
  - effect: NoExecute
    key: app
    operator: Equal
    value: openes
  persistence:
    ...
    storageClass: openebs-opensearch
If you do not want to manually set the kernel parameter
vm.max_map_counton the host, you can enable thesysctlInitconfiguration to use an init container for this task. After setting this parameter via the init container, the kernel parameter will persist independently of the container lifecycle for a period unless the machine is rebooted orsysctl -pis executed to refresh the configuration.vm.max_map_countis a kernel parameter not isolated by namespaces. To minimize the impact radius, it is recommended to isolate OpenSearch on dedicated machines.
Perform Installation
Execute the following command in the /etc/kubeasz/guance/infrastructure/charts directory:
$ helm install opensearch-cluster -n middleware --create-namespace -f opensearch-cluster/values.yaml opensearch-cluster-0.0.1.tgz
Output:
Release "opensearch-cluster" has been installed. Happy Helming!
NAME: opensearch-cluster
LAST DEPLOYED: Wed Nov  2 20:26:16 2022
NAMESPACE: middleware
STATUS: deployed
REVISION: 1
TEST SUITE: None
Verify Deployment and Configuration
Check Pod Status
Output:
NAMESPACE    NAME                          READY   STATUS    RESTARTS   AGE
middleware   opensearch-cluster-client-0   1/1     Running   0          63m
middleware   opensearch-cluster-client-1   1/1     Running   0          4m52s
middleware   opensearch-cluster-client-2   1/1     Running   0          4m47s
middleware   opensearch-cluster-data-0     1/1     Running   0          63m
middleware   opensearch-cluster-data-1     1/1     Running   0          63m
middleware   opensearch-cluster-data-2     1/1     Running   0          63m
middleware   opensearch-cluster-master-0   1/1     Running   0          63m
middleware   opensearch-cluster-master-1   1/1     Running   0          63m
middleware   opensearch-cluster-master-2   1/1     Running   0          4m31s
Runningindicates a successful deployment.
Configure Account
Create User
kJMerxk3PwqQis the password set; you can customize it.
kubectl exec -ti -n middleware opensearch-cluster-client-0 -c opensearch-client \
    -- curl -X PUT -u admin:admin  http://127.0.0.1:9200/_plugins/_security/api/internalusers/openes \
    -H  'Content-Type: application/json' \
    -d '{"password": "kJMerxk3PwqQ","opendistro_security_roles": ["all_access"]}'
Output:
Verify User
If the default password in the document was modified during user creation, adjust the command accordingly.
Execute the following command:
kubectl exec -ti -n middleware opensearch-cluster-client-0 -c opensearch-client -- curl -u openes:kJMerxk3PwqQ http://127.0.0.1:9200/_cat/indices
Output: