Download and Deploy LogBamboo
This guide explains how to download the LogBamboo container image package, prepare the configuration, and complete service startup and login verification. The following example uses a new single-node Kubernetes deployment with S3 primary storage; you can also replace it with local storage or OSS as described.
Deployment workflow: Download image package → Import image → Prepare configuration → Start service → Verify login.
Replace the domain name, image address, storage address, and all REPLACE_WITH_ content. When upgrading an existing deployment, retain the original configuration, storage prefix, and identity, and read the changelog first.
Step 1: Download the image package
Select the Linux container image package based on the CPU architecture of the Kubernetes nodes:
| CPU Architecture | Download URL |
|---|---|
| AMD64 (x86_64) | Download AMD64 image package |
| ARM64 (aarch64) | Download ARM64 image package |
The latest in the file name is updated with each release. The actual image name and version in the package are subject to the import result. After downloading, continue to Import the image and prepare an image address accessible to Kubernetes. For version changes, see the LogBamboo changelog.
Step 2: Import the image
From Download LogBamboo, select the image package that matches the target node architecture. Perform the import on an image preparation machine with Docker installed. The following example uses AMD64; for ARM64, use the corresponding file name:
After the import is complete, record the full image name and version in the output. The image package can be imported directly. For command parameters, see Docker image load documentation.
Prepare an image address accessible to the cluster
Push the imported image to an image registry accessible to the Kubernetes cluster. If authentication is required, log in according to the registry requirements first. Replace the source image name, target registry address, and version number below:
docker image tag REPLACE_WITH_LOADED_IMAGE REPLACE_WITH_REGISTRY/logbamboo:REPLACE_WITH_VERSION
docker image push REPLACE_WITH_REGISTRY/logbamboo:REPLACE_WITH_VERSION
REPLACE_WITH_LOADED_IMAGE uses the full image name from the import output. Enter the pushed target image address (including the version number) in image: REPLACE_WITH_IMAGE in the Deployment in the Kubernetes manifest below; Kubernetes nodes must be able to pull the image from that registry. The deployment uses a fixed version number to facilitate later verification and upgrades.
Step 3: Prepare the configuration
First verify the target cluster, node architecture, and available resources:
kubectl config current-context
kubectl get nodes -L kubernetes.io/arch
kubectl get storageclass
kubectl get ingressclass
kubectl get namespace utils
Prepare the following configurations and resources:
| Preparation Item | Requirement |
|---|---|
| Kubernetes cluster | Prepare the namespace, available nodes, and CSI / StorageClass; if using Ingress, an available ingress controller must already be deployed in the cluster |
| Container image | Download an image package that matches the node CPU architecture, import it, and push it to an image registry accessible to the cluster; if the registry requires authentication, prepare the corresponding pull credentials |
| Image preparation tool | Install Docker on the machine used to import and push images, and ensure it can access the target image registry |
| Persistent storage | The example in this document uses a 200 GiB PVC to store state, WAL, and temporary build data; if using local primary storage, it must also accommodate the final log data. Plan capacity based on write volume, failure cache duration, and retention policy |
| Object storage (optional) | When using S3, prepare the Endpoint, Region, Bucket, a new Prefix dedicated to the current deployment, AK/SK, and the list, read, write, multipart upload, and cleanup permissions required for that prefix; the Pod must be able to access the Endpoint |
| Login and API credentials | Prepare an administrator password, Ingest Token, and Search Token separately; the administrator password must be 12–128 UTF-8 bytes, and both Tokens must be at least 16 bytes and different from each other |
| HTTPS ingress | Prepare DNS resolution and a valid certificate and private key covering the domain; the existing Ingress controller terminates TLS |
| Network access | Administrators and the Data Forwarding service must both be able to access the production HTTPS domain; backend port 8080 is only for access within controlled networks |
The image packages can be downloaded directly from this page. If you need to confirm production resource specifications or a deployment plan, contact deployment support.
A single node does not require an additional Redis deployment. Even when using S3, you must retain the PVC: the remote end stores log objects, while state_dir in the PVC stores the WAL, node identity, and single-node control state; the two cannot replace each other. Local primary storage supports only a single node; multiple nodes require separate planning of shared object storage, a Redis control plane, and corresponding authorization. You cannot directly change the replica count in this document to 2.
This document uses the utils namespace as an example. The CPU / memory limit of 2 CPU / 4 GiB and the PVC 200 GiB are example specifications; plan actual resources based on write volume, failure cache duration, and retention policy.
Kubernetes deployment configuration
Expand the manifest below, fill in the storage, account credentials, persistent volume, and HTTPS ingress based on the information prepared above, and save it as logbamboo.yaml.
View the complete configuration and parameter descriptions for S3 primary storage
S3 connection parameters
Write the following connection parameters into the [storage] section of logbamboo.toml in ConfigMap/logbamboo-config. Put the values of AK/SK in Secret/logbamboo-object-storage for the Deployment to inject as environment variables; write only the environment variable names in TOML.
| Information | TOML Field | Description |
|---|---|---|
| S3 API address | endpoint |
Full URL, such as https://s3.ap-southeast-1.amazonaws.com; use the service API address, not the console URL, and do not append the Bucket or Prefix to the URL |
| Region | region |
Must match the Region where the Bucket resides and the signing requirements, such as ap-southeast-1 |
| Bucket | bucket |
The name of an existing bucket; the deployment template does not create the Bucket |
| Data directory prefix | prefix |
Assign an unused prefix to this deployment, such as logbamboo/prod-a; subsequent upgrades must reuse the original prefix |
| Access Key | access_key_env |
Always references LOGLAKE_OBJECT_ACCESS_KEY; put the actual value in the Secret |
| Secret Key | secret_key_env |
Always references LOGLAKE_OBJECT_SECRET_KEY; put the actual value in the Secret |
| Addressing style | path_style |
The example false indicates virtual-hosted style; if an S3-compatible service requires path-style, change it to true, and verify DNS, certificates, and server-side support |
| Data protection mode | protection_mode |
The example is application_only, which indicates application-side protection and does not mean cloud-side WORM is enabled |
S3 compatibility is not just about being able to connect to the Endpoint; you also need to verify the conditional writes, multipart upload, read, and cleanup capabilities used by the program. An internal network Endpoint is only applicable to nodes that can reach that internal network and cannot be directly reused for cross-cloud deployments. Primary storage, cold archiving, and independent disaster recovery are different configurations; this document configures only primary storage, and subsequent Data Forwarding rules do not require the S3 parameters to be entered again.
Complete deployment manifest
Below is a complete single Pod + S3 + PVC + HTTPS Ingress manifest. Save it as logbamboo.yaml and replace all placeholders and logbamboo.example.com. The Ingress annotations apply to the existing ingress-nginx controller; other controllers should use their corresponding configuration. Creating the Ingress resource itself does not install an ingress controller, nor does it automatically create certificates or DNS records.
Credentials are filled in through Secret.stringData; the configuration file will contain plaintext credentials, so restrict local file permissions and store it securely according to credential management requirements. The AK/SK and Tokens in the template are placeholders to be replaced.
apiVersion: v1
kind: Namespace
metadata:
  name: utils
---
apiVersion: v1
kind: Secret
metadata:
  name: logbamboo-auth
  namespace: utils
type: Opaque
stringData:
  admin-password: "REPLACE_WITH_ADMIN_PASSWORD"
  ingest-token: "REPLACE_WITH_UNIQUE_INGEST_TOKEN"
  search-token: "REPLACE_WITH_DIFFERENT_SEARCH_TOKEN"
---
apiVersion: v1
kind: Secret
metadata:
  name: logbamboo-object-storage
  namespace: utils
type: Opaque
stringData:
  access-key: "REPLACE_WITH_OBJECT_ACCESS_KEY"
  secret-key: "REPLACE_WITH_OBJECT_SECRET_KEY"
---
apiVersion: v1
kind: ConfigMap
metadata:
  name: logbamboo-config
  namespace: utils
data:
  logbamboo.toml: |
    listen = "0.0.0.0:8080"
    allow_insecure_http = true
    state_dir = "/var/lib/logbamboo/state"
    require_state_dir_fsync = true

    # The example reserves for a 200 GiB persistent disk; this is not a business capacity commitment.
    state_max_bytes = 85899345920
    wal_max_bytes = 42949672960
    staging_max_bytes = 34359738368
    state_reserved_free_bytes = 10737418240
    staging_min_free_bytes = 5368709120
    wal_high_watermark_bytes = 32212254720
    wal_low_watermark_bytes = 21474836480

    # Single-instance example budget; adjust after observing RSS under real write and query loads.
    max_request_bytes = 67108864
    max_records_per_request = 1000000
    max_ingest_inflight_bytes = 268435456
    segment_build_concurrency = 1
    segment_index_workers = 1
    build_memory_max_bytes = 1073741824
    max_concurrent_queries = 1
    query_memory_max_bytes = 1073741824

    [cluster]
    maintenance_enabled = true

    [storage]
    type = "s3"
    endpoint = "https://REPLACE_WITH_S3_ENDPOINT"
    region = "REPLACE_WITH_REGION"
    bucket = "REPLACE_WITH_BUCKET"
    prefix = "REPLACE_WITH_NEW_DEDICATED_PREFIX"
    access_key_env = "LOGLAKE_OBJECT_ACCESS_KEY"
    secret_key_env = "LOGLAKE_OBJECT_SECRET_KEY"
    path_style = false
    protection_mode = "application_only"

    [[tenants]]
    id = "default"
    ingest_token_env = "LOGLAKE_TOKEN"
    search_token_env = "LOGLAKE_SEARCH_TOKEN"

    [[tenants.indexes]]
    name = "app"
    retention = "7d"
    retention_policy_revision = 1

    [web_ui]
    public_url = "https://logbamboo.example.com"
    # Fill in the exact IPs of trusted proxies that overwrite X-Real-IP for the site; do not copy the loopback address.
    trusted_proxy_ips = []

    [web_ui.auth_state]
    mode = "memory"
    single_replica = true

    [web_ui.auth]
    mode = "local"
    admin_username = "admin"
    admin_password_env = "LOGLAKE_ADMIN_PASSWORD"
---
apiVersion: v1
kind: PersistentVolumeClaim
metadata:
  name: logbamboo-data
  namespace: utils
spec:
  accessModes:
    - ReadWriteOnce
  storageClassName: REPLACE_WITH_STORAGE_CLASS
  resources:
    requests:
      storage: 200Gi
---
apiVersion: apps/v1
kind: Deployment
metadata:
  name: logbamboo
  namespace: utils
spec:
  replicas: 1
  strategy:
    type: Recreate
  selector:
    matchLabels:
      app: logbamboo
  template:
    metadata:
      labels:
        app: logbamboo
    spec:
      terminationGracePeriodSeconds: 120
      securityContext:
        runAsNonRoot: true
        runAsUser: 10001
        runAsGroup: 10001
        fsGroup: 10001
        fsGroupChangePolicy: OnRootMismatch
      # For a private image registry, prepare credentials in this namespace before enabling:
      # imagePullSecrets:
      #   - name: YOUR_IMAGE_PULL_SECRET
      containers:
        - name: logbamboo
          image: REPLACE_WITH_IMAGE
          imagePullPolicy: IfNotPresent
          command: ["/usr/local/bin/logbamboo"]
          args: ["--config", "/etc/logbamboo/logbamboo.toml"]
          ports:
            - name: http
              containerPort: 8080
          env:
            - name: LOGLAKE_UI_DIR
              value: /usr/share/logbamboo/ui
            - name: LOGLAKE_ADMIN_PASSWORD
              valueFrom:
                secretKeyRef:
                  name: logbamboo-auth
                  key: admin-password
            - name: LOGLAKE_TOKEN
              valueFrom:
                secretKeyRef:
                  name: logbamboo-auth
                  key: ingest-token
            - name: LOGLAKE_SEARCH_TOKEN
              valueFrom:
                secretKeyRef:
                  name: logbamboo-auth
                  key: search-token
            - name: LOGLAKE_OBJECT_ACCESS_KEY
              valueFrom:
                secretKeyRef:
                  name: logbamboo-object-storage
                  key: access-key
            - name: LOGLAKE_OBJECT_SECRET_KEY
              valueFrom:
                secretKeyRef:
                  name: logbamboo-object-storage
                  key: secret-key
          resources:
            requests:
              cpu: "1"
              memory: 2Gi
            limits:
              cpu: "2"
              memory: 4Gi
          startupProbe:
            httpGet:
              path: /livez
              port: http
            periodSeconds: 10
            failureThreshold: 30
          livenessProbe:
            httpGet:
              path: /livez
              port: http
            periodSeconds: 20
            failureThreshold: 3
          readinessProbe:
            httpGet:
              path: /readyz
              port: http
            periodSeconds: 10
            failureThreshold: 3
          volumeMounts:
            - name: config
              mountPath: /etc/logbamboo/logbamboo.toml
              subPath: logbamboo.toml
              readOnly: true
            - name: data
              mountPath: /var/lib/logbamboo
      volumes:
        - name: config
          configMap:
            name: logbamboo-config
        - name: data
          persistentVolumeClaim:
            claimName: logbamboo-data
---
apiVersion: v1
kind: Service
metadata:
  name: logbamboo
  namespace: utils
spec:
  type: ClusterIP
  selector:
    app: logbamboo
  ports:
    - name: http
      port: 8080
      targetPort: http
---
apiVersion: networking.k8s.io/v1
kind: Ingress
metadata:
  name: logbamboo
  namespace: utils
  annotations:
    nginx.ingress.kubernetes.io/ssl-redirect: "true"
    nginx.ingress.kubernetes.io/proxy-body-size: "64m"
    nginx.ingress.kubernetes.io/proxy-read-timeout: "300"
    nginx.ingress.kubernetes.io/proxy-send-timeout: "300"
spec:
  ingressClassName: REPLACE_WITH_INGRESS_CLASS
  tls:
    - hosts:
        - logbamboo.example.com
      secretName: logbamboo-tls
  rules:
    - host: logbamboo.example.com
      http:
        paths:
          - path: /
            pathType: Prefix
            backend:
              service:
                name: logbamboo
                port:
                  number: 8080
Relationship between the PVC, configuration, credentials, and ingress:
| Item | Configuration and Purpose in This Manifest |
|---|---|
| PVC declaration | PersistentVolumeClaim/logbamboo-data requests a 200 GiB volume from the specified StorageClass. If the StorageClass supports dynamic provisioning, you do not need to manually create a PV; if it does not, the cluster administrator must first prepare a matching PV |
| Deployment references the PVC | volumes[].persistentVolumeClaim.claimName: logbamboo-data references the above PVC, and volumeMounts mounts it at /var/lib/logbamboo; the TOML state_dir is located within this mount |
| Why is a PVC still needed when using S3? | S3 stores the primary log objects, while the PVC stores the unpublished WAL, node identity, single-node control state, and temporary files; deleting the PVC and recreating the Pod cannot guarantee restoration of the original deployment |
| Single-instance updates | replicas: 1 with Recreate prevents two instances from using the same state directory simultaneously during a normal rolling update; HPA is not configured. ReadWriteOnce restricts node mounting, not single-Pod locking |
| Disk write permissions | The image runs with UID/GID 10001, and fsGroup: 10001 must be supported by the CSI; if writes fail, first verify the storage driver and directory permissions |
| TOML mount | The ConfigMap file is mounted at /etc/logbamboo/logbamboo.toml, and the container explicitly reads it through --config; it is not mounted to the data directory and does not enter the first-run wizard |
| Environment variable injection | logbamboo-auth injects the administrator password and two Tokens; logbamboo-object-storage injects the S3 AK/SK. The names correspond exactly to the *_env references in TOML |
| Service and domain | Ingress / → Service/logbamboo:8080 → Pod 8080. The Service is ClusterIP and does not separately expose port 8080 to the public network |
| TLS | utils/logbamboo-tls stores the certificate and private key; spec.tls.hosts, rules.host, the certificate domain, and web_ui.public_url must match |
| Real source IP | The example does not guess the Ingress source IP, so trusted_proxy_ips = []; after deployment, configure it with the exact IPs of trusted proxies that overwrite X-Real-IP; otherwise, users behind the proxy will share login rate limits based on the source IP |
For PVC access modes and dynamic provisioning, see the Kubernetes persistent volumes documentation; for the HTTPS redirect and request body size annotations, see the official ingress-nginx documentation.
Use local disks, OSS, or other object storage instead
Choose only one type of primary storage. Replace the entire [storage] block in the ConfigMap; do not append a second block with the same name after the original block. Switching storage for a deployment that already contains data is a migration and is not performed by directly switching according to a new deployment template.
When using local primary storage:
In this case, the same PVC stores both state and final logs, so recalculate the capacity; you can remove the logbamboo-object-storage Secret and the corresponding two environment variable references from the manifest, but you must still retain the PVC.
When using the Alibaba Cloud OSS native API:
[storage]
type = "oss"
endpoint = "https://oss-cn-hangzhou.aliyuncs.com"
bucket = "REPLACE_WITH_OSS_BUCKET"
prefix = "REPLACE_WITH_NEW_DEDICATED_PREFIX"
access_key_env = "LOGLAKE_OBJECT_ACCESS_KEY"
secret_key_env = "LOGLAKE_OBJECT_SECRET_KEY"
protection_mode = "application_only"
OSS does not add the S3-specific region and path_style fields, and the AK/SK injection method remains unchanged. Volcengine TOS can use type = "s3" through the corresponding S3 API, with the actual Region and S3 Endpoint filled in; this document does not regard other S3-compatible services that have not been accepted on site as verified production solutions.
Step 4: Start the service
After completing the deployment configuration, create or verify the namespace; replace the certificate file paths with actual paths. If a TLS Secret covering the domain already exists, reference it directly in the Ingress instead of recreating it.
kubectl create namespace utils --dry-run=client -o yaml | kubectl apply -f -
kubectl -n utils create secret tls logbamboo-tls \
  --cert=/path/to/fullchain.pem \
  --key=/path/to/privkey.pem
Point DNS to the actual external IP or load balancer address of the Ingress. After filling in the configuration, check for placeholders; if there is still output, complete it first and do not apply:
Perform validation, review, and deployment according to the change process of the target environment:
kubectl apply --dry-run=server -f logbamboo.yaml
kubectl diff -f logbamboo.yaml
# A diff return value of 1 usually indicates differences pending application; review the differences before continuing.
kubectl apply -f logbamboo.yaml
kubectl -n utils rollout status deployment/logbamboo --timeout=300s
kubectl -n utils get pvc/logbamboo-data
kubectl -n utils get pods -l app=logbamboo
kubectl -n utils get service/logbamboo ingress/logbamboo
kubectl -n utils logs deployment/logbamboo --tail=100
Confirm that the PVC is Bound and the Pod is 1/1 Ready. A StorageClass with delayed binding may bind the PVC only after the Pod is scheduled; if it remains Pending, check the PVC / Pod events and CSI. If image pulling fails, first check the actual version, architecture, and registry authentication. The dry-run here only validates API acceptance and cannot replace storage and service runtime acceptance.
Step 5: Log in and verify the service
Run this from a network that can access the production ingress, and replace the domain with the actual value; for an enterprise internal CA or self-signed certificate, use --cacert to specify the trusted CA file:
curl --fail --show-error https://logbamboo.example.com/readyz
curl --fail --show-error https://logbamboo.example.com/ingest-readyz
Both requests should return 2xx successfully (a response body is optional). Then complete the page verification:
- Open the configured HTTPS domain in a browser;
- For the first login, use
adminand the administrator password set in the Secretlogbamboo-auth; - In the Log Index list on the left, confirm that the configured index is visible, for example,
app; - Follow the onboarding guide in Use LogBamboo to verify actual writes and queries.
When using platform Data Forwarding, you also need to verify reachability from the network where the Data Forwarding service resides and check the data sent through the Data Forwarding rule. For details, see Verify forwarding results.
Prepare Data Forwarding connection information
Confirm or add an index
The above configuration defines tenant default and index app with a retention policy of 7d. Indexes are defined by the server-side TOML, and the current management page does not provide index creation or deletion. After logging in, first confirm that app exists in the left-hand list; modify the retention period according to business requirements.
Standalone uses one tenant, and you can configure multiple indexes under that tenant. Multiple indexes share the primary storage, tenant-level Tokens, and total capacity, but they store data separately and apply their own retention policies. When adding an index, keep the existing blocks and append the new index under the same tenant, for example:
Before making changes, export and review the current configuration, then update the configuration and restart the service according to the change process of the environment.
The TOML in Kubernetes is mounted using subPath and read when the service starts. After updating the ConfigMap, you must perform a controlled restart of the Deployment to load the new index.
The service will be briefly unavailable during a single-instance restart. When using memory mode, browser sessions need to log in again.
After the restart, verify the readiness status and index list before forwarding to the new index. Index names may contain only ASCII letters, digits, ., _, and -, must not exceed 128 characters, and cannot be . or ... Authorization for the new index for local read-only accounts and SSO must be confirmed separately.
Prepare administrator and data plane credentials
The administrator login password is used for the management page; the Ingest Token and Search Token are used for data APIs. Keep the three separately, and do not use the administrator password or a Guance Workspace Token in place of an API Token.
| Credential | Initial Source in This Document | Purpose |
|---|---|---|
| Administrator password | admin-password in the Secret logbamboo-auth |
Management page login |
| Ingest Token | ingest-token in the Secret logbamboo-auth |
Data writes to each index under the current tenant |
| Search Token | search-token in the Secret logbamboo-auth |
Data query APIs for each index under the current tenant |
Environment variable names are not the actual Token values. Administrators can generate or enter a new value in Settings > Ingest Tokens and replace it: the page does not display the old value, and the replacement takes effect immediately after saving, with no dual-Token transition period. Securely save the new value first, then update all Data Forwarding rules accordingly; if it has already been rotated through the UI, the value in the original Secret may no longer be valid, and the actually effective Token should be handed over.
Hand over connection information
| Information | What to Provide |
|---|---|
| Service address | The root address accessible to the Data Forwarding service, such as https://logbamboo.example.com, without appending API paths such as /v1/indexes/.../logs |
| Target index | The name of a configured and loaded index, for example, app |
| Ingest Token | The currently effective credential that is allowed to write to the target tenant |
| Search Token (optional) | Used when querying historical data in the console; it must be different from the Ingest Token and can be omitted when only forwarding |
| Trusted certificate (optional) | When using a self-signed or enterprise internal HTTPS certificate, provide the trusted certificate content in PEM format |
Within the same Kubernetes cluster, you can use http://logbamboo.utils.svc.cluster.local:8080 according to the actual Service; callers in another cluster or on the public network should use a verified reachable HTTPS ingress. Deliver complete Tokens through controlled channels and do not write them into shared documents, screenshots, or logs.
Connect and verify Data Forwarding
- Go to the Data Forwarding page in the console, select Create, and choose LogBamboo as the destination;
- Enter the connection information prepared in the previous step, test the connection, then save and enable the rule. For details, see Data Forwarding to LogBamboo;
- Let data that meets the forwarding conditions enter the rule, and check the receiving and processing status in Running Status in LogBamboo;
- Wait for data processing to complete, then query by server receive time and verify whether the expected data is included. For detailed steps, see Verify forwarding results.
Successful receipt and queryability are two stages. In production default low-traffic scenarios, you may need to wait about one hour or longer; if data is temporarily unavailable, first check the time range and processing status, and do not resend the entire batch.
Capacity and commercial licensing
The Community Edition does not require a license and provides 5 TB of data retention capacity by default, calculated based on uncompressed content. When the limit is reached, older processed data is automatically cleaned up. Before use, confirm the retention period and capacity according to business needs; 5 TB does not represent compressed disk usage.
Purchase and activate a license
If you need more capacity, contact sales to purchase a commercial license. The license is bound to the cluster ID of the current deployment. Perform the following steps:
- Log in to LogBamboo with an administrator account and go to Settings > License;
- View and copy the current Cluster ID, provide it to sales together with the required licensed capacity and license term, and obtain an offline license file bound to that cluster;
- Return to Settings > License, click Choose File under Offline License File, and upload the obtained license file;
- Click Activate License and wait for the page to indicate completion;
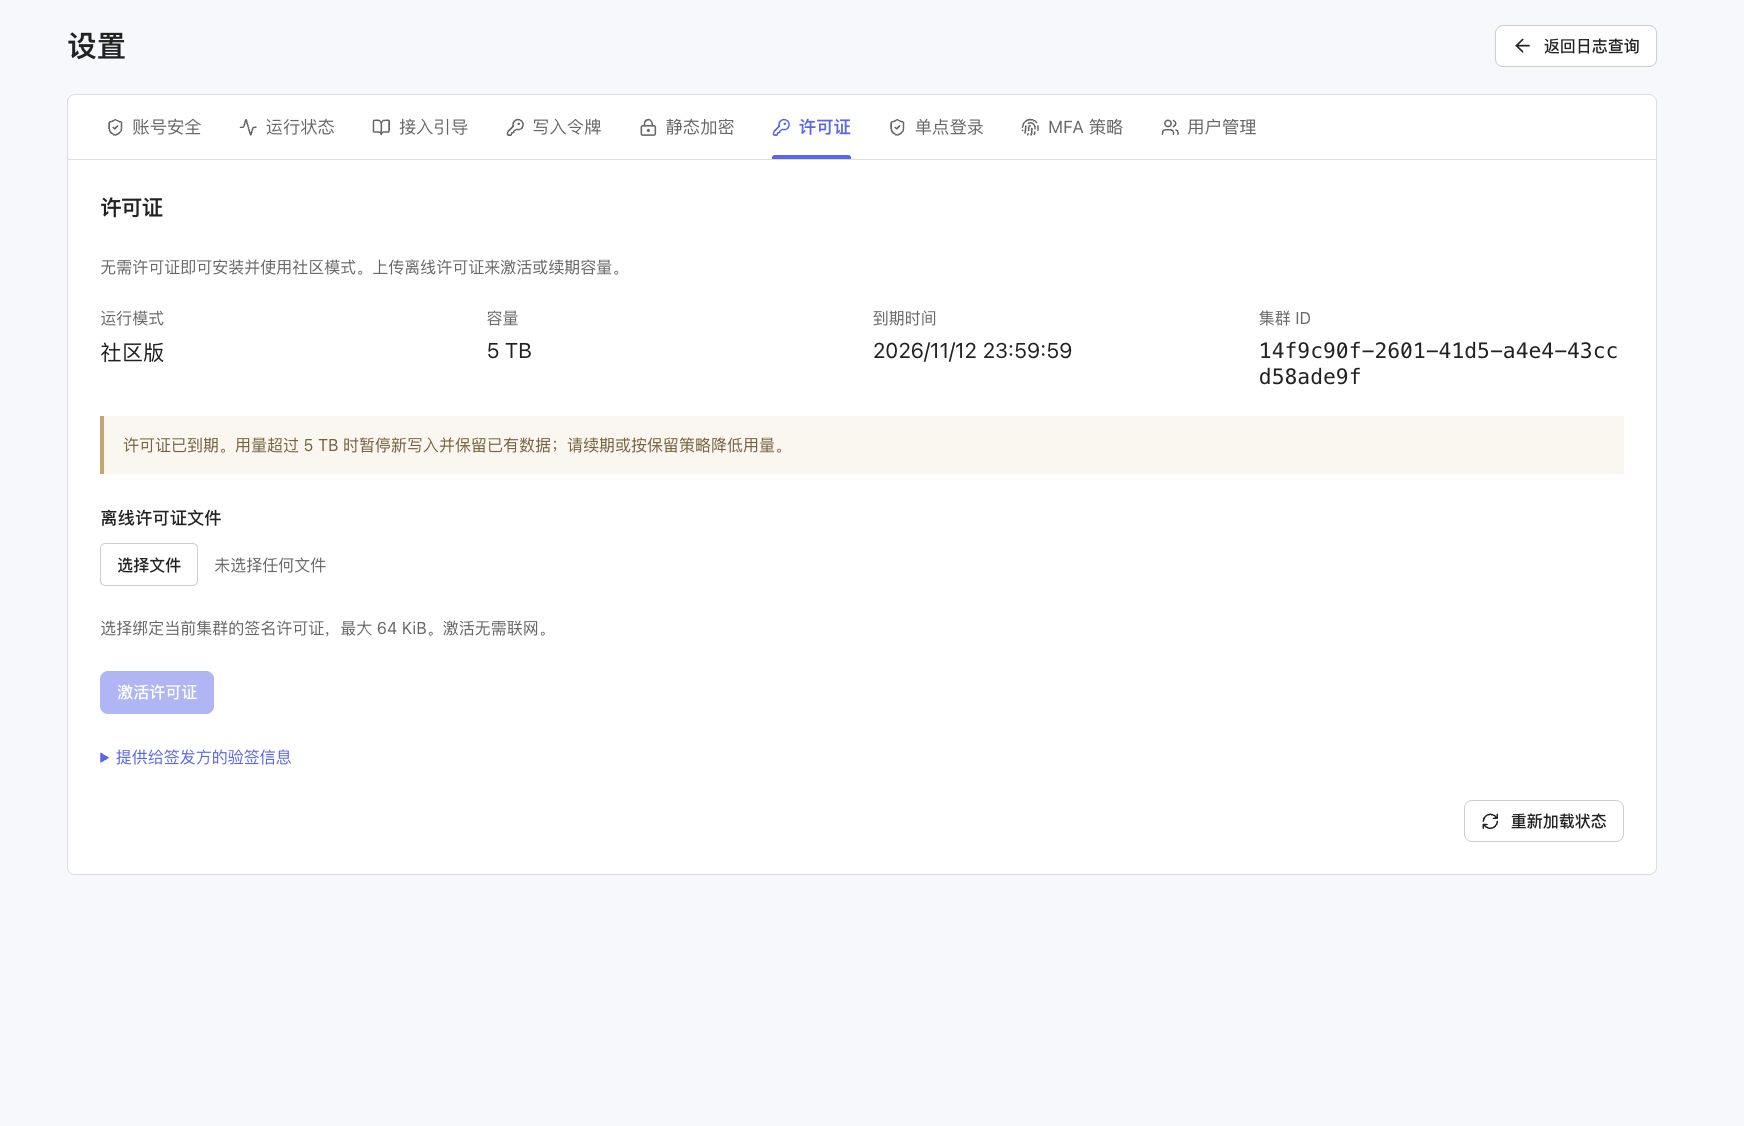
- Verify that Operating Mode has changed to Commercial Plan and that Capacity and Expiration Time match the purchased license. To refresh, click Reload Status.
The license file must be bound to the current cluster and must not exceed 64 KiB. Offline activation does not require network access. When using a unified installation package that supports licensing, activating the license does not require reinstalling or restarting the service; for other installation packages, first confirm compatibility with deployment support.
Renewal and license expiration
To renew, contact sales to obtain a new license bound to the current cluster, upload and activate it on the same page, and verify the updated expiration time. Before replacing the deployment or migrating the service, confirm with deployment support how the cluster identity and license will be handled.
If the license expires and the current usage exceeds 5 TB, new writes will be suspended and existing data retained. Contact sales to renew, upload the new license, and then verify the capacity and expiration status; alternatively, the administrator can reduce usage to below 5 TB according to the configured retention policy.
The following figure shows an example page after an existing license has expired. The operating mode, capacity, expiration time, and cluster ID in the figure are for page display only; the actual status of the current deployment prevails. The Community Edition does not require a license for first use.
FAQ
| Issue | Checks and Resolution |
|---|---|
| Not sure how to log in to the management page | This document configures the service directly through TOML, so no first-run initialization wizard is required. After deployment, access the configured HTTPS domain; for the first login, use admin and the administrator password set in the Secret logbamboo-auth. If it is inaccessible, check the Pod, Service, Ingress, DNS resolution, and TLS certificate |
| Management page does not open | Check the service running status, listen address, port, and network access rules |
| Storage configuration validation fails | Verify the storage directory permissions, or the object storage address, bucket, and access credentials, and check the network from the server to the storage service |
| Connection test fails | Verify the service address, target index, Token, and HTTPS certificate; confirm that you are testing from the network where the Data Forwarding service resides |
| Received but temporarily not queryable | Check the processing status, select the query range by server receive time, and wait for processing to complete |
| License activation fails | Verify whether the license is bound to the cluster ID displayed on the current page, and ask deployment support to check whether the installation package and license match |
Ongoing maintenance
- Regularly monitor the service running status, available disk space, capacity growth, and data retention scope;
- After replacing the Ingest or Search Token, update the Data Forwarding rules that use that Token accordingly;
- Before upgrading, retain the configuration and local runtime data, and read the upgrade instructions for the corresponding version;
- If disaster recovery is required, plan a separate recovery repository and recovery points. Archival cold storage and query exports cannot replace disaster recovery backups.
Next Steps
After the service is deployed and ready, continue reading Use LogBamboo to complete login, confirm the index, ingest data, and verify query results in sequence.